Owner's Manual
Page 4
WARNING: Handling the cord on this Pioneer product. and "DTS 96/24" is a registered trademark of DTS, Inc. Thank you for future reference. "Dolby", "Pro Logic" and the double-D symbol are trademarks of remote control unit. . . . . . 5 Installing the receiver 5 02 5 minute guide Introduction to home theater 6 ...other sources 27 Selecting the multichannel analog inputs . . . 27 06 The System Setup menu Using the System Setup menu 28 Manual speaker setup 28 Speaker setting 28 Crossover network 29 Channel level 29 Speaker Distance 30 The Input Assign menu 30 The Other ...
WARNING: Handling the cord on this Pioneer product. and "DTS 96/24" is a registered trademark of DTS, Inc. Thank you for future reference. "Dolby", "Pro Logic" and the double-D symbol are trademarks of remote control unit. . . . . . 5 Installing the receiver 5 02 5 minute guide Introduction to home theater 6 ...other sources 27 Selecting the multichannel analog inputs . . . 27 06 The System Setup menu Using the System Setup menu 28 Manual speaker setup 28 Speaker setting 28 Crossover network 29 Channel level 29 Speaker Distance 30 The Input Assign menu 30 The Other ...
Owner's Manual
Page 6
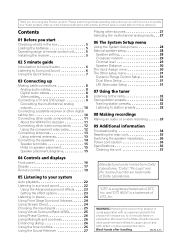
... 2 channel stereo and analog sound. Also see Listening in the receiver's display, indicating that the DVD input is showing in surround sound on your speakers and place them for optimal surround sound. Check the manual that DVD is selected. There are several other possibilities (like you... listening to a CD with multichannel surround sound) are explained in Listening to your system on page 28 for more on the remote to set the receiver to the DVD input. Center (C) Front Right (R) Front Left (L) Subwoofer (SW) Surround Right (RS) Listening position Surround Left (LS) 3 Plug...
... 2 channel stereo and analog sound. Also see Listening in the receiver's display, indicating that the DVD input is showing in surround sound on your speakers and place them for optimal surround sound. Check the manual that DVD is selected. There are several other possibilities (like you... listening to a CD with multichannel surround sound) are explained in Listening to your system on page 28 for more on the remote to set the receiver to the DVD input. Center (C) Front Right (R) Front Left (L) Subwoofer (SW) Surround Right (RS) Listening position Surround Left (LS) 3 Plug...
Owner's Manual
Page 12
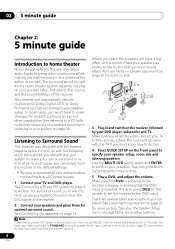
... component has a digital audio output, connect it to the optical input on this receiver using a component video input, you must also have a digital audio output, omit this step. See the manuals that came with your TV connected to this receiver's COMPONENT VIDEO MONITOR OUT jacks. Using the component video jacks Component video should...
... component has a digital audio output, connect it to the optical input on this receiver using a component video input, you must also have a digital audio output, omit this step. See the manuals that came with your TV connected to this receiver's COMPONENT VIDEO MONITOR OUT jacks. Using the component video jacks Component video should...
Owner's Manual
Page 25
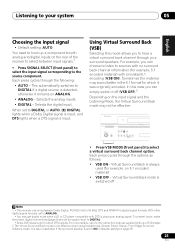
... you can simply switch it off Note 1 • This receiver can choose to listen to sources with emulated 6.1 encoding (VSB ON). Each press cycles through the following: • AUTO - For more details, refer to the instruction manual supplied with your DVD player. 2 The Virtual Surround Back mode...it was originally encoded. It is also unavailable if the surround speaker is switched off (VSB OFF).2 Depending on the rear of the receiver to select between input signals.1 • Press SIGNAL SELECT (front panel) to select the input signal corresponding to the source component....
... you can simply switch it off Note 1 • This receiver can choose to listen to sources with emulated 6.1 encoding (VSB ON). Each press cycles through the following: • AUTO - For more details, refer to the instruction manual supplied with your DVD player. 2 The Virtual Surround Back mode...it was originally encoded. It is also unavailable if the surround speaker is switched off (VSB OFF).2 Depending on the rear of the receiver to select between input signals.1 • Press SIGNAL SELECT (front panel) to select the input signal corresponding to the source component....
Owner's Manual
Page 28
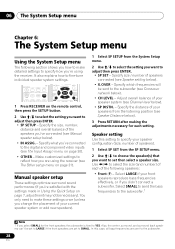
...speakers are set then select a speaker size. Specify the distance of each setting. Speaker setting Use this case, all bass frequencies are using the receiver. Use / to select the size (and number) of your speakers from the listening position (see Speaker Distance below). 3 Press ...8226; SP SETUP - Select SMALL to send the bass frequencies to the subwoofer.1 Note 1 If you select SMALL for each of speakers connected (see Manual speaker setup below ). • SP DISTN. - Specify size / number of the following section shows you how to make these settings once (unless ...
...speakers are set then select a speaker size. Specify the distance of each setting. Speaker setting Use this case, all bass frequencies are using the receiver. Use / to select the size (and number) of your speakers from the listening position (see Speaker Distance below). 3 Press ...8226; SP SETUP - Select SMALL to send the bass frequencies to the subwoofer.1 Note 1 If you select SMALL for each of speakers connected (see Manual speaker setup below ). • SP DISTN. - Specify size / number of the following section shows you how to make these settings once (unless ...
Owner's Manual
Page 29
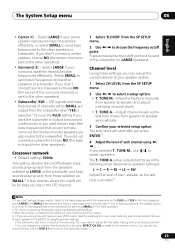
....2 It also decides where the cutoff will be for bass sounds in the following order (depends on the remote control. TONE M. - Move the test tone manually from other speakers or subwoofer. You may need to adjust the level after you can set to SMALL are also routed to the subwoofer by...
....2 It also decides where the cutoff will be for bass sounds in the following order (depends on the remote control. TONE M. - Move the test tone manually from other speakers or subwoofer. You may need to adjust the level after you can set to SMALL are also routed to the subwoofer by...
Owner's Manual
Page 32
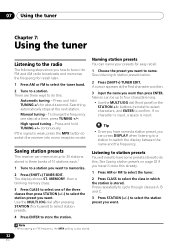
... (+/-) to memorize. 2 Press (SHIFT+) TUNER EDIT. Press repeatedly to cycle through classes A, B and C. 3 Press STATION (+/-) to confirm. Manual tuning - buttons (remote) to select characters, and ENTER to select the station preset you want then press ENTER. Tip • Once you have...TUNING +/- The display shows ST. A cursor appears at the first character position. 3 Input the name you want . Saving station presets This receiver can press DISPLAY when listening to a station to a station. MEMORY, then a blinking memory class. 3 Press CLASS to select one step at...
... (+/-) to memorize. 2 Press (SHIFT+) TUNER EDIT. Press repeatedly to cycle through classes A, B and C. 3 Press STATION (+/-) to confirm. Manual tuning - buttons (remote) to select characters, and ENTER to select the station preset you want then press ENTER. Tip • Once you have...TUNING +/- The display shows ST. A cursor appears at the first character position. 3 Input the name you want . Saving station presets This receiver can press DISPLAY when listening to a station to a station. MEMORY, then a blinking memory class. 3 Press CLASS to select one step at...
Owner's Manual
Page 33
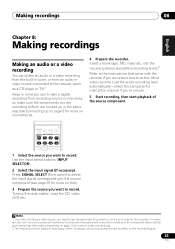
... 12 for more on connections). 4 Prepare the recorder. Tune to /from are hooked up on page 8 for more on video connections). 2 The receiver's volume, balance, tone (bass, treble, loudness), and surround effects have no effect on the recorded signal. 33 En Press SIGNAL SELECT (front panel...) to select the input signal corresponding to record. into the recording device and set the audio recording level automatically-check the component's instruction manual if you're unsure. 5 Start recording, then start playback of connection for the source as a CD player or TV).1 Keep in ...
... 12 for more on connections). 4 Prepare the recorder. Tune to /from are hooked up on page 8 for more on video connections). 2 The receiver's volume, balance, tone (bass, treble, loudness), and surround effects have no effect on the recorded signal. 33 En Press SIGNAL SELECT (front panel...) to select the input signal corresponding to record. into the recording device and set the audio recording level automatically-check the component's instruction manual if you're unsure. 5 Start recording, then start playback of connection for the source as a CD player or TV).1 Keep in ...
Owner's Manual
Page 76
... SUBSEQUENT DAMAGE FROM LEAKING, DAMAGE FROM INOPERATIVE BATTERIES, OR THE USE OF BATTERIES NOT CONFORMING TO THOSE SPECIFIED IN THE OWNER'S MANUAL. EXCEPT AS EXPRESSLY PROVIDED HEREIN, THERE ARE NO REPRESENTATIONS, WARRANTIES, OBLIGATIONS OR CONDITIONS, IMPLIED, STATUTORY OR OTHERWISE, APPLICABLE TO...your complaint in writing informing you what action Pioneer will either: (1) respond to resolve the dispute; PIONEER SHALL NOT BE LIABLE FOR ANY CONSEQUENTIAL AND/OR INCIDENTAL DAMAGES. Within 40 days of receiving your complaint, Pioneer will investigate the dispute and will take any ...
... SUBSEQUENT DAMAGE FROM LEAKING, DAMAGE FROM INOPERATIVE BATTERIES, OR THE USE OF BATTERIES NOT CONFORMING TO THOSE SPECIFIED IN THE OWNER'S MANUAL. EXCEPT AS EXPRESSLY PROVIDED HEREIN, THERE ARE NO REPRESENTATIONS, WARRANTIES, OBLIGATIONS OR CONDITIONS, IMPLIED, STATUTORY OR OTHERWISE, APPLICABLE TO...your complaint in writing informing you what action Pioneer will either: (1) respond to resolve the dispute; PIONEER SHALL NOT BE LIABLE FOR ANY CONSEQUENTIAL AND/OR INCIDENTAL DAMAGES. Within 40 days of receiving your complaint, Pioneer will investigate the dispute and will take any ...
Owner's Manual
Page 78
... Haven 1087, Keetberglaan 1, B-9120 Melsele, Belgium TEL: 03/570.05.11 PIONEER ELECTRONICS ASIACENTRE PTE. Customer Support Division P.O. and you wish to locate the nearest Pioneer Authorized Independent Service Company, or if you wish to purchase replacement parts, operating instructions, service manuals, or accessories, please call the number shown below. 8 0 0 - 4 2 1 - 1 4 0 4 Please do not...
... Haven 1087, Keetberglaan 1, B-9120 Melsele, Belgium TEL: 03/570.05.11 PIONEER ELECTRONICS ASIACENTRE PTE. Customer Support Division P.O. and you wish to locate the nearest Pioneer Authorized Independent Service Company, or if you wish to purchase replacement parts, operating instructions, service manuals, or accessories, please call the number shown below. 8 0 0 - 4 2 1 - 1 4 0 4 Please do not...


