Owner's Manual
Page 1
AUDIO/VIDEO MULTI-CHANNEL RECEIVER VSX-49TXi Operating Instructions
AUDIO/VIDEO MULTI-CHANNEL RECEIVER VSX-49TXi Operating Instructions
Owner's Manual
Page 5
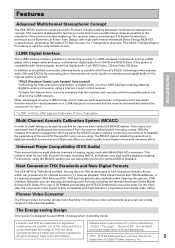
...playback on the i.LINK network. Next Generation THX Standards and New Digital Formats The VSX-49TXi is a trademark of Digital Theater Systems, Inc. Used under license from the receiver makes trouble-free setup a snap. In addition to the intentions of analog inputs, ...THX Ultra2 certified. Features PREPARATION PREPARATION Advanced Multichannel Stereophonic Concept The VSX-49TXi receiver is constructed with Pioneer's PQLS* technology when playing audio CDs and SACDs. This means it is only necessary that this receiver and one rate-control-compatible player are alive on a i.LINK...
...playback on the i.LINK network. Next Generation THX Standards and New Digital Formats The VSX-49TXi is a trademark of Digital Theater Systems, Inc. Used under license from the receiver makes trouble-free setup a snap. In addition to the intentions of analog inputs, ...THX Ultra2 certified. Features PREPARATION PREPARATION Advanced Multichannel Stereophonic Concept The VSX-49TXi receiver is constructed with Pioneer's PQLS* technology when playing audio CDs and SACDs. This means it is only necessary that this receiver and one rate-control-compatible player are alive on a i.LINK...

Owner's Manual
Page 6
... batteries 8 Remote Control Battery Alarm 8 The Touch Pen & Lock 9 Remote Control Cushions 9 Operating range of remote control unit 9 Installing the Receiver 9 Opening the Front Panel 9 Setting Up the Remote Control 10 Remote Control Backlight 11 Quick Start Guide Part 1 12 Home Theater: The Basics...Creating an i.LINK Network 31 Displays & Controls 32 Front Panel 32 Back Panel 34 Remote Control 36 Basic Receiver LCD Screens 37 Receiver MAIN Screen 37 Receiver SUB Screen 38 Display 39 Setting Up for Surround Sound ........ 40 SPEAKER SYSTEMS 41 CHANNEL LEVEL (channel balance ...
... batteries 8 Remote Control Battery Alarm 8 The Touch Pen & Lock 9 Remote Control Cushions 9 Operating range of remote control unit 9 Installing the Receiver 9 Opening the Front Panel 9 Setting Up the Remote Control 10 Remote Control Backlight 11 Quick Start Guide Part 1 12 Home Theater: The Basics...Creating an i.LINK Network 31 Displays & Controls 32 Front Panel 32 Back Panel 34 Remote Control 36 Basic Receiver LCD Screens 37 Receiver MAIN Screen 37 Receiver SUB Screen 38 Display 39 Setting Up for Surround Sound ........ 40 SPEAKER SYSTEMS 41 CHANNEL LEVEL (channel balance ...

Owner's Manual
Page 8
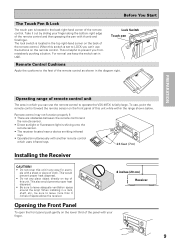
...Unit Touch Pen (attached to the back of the remote control) Cushion for Remote x 4 U-shaped connectors x 2 (attached to back of receiver) • Operating Instructions Preparing the Remote Control Loading the batteries Load the batteries into the remote control as shown above. Before You Start ... average of 1-3 months of used batteries, please comply with governmental regulations or environmental public institu- tion's rules that you may have received all batteries with new ones. This must be done within five minutes of the alarm sounding or all your country or area. "...
...Unit Touch Pen (attached to the back of the remote control) Cushion for Remote x 4 U-shaped connectors x 2 (attached to back of receiver) • Operating Instructions Preparing the Remote Control Loading the batteries Load the batteries into the remote control as shown above. Before You Start ... average of 1-3 months of used batteries, please comply with governmental regulations or environmental public institu- tion's rules that you may have received all batteries with new ones. This must be done within five minutes of the alarm sounding or all your country or area. "...
Owner's Manual
Page 9
...out by sliding your finger. 9 Operating range of this unit in a rack, shelf, etc., be sure to operate the VSX-49TXi is shining onto the remote sensor. • The receiver located near a device emitting infrared rays. • Operated simultaneously with your finger along the bottom right edge of the remote ...Cushions Apply the cushions to LOCK you can 't use the remote control to leave more than 8 inches of space above the receiver. 8 inches (20 cm) Receiver Opening the Front Panel To open the front panel push gently on the remote control. To use keep the switch set to ...
...out by sliding your finger. 9 Operating range of this unit in a rack, shelf, etc., be sure to operate the VSX-49TXi is shining onto the remote sensor. • The receiver located near a device emitting infrared rays. • Operated simultaneously with your finger along the bottom right edge of the remote ...Cushions Apply the cushions to LOCK you can 't use the remote control to leave more than 8 inches of space above the receiver. 8 inches (20 cm) Receiver Opening the Front Panel To open the front panel push gently on the remote control. To use keep the switch set to ...
Owner's Manual
Page 10
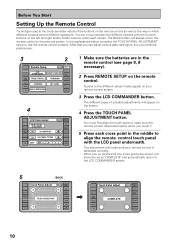
... on the remote control. In the explanations below complete the TOUCH PANEL ADJUSTMENT setup to the LCD COMMANDER screen. 5 BACK Touch Panel Adjust RECEIVER BACK REMOTE SETUP CD DVD/LD VCR1 /DVR VCR2 TOUCH CROSS POINT CD-R/ TAPE1 TUNER VIDEO VCR3 TV SAT TV CONTROL « Touch ... control as well as the way in the remote control (see page 8, if necessary). 2 Press REMOTE SETUP on your personal preferences. 3 2 RECEIVER DVD/LD VCR1 /DVR Remote Setup BACK REMOTE SETUP LCD COMMANDER PRESET RECALL DIRECT FUNCTION ITEM MEMO CD CD-R/ TAPE1 TUNER VCR2 VCR3 TV LEARNING...
... on the remote control. In the explanations below complete the TOUCH PANEL ADJUSTMENT setup to the LCD COMMANDER screen. 5 BACK Touch Panel Adjust RECEIVER BACK REMOTE SETUP CD DVD/LD VCR1 /DVR VCR2 TOUCH CROSS POINT CD-R/ TAPE1 TUNER VIDEO VCR3 TV SAT TV CONTROL « Touch ... control as well as the way in the remote control (see page 8, if necessary). 2 Press REMOTE SETUP on your personal preferences. 3 2 RECEIVER DVD/LD VCR1 /DVR Remote Setup BACK REMOTE SETUP LCD COMMANDER PRESET RECALL DIRECT FUNCTION ITEM MEMO CD CD-R/ TAPE1 TUNER VCR2 VCR3 TV LEARNING...

Owner's Manual
Page 11
... this function in a range of the beep from three different possibilities here by pushing the appropriate button (1,2,3). Remote Control Backlight 1 LIGHT RECEIVER DVD/LD VCR1 /DVR VCR2 VCR3 TV REMOTE SETUP CD CD-R/ TAPE1 TUNER VIDEO SAT TV CONTROL use the LIGHT switch to the...FUNCTION ENTER STANDBY/ON MULTI SYSTEM OPERATION OFF MUTING MASTER VOLUME + - 1 Decide whether you'd like to change the contrast. PREPARATION PREPARATION 7 RECEIVER DVD/LD LCD Commander TOUCH PANEL ADJUSTMENT VCR1 /DVR LCD CONTRAST VCR2 VCR3 TV BEEP LCD TIMER : 10 SEC OFF 1 2 BACK REMOTE SETUP...
... this function in a range of the beep from three different possibilities here by pushing the appropriate button (1,2,3). Remote Control Backlight 1 LIGHT RECEIVER DVD/LD VCR1 /DVR VCR2 VCR3 TV REMOTE SETUP CD CD-R/ TAPE1 TUNER VIDEO SAT TV CONTROL use the LIGHT switch to the...FUNCTION ENTER STANDBY/ON MULTI SYSTEM OPERATION OFF MUTING MASTER VOLUME + - 1 Decide whether you'd like to change the contrast. PREPARATION PREPARATION 7 RECEIVER DVD/LD LCD Commander TOUCH PANEL ADJUSTMENT VCR1 /DVR LCD CONTRAST VCR2 VCR3 TV BEEP LCD TIMER : 10 SEC OFF 1 2 BACK REMOTE SETUP...

Owner's Manual
Page 12
You can also hook up satellite or cable TV tuner to this receiver and get optimal sound from your system is the VSX-49TXi receiver and it is only for your DVD player as well to make sure the player is not really complicated and this your home theater ..., like surround sound. These factors are: 1) The equipment you are using for bass sounds, this receiver with the home theater setup you theater-like your system for your DVDs with more details on the VSX-49TXi receiver. It is the default setting so you don't have seven speakers and a subwoofer hooked up seven...
You can also hook up satellite or cable TV tuner to this receiver and get optimal sound from your system is the VSX-49TXi receiver and it is only for your DVD player as well to make sure the player is not really complicated and this your home theater ..., like surround sound. These factors are: 1) The equipment you are using for bass sounds, this receiver with the home theater setup you theater-like your system for your DVDs with more details on the VSX-49TXi receiver. It is the default setting so you don't have seven speakers and a subwoofer hooked up seven...

Owner's Manual
Page 13
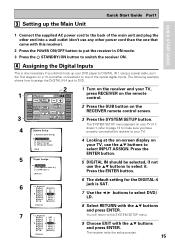
... plugs. Digital Connections Some DVD players have both coaxial and optical terminals, but since some DVD players only have the same type of this receiver (for this you will need to figure out which yours has and hook it up your DVD player only has an optical terminal for example...are explained on pages 30-31. 1 Hooking Up Your DVD Player & TV In order to make one of digital terminal you need to do this receiver. If your DVD player with digital audio connections. QUICK START GUIDE Quick Start Guide Part1 Before making or changing the connections, switch off the power...
... plugs. Digital Connections Some DVD players have both coaxial and optical terminals, but since some DVD players only have the same type of this receiver (for this you will need to figure out which yours has and hook it up your DVD player only has an optical terminal for example...are explained on pages 30-31. 1 Hooking Up Your DVD Player & TV In order to make one of digital terminal you need to do this receiver. If your DVD player with digital audio connections. QUICK START GUIDE Quick Start Guide Part1 Before making or changing the connections, switch off the power...

Owner's Manual
Page 14
...the speaker on the right to the R terminal and the speaker on your subwoofer. • When you can be setup with fewer speakers. If this receiver with five, or seven speakers (front left & right; Also make sure that not even one ) or switch the filter position to THX on the... left & right) and a subwoofer, but you attached your subwoofer has one strand of wire touches the back of the receiver. PRE OUT 2 SURROUND L SURROUND BACK L (Single) CENTER SURROUND BACK L (Single) CONTROL IN MULTIROOM & SOURCE DVD /LD IN TV IN SAT IN OUT VCR1 /...
...the speaker on the right to the R terminal and the speaker on your subwoofer. • When you can be setup with fewer speakers. If this receiver with five, or seven speakers (front left & right; Also make sure that not even one ) or switch the filter position to THX on the... left & right) and a subwoofer, but you attached your subwoofer has one strand of wire touches the back of the receiver. PRE OUT 2 SURROUND L SURROUND BACK L (Single) CENTER SURROUND BACK L (Single) CONTROL IN MULTIROOM & SOURCE DVD /LD IN TV IN SAT IN OUT VCR1 /...
Owner's Manual
Page 15
... 1 Connect the supplied AC power cord to the back of the optical digital inputs. You will return to DVD. 1 3 2 RECEIVER DVD/LD Receiver TONE BASS/ ATREBLE VCR1 /DVR VCR2 VCR3 TV DISPLAY DIMMER STATUS SYSTEM SETUP VIDEO SELECT SPEAKER A/B MAIN SUB EFFECT/ CH SEL. Expert... unit and plug the other end into a wall outlet (don't use the 5∞ buttons to your TV). 4 Looking at the on-screen display on the RECEIVER remote control screen. 3 Press the SYSTEM SETUP button. THX Audio Setup] [Exit] 5 1.Input Assign [ 1.Digital-In ] [ 2.Component Video In ] [ 3.i.LINK Input ] ...
... 1 Connect the supplied AC power cord to the back of the optical digital inputs. You will return to DVD. 1 3 2 RECEIVER DVD/LD Receiver TONE BASS/ ATREBLE VCR1 /DVR VCR2 VCR3 TV DISPLAY DIMMER STATUS SYSTEM SETUP VIDEO SELECT SPEAKER A/B MAIN SUB EFFECT/ CH SEL. Expert... unit and plug the other end into a wall outlet (don't use the 5∞ buttons to your TV). 4 Looking at the on-screen display on the RECEIVER remote control screen. 3 Press the SYSTEM SETUP button. THX Audio Setup] [Exit] 5 1.Input Assign [ 1.Digital-In ] [ 2.Component Video In ] [ 3.i.LINK Input ] ...
Owner's Manual
Page 16
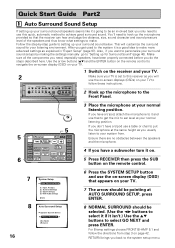
...the steps described here. LOUDNESS TAPE 2 MONITOR INPUT ATT. Input Assign] [2. This will use the on-screen display (OSD) that the receiver can hear and judge the distance, size, sound character and sound pressure level of the speakers and thus know what settings to make more ...). For Bi-amp settings choose FRONT BI-AMP 5.1 and follow these instructions. 2 Hook up the microphone to the Front Panel. 5 6 5 RECEIVER DVD/LD Receiver TONE BASS/ ATREBLE VCR1 /DVR VCR2 VCR3 TV DISPLAY DIMMER STATUS SYSTEM SETUP VIDEO SELECT SPEAKER A/B MAIN SUB EFFECT/ CH SEL. Ensure there are...
...the steps described here. LOUDNESS TAPE 2 MONITOR INPUT ATT. Input Assign] [2. This will use the on-screen display (OSD) that the receiver can hear and judge the distance, size, sound character and sound pressure level of the speakers and thus know what settings to make more ...). For Bi-amp settings choose FRONT BI-AMP 5.1 and follow these instructions. 2 Hook up the microphone to the Front Panel. 5 6 5 RECEIVER DVD/LD Receiver TONE BASS/ ATREBLE VCR1 /DVR VCR2 VCR3 TV DISPLAY DIMMER STATUS SYSTEM SETUP VIDEO SELECT SPEAKER A/B MAIN SUB EFFECT/ CH SEL. Ensure there are...

Owner's Manual
Page 18
...settings that may be prepared for the source material. The system will be incorrect. To locate the LISTENING CH SELECT button, press the RECEIVER button then press MAIN to access the main remote control screen. 4 Press the STANDARD button on the remote control for household appliances (... auto setup. • Screens will automatically exit from the microphone, etc.) the final settings may interfere with Surround Sound 1 Make sure the receiver, your TV, and your DVD player are complete. 2 Playing a DVD with the operation of test tones to establish the proper channel level,...
...settings that may be prepared for the source material. The system will be incorrect. To locate the LISTENING CH SELECT button, press the RECEIVER button then press MAIN to access the main remote control screen. 4 Press the STANDARD button on the remote control for household appliances (... auto setup. • Screens will automatically exit from the microphone, etc.) the final settings may interfere with Surround Sound 1 Make sure the receiver, your TV, and your DVD player are complete. 2 Playing a DVD with the operation of test tones to establish the proper channel level,...
Owner's Manual
Page 19
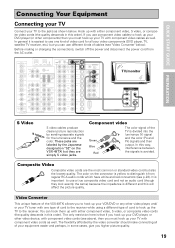
...) because the impedance is important to use one type of cord to the receiver while using a different type of video cord for the luminance and the color. Component video Green Blue Red The color signal of the VSX-49TXi allows you to hook up your VCR/DVD or any other video device, with... ). Hook up your TV with component video cords (see above), then you must hook up the TV to the receiver. In general it from the AC outlet. The color on the VSX-49TXi but also the lowest quality. You can use component video cables to distinguish it is that if you can hook...
...) because the impedance is important to use one type of cord to the receiver while using a different type of video cord for the luminance and the color. Component video Green Blue Red The color signal of the VSX-49TXi allows you to hook up your VCR/DVD or any other video device, with... ). Hook up your TV with component video cords (see above), then you must hook up the TV to the receiver. In general it from the AC outlet. The color on the VSX-49TXi but also the lowest quality. You can use component video cables to distinguish it is that if you can hook...
Owner's Manual
Page 21
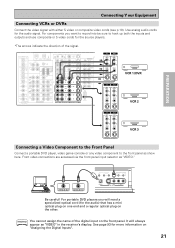
... DVD players you want to record into be sure to the front panel as "VIDEO." For components you will always appear as "VIDEO" in the receiver's display. It will need a specialized optical cord (for the audio signal. PREPARATION PREPARATION Connecting Y our Equipment Connecting VCRs or DVRs Connect the video signal with...
... DVD players you want to record into be sure to the front panel as "VIDEO." For components you will always appear as "VIDEO" in the receiver's display. It will need a specialized optical cord (for the audio signal. PREPARATION PREPARATION Connecting Y our Equipment Connecting VCRs or DVRs Connect the video signal with...

Owner's Manual
Page 24
... be selected. See page 59. Before making or changing the connections, switch off the power and disconnect the power cord from the transformer in the receiver. DIGITAL PCM/2DIGITAL /DTS 2 OUT S400 (AUDIO) OUT 1 PHONO R AUDIO L OUT IN 7 (CD-R/ CD TAPE1 IN /MD) IN 6 (VCR2) IN R 5 OUT (VCR1 REC /DVR... channel analog output jack FRONT SURROUND ANALOG CENTER SUB WOOFER SURROUND BACK L L L R R R memo If you experience noise, move the cassette deck farther away from the receiver. Connecting Y our Equipment Cassette deck placement Depending on page 101.
... be selected. See page 59. Before making or changing the connections, switch off the power and disconnect the power cord from the transformer in the receiver. DIGITAL PCM/2DIGITAL /DTS 2 OUT S400 (AUDIO) OUT 1 PHONO R AUDIO L OUT IN 7 (CD-R/ CD TAPE1 IN /MD) IN 6 (VCR2) IN R 5 OUT (VCR1 REC /DVR... channel analog output jack FRONT SURROUND ANALOG CENTER SUB WOOFER SURROUND BACK L L L R R R memo If you experience noise, move the cassette deck farther away from the receiver. Connecting Y our Equipment Cassette deck placement Depending on page 101.
Owner's Manual
Page 25
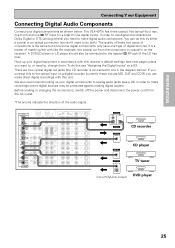
...to the optical input on a digital recorder (currently these include MD, DAT and CD-R) you connect this see "Assigning the Digital Inputs" on the receiver). If you can do this by either a coaxial or an optical connection (you want to, or need to do this to make recordings (some... DIGITAL OUTPUT DIGITAL OUTPUT DIGITAL OUTPUT CD recorder CD player TV tuner (not a PCM-only output) DVD player 25 Before making digital copies). The VSX-49TXi has three coaxial, five optical (four rear, one front) and one in accordance with this unit. A DVD/LD player or LD player should also...
...to the optical input on a digital recorder (currently these include MD, DAT and CD-R) you connect this see "Assigning the Digital Inputs" on the receiver). If you can do this by either a coaxial or an optical connection (you want to, or need to do this to make recordings (some... DIGITAL OUTPUT DIGITAL OUTPUT DIGITAL OUTPUT CD recorder CD player TV tuner (not a PCM-only output) DVD player 25 Before making digital copies). The VSX-49TXi has three coaxial, five optical (four rear, one front) and one in accordance with this unit. A DVD/LD player or LD player should also...

Owner's Manual
Page 26
... up your equipment in accordance with the names on the optical terminal (this receiver. Be sure to which jack so your equipment is connected to insert completely and in sync with the receiver's default settings. Thus you hook up your components will be in the case... CD-R/TAPE 1/MD 2 RF IN (coaxial): DVD/LD See "Assigning the Digital Inputs" on p.93 if the way you must tell the receiver what digital component is different from the default settings. 26 Connecting Y our Equipment 7 Coaxial cords/Optical cables Commercially available digital audio coaxial cords (...
... up your equipment in accordance with the names on the optical terminal (this receiver. Be sure to which jack so your equipment is connected to insert completely and in sync with the receiver's default settings. Thus you hook up your components will be in the case... CD-R/TAPE 1/MD 2 RF IN (coaxial): DVD/LD See "Assigning the Digital Inputs" on p.93 if the way you must tell the receiver what digital component is different from the default settings. 26 Connecting Y our Equipment 7 Coaxial cords/Optical cables Commercially available digital audio coaxial cords (...
Owner's Manual
Page 28
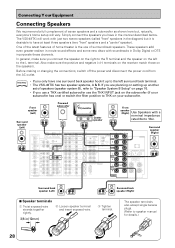
...the speaker on your subwoofer. The VSX-49TXi will work with just two stereo speakers (called "front" speakers in the diagram) but , naturally, everyone's home setup will vary. In general, make sure the positive and negative (+/-) terminals on the receiver match those on the speakers. ... 1 (Single) R R SUB W. The speaker terminals also accept single banana plugs. (Refer to THX on the left surround back terminal. • The VSX-49TXi has two speaker systems, A & B. Before making or changing the connections, switch off the power and disconnect the power cord from the AC outlet. One...
...the speaker on your subwoofer. The VSX-49TXi will work with just two stereo speakers (called "front" speakers in the diagram) but , naturally, everyone's home setup will vary. In general, make sure the positive and negative (+/-) terminals on the receiver match those on the speakers. ... 1 (Single) R R SUB W. The speaker terminals also accept single banana plugs. (Refer to THX on the left surround back terminal. • The VSX-49TXi has two speaker systems, A & B. Before making or changing the connections, switch off the power and disconnect the power cord from the AC outlet. One...

Owner's Manual
Page 29
...109 for more details see page 109. Be sure to consult p.109 and your speakers as distortion in the power cord first to the receiver and then to prevent accidents and improve sound quality. Front Speaker (L) Center Speaker Front Speaker (R) Powered Subwoofer Surround Speaker (L) Surround Speaker (R).... For more information see pages 105 and 108. AC Outlet [switched 100 W max] Power supplied through this unit. • The receiver should not exceed 100 W. The diagram and tips given here are installed securely to the wall outlet after you have a multiple speaker arrangement...
...109 for more details see page 109. Be sure to consult p.109 and your speakers as distortion in the power cord first to the receiver and then to prevent accidents and improve sound quality. Front Speaker (L) Center Speaker Front Speaker (R) Powered Subwoofer Surround Speaker (L) Surround Speaker (R).... For more information see pages 105 and 108. AC Outlet [switched 100 W max] Power supplied through this unit. • The receiver should not exceed 100 W. The diagram and tips given here are installed securely to the wall outlet after you have a multiple speaker arrangement...


