
Owner's Manual
Page 6
... Supplied Accessories 8 Preparing the Remote Control 8 Loading the batteries 8 Remote Control Battery Alarm 8 The Touch Pen & Lock 9 Remote Control Cushions 9 Operating range of remote control unit 9 Installing the Receiver 9 Opening the Front Panel 9 Setting Up the Remote Control 10 Remote Control Backlight 11 Quick Start ...Connecting i.LINK-equipped Components 30 Creating an i.LINK Network 31 Displays & Controls 32 Front Panel 32 Back Panel 34 Remote Control 36 Basic Receiver LCD Screens 37 Receiver MAIN Screen 37 Receiver SUB Screen 38 Display 39 Setting Up for Surround...
... Supplied Accessories 8 Preparing the Remote Control 8 Loading the batteries 8 Remote Control Battery Alarm 8 The Touch Pen & Lock 9 Remote Control Cushions 9 Operating range of remote control unit 9 Installing the Receiver 9 Opening the Front Panel 9 Setting Up the Remote Control 10 Remote Control Backlight 11 Quick Start ...Connecting i.LINK-equipped Components 30 Creating an i.LINK Network 31 Displays & Controls 32 Front Panel 32 Back Panel 34 Remote Control 36 Basic Receiver LCD Screens 37 Receiver MAIN Screen 37 Receiver SUB Screen 38 Display 39 Setting Up for Surround...

Owner's Manual
Page 7
... 82 Controlling the MULTI-ROOM system from the sub room 83 The PIONEER SR System: Operating other PIONEER components 84 Multi Operations 85 Performing multi operations 86 System off 87 Using System off 88 Editing Remote Control Screen Names (ITEM MEMO 89 Editing Buttons Names (KEY LABEL... 90 Resetting the Main Unit 92 Resetting the Remote Control 92 Advanced Setup ...
... 82 Controlling the MULTI-ROOM system from the sub room 83 The PIONEER SR System: Operating other PIONEER components 84 Multi Operations 85 Performing multi operations 86 System off 87 Using System off 88 Editing Remote Control Screen Names (ITEM MEMO 89 Editing Buttons Names (KEY LABEL... 90 Resetting the Main Unit 92 Resetting the Remote Control 92 Advanced Setup ...

Owner's Manual
Page 8
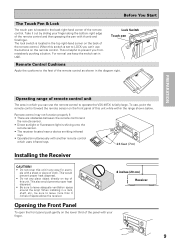
...8226; Insert the plus and minus sides of the following supplied accessories. tion's rules that you have received all your country or area. Remote Control Battery Alarm When the batteries get an average of 1-3 months of used batteries, please comply with the same shape may have different voltages...ones. SIZE AA, LR6 8 Before You Start Checking the Supplied Accessories Please check that apply in your remote control settings will be able to get too weak to operate the remote control properly an alarm will sound and a warning screen will need re-adjusting (see below . When ...
...8226; Insert the plus and minus sides of the following supplied accessories. tion's rules that you have received all your country or area. Remote Control Battery Alarm When the batteries get an average of 1-3 months of used batteries, please comply with the same shape may have different voltages...ones. SIZE AA, LR6 8 Before You Start Checking the Supplied Accessories Please check that apply in your remote control settings will be able to get too weak to operate the remote control properly an alarm will sound and a warning screen will need re-adjusting (see below . When ...
Owner's Manual
Page 9
...inches (20 cm) Receiver Opening the Front Panel To open the front panel push gently on the lower third of the remote control. When installing in a rack, shelf, etc., be sure to operate the VSX-49TXi is fairly large. When this unit in any place object directly on the front panel of the... remote control. This is helpful to LOCK you can 't use , point the remote control toward the remote sensor on top of the remote control as shown in USE. This ...
...inches (20 cm) Receiver Opening the Front Panel To open the front panel push gently on the lower third of the remote control. When installing in a rack, shelf, etc., be sure to operate the VSX-49TXi is fairly large. When this unit in any place object directly on the front panel of the... remote control. This is helpful to LOCK you can 't use , point the remote control toward the remote sensor on top of the remote control as shown in USE. This ...
Owner's Manual
Page 10
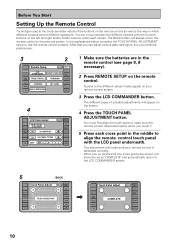
... of possible adjustments will show the word "COMPLETE" and automatically return to the LCD COMMANDER screen. 5 BACK Touch Panel Adjust RECEIVER BACK REMOTE SETUP CD DVD/LD VCR1 /DVR VCR2 TOUCH CROSS POINT CD-R/ TAPE1 TUNER VIDEO VCR3 TV SAT TV CONTROL « Touch Panel Adjust... calibrated correctly. You must first align the touch panel to suit your personal preferences. 3 2 RECEIVER DVD/LD VCR1 /DVR Remote Setup BACK REMOTE SETUP LCD COMMANDER PRESET RECALL DIRECT FUNCTION ITEM MEMO CD CD-R/ TAPE1 TUNER VCR2 VCR3 TV LEARNING MULTI OPERATION KEY LABEL VIDEO ...
... of possible adjustments will show the word "COMPLETE" and automatically return to the LCD COMMANDER screen. 5 BACK Touch Panel Adjust RECEIVER BACK REMOTE SETUP CD DVD/LD VCR1 /DVR VCR2 TOUCH CROSS POINT CD-R/ TAPE1 TUNER VIDEO VCR3 TV SAT TV CONTROL « Touch Panel Adjust... calibrated correctly. You must first align the touch panel to suit your personal preferences. 3 2 RECEIVER DVD/LD VCR1 /DVR Remote Setup BACK REMOTE SETUP LCD COMMANDER PRESET RECALL DIRECT FUNCTION ITEM MEMO CD CD-R/ TAPE1 TUNER VCR2 VCR3 TV LEARNING MULTI OPERATION KEY LABEL VIDEO ...

Owner's Manual
Page 11
PREPARATION PREPARATION 7 RECEIVER DVD/LD LCD Commander TOUCH PANEL ADJUSTMENT VCR1 /DVR LCD CONTRAST VCR2 VCR3 TV BEEP LCD TIMER : 10 SEC OFF 1 2 BACK REMOTE SETUP CD CD-R/ TAPE1 TUNER VIDEO SAT 3 TV CONTROL 6 Before You Start 6 Decide which other adjustments you 'd like to make and press those buttons... on before the timer turns it off . If no commands are finished with the adjustments press the BACK button to go back to turn the remote control off after a set this function in a range of time if no command is 10 seconds. If you leave it on 60 seconds....
PREPARATION PREPARATION 7 RECEIVER DVD/LD LCD Commander TOUCH PANEL ADJUSTMENT VCR1 /DVR LCD CONTRAST VCR2 VCR3 TV BEEP LCD TIMER : 10 SEC OFF 1 2 BACK REMOTE SETUP CD CD-R/ TAPE1 TUNER VIDEO SAT 3 TV CONTROL 6 Before You Start 6 Decide which other adjustments you 'd like to make and press those buttons... on before the timer turns it off . If no commands are finished with the adjustments press the BACK button to go back to turn the remote control off after a set this function in a range of time if no command is 10 seconds. If you leave it on 60 seconds....

Owner's Manual
Page 13
... SAT IN OUT VCR1 /DVR IN OUT VCR2 IN MONITOR OUT OUT IN IN IN OUT IN OUT IN DVD /LD IN 1 Y PB PR IN 2 Y REMOTE IN MULTIROOM & SOURCE Y MONITOR OUT PB PR IN 3 Y PB PB PR PR COMPONENT VIDEO ASSIGNABLE R L AUDIO OUT OUT VCR3 IN IN VIDEO S2 VIDEO RS...
... SAT IN OUT VCR1 /DVR IN OUT VCR2 IN MONITOR OUT OUT IN IN IN OUT IN OUT IN DVD /LD IN 1 Y PB PR IN 2 Y REMOTE IN MULTIROOM & SOURCE Y MONITOR OUT PB PR IN 3 Y PB PB PR PR COMPONENT VIDEO ASSIGNABLE R L AUDIO OUT OUT VCR3 IN IN VIDEO S2 VIDEO RS...

Owner's Manual
Page 14
... SAT IN OUT VCR1 /DVR IN OUT VCR2 IN MONITOR OUT OUT IN IN IN OUT IN OUT IN DVD /LD IN 1 Y PB PR IN 2 Y REMOTE IN MULTIROOM & SOURCE Y MONITOR OUT PB PR IN 3 Y PB PB PR PR COMPONENT VIDEO ASSIGNABLE R L AUDIO OUT OUT VCR3 IN IN VIDEO S2 VIDEO RS...
... SAT IN OUT VCR1 /DVR IN OUT VCR2 IN MONITOR OUT OUT IN IN IN OUT IN OUT IN DVD /LD IN 1 Y PB PR IN 2 Y REMOTE IN MULTIROOM & SOURCE Y MONITOR OUT PB PR IN 3 Y PB PB PR PR COMPONENT VIDEO ASSIGNABLE R L AUDIO OUT OUT VCR3 IN IN VIDEO S2 VIDEO RS...
Owner's Manual
Page 15
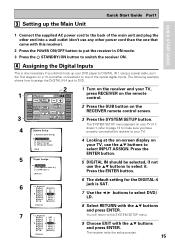
... the other end into a wall outlet (don't use the 5∞ buttons to select it to put the receiver in the first diagram on the RECEIVER remote control screen. 3 Press the SYSTEM SETUP button. The receiver exits the setup process. 15 Input Assign ] [2. THX Audio Setup] [Exit] 5 1.Input ... only necessary if you have properly connected the receiver to your TV). 4 Looking at the on-screen display on your TV, press RECEIVER on the remote control. 2 Press the SUB button on p.13, but rather connected it . Digital-In Digital-1 [ DVD/LD ] Digital-2 [ TV ] Digital-3 [ CD ] Digital-4 [ ...
... the other end into a wall outlet (don't use the 5∞ buttons to select it to put the receiver in the first diagram on the RECEIVER remote control screen. 3 Press the SYSTEM SETUP button. The receiver exits the setup process. 15 Input Assign ] [2. THX Audio Setup] [Exit] 5 1.Input ... only necessary if you have properly connected the receiver to your TV). 4 Looking at the on-screen display on your TV, press RECEIVER on the remote control. 2 Press the SUB button on p.13, but rather connected it . Digital-In Digital-1 [ DVD/LD ] Digital-2 [ TV ] Digital-3 [ CD ] Digital-4 [ ...
Owner's Manual
Page 16
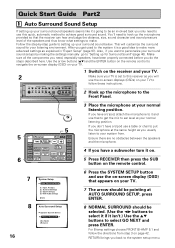
... setting up your surround sound below. Surround Setup] [3. Also, if you have a tripod use that appears on the remote control. 16 7 8 System Setup [ Auto Surround Setup ] [1. SIGNAL SELECT REMOTE SETUP CD CD-R/ TAPE1 TUNER VIDEO SAT TV CONTROL 3 Place the microphone at AUTO SURROUND SETUP, press ENTER. 8...instructions. 2 Hook up for your TV is a good idea to navigate the on-screen display (OSD) on your TV. 1 Switch on the remote control to make . Quick Start Guide Part2 1 Auto Surround Sound Setup If setting up your surround sound speakers seems like it's going to be ...
... setting up your surround sound below. Surround Setup] [3. Also, if you have a tripod use that appears on the remote control. 16 7 8 System Setup [ Auto Surround Setup ] [1. SIGNAL SELECT REMOTE SETUP CD CD-R/ TAPE1 TUNER VIDEO SAT TV CONTROL 3 Place the microphone at AUTO SURROUND SETUP, press ENTER. 8...instructions. 2 Hook up for your TV is a good idea to navigate the on-screen display (OSD) on your TV. 1 Switch on the remote control to make . Quick Start Guide Part2 1 Auto Surround Sound Setup If setting up your surround sound speakers seems like it's going to be ...

Owner's Manual
Page 18
... for loud test tones. If you don't see "7.1" in the display on the receiver. 3 Press the LISTENING CH SELECT button on the remote control repeatedly until you choose CANCEL at anytime during auto setup. Quick Start Guide Part2 memo • Make sure the room environment follows the ... final settings may be prepared for three minutes, or you see the STANDARD button, press the RECEIVER button then press MAIN to access the main remote control screen. 5 Play a DVD then adjust the MASTER VOLUME. 3 Personalizing Your Sound 1 Use the Surround Listening Mode buttons to establish the proper...
... for loud test tones. If you don't see "7.1" in the display on the receiver. 3 Press the LISTENING CH SELECT button on the remote control repeatedly until you choose CANCEL at anytime during auto setup. Quick Start Guide Part2 memo • Make sure the room environment follows the ... final settings may be prepared for three minutes, or you see the STANDARD button, press the RECEIVER button then press MAIN to access the main remote control screen. 5 Play a DVD then adjust the MASTER VOLUME. 3 Personalizing Your Sound 1 Use the Surround Listening Mode buttons to establish the proper...
Owner's Manual
Page 19
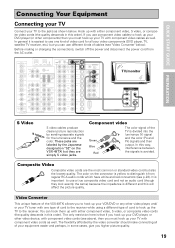
... SAT IN OUT VCR1 /DVR IN OUT VCR2 IN MONITOR OUT OUT IN IN IN OUT IN OUT IN DVD /LD IN 1 Y PB PR IN 2 Y REMOTE IN MULTIROOM & SOURCE Y MONITOR OUT PB PR IN 3 Y PB PB PR PR COMPONENT VIDEO ASSIGNABLE R L AUDIO OUT OUT VCR3 IN IN VIDEO S2 VIDEO ... other video device, with either component video, S video, or composite video cords (the quality descends in this order). Video Converter This unique feature of the VSX-49TXi allows you must hook up your TV with either component video, S video, or composite video cords (the quality descends in some cases, give you use...
... SAT IN OUT VCR1 /DVR IN OUT VCR2 IN MONITOR OUT OUT IN IN IN OUT IN OUT IN DVD /LD IN 1 Y PB PR IN 2 Y REMOTE IN MULTIROOM & SOURCE Y MONITOR OUT PB PR IN 3 Y PB PB PR PR COMPONENT VIDEO ASSIGNABLE R L AUDIO OUT OUT VCR3 IN IN VIDEO S2 VIDEO ... other video device, with either component video, S video, or composite video cords (the quality descends in this order). Video Converter This unique feature of the VSX-49TXi allows you must hook up your TV with either component video, S video, or composite video cords (the quality descends in some cases, give you use...

Owner's Manual
Page 20
... SAT IN OUT VCR1 /DVR IN OUT VCR2 IN MONITOR OUT OUT IN IN IN OUT IN OUT IN DVD /LD IN 1 Y PB PR IN 2 Y REMOTE IN MULTIROOM & SOURCE Y MONITOR OUT PB PR IN 3 Y PB PB PR PR COMPONENT VIDEO ASSIGNABLE R L AUDIO OUT OUT VCR3 IN IN VIDEO S2 VIDEO RS...
... SAT IN OUT VCR1 /DVR IN OUT VCR2 IN MONITOR OUT OUT IN IN IN OUT IN OUT IN DVD /LD IN 1 Y PB PR IN 2 Y REMOTE IN MULTIROOM & SOURCE Y MONITOR OUT PB PR IN 3 Y PB PB PR PR COMPONENT VIDEO ASSIGNABLE R L AUDIO OUT OUT VCR3 IN IN VIDEO S2 VIDEO RS...
Owner's Manual
Page 21
... SAT IN OUT VCR1 /DVR IN OUT VCR2 IN MONITOR OUT OUT IN IN IN OUT IN OUT IN DVD /LD IN 1 Y PB PR IN 2 Y REMOTE IN MULTIROOM & SOURCE Y MONITOR OUT PB PR IN 3 Y PB PB PR PR COMPONENT VIDEO ASSIGNABLE R L AUDIO OUT OUT VCR3 IN IN VIDEO S2 VIDEO RS...
... SAT IN OUT VCR1 /DVR IN OUT VCR2 IN MONITOR OUT OUT IN IN IN OUT IN OUT IN DVD /LD IN 1 Y PB PR IN 2 Y REMOTE IN MULTIROOM & SOURCE Y MONITOR OUT PB PR IN 3 Y PB PB PR PR COMPONENT VIDEO ASSIGNABLE R L AUDIO OUT OUT VCR3 IN IN VIDEO S2 VIDEO RS...

Owner's Manual
Page 22
... SAT IN OUT VCR1 /DVR IN OUT VCR2 IN MONITOR OUT OUT IN IN IN OUT IN OUT IN DVD /LD IN 1 Y PB PR IN 2 Y REMOTE IN MULTIROOM & SOURCE Y MONITOR OUT PB PR IN 3 Y PB PB PR PR COMPONENT VIDEO ASSIGNABLE R L AUDIO OUT OUT VCR3 IN IN VIDEO S2 VIDEO RS...
... SAT IN OUT VCR1 /DVR IN OUT VCR2 IN MONITOR OUT OUT IN IN IN OUT IN OUT IN DVD /LD IN 1 Y PB PR IN 2 Y REMOTE IN MULTIROOM & SOURCE Y MONITOR OUT PB PR IN 3 Y PB PB PR PR COMPONENT VIDEO ASSIGNABLE R L AUDIO OUT OUT VCR3 IN IN VIDEO S2 VIDEO RS...

Owner's Manual
Page 26
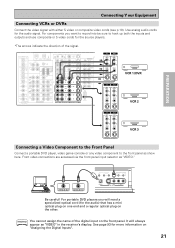
... 5 (optical): VCR1/DVR DIGITAL IN 6 (optical): VCR2 DIGITAL IN 7 (optical): CD-R/TAPE 1/MD 2 RF IN (coaxial): DVD/LD See "Assigning the Digital Inputs" on the remote control buttons and the like. Connecting Y our Equipment 7 Coaxial cords/Optical cables Commercially available digital audio coaxial cords (standard video cords can also be used...
... 5 (optical): VCR1/DVR DIGITAL IN 6 (optical): VCR2 DIGITAL IN 7 (optical): CD-R/TAPE 1/MD 2 RF IN (coaxial): DVD/LD See "Assigning the Digital Inputs" on the remote control buttons and the like. Connecting Y our Equipment 7 Coaxial cords/Optical cables Commercially available digital audio coaxial cords (standard video cords can also be used...

Owner's Manual
Page 27
... IN MULTIROOM & SOURCE DVD /LD IN TV IN SAT IN OUT VCR1 MONITOR OUT OUT IN IN IN OUT DVD /LD IN 1 Y PB PR IN 2 Y REMOTE IN MULTIROOM & SOURCE Y MONITOR OUT PB PR IN 3 Y ·Åª ANTENNA L AM LOOP ANTENNA FM 75Ω UNBAL FRONT R CENTER L AC OUTLET AC IN...
... IN MULTIROOM & SOURCE DVD /LD IN TV IN SAT IN OUT VCR1 MONITOR OUT OUT IN IN IN OUT DVD /LD IN 1 Y PB PR IN 2 Y REMOTE IN MULTIROOM & SOURCE Y MONITOR OUT PB PR IN 3 Y ·Åª ANTENNA L AM LOOP ANTENNA FM 75Ω UNBAL FRONT R CENTER L AC OUTLET AC IN...
Owner's Manual
Page 28
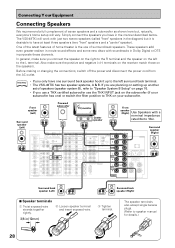
... L terminal. memo • If you connect the speaker on the right to the R terminal and the speaker on the left surround back terminal. • The VSX-49TXi has two speaker systems, A & B. Before making or changing the connections, switch off the power and disconnect the power cord from the AC outlet. Front speaker... SAT IN OUT VCR1 /DVR IN OUT VCR2 IN MONITOR OUT OUT IN IN IN OUT IN OUT IN DVD /LD IN 1 Y PB PR IN 2 Y REMOTE IN MULTIROOM & SOURCE Y MONITOR OUT PB PR IN 3 Y PB PB PR PR COMPONENT VIDEO ASSIGNABLE R L AUDIO OUT OUT VCR3 IN IN VIDEO S2 VIDEO RS...
... L terminal. memo • If you connect the speaker on the right to the R terminal and the speaker on the left surround back terminal. • The VSX-49TXi has two speaker systems, A & B. Before making or changing the connections, switch off the power and disconnect the power cord from the AC outlet. Front speaker... SAT IN OUT VCR1 /DVR IN OUT VCR2 IN MONITOR OUT OUT IN IN IN OUT IN OUT IN DVD /LD IN 1 Y PB PR IN 2 Y REMOTE IN MULTIROOM & SOURCE Y MONITOR OUT PB PR IN 3 Y PB PB PR PR COMPONENT VIDEO ASSIGNABLE R L AUDIO OUT OUT VCR3 IN IN VIDEO S2 VIDEO RS...

Owner's Manual
Page 32
... CAL. To open the front panel push gently on and this receiver consumes a small amount of power [0.65 W] in the standby mode.) 4 Remote sensor Receives the signals from the remote control. 5 Display (see p.39) 32 6 MCACC indicator (see p.56) Lights when the ACOUSTIC CAL EQ is on. (After the Auto Surround Sound...
... CAL. To open the front panel push gently on and this receiver consumes a small amount of power [0.65 W] in the standby mode.) 4 Remote sensor Receives the signals from the remote control. 5 Display (see p.39) 32 6 MCACC indicator (see p.56) Lights when the ACOUSTIC CAL EQ is on. (After the Auto Surround Sound...

Owner's Manual
Page 33
... TONE BYPASS, which bypasses the tone circuitry. ON/OFF button: Use to select the function or use the multi room feature (requires an optional PIONEER Multi-Room Remote Sensor Unit MR-100 or another IR receiver). A is the default setting. To select an 2 RF signal. Allows monitoring of priority: , 2 RF, DIGITAL, ANALOG...
... TONE BYPASS, which bypasses the tone circuitry. ON/OFF button: Use to select the function or use the multi room feature (requires an optional PIONEER Multi-Room Remote Sensor Unit MR-100 or another IR receiver). A is the default setting. To select an 2 RF signal. Allows monitoring of priority: , 2 RF, DIGITAL, ANALOG...


