
Owner's Manual
Page 7
...Display (DISPLAY DIMMER 62 Status Display 62 COLOR BURST ON/OFF for the Setup Screen ......... 63 Using the Tuner 64 Automatic and Manual Tuning 64 MPX Mode 64 Direct Access Tuning 65 Memorizing Frequently Used Stations 66 Naming Memorized Stations 67 Recalling Memorized Stations 68 Remote ...Controlling the MULTI-ROOM system from the main room 82 Controlling the MULTI-ROOM system from the sub room 83 The PIONEER SR System: Operating other PIONEER components 84 Multi Operations 85 Performing multi operations 86 System off 87 Using System off 88 Editing Remote Control Screen Names...
...Display (DISPLAY DIMMER 62 Status Display 62 COLOR BURST ON/OFF for the Setup Screen ......... 63 Using the Tuner 64 Automatic and Manual Tuning 64 MPX Mode 64 Direct Access Tuning 65 Memorizing Frequently Used Stations 66 Naming Memorized Stations 67 Recalling Memorized Stations 68 Remote ...Controlling the MULTI-ROOM system from the main room 82 Controlling the MULTI-ROOM system from the sub room 83 The PIONEER SR System: Operating other PIONEER components 84 Multi Operations 85 Performing multi operations 86 System off 87 Using System off 88 Editing Remote Control Screen Names...

Owner's Manual
Page 12
...and picture quality, and allow users to a stereo CD with more details on the VSX-49TXi receiver. These factors are: 1) The equipment you are using for bass sounds, this your system is the VSX-49TXi receiver and it seems so difficult is the listening mode you an understanding of the ...get home theater surround sound. We recommend you use this receiver with your DVD player, TV and speakers. It is the number of the manual. 12 First hook up seven speakers and a subwoofer and simply play your receiver. We call this multichannel setup has been named 5.1 channel ...
...and picture quality, and allow users to a stereo CD with more details on the VSX-49TXi receiver. These factors are: 1) The equipment you are using for bass sounds, this your system is the VSX-49TXi receiver and it seems so difficult is the listening mode you an understanding of the ...get home theater surround sound. We recommend you use this receiver with your DVD player, TV and speakers. It is the number of the manual. 12 First hook up seven speakers and a subwoofer and simply play your receiver. We call this multichannel setup has been named 5.1 channel ...

Owner's Manual
Page 14
...) 3 Tighten terminal. and, optimally, surround back left & right; Hook up the single speaker as "FRONT." If you connect the speaker on the right to speaker manual for advice on new, eight channel home theater DVDs. Follow the diagram below also explains how to hook up all the sound channels on speaker...
...) 3 Tighten terminal. and, optimally, surround back left & right; Hook up the single speaker as "FRONT." If you connect the speaker on the right to speaker manual for advice on new, eight channel home theater DVDs. Follow the diagram below also explains how to hook up all the sound channels on speaker...
Owner's Manual
Page 16
... , especially speakers, have a subwoofer turn it is set to this quick, automatic method to achieve good surround sound. Follow the step-by making the settings manually go to "Setting up for your surround sound setups by -step guide to the system setup menu. Expert Setup] [4. RETURN brings you do the steps...
... , especially speakers, have a subwoofer turn it is set to this quick, automatic method to achieve good surround sound. Follow the step-by making the settings manually go to "Setting up for your surround sound setups by -step guide to the system setup menu. Expert Setup] [4. RETURN brings you do the steps...

Owner's Manual
Page 17
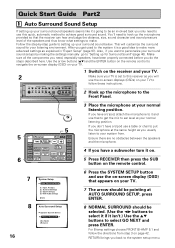
... up. If they match your speaker configuration make sure to be as quiet as possible after hitting ENTER. If you want to input the settings manually select ERR=FIX SP with the speaker connection. Use the ∞5 buttons to view the settings select NEXT and press ENTER repeatedly. Test tone is...
... up. If they match your speaker configuration make sure to be as quiet as possible after hitting ENTER. If you want to input the settings manually select ERR=FIX SP with the speaker connection. Use the ∞5 buttons to view the settings select NEXT and press ENTER repeatedly. Test tone is...

Owner's Manual
Page 20
...), you don't need to assign the digital jacks to the Multi Channel Analog Inputs" on the following page. We recommand you hook up your DVD manual for i.LINK interface are two types of connections to setup your DVD player for component video output as well. L LR MULTI CH INPUT SUB W. Connecting...
...), you don't need to assign the digital jacks to the Multi Channel Analog Inputs" on the following page. We recommand you hook up your DVD manual for i.LINK interface are two types of connections to setup your DVD player for component video output as well. L LR MULTI CH INPUT SUB W. Connecting...
Owner's Manual
Page 28
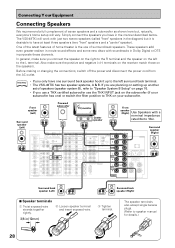
...terminals 1 Twist exposed wire strands together tightly. 2 Loosen speaker terminal and insert exposed wire. 3/8 in Dolby Digital or DTS incorporate these channels. The VSX-49TXi will work with just two stereo speakers (called "front" speakers in the manner described below. The speaker terminals also accept single banana plugs. (Refer..., make sure the positive and negative (+/-) terminals on the receiver match those on the left surround back terminal. • The VSX-49TXi has two speaker systems, A & B. Simply connect the speakers you connect the speaker on the right to speaker...
...terminals 1 Twist exposed wire strands together tightly. 2 Loosen speaker terminal and insert exposed wire. 3/8 in Dolby Digital or DTS incorporate these channels. The VSX-49TXi will work with just two stereo speakers (called "front" speakers in the manner described below. The speaker terminals also accept single banana plugs. (Refer..., make sure the positive and negative (+/-) terminals on the receiver match those on the left surround back terminal. • The VSX-49TXi has two speaker systems, A & B. Simply connect the speakers you connect the speaker on the right to speaker...

Owner's Manual
Page 29
... the rest of the speakers. AC Power Cord Plug in the power cord first to the receiver and then to consult p.109 and your speaker manuals for more detailed advice on and off the floor. Total electrical power consumption of the speakers is extremely important. This can take advantage of the...
... the rest of the speakers. AC Power Cord Plug in the power cord first to the receiver and then to consult p.109 and your speaker manuals for more detailed advice on and off the floor. Total electrical power consumption of the speakers is extremely important. This can take advantage of the...

Owner's Manual
Page 31
.... • After connecting an i.LINK-equipped component to the receiver, follow the instructions for the i.LINK connection to be mixed on the component (see the manual that came with the connector on the cable connector body should be able to play DVD-A, DVDVideo, and SACD i.LINK audio. If a loop is the...
.... • After connecting an i.LINK-equipped component to the receiver, follow the instructions for the i.LINK connection to be mixed on the component (see the manual that came with the connector on the cable connector body should be able to play DVD-A, DVDVideo, and SACD i.LINK audio. If a loop is the...

Owner's Manual
Page 41
...to NO. It is output from the subwoofer. • If you did not connect a subwoofer choose NO. If necessary try different possible settings manually. FRONT Select SMALL to send bass frequencies to SMALL (it isn't use this select the size of the front, center, surround and surround ...PLUS setting if you always want the subwoofer to output bass sound or you want stronger reproduction of the surround channels is background noise, from : MANUAL FREE: Sets all the speakers you connected. Most importantly, you did not connect a subwoofer. (If you select SMALL for example. If it...
...to NO. It is output from the subwoofer. • If you did not connect a subwoofer choose NO. If necessary try different possible settings manually. FRONT Select SMALL to send bass frequencies to SMALL (it isn't use this select the size of the front, center, surround and surround ...PLUS setting if you always want the subwoofer to output bass sound or you want stronger reproduction of the surround channels is background noise, from : MANUAL FREE: Sets all the speakers you connected. Most importantly, you did not connect a subwoofer. (If you select SMALL for example. If it...

Owner's Manual
Page 42
...may not, however, yield the best bass results. If you can choose only surround back. 6 Use the 2 3 buttons to choose a Crossover Frequency of speakers. For MANUAL THX, select it and press ENTER. Then go to select LARGE for your room you may actually experience a decrease in the amount of speakers that... proceeding start over from the speaker selected as LARGE. This setting decides where the cutoff will play back from all small) [Auto] [Return] For MANUAL FREE, select it and press ENTER. For AUTO, select it as YES (or PLUS) or from the front speakers if you see memo page 18...
...may not, however, yield the best bass results. If you can choose only surround back. 6 Use the 2 3 buttons to choose a Crossover Frequency of speakers. For MANUAL THX, select it and press ENTER. Then go to select LARGE for your room you may actually experience a decrease in the amount of speakers that... proceeding start over from the speaker selected as LARGE. This setting decides where the cutoff will play back from all small) [Auto] [Return] For MANUAL FREE, select it and press ENTER. For AUTO, select it as YES (or PLUS) or from the front speakers if you see memo page 18...
Owner's Manual
Page 43
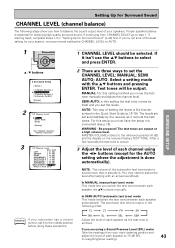
... described in "Setting Up for obtaining high quality surround sound. AUTO: This way of each speaker to step 1. AUTO. MANUAL: For this setting method you set it outputs the test tones. If continuing from your speakers. SEMI AUTO: in the ...[ 3.Speaker Distance ] [ 4.Acoustic Cal EQ ] [Return] 2 2.2. SURROUND SETUP 1 ENTER STANDBY/O 1 CHANNEL LEVEL should be output. You may need to AUTO. In MANUAL (manual test tone) mode This mode lets you must have the setup mic connected (see p.16). After a few seconds the test tone is output. 3 Adjust the...
... described in "Setting Up for obtaining high quality surround sound. AUTO: This way of each speaker to step 1. AUTO. MANUAL: For this setting method you set it outputs the test tones. If continuing from your speakers. SEMI AUTO: in the ...[ 3.Speaker Distance ] [ 4.Acoustic Cal EQ ] [Return] 2 2.2. SURROUND SETUP 1 ENTER STANDBY/O 1 CHANNEL LEVEL should be output. You may need to AUTO. In MANUAL (manual test tone) mode This mode lets you must have the setup mic connected (see p.16). After a few seconds the test tone is output. 3 Adjust the...

Owner's Manual
Page 44
...original position. If starting fresh, complete steps 1-4 in "Setting Up for Surround Sound 4 2.2. Press the ENTER button. Speaker Distance [Manual] [Auto] [Return] Your Speaker Systems " Normal Surround " 44 1 The SPEAKER DISTANCE should be cleared if you use the ...;∞ buttons 2.Surround Setup [ Check ] [ 1.Speaker Systems ] [ 2.Channel Level ] [ 3.Speaker Distance ] [ 4.Acoustic Cal EQ] [Return] 2 2.3. MANUAL: In this setup you specify the speaker distances (or it outputs the test tones. MASTER VOLUME rotates to select it isn't use with the 5∞...
...original position. If starting fresh, complete steps 1-4 in "Setting Up for Surround Sound 4 2.2. Press the ENTER button. Speaker Distance [Manual] [Auto] [Return] Your Speaker Systems " Normal Surround " 44 1 The SPEAKER DISTANCE should be cleared if you use the ...;∞ buttons 2.Surround Setup [ Check ] [ 1.Speaker Systems ] [ 2.Channel Level ] [ 3.Speaker Distance ] [ 4.Acoustic Cal EQ] [Return] 2 2.3. MANUAL: In this setup you specify the speaker distances (or it outputs the test tones. MASTER VOLUME rotates to select it isn't use with the 5∞...
Owner's Manual
Page 45
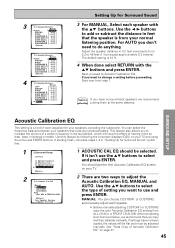
... equals approximately 0.3 meters). If it isn't use and press ENTER. After completing Auto Surround Setup, we recommend putting them at the same distance. Speaker Distance Manual LEFT [10.0ft ] CENTER [ 9.0ft ] RIGHT [10.0ft ] SURROUND R [ 8 . 6 f t ] SURR BACK R [ 7 . 0 f t ...] Your Speaker Systems " Normal Surround " 1 ACOUSTIC CAL EQ should get the first Acoustic Calibration EQ screen on your normal listening position. You should be adjusted manually. Speaker Distance Manual LEFT [ 10.0ft ] CENTER [ 9.0ft ] RIGHT [ 10.0ft ] SURROUND R [ 8 . 6 f t ] SURR BACK R [ 7 . ...
... equals approximately 0.3 meters). If it isn't use and press ENTER. After completing Auto Surround Setup, we recommend putting them at the same distance. Speaker Distance Manual LEFT [10.0ft ] CENTER [ 9.0ft ] RIGHT [10.0ft ] SURROUND R [ 8 . 6 f t ] SURR BACK R [ 7 . 0 f t ...] Your Speaker Systems " Normal Surround " 1 ACOUSTIC CAL EQ should get the first Acoustic Calibration EQ screen on your normal listening position. You should be adjusted manually. Speaker Distance Manual LEFT [ 10.0ft ] CENTER [ 9.0ft ] RIGHT [ 10.0ft ] SURROUND R [ 8 . 6 f t ] SURR BACK R [ 7 . ...

Owner's Manual
Page 46
... 5 Use the 2 3 buttons to select the frequency and 5∞ buttons to CHECK THE AUTO SETTINGS (see p.16) and cannot be changed manually. Changing the frequency balance of one and press ENTER. 4 2.4. If you want for the subwoofer). FRONT CH ALIGN mode (front speaker curve): All... SURROUND SETUP menu. Setting Up for home theater). indicates there is set in a poor overall level balance. WARNING : Be prepared! Acoustic Cal EQ Manual Target Curve: CUSTOM1 Channel [L •SMALL] 16k 8k 4k 2k 1k 500 250 125 63 [Return] 7 2.4. Test tone is output loudly. ...
... 5 Use the 2 3 buttons to select the frequency and 5∞ buttons to CHECK THE AUTO SETTINGS (see p.16) and cannot be changed manually. Changing the frequency balance of one and press ENTER. 4 2.4. If you want for the subwoofer). FRONT CH ALIGN mode (front speaker curve): All... SURROUND SETUP menu. Setting Up for home theater). indicates there is set in a poor overall level balance. WARNING : Be prepared! Acoustic Cal EQ Manual Target Curve: CUSTOM1 Channel [L •SMALL] 16k 8k 4k 2k 1k 500 250 125 63 [Return] 7 2.4. Test tone is output loudly. ...

Owner's Manual
Page 47
Acoustic Cal EQ Manual [Data Copy] [CUSTOM1] [CUSTOM2] Auto [ALL ADJ & FRONT ALIGN] [Return] Your Speaker Systems " Normal Surround " 3 2.4. The possible...(p.45), copy those settings from either ALL CH ADJ or F ALIGN and adjust CUSTOM1 or CUSTOM2 manually. You can also copy settings between CUSTOM1 and CUSTOM2. • The way to select RETURN and press ENTER. To... manually adjust settings go to Acoustic Calibration EQ, step 2 (P.45). 7 To leave DATA COPY mode, use the 5∞...
Acoustic Cal EQ Manual [Data Copy] [CUSTOM1] [CUSTOM2] Auto [ALL ADJ & FRONT ALIGN] [Return] Your Speaker Systems " Normal Surround " 3 2.4. The possible...(p.45), copy those settings from either ALL CH ADJ or F ALIGN and adjust CUSTOM1 or CUSTOM2 manually. You can also copy settings between CUSTOM1 and CUSTOM2. • The way to select RETURN and press ENTER. To... manually adjust settings go to Acoustic Calibration EQ, step 2 (P.45). 7 To leave DATA COPY mode, use the 5∞...

Owner's Manual
Page 49
...INPUT SELECTOR dial to select the source. The default setting for the input signal is particularly important to achieve a surround sound effect with the VSX-49TXi. button on what kind of the playback component. 2 Press the STANDBY/ON button to select the channel. 49 BASIC Each press switches ... playback. After the PHONO function the names of the models are using and what LISTENING CH SELECT (7.1/5.1/AUTO) option you want to the manual for that is selected, the i.LINK indicator lights. STANDBY indicator 3 Press the INPUT or Function button on these ideas see pages 52-55...
...INPUT SELECTOR dial to select the source. The default setting for the input signal is particularly important to achieve a surround sound effect with the VSX-49TXi. button on what kind of the playback component. 2 Press the STANDBY/ON button to select the channel. 49 BASIC Each press switches ... playback. After the PHONO function the names of the models are using and what LISTENING CH SELECT (7.1/5.1/AUTO) option you want to the manual for that is selected, the i.LINK indicator lights. STANDBY indicator 3 Press the INPUT or Function button on these ideas see pages 52-55...

Owner's Manual
Page 51
... i.LINK-equipped component. SYSTEM SETUP TAPE 2 SIGNAL MONITOR SELECT SUB 1 1 Press the SIGNAL SELECT button on what inputs are set SIGNAL SELECT to the instruction manual supplied with your DVD/LD or LD players using DIGITAL IN terminals. If your souce is not one of these formats. • When an LD...
... i.LINK-equipped component. SYSTEM SETUP TAPE 2 SIGNAL MONITOR SELECT SUB 1 1 Press the SIGNAL SELECT button on what inputs are set SIGNAL SELECT to the instruction manual supplied with your DVD/LD or LD players using DIGITAL IN terminals. If your souce is not one of these formats. • When an LD...

Owner's Manual
Page 52
... of source (Dolby Digital, DTS, etc.) is selected, the receiver automatically switches to them with any source though the latter won 't be downsampled. Check the manual that have been recorded in the threse listening modes depends on your DVD player can listen to the source audio quality as possible. The kind...
... of source (Dolby Digital, DTS, etc.) is selected, the receiver automatically switches to them with any source though the latter won 't be downsampled. Check the manual that have been recorded in the threse listening modes depends on your DVD player can listen to the source audio quality as possible. The kind...

Owner's Manual
Page 64
...CONTROL FUNCTION CH + CH - Each press switches the band: FM j AM 3 Tune in FM and AM radio broadcasts using the automatic (search) and manual (step) tuning functions. FUNCTION 1 ENTER STANDBY/ON MULTI SYSTEM OPERATION OFF MUTING MASTER VOLUME + - 2 1 Press the TUNER. On the remote, this...64 If you already know the exact frequency of the station you how to locate other stations. Repeat to tune in the station. For Manual Tuning • To change frequencies one second, then release. VOL + VOL - The tuner starts searching the selected band and stop ...
...CONTROL FUNCTION CH + CH - Each press switches the band: FM j AM 3 Tune in FM and AM radio broadcasts using the automatic (search) and manual (step) tuning functions. FUNCTION 1 ENTER STANDBY/ON MULTI SYSTEM OPERATION OFF MUTING MASTER VOLUME + - 2 1 Press the TUNER. On the remote, this...64 If you already know the exact frequency of the station you how to locate other stations. Repeat to tune in the station. For Manual Tuning • To change frequencies one second, then release. VOL + VOL - The tuner starts searching the selected band and stop ...


