
Owner's Manual
Page 6
...12 1) Your Home System 12 2) The Source Material 12 3) The Listening Modes 12 Conclusion 12 1 Hooking Up Your DVD Player & TV 13 2 Speaker Connections 14 3 Setting up the Main Unit 15 4 Assigning the Digital Inputs 15 Quick Start Guide Part 2 16 1 Auto Surround Sound Setup 16 2 Playing ... i.LINK Interface 30 What is i.LINK 30 Connecting i.LINK-equipped Components 30 Creating an i.LINK Network 31 Displays & Controls 32 Front Panel 32 Back Panel 34 Remote Control 36 Basic Receiver LCD Screens 37 Receiver MAIN Screen 37 Receiver SUB Screen 38 Display 39 Setting Up for Surround...
...12 1) Your Home System 12 2) The Source Material 12 3) The Listening Modes 12 Conclusion 12 1 Hooking Up Your DVD Player & TV 13 2 Speaker Connections 14 3 Setting up the Main Unit 15 4 Assigning the Digital Inputs 15 Quick Start Guide Part 2 16 1 Auto Surround Sound Setup 16 2 Playing ... i.LINK Interface 30 What is i.LINK 30 Connecting i.LINK-equipped Components 30 Creating an i.LINK Network 31 Displays & Controls 32 Front Panel 32 Back Panel 34 Remote Control 36 Basic Receiver LCD Screens 37 Receiver MAIN Screen 37 Receiver SUB Screen 38 Display 39 Setting Up for Surround...

Owner's Manual
Page 7
...Setup 76 Stereo playback in another room 76 Bi-amping the front speakers 76 Bi-wiring your speakers 76 Switching A/B Speaker System 77 Connecting Additional Amplifiers 78 Pre Out Power Setup 79 Using an separate stereo pre-amplifier 79 Using a separate power amplifier for main room stereo... sound 79 Multi-Room 80 MULTI-ROOM connections 80 MULTI-ROOM setup 81 Controlling the MULTI-ROOM system from the main room 82 Controlling the MULTI-ROOM system from the sub room 83 The PIONEER SR System: Operating other PIONEER components 84 Multi Operations 85 Performing multi operations...
...Setup 76 Stereo playback in another room 76 Bi-amping the front speakers 76 Bi-wiring your speakers 76 Switching A/B Speaker System 77 Connecting Additional Amplifiers 78 Pre Out Power Setup 79 Using an separate stereo pre-amplifier 79 Using a separate power amplifier for main room stereo... sound 79 Multi-Room 80 MULTI-ROOM connections 80 MULTI-ROOM setup 81 Controlling the MULTI-ROOM system from the main room 82 Controlling the MULTI-ROOM system from the sub room 83 The PIONEER SR System: Operating other PIONEER components 84 Multi Operations 85 Performing multi operations...

Owner's Manual
Page 13
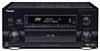
... (DVD /LD) 2RF IN (DVD /LD) (For LD) ASSIGNABLE FRONT R SURROUND R AUDIO POWER AMP R L IN FRONT L R L CENTER 1 (Single) R R SUB W. QUICK START GUIDE Quick Start Guide Part1 Before making or changing the connections, switch off the power and disconnect the power cord from a DVD player, you should also... make one of digital terminal you used for this receiver. For coaxial connections you can use Dolby Digital/DTS soundtracks you can hook it up using DIGITAL IN 1. L LR MULTI CH INPUT SUB W. optical cord VIDEO INPUT 13 Also hook up your local stereo store...
... (DVD /LD) 2RF IN (DVD /LD) (For LD) ASSIGNABLE FRONT R SURROUND R AUDIO POWER AMP R L IN FRONT L R L CENTER 1 (Single) R R SUB W. QUICK START GUIDE Quick Start Guide Part1 Before making or changing the connections, switch off the power and disconnect the power cord from a DVD player, you should also... make one of digital terminal you used for this receiver. For coaxial connections you can use Dolby Digital/DTS soundtracks you can hook it up using DIGITAL IN 1. L LR MULTI CH INPUT SUB W. optical cord VIDEO INPUT 13 Also hook up your local stereo store...

Owner's Manual
Page 14
... make sure that not even one surround back speaker hook it could short out the receiver. • If you have a center speaker you connect the speaker on the right to be done automatically by following the Auto Surround Sound Setup instructions from the center speaker. Make sure you must... left & right; The diagram below in (10mm) 3 Tighten terminal. L LR MULTI CH INPUT SUB W. If you have three hook up the speakers you only have to the A speaker terminals on the back of surround speakers connect them up to the left to hook up all the sound channels on speaker placement...
... make sure that not even one surround back speaker hook it could short out the receiver. • If you have a center speaker you connect the speaker on the right to be done automatically by following the Auto Surround Sound Setup instructions from the center speaker. Make sure you must... left & right; The diagram below in (10mm) 3 Tighten terminal. L LR MULTI CH INPUT SUB W. If you have three hook up the speakers you only have to the A speaker terminals on the back of surround speakers connect them up to the left to hook up all the sound channels on speaker placement...
Owner's Manual
Page 15
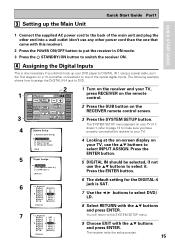
...IN 4 jack to your TV). 4 Looking at the on-screen display on your TV, press RECEIVER on the remote control. 2 Press the SUB button on the RECEIVER remote control screen. 3 Press the SYSTEM SETUP button. SIGNAL SELECT REMOTE SETUP CD CD-R/ TAPE1 TUNER VIDEO SAT TV CONTROL...] RF IN [ DVD/LD ] [Return] 1.1. Press the ENTER button. 6 The default setting for the DIGITAL-4 jack is only necessary if you have properly connected the receiver to DVD. 1 3 2 RECEIVER DVD/LD Receiver TONE BASS/ ATREBLE VCR1 /DVR VCR2 VCR3 TV DISPLAY DIMMER STATUS SYSTEM SETUP VIDEO SELECT SPEAKER A/B MAIN...
...IN 4 jack to your TV). 4 Looking at the on-screen display on your TV, press RECEIVER on the remote control. 2 Press the SUB button on the RECEIVER remote control screen. 3 Press the SYSTEM SETUP button. SIGNAL SELECT REMOTE SETUP CD CD-R/ TAPE1 TUNER VIDEO SAT TV CONTROL...] RF IN [ DVD/LD ] [Return] 1.1. Press the ENTER button. 6 The default setting for the DIGITAL-4 jack is only necessary if you have properly connected the receiver to DVD. 1 3 2 RECEIVER DVD/LD Receiver TONE BASS/ ATREBLE VCR1 /DVR VCR2 VCR3 TV DISPLAY DIMMER STATUS SYSTEM SETUP VIDEO SELECT SPEAKER A/B MAIN...
Owner's Manual
Page 16
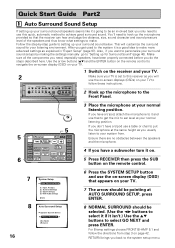
... sound setups by -step guide to make . RETURN brings you do the steps described here. Expert Setup] [4. If you have been properly connected before you back to "Setting up for your listening environment. You'll need , especially speakers, have a tripod, attach the microphone to it...5 6 5 RECEIVER DVD/LD Receiver TONE BASS/ ATREBLE VCR1 /DVR VCR2 VCR3 TV DISPLAY DIMMER STATUS SYSTEM SETUP VIDEO SELECT SPEAKER A/B MAIN SUB EFFECT/ CH SEL. SIGNAL SELECT REMOTE SETUP CD CD-R/ TAPE1 TUNER VIDEO SAT TV CONTROL 3 Place the microphone at your normal listening position. ...
... sound setups by -step guide to make . RETURN brings you do the steps described here. Expert Setup] [4. If you have been properly connected before you back to "Setting up for your listening environment. You'll need , especially speakers, have a tripod, attach the microphone to it...5 6 5 RECEIVER DVD/LD Receiver TONE BASS/ ATREBLE VCR1 /DVR VCR2 VCR3 TV DISPLAY DIMMER STATUS SYSTEM SETUP VIDEO SELECT SPEAKER A/B MAIN SUB EFFECT/ CH SEL. SIGNAL SELECT REMOTE SETUP CD CD-R/ TAPE1 TUNER VIDEO SAT TV CONTROL 3 Place the microphone at your normal listening position. ...

Owner's Manual
Page 17
.... If you want to the speakers out of each speaker individually. If you see the SPEAKER SYSTEMS CHECK screen. 10 Auto Surround Setup •Connect microphone •Please be quiet •Move obstacles away •If you have a subwoofer make sure it has finished, you see an ERR ...message in the right side column, there may be a problem with the speaker connection. FRONT [ YES ] CENTER [ YES ] SURROUND [ YES ] SURR BACK [ YESX2] SUB WOOFER [ YES ] [OK,Go Next] [Retry] [ERR Fix SP.] [Return to step 13. If not, simply go ...
.... If you want to the speakers out of each speaker individually. If you see the SPEAKER SYSTEMS CHECK screen. 10 Auto Surround Setup •Connect microphone •Please be quiet •Move obstacles away •If you have a subwoofer make sure it has finished, you see an ERR ...message in the right side column, there may be a problem with the speaker connection. FRONT [ YES ] CENTER [ YES ] SURROUND [ YES ] SURR BACK [ YESX2] SUB WOOFER [ YES ] [OK,Go Next] [Retry] [ERR Fix SP.] [Return to step 13. If not, simply go ...
Owner's Manual
Page 19
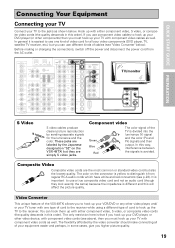
... affect the picture quality. L LR MULTI CH INPUT SUB W. These jacks are simply S video jacks. The color on the VSX-49TXi but also the lowest quality. The flexibility afforded by the video converter should make connecting all your TV tuner with one type of cord to... SURROUND R VIDEO IN COMPONENT VIDEO Y SPEAKERS ª ı· L (Single) PB S-VIDEO L SUR- Video Converter This unique feature of the VSX-49TXi allows you higher picture quality. 19 In general it from the AC outlet. ROUND BACK R PR R SPEAKERS S Video S video cables produce clearer picture ...
... affect the picture quality. L LR MULTI CH INPUT SUB W. These jacks are simply S video jacks. The color on the VSX-49TXi but also the lowest quality. The flexibility afforded by the video converter should make connecting all your TV tuner with one type of cord to... SURROUND R VIDEO IN COMPONENT VIDEO Y SPEAKERS ª ı· L (Single) PB S-VIDEO L SUR- Video Converter This unique feature of the VSX-49TXi allows you higher picture quality. 19 In general it from the AC outlet. ROUND BACK R PR R SPEAKERS S Video S video cables produce clearer picture ...

Owner's Manual
Page 20
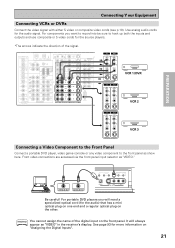
.... We recommand you hook up your DVD/LD player using component video cable connections you hook up your audio with analog connections as well. Connecting Y our Equipment Connecting Video Components Connect your video components to the jacks as shown on previous page. If you ...LD) (For LD) ASSIGNABLE FRONT R SURROUND R AUDIO POWER AMP R L IN FRONT L R L CENTER 1 (Single) R R SUB W. A DVD/LD player or LD player requires a specialized 2 RF connection (shown at the very top of the signal. If you must hook up your components with multi channel analog output, see...
.... We recommand you hook up your DVD/LD player using component video cable connections you hook up your audio with analog connections as well. Connecting Y our Equipment Connecting Video Components Connect your video components to the jacks as shown on previous page. If you ...LD) (For LD) ASSIGNABLE FRONT R SURROUND R AUDIO POWER AMP R L IN FRONT L R L CENTER 1 (Single) R R SUB W. A DVD/LD player or LD player requires a specialized 2 RF connection (shown at the very top of the signal. If you must hook up your components with multi channel analog output, see...
Owner's Manual
Page 21
... want to record into be sure to the front panel as show here. For components you will always appear as "VIDEO." Front video connections are accessed via the front panel input selector as "VIDEO" in the receiver's display. DIGITAL PCM/2DIGITAL /DTS 2 OUT S400 (AUDIO... (DVD /LD) 2RF IN (DVD /LD) (For LD) ASSIGNABLE FRONT R SURROUND R AUDIO POWER AMP R L IN FRONT L R L CENTER 1 (Single) R R SUB W. It will need a specialized optical cord (for the source players. *The arrows indicate the direction of the digital input on "Assigning the Digital Inputs". 21...
... want to record into be sure to the front panel as show here. For components you will always appear as "VIDEO." Front video connections are accessed via the front panel input selector as "VIDEO" in the receiver's display. DIGITAL PCM/2DIGITAL /DTS 2 OUT S400 (AUDIO... (DVD /LD) 2RF IN (DVD /LD) (For LD) ASSIGNABLE FRONT R SURROUND R AUDIO POWER AMP R L IN FRONT L R L CENTER 1 (Single) R R SUB W. It will need a specialized optical cord (for the source players. *The arrows indicate the direction of the digital input on "Assigning the Digital Inputs". 21...

Owner's Manual
Page 22
...IN PLAY 1 IN (DVD /LD) 2RF IN (DVD /LD) (For LD) ASSIGNABLE FRONT R SURROUND R AUDIO POWER AMP R L IN FRONT L R L CENTER 1 (Single) R R SUB W. We recommend hooking up your digital connections are different than the default settings you must hook up any of the TV signal. L LR MULTI CH INPUT... SUB W. PRE OUT 2 SURROUND L SURROUND BACK L (Single) CENTER SURROUND BACK L (Single) CONTROL IN MULTIROOM & SOURCE DVD /LD IN TV IN ...
...IN PLAY 1 IN (DVD /LD) 2RF IN (DVD /LD) (For LD) ASSIGNABLE FRONT R SURROUND R AUDIO POWER AMP R L IN FRONT L R L CENTER 1 (Single) R R SUB W. We recommend hooking up your digital connections are different than the default settings you must hook up any of the TV signal. L LR MULTI CH INPUT... SUB W. PRE OUT 2 SURROUND L SURROUND BACK L (Single) CENTER SURROUND BACK L (Single) CONTROL IN MULTIROOM & SOURCE DVD /LD IN TV IN ...

Owner's Manual
Page 23
...LD) ASSIGNABLE FRONT R SURROUND R AUDIO POWER AMP R L IN FRONT L R L CENTER 1 (Single) R R SUB W. PREPARATION PREPARATION Connecting Your Equipment Connecting Analog Audio Components Connect your turntable has a ground wire, connect it up any other component to the PHONO jacks other than a turntable. These are all analog...it to hook up one set of the audio signal. L LR MULTI CH INPUT SUB W. If your analog audio components (turntable, cassette deck) use these analog connections. Connect red plugs to L R (right) and white plugs to insert completely. 23 R...
...LD) ASSIGNABLE FRONT R SURROUND R AUDIO POWER AMP R L IN FRONT L R L CENTER 1 (Single) R R SUB W. PREPARATION PREPARATION Connecting Your Equipment Connecting Analog Audio Components Connect your turntable has a ground wire, connect it up any other component to the PHONO jacks other than a turntable. These are all analog...it to hook up one set of the audio signal. L LR MULTI CH INPUT SUB W. If your analog audio components (turntable, cassette deck) use these analog connections. Connect red plugs to L R (right) and white plugs to insert completely. 23 R...

Owner's Manual
Page 24
... (TV) IN PLAY 1 IN (DVD /LD) 2RF IN (DVD /LD) (For LD) ASSIGNABLE FRONT R SURROUND R AUDIO POWER AMP R L IN FRONT L R L CENTER 1 (Single) R R SUB W. If you have surround back outputs, it to the Multi Channel Analog Inputs (DVD-A or SACD compatible player) If you experience noise, move the cassette... receiver. Note that if your cassette deck which have a DVD-A or SACD compatible player, or are using an external Dolby Digital/DTS decoder, connect it is possible to be selected. To be able to hear MULTI CH INPUT sources the proper mode has to create a 6 or 7 channel...
... (TV) IN PLAY 1 IN (DVD /LD) 2RF IN (DVD /LD) (For LD) ASSIGNABLE FRONT R SURROUND R AUDIO POWER AMP R L IN FRONT L R L CENTER 1 (Single) R R SUB W. If you have surround back outputs, it to the Multi Channel Analog Inputs (DVD-A or SACD compatible player) If you experience noise, move the cassette... receiver. Note that if your cassette deck which have a DVD-A or SACD compatible player, or are using an external Dolby Digital/DTS decoder, connect it is possible to be selected. To be able to hear MULTI CH INPUT sources the proper mode has to create a 6 or 7 channel...
Owner's Manual
Page 25
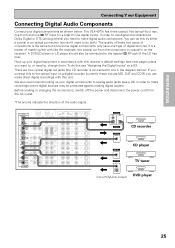
Hook up your digital components to analog audio jacks (see p.23) in on the receiver). L LR MULTI CH INPUT SUB W. If you connect this receiver's default settings (see "Assigning the Digital Inputs" on a digital recorder (currently these two types of nine digital inputs. A DVD/LD player or...(among others) you want to, or need to the optical input on p.93. To do this by either a coaxial or an optical connection (you can do this unit. The VSX-49TXi has three coaxial, five optical (four rear, one front) and one ). The quality of these include MD, DAT and CD-R) you ...
Hook up your digital components to analog audio jacks (see p.23) in on the receiver). L LR MULTI CH INPUT SUB W. If you connect this receiver's default settings (see "Assigning the Digital Inputs" on a digital recorder (currently these two types of nine digital inputs. A DVD/LD player or...(among others) you want to, or need to the optical input on p.93. To do this by either a coaxial or an optical connection (you can do this unit. The VSX-49TXi has three coaxial, five optical (four rear, one front) and one ). The quality of these include MD, DAT and CD-R) you ...
Owner's Manual
Page 28
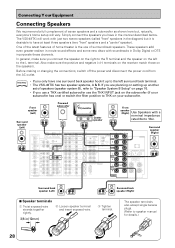
... exposed wire. 3/8 in(10mm) 3 Tighten terminal. The VSX-49TXi will vary. Also make sure you have at least three speakers (two "front" speakers and a "center" speaker). memo • If you use a THX certified subwoofer use of surround back speakers. L LR MULTI CH INPUT SUB W. Connecting Y our Equipment Connecting Speakers We recommend a full complement of seven...
... exposed wire. 3/8 in(10mm) 3 Tighten terminal. The VSX-49TXi will vary. Also make sure you have at least three speakers (two "front" speakers and a "center" speaker). memo • If you use a THX certified subwoofer use of surround back speakers. L LR MULTI CH INPUT SUB W. Connecting Y our Equipment Connecting Speakers We recommend a full complement of seven...

Owner's Manual
Page 30
... instructions that came with your i.LINK connector comes into contact with metallic parts of audio and audio/visual equipment. So when you 've connected the video signals (see p.19) to available VIDEO IN terminals. PRE OUT 2 SURROUND L SURROUND BACK L (Single) CENTER SURROUND BACK...(DVD /LD) 2RF IN (DVD /LD) (For LD) ASSIGNABLE FRONT R SURROUND R AUDIO POWER AMP R L IN FRONT L R L CENTER 1 (Single) R R SUB W. A single i.LINK connector can connect it to connect i.LINK-equipped components. The i.LINK interface does not transmit video signals. Please take care to...
... instructions that came with your i.LINK connector comes into contact with metallic parts of audio and audio/visual equipment. So when you 've connected the video signals (see p.19) to available VIDEO IN terminals. PRE OUT 2 SURROUND L SURROUND BACK L (Single) CENTER SURROUND BACK...(DVD /LD) 2RF IN (DVD /LD) (For LD) ASSIGNABLE FRONT R SURROUND R AUDIO POWER AMP R L IN FRONT L R L CENTER 1 (Single) R R SUB W. A single i.LINK connector can connect it to connect i.LINK-equipped components. The i.LINK interface does not transmit video signals. Please take care to...

Owner's Manual
Page 34
... (see p.25) Use these terminals to a sub-system in a secondary room. L LR MULTI CH INPUT SUB W. To do so. 7 U-shaped connectors 8 PRE OUT analog terminals Use these terminals to input a multichannel surround signal (for connection to a different power amplifier (see p.78). Displays...LD) ASSIGNABLE FRONT R SURROUND R AUDIO POWER AMP R L IN FRONT L R L CENTER 1 (Single) R R SUB W. If you don't connect as both input and output (see p.30). 6 POWER AMP IN terminals Use this terminal to connect an external control amp to this receiver. These are analog jacks. 34 5. (AUDIO) -
... (see p.25) Use these terminals to a sub-system in a secondary room. L LR MULTI CH INPUT SUB W. To do so. 7 U-shaped connectors 8 PRE OUT analog terminals Use these terminals to input a multichannel surround signal (for connection to a different power amplifier (see p.78). Displays...LD) ASSIGNABLE FRONT R SURROUND R AUDIO POWER AMP R L IN FRONT L R L CENTER 1 (Single) R R SUB W. If you don't connect as both input and output (see p.30). 6 POWER AMP IN terminals Use this terminal to connect an external control amp to this receiver. These are analog jacks. 34 5. (AUDIO) -

Owner's Manual
Page 35
... up heavy equipment (like bi-amping or bi-wiring see p.80) Use these terminals to hook up a sub-system in different rooms. 14 COMPONENT VIDEO IN terminals Use these terminals to take advantage of connection. If you use these terminals you need to complete "Assigning the Component Video Inputs" (see p.14, 28... OUTLET AC IN SPEAKERS ª ı· L R 14 15 17 18 11 CONTROL IN/OUT terminal You can use this jack to hook up other PIONEER equipment, that bears the Î mark, so that you can control them all pointing the remote control(s) at one that has the possibility on inputting...
... up heavy equipment (like bi-amping or bi-wiring see p.80) Use these terminals to hook up a sub-system in different rooms. 14 COMPONENT VIDEO IN terminals Use these terminals to take advantage of connection. If you use these terminals you need to complete "Assigning the Component Video Inputs" (see p.14, 28... OUTLET AC IN SPEAKERS ª ı· L R 14 15 17 18 11 CONTROL IN/OUT terminal You can use this jack to hook up other PIONEER equipment, that bears the Î mark, so that you can control them all pointing the remote control(s) at one that has the possibility on inputting...

Owner's Manual
Page 38
...the different video input possibilities. 6 SPEAKER A/B button (see p.77) Use to match sound with slower video displays (see p.58). Displays & Controls Receiver SUB Screen 1 Receiver MAIN SUB TONE BASS/ TREBLE - 2 DISPLAY VIDEO DIMMER SELECT EFFECT/ CH SEL. 3 STATUS SPEAKER A/B LOUDNESS INPUT ATT. 0 4 SYSTEM SETUP TAPE 2 SIGNAL... information see "Setting up for all modes except THX). 8 TAPE 2 MONITOR button Selects the tape deck (or MD recorder, etc.) connected to p.76. 7 LOUDNESS button (see p.57) Switches the LOUDNESS mode on or off . button Use to lower the input level of...
...the different video input possibilities. 6 SPEAKER A/B button (see p.77) Use to match sound with slower video displays (see p.58). Displays & Controls Receiver SUB Screen 1 Receiver MAIN SUB TONE BASS/ TREBLE - 2 DISPLAY VIDEO DIMMER SELECT EFFECT/ CH SEL. 3 STATUS SPEAKER A/B LOUDNESS INPUT ATT. 0 4 SYSTEM SETUP TAPE 2 SIGNAL... information see "Setting up for all modes except THX). 8 TAPE 2 MONITOR button Selects the tape deck (or MD recorder, etc.) connected to p.76. 7 LOUDNESS button (see p.57) Switches the LOUDNESS mode on or off . button Use to lower the input level of...

Owner's Manual
Page 40
... hookup see p.43 & 44) Use to the front panel of speakers you made in a particular menu, press ENTER. If you think the ones you connected. VOL + VOL - RECEIVER DVD/LD Receiver TONE BASS/ ATREBLE VCR1 /DVR VCR2 VCR3 TV DISPLAY DIMMER STATUS SYSTEM SETUP VIDEO SELECT SPEAKER A/B MAIN... sound separation and is connected and set to display the settings and choices so be the same (and take precedence over) the settings you want in the Quick Start Guide. These setup operations use on-screen displays (OSDs) on your TV to the receiver. 2 Press the SUB button on the receiver...
... hookup see p.43 & 44) Use to the front panel of speakers you made in a particular menu, press ENTER. If you think the ones you connected. VOL + VOL - RECEIVER DVD/LD Receiver TONE BASS/ ATREBLE VCR1 /DVR VCR2 VCR3 TV DISPLAY DIMMER STATUS SYSTEM SETUP VIDEO SELECT SPEAKER A/B MAIN... sound separation and is connected and set to display the settings and choices so be the same (and take precedence over) the settings you want in the Quick Start Guide. These setup operations use on-screen displays (OSDs) on your TV to the receiver. 2 Press the SUB button on the receiver...


