Owner's Manual
Page 5
... make setting up video components as a DVD player with a single cable and enjoy multichannel digital audio from DVD-Video, CD and Video CD discs. The receiver uses a revolutionary 3-D Frame Construction technique and a Symmetrical Power Train Design, with these outputs), as well as possible for the specific room you studio quality home theater sound with all existing audio formats, including the recently developed Dolby Digital Surround EX, Dolby Pro Logic II, DTS 96/24 soundtracks and DTS-ES Extended Surround...
... make setting up video components as a DVD player with a single cable and enjoy multichannel digital audio from DVD-Video, CD and Video CD discs. The receiver uses a revolutionary 3-D Frame Construction technique and a Symmetrical Power Train Design, with these outputs), as well as possible for the specific room you studio quality home theater sound with all existing audio formats, including the recently developed Dolby Digital Surround EX, Dolby Pro Logic II, DTS 96/24 soundtracks and DTS-ES Extended Surround...
Owner's Manual
Page 6
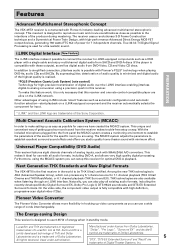
... to the Multi Channel Analog Inputs (DVD-A or SACD compatible player 24 Connecting Digital Audio Components 25 Digital Input Default Settings 26 Connecting the Radio Antennas 27 Using outdoor antennas 27 Connecting Speakers 28 Placing Your Speakers 29 Speaker placement 29 Using i.LINK Interface 30 What is i.LINK 30 Connecting i.LINK-equipped Components 30 Creating an i.LINK Network 31 Displays & Controls 32 Front Panel 32 Back Panel 34 Remote Control 36 Basic Receiver LCD Screens 37 Receiver MAIN Screen 37 Receiver SUB Screen 38 Display 39 Setting Up for Surround Sound...
... to the Multi Channel Analog Inputs (DVD-A or SACD compatible player 24 Connecting Digital Audio Components 25 Digital Input Default Settings 26 Connecting the Radio Antennas 27 Using outdoor antennas 27 Connecting Speakers 28 Placing Your Speakers 29 Speaker placement 29 Using i.LINK Interface 30 What is i.LINK 30 Connecting i.LINK-equipped Components 30 Creating an i.LINK Network 31 Displays & Controls 32 Front Panel 32 Back Panel 34 Remote Control 36 Basic Receiver LCD Screens 37 Receiver MAIN Screen 37 Receiver SUB Screen 38 Display 39 Setting Up for Surround Sound...
Owner's Manual
Page 7
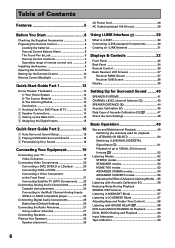
... Bi-amping the front speakers 76 Bi-wiring your speakers 76 Switching A/B Speaker System 77 Connecting Additional Amplifiers 78 Pre Out Power Setup 79 Using an separate stereo pre-amplifier 79 Using a separate power amplifier for main room stereo sound 79 Multi-Room 80 MULTI-ROOM connections 80 MULTI-ROOM setup 81 Controlling the MULTI-ROOM system from the main room 82 Controlling the MULTI-ROOM system from Audio/Video Components 75 Record monitor (TAPE 2 MONITOR 75 Speaker System B Setup 76 Stereo playback in STANDARD, STEREO and MULTI-CH INPUT modes the...
... Bi-amping the front speakers 76 Bi-wiring your speakers 76 Switching A/B Speaker System 77 Connecting Additional Amplifiers 78 Pre Out Power Setup 79 Using an separate stereo pre-amplifier 79 Using a separate power amplifier for main room stereo sound 79 Multi-Room 80 MULTI-ROOM connections 80 MULTI-ROOM setup 81 Controlling the MULTI-ROOM system from the main room 82 Controlling the MULTI-ROOM system from Audio/Video Components 75 Record monitor (TAPE 2 MONITOR 75 Speaker System B Setup 76 Stereo playback in STANDARD, STEREO and MULTI-CH INPUT modes the...
Owner's Manual
Page 12
... using . Also, a DVD player is that give you many different listening modes and they offer excellent sound and picture quality, and allow users to enjoy home theater soundtracks with anywhere from two to your system for your system is the VSX-49TX receiver and it seems so difficult is essential for home theater and you can use seven speakers and a subwoofer. Originally Dolby Digital and DTS sources had six discrete channels...
... using . Also, a DVD player is that give you many different listening modes and they offer excellent sound and picture quality, and allow users to enjoy home theater soundtracks with anywhere from two to your system for your system is the VSX-49TX receiver and it seems so difficult is essential for home theater and you can use seven speakers and a subwoofer. Originally Dolby Digital and DTS sources had six discrete channels...

Owner's Manual
Page 14
... a center speaker you must tell the receiver the center channel is designed to take full advantage of surround speakers connect them up the speakers you can be setup with fewer speakers. These speakers are important to be done automatically by following the Auto Surround Sound Setup instructions from page 16 in digital soundtracks the dialog comes from the center speaker. Front speaker (Left) Surround speaker (Left) Powered subwoofer INPUT TV/monitor Center speaker Front speaker (Right) DIGITAL PCM/2DIGITAL /DTS 2 OUT S400 (AUDIO) OUT 1 PHONO R AUDIO...
... a center speaker you must tell the receiver the center channel is designed to take full advantage of surround speakers connect them up the speakers you can be setup with fewer speakers. These speakers are important to be done automatically by following the Auto Surround Sound Setup instructions from page 16 in digital soundtracks the dialog comes from the center speaker. Front speaker (Left) Surround speaker (Left) Powered subwoofer INPUT TV/monitor Center speaker Front speaker (Right) DIGITAL PCM/2DIGITAL /DTS 2 OUT S400 (AUDIO) OUT 1 PHONO R AUDIO...
Owner's Manual
Page 19
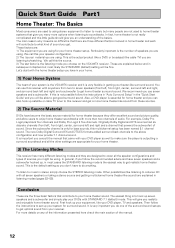
... lowest quality. L LR MULTI CH INPUT SUB W. Component video Green Blue Red The color signal of function information. Video Converter This unique feature of the VSX-49TX allows you to hook up your VCR/DVD or any other video player, and/ or your TV tuner with one kind of cables (see above), then you must hook up your TV with component video cables as well. DIGITAL PCM/2DIGITAL /DTS 2 OUT S400 (AUDIO) OUT 1 PHONO R AUDIO L OUT IN...
... lowest quality. L LR MULTI CH INPUT SUB W. Component video Green Blue Red The color signal of function information. Video Converter This unique feature of the VSX-49TX allows you to hook up your VCR/DVD or any other video player, and/ or your TV tuner with one kind of cables (see above), then you must hook up your TV with component video cables as well. DIGITAL PCM/2DIGITAL /DTS 2 OUT S400 (AUDIO) OUT 1 PHONO R AUDIO L OUT IN...

Owner's Manual
Page 20
... will need to assign the digital jacks to the proper component(s) with the "Assigning 20 the Component Video Input" procedure (see p.94). We recommand you hook up your audio with multi channel analog output, see "Connecting to a terminal other than the default settings you will ensure you can use digital soundtracks like above), you must hook up the 2 RF connection as well (with analog audio connections as well. DIGITAL PCM/2DIGITAL /DTS 2 OUT S400 (AUDIO) OUT 1 PHONO R AUDIO L OUT IN...
... will need to assign the digital jacks to the proper component(s) with the "Assigning 20 the Component Video Input" procedure (see p.94). We recommand you hook up your audio with multi channel analog output, see "Connecting to a terminal other than the default settings you will ensure you can use digital soundtracks like above), you must hook up the 2 RF connection as well (with analog audio connections as well. DIGITAL PCM/2DIGITAL /DTS 2 OUT S400 (AUDIO) OUT 1 PHONO R AUDIO L OUT IN...

Owner's Manual
Page 22
... (CD) REC TAPE2 MONITOR 2 IN (TV) IN PLAY 1 IN (DVD /LD) 2RF IN (DVD /LD) (For LD) ASSIGNABLE FRONT R SURROUND R AUDIO POWER AMP R L IN FRONT L R L CENTER 1 (Single) R R SUB W. Connecting Your Equipment Connecting Satellite TV (SAT) Components Hook up the video signal with analog cables as well (see below). We recommend hooking up a digital input. For the audio signal, in order to use component video cords to do this . PRE OUT 2 SURROUND L SURROUND BACK L (Single) CENTER SURROUND BACK L (Single) CONTROL IN MULTIROOM & SOURCE DVD /LD IN TV...
... (CD) REC TAPE2 MONITOR 2 IN (TV) IN PLAY 1 IN (DVD /LD) 2RF IN (DVD /LD) (For LD) ASSIGNABLE FRONT R SURROUND R AUDIO POWER AMP R L IN FRONT L R L CENTER 1 (Single) R R SUB W. Connecting Your Equipment Connecting Satellite TV (SAT) Components Hook up the video signal with analog cables as well (see below). We recommend hooking up a digital input. For the audio signal, in order to use component video cords to do this . PRE OUT 2 SURROUND L SURROUND BACK L (Single) CENTER SURROUND BACK L (Single) CONTROL IN MULTIROOM & SOURCE DVD /LD IN TV...
Owner's Manual
Page 25
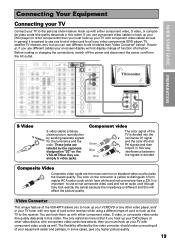
... , change them. The VSX-49TX has three coaxial, five optical (four rear, one front) and one ). PRE OUT 2 SURROUND L SURROUND BACK L (Single) CENTER SURROUND BACK L (Single) CONTROL IN MULTIROOM & SOURCE DVD /LD IN TV IN SAT IN OUT VCR1 /DVR IN MONITOR OUT OUT IN IN IN OUT IN OUT OUT VCR2 IN IN R L AUDIO OUT OUT VCR3 IN IN VIDEO S2 VIDEO DIGITAL OUTPUT (PLAY) INPUT (REC) DIGITAL DIGITAL OUTPUT DIGITAL OUTPUT DIGITAL OUTPUT CD recorder CD player TV tuner...
... , change them. The VSX-49TX has three coaxial, five optical (four rear, one front) and one ). PRE OUT 2 SURROUND L SURROUND BACK L (Single) CENTER SURROUND BACK L (Single) CONTROL IN MULTIROOM & SOURCE DVD /LD IN TV IN SAT IN OUT VCR1 /DVR IN MONITOR OUT OUT IN IN IN OUT IN OUT OUT VCR2 IN IN R L AUDIO OUT OUT VCR3 IN IN VIDEO S2 VIDEO DIGITAL OUTPUT (PLAY) INPUT (REC) DIGITAL DIGITAL OUTPUT DIGITAL OUTPUT DIGITAL OUTPUT CD recorder CD player TV tuner...
Owner's Manual
Page 28
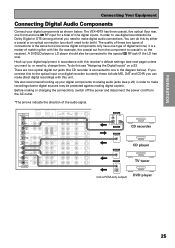
... in movie sound effects and some new discs with a nominal impedance rated 6Ω to have in the diagram) but , naturally, everyone's home setup will work with just two stereo speakers (called "front" speakers in the manner described below. Before making or changing the connections, switch off the power and disconnect the power cord from the AC outlet. Front speaker (Left) Surround speaker (Left) Powered subwoofer INPUT TV/monitor Center speaker DIGITAL PCM/2DIGITAL /DTS 2 OUT S400 (AUDIO) OUT 1 PHONO R AUDIO L OUT IN...
... in movie sound effects and some new discs with a nominal impedance rated 6Ω to have in the diagram) but , naturally, everyone's home setup will work with just two stereo speakers (called "front" speakers in the manner described below. Before making or changing the connections, switch off the power and disconnect the power cord from the AC outlet. Front speaker (Left) Surround speaker (Left) Powered subwoofer INPUT TV/monitor Center speaker DIGITAL PCM/2DIGITAL /DTS 2 OUT S400 (AUDIO) OUT 1 PHONO R AUDIO L OUT IN...

Owner's Manual
Page 36
... components/functions. 1 23 4 5 6 LIGHT RECEIVER DVD/LD VCR1 /DVR VCR2 VCR3 TV REMOTE SETUP CD CD-R/ TAPE1 TUNER VIDEO SAT TV CONTROL use keep it anywhere on the screen 1 STANDBY/ON button Press to turn the power of the TV. 36 9 INPUT button Press to select a source. In the SYSTEM SETUP menu, the 5˜∞ buttons can be use the MULTI OPERATION mode. ! 5˜∞˜2˜3˜ENTER buttons These buttons can be used to adjust CHANNEL DELAY or CHANNEL LEVEL. VOL +/- : Press to control...
... components/functions. 1 23 4 5 6 LIGHT RECEIVER DVD/LD VCR1 /DVR VCR2 VCR3 TV REMOTE SETUP CD CD-R/ TAPE1 TUNER VIDEO SAT TV CONTROL use keep it anywhere on the screen 1 STANDBY/ON button Press to turn the power of the TV. 36 9 INPUT button Press to select a source. In the SYSTEM SETUP menu, the 5˜∞ buttons can be use the MULTI OPERATION mode. ! 5˜∞˜2˜3˜ENTER buttons These buttons can be used to adjust CHANNEL DELAY or CHANNEL LEVEL. VOL +/- : Press to control...
Owner's Manual
Page 40
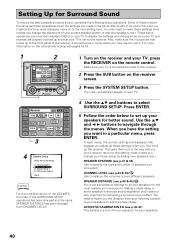
...operations use lock TV CONTROL FUNCTION CH + CH - SIGNAL SELECT REMOTE SETUP CD CD-R/ TAPE1 TUNER VIDEO SAT TV CONTROL 3 4 System Setup [Auto Surround Setup] [1. Some of your different speakers. Input Assign ] [2. Setting Up for the most realistic surround sound. If you think the ones you connected. For more information on the receiver screen. 3 Press the SYSTEM SETUP button. CHANNEL LEVEL (see pages 16-18. 1 2 LIGHT RECEIVER DVD/LD VCR1 /DVR VCR2 Receiver MAIN SUB REMOTE SETUP LISTENING MODE SURROUND STEREO /DIRECT THX STANDARD (DVD-A /SACD) MULTI...
...operations use lock TV CONTROL FUNCTION CH + CH - SIGNAL SELECT REMOTE SETUP CD CD-R/ TAPE1 TUNER VIDEO SAT TV CONTROL 3 4 System Setup [Auto Surround Setup] [1. Some of your different speakers. Input Assign ] [2. Setting Up for the most realistic surround sound. If you think the ones you connected. For more information on the receiver screen. 3 Press the SYSTEM SETUP button. CHANNEL LEVEL (see pages 16-18. 1 2 LIGHT RECEIVER DVD/LD VCR1 /DVR VCR2 Receiver MAIN SUB REMOTE SETUP LISTENING MODE SURROUND STEREO /DIRECT THX STANDARD (DVD-A /SACD) MULTI...
Owner's Manual
Page 49
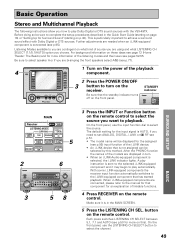
... lights. A play instruction is connected (see p.77). 4 LIGHT RECEIVER DVD/LD VCR1 /DVR VCR2 VCR3 TV REMOTE SETUP CD CD-R/ TAPE1 TUNER VIDEO SAT TV CONTROL use lock TV CONTROL FUNCTION CH + CH - When i.LINK-equipped components are bi-amping the front speakers select A&B (see p.95). STANDBY indicator ENTER STANDBY/ON MULTI SYSTEM OPERATION OFF MUTING MASTER VOLUME + - After the PHONO function the names of the playback component. 2 Press the POWER ON/OFF 3 button to select the channel. 49 Further adjustments are displayed in turn...
... lights. A play instruction is connected (see p.77). 4 LIGHT RECEIVER DVD/LD VCR1 /DVR VCR2 VCR3 TV REMOTE SETUP CD CD-R/ TAPE1 TUNER VIDEO SAT TV CONTROL use lock TV CONTROL FUNCTION CH + CH - When i.LINK-equipped components are bi-amping the front speakers select A&B (see p.95). STANDBY indicator ENTER STANDBY/ON MULTI SYSTEM OPERATION OFF MUTING MASTER VOLUME + - After the PHONO function the names of the playback component. 2 Press the POWER ON/OFF 3 button to select the channel. 49 Further adjustments are displayed in turn...

Owner's Manual
Page 79
...LR MULTI CH INPUT SUB W. For stereo sources connected directly to a stereo input on the power amp. For digital sources connected to this receiver, the receiver acts as a digital decoder/digital-to-analog converter and as a power amplifier. 1 Remove the U-shaped connectors that connect the PRE OUT jacks to the POWER IN jacks. 2 Use a stereo RCA audio cable to connect the PRE OUT jacks of this receiver. 4 Connect the main room speakers to the FRONT POWER AMP IN jack of the pre-amp to the speaker outputs on the pre-amp. Use any input except phono. 3 Use a stereo RCA audio cable to...
...LR MULTI CH INPUT SUB W. For stereo sources connected directly to a stereo input on the power amp. For digital sources connected to this receiver, the receiver acts as a digital decoder/digital-to-analog converter and as a power amplifier. 1 Remove the U-shaped connectors that connect the PRE OUT jacks to the POWER IN jacks. 2 Use a stereo RCA audio cable to connect the PRE OUT jacks of this receiver. 4 Connect the main room speakers to the FRONT POWER AMP IN jack of the pre-amp to the speaker outputs on the pre-amp. Use any input except phono. 3 Use a stereo RCA audio cable to...
Owner's Manual
Page 81
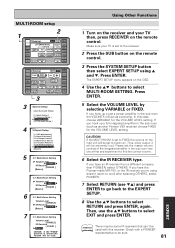
SIGNAL SELECT REMOTE SETUP CD CD-R/ TAPE1 TUNER VIDEO SAT TV CONTROL 3 3 System Setup [Auto Surround Setup] [1. Bass Peak Level ] [3. Multi-Ch In Select ] [5. Hi-bit/Hi-Sampling ] [7. Multi-Room Setting Volume Level [ FIXED ] IR Receiver [PIONEER ] [Return] 6 3.7. If you hook up a just a power amplifier in the sub room very low at first and experiment to select EXIT and press ENTER. If you hook up a full integrated amplifier in the sub room (such as a pre-amp. If you 're using 5 and ∞. LOUDNESS TAPE 2 MONITOR INPUT ATT. Input Assign ] [2. Expert...
SIGNAL SELECT REMOTE SETUP CD CD-R/ TAPE1 TUNER VIDEO SAT TV CONTROL 3 3 System Setup [Auto Surround Setup] [1. Bass Peak Level ] [3. Multi-Ch In Select ] [5. Hi-bit/Hi-Sampling ] [7. Multi-Room Setting Volume Level [ FIXED ] IR Receiver [PIONEER ] [Return] 6 3.7. If you hook up a just a power amplifier in the sub room very low at first and experiment to select EXIT and press ENTER. If you hook up a full integrated amplifier in the sub room (such as a pre-amp. If you 're using 5 and ∞. LOUDNESS TAPE 2 MONITOR INPUT ATT. Input Assign ] [2. Expert...

Owner's Manual
Page 97
... [3. D-Range Control] [4. OSD (ON-SCREEN DISPLAY) ADJUSTMENT (p.98) This feature allows you to extend dynamic range and restore high-frequency information to fit your TV. 4 Select EXPERT SETUP with multi channel analog inputs. SIGNAL SELECT REMOTE SETUP CD CD-R/ TAPE1 TUNER VIDEO SAT TV CONTROL 3 4 System Setup [Auto Surround Setup] [1. BASS PEAK LEVEL (p.99) Dolby Digital and DTS audio sources include ultra-low bass tones. These setup operations use lock TV CONTROL FUNCTION CH + CH - FUNCTION ENTER STANDBY/ON MULTI SYSTEM OPERATION OFF MUTING MASTER VOLUME + - 1 Turn on...
... [3. D-Range Control] [4. OSD (ON-SCREEN DISPLAY) ADJUSTMENT (p.98) This feature allows you to extend dynamic range and restore high-frequency information to fit your TV. 4 Select EXPERT SETUP with multi channel analog inputs. SIGNAL SELECT REMOTE SETUP CD CD-R/ TAPE1 TUNER VIDEO SAT TV CONTROL 3 4 System Setup [Auto Surround Setup] [1. BASS PEAK LEVEL (p.99) Dolby Digital and DTS audio sources include ultra-low bass tones. These setup operations use lock TV CONTROL FUNCTION CH + CH - FUNCTION ENTER STANDBY/ON MULTI SYSTEM OPERATION OFF MUTING MASTER VOLUME + - 1 Turn on...
Owner's Manual
Page 108
... speaker system, play back of this product as DTS and Dolby Digital. If you to the currently available front left, front center, front right, surround right, surround left and subwoofer channels. In a movie theater, there is a joint development of Dolby Laboratories and the THX division of the program. In a home theater, you feel that were created using all 8 speakers the THX MusicMode provides a wide stable rear soundstage, placing surround sounds best...
... speaker system, play back of this product as DTS and Dolby Digital. If you to the currently available front left, front center, front right, surround right, surround left and subwoofer channels. In a movie theater, there is a joint development of Dolby Laboratories and the THX division of the program. In a home theater, you feel that were created using all 8 speakers the THX MusicMode provides a wide stable rear soundstage, placing surround sounds best...
Owner's Manual
Page 113
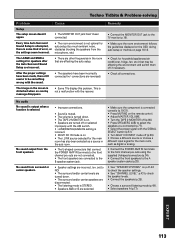
... the remote control. • Adjust MASTER VOLUME. • Turn the TAPE 2 MONITOR off (p.60). • Press SPEAKERS (A/B) to select the speakers you connected (p.77). • Select the proper signal with the SIGNAL SELECT button (p.51). • Turn MULTI CH INPUT mode off (p.59). • Choose a different source or choose a different input signal for auto setup (too much ambient noise, obstacles blocking the speakers from the front speakers. set to NO) • The surround and/or center levels are turned down . • The TAPE 2 MONITOR is...
... the remote control. • Adjust MASTER VOLUME. • Turn the TAPE 2 MONITOR off (p.60). • Press SPEAKERS (A/B) to select the speakers you connected (p.77). • Select the proper signal with the SIGNAL SELECT button (p.51). • Turn MULTI CH INPUT mode off (p.59). • Choose a different source or choose a different input signal for auto setup (too much ambient noise, obstacles blocking the speakers from the front speakers. set to NO) • The surround and/or center levels are turned down . • The TAPE 2 MONITOR is...
Owner's Manual
Page 114
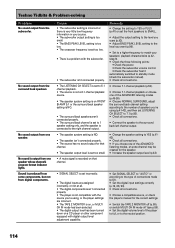
Sound is a problem with digital output level adjustment capability. • Set SIGNAL SELECT to "AUTO" or according to the type of connections made (p.51). • Set the digital input settings correctly (p.15, 26, 93). • Check all connections. • Choose a compatible source, or check the player's manual for the correct settings. • Switch the TAPE 2 MONITOR off (p.60), or switch MULTI CH IN mode off (see p.59). • Set the digital volume level of the ADVANCED listening modes, an extra channel may be...
Sound is a problem with digital output level adjustment capability. • Set SIGNAL SELECT to "AUTO" or according to the type of connections made (p.51). • Set the digital input settings correctly (p.15, 26, 93). • Check all connections. • Choose a compatible source, or check the player's manual for the correct settings. • Switch the TAPE 2 MONITOR off (p.60), or switch MULTI CH IN mode off (see p.59). • Set the digital volume level of the ADVANCED listening modes, an extra channel may be...
Owner's Manual
Page 116
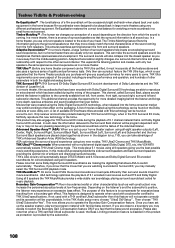
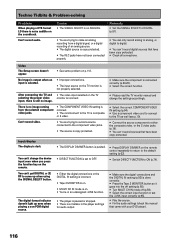
...; Fix the audio settings (check the manual that came with your DVD player). 116 The digital format indicator doesn't light up when using the SIGNAL SELECT button. There is no image. • The video input selected on the TV monitor is composite or S video. Techno Tidbits & Problem-solving Problem When playing a DTS format LD there is done correctly. • Press the Tape 2 MONITOR button so it goes into the off setting (p.60). • Turn MULTI CH IN mode...
...; Fix the audio settings (check the manual that came with your DVD player). 116 The digital format indicator doesn't light up when using the SIGNAL SELECT button. There is no image. • The video input selected on the TV monitor is composite or S video. Techno Tidbits & Problem-solving Problem When playing a DTS format LD there is done correctly. • Press the Tape 2 MONITOR button so it goes into the off setting (p.60). • Turn MULTI CH IN mode...


