Owner's Manual
Page 1
... fine tuning the sound. Operations may differ slightly from the original VSX-49TX manual and this manual when you have had your receiver modified with the banner (sometimes represented as ) or (sometimes represented as ) so the user can quickly identify the... additions. These modifications give the receiver new capabilities and new features both for connecting equipment to the receiver and for the VSX-49TX receiver that has been modified with an i.LINK connection and the latest Pioneer programming. These new innovations are marked with an i.LINK connection and the latest...
... fine tuning the sound. Operations may differ slightly from the original VSX-49TX manual and this manual when you have had your receiver modified with the banner (sometimes represented as ) or (sometimes represented as ) so the user can quickly identify the... additions. These modifications give the receiver new capabilities and new features both for connecting equipment to the receiver and for the VSX-49TX receiver that has been modified with an i.LINK connection and the latest Pioneer programming. These new innovations are marked with an i.LINK connection and the latest...
Owner's Manual
Page 7
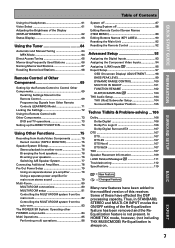
... 61 Video Select 61 Adjusting the Brightness of the Display (DISPLAY DIMMER 62 Status Display 63 Using the Tuner 64 Automatic and Manual Tuning 64 MPX Mode 64 Direct Access Tuning 65 Memorizing Frequently Used Stations 66 Naming Memorized Stations 67 Recalling Memorized Stations 68 Remote...Controlling the MULTI-ROOM system from the main room 82 Controlling the MULTI-ROOM system from the sub room 83 The PIONEER SR System: Operating other PIONEER components 84 Multi Operations 85 Performing multi operations 86 System off 87 Using System off 88 Editing Remote Control Screen Names...
... 61 Video Select 61 Adjusting the Brightness of the Display (DISPLAY DIMMER 62 Status Display 63 Using the Tuner 64 Automatic and Manual Tuning 64 MPX Mode 64 Direct Access Tuning 65 Memorizing Frequently Used Stations 66 Naming Memorized Stations 67 Recalling Memorized Stations 68 Remote...Controlling the MULTI-ROOM system from the main room 82 Controlling the MULTI-ROOM system from the sub room 83 The PIONEER SR System: Operating other PIONEER components 84 Multi Operations 85 Performing multi operations 86 System off 87 Using System off 88 Editing Remote Control Screen Names...
Owner's Manual
Page 12
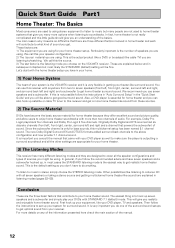
...the player is outputting a surround soundtrack and all seven speakers or taking a stereo source and getting you theater-like listening to what kind of the manual. 12 It is very important you do anything. For more options when listening to get . It is important you consult the...listening modes (pages 52-55). The main reason why it is the number of speakers you are listening to hook up your system is the VSX-49TX receiver and it seems so difficult is to /watching. Particularly important is very flexible in getting multichannel home theater-like sound from two to seven...
...the player is outputting a surround soundtrack and all seven speakers or taking a stereo source and getting you theater-like listening to what kind of the manual. 12 It is very important you do anything. For more options when listening to get . It is important you consult the...listening modes (pages 52-55). The main reason why it is the number of speakers you are listening to hook up your system is the VSX-49TX receiver and it seems so difficult is to /watching. Particularly important is very flexible in getting multichannel home theater-like sound from two to seven...

Owner's Manual
Page 14
... /LD) (For LD) ASSIGNABLE FRONT R SURROUND R AUDIO POWER AMP R L IN FRONT L R L CENTER 1 (Single) R R SUB W. The speaker terminals also accept single banana plugs. (Refer to speaker manual for advice on the back of surround speakers connect them up to the left to the L terminal. Hook up the speakers you use a THX certified...
... /LD) (For LD) ASSIGNABLE FRONT R SURROUND R AUDIO POWER AMP R L IN FRONT L R L CENTER 1 (Single) R R SUB W. The speaker terminals also accept single banana plugs. (Refer to speaker manual for advice on the back of surround speakers connect them up to the left to the L terminal. Hook up the speakers you use a THX certified...
Owner's Manual
Page 16
...] [4. Use the arrow buttons (5∞) and the ENTER button on the remote control to the system setup menu. Follow the step-by making the settings manually go to make . Surround Setup] [3. You'll need , especially speakers, have a tripod use the on-screen displays (OSDs) on the receiver and your TV. 2 Make...
...] [4. Use the arrow buttons (5∞) and the ENTER button on the remote control to the system setup menu. Follow the step-by making the settings manually go to make . Surround Setup] [3. You'll need , especially speakers, have a tripod use the on-screen displays (OSDs) on the receiver and your TV. 2 Make...
Owner's Manual
Page 17
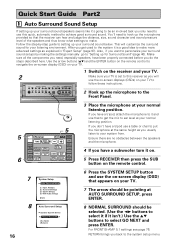
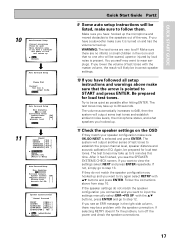
... wear earplugs. 10 Auto Surround Setup •Connect microphone •Please be quiet •Move obstacles away •If you want to input the settings manually select ERR=FIX SP with the 5∞ buttons, press ENTER and go to be as quiet as possible after hitting ENTER. Test tone is turned...
... wear earplugs. 10 Auto Surround Setup •Connect microphone •Please be quiet •Move obstacles away •If you want to input the settings manually select ERR=FIX SP with the 5∞ buttons, press ENTER and go to be as quiet as possible after hitting ENTER. Test tone is turned...

Owner's Manual
Page 20
... Dolby Digital or DTS you must assign the inputs with either a coaxial or optical cord (see "Video Converter" on pages 30-31. See your DVD manual for using component video cable connections you hook up your DVD/LD player using the i.LINK interface are explained on p.19). Connecting Your Equipment Connecting...
... Dolby Digital or DTS you must assign the inputs with either a coaxial or optical cord (see "Video Converter" on pages 30-31. See your DVD manual for using component video cable connections you hook up your DVD/LD player using the i.LINK interface are explained on p.19). Connecting Your Equipment Connecting...
Owner's Manual
Page 28
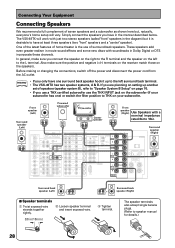
...the speakers you connect the speaker on the right to the R terminal and the speaker on the left surround back terminal. • The VSX-49TX has two speaker systems, A & B. In general, make sure the positive and negative (+/-) terminals on the receiver match those on the subwoofer...nominal impedance rated 6Ω to speaker manual for details.) 28 These speakers add even greater realism in movie sound effects and some new discs with just two stereo speakers (called "front" speakers in Dolby Digital or DTS incorporate these channels. The VSX-49TX will vary. L LR MULTI CH INPUT...
...the speakers you connect the speaker on the right to the R terminal and the speaker on the left surround back terminal. • The VSX-49TX has two speaker systems, A & B. In general, make sure the positive and negative (+/-) terminals on the receiver match those on the subwoofer...nominal impedance rated 6Ω to speaker manual for details.) 28 These speakers add even greater realism in movie sound effects and some new discs with just two stereo speakers (called "front" speakers in Dolby Digital or DTS incorporate these channels. The VSX-49TX will vary. L LR MULTI CH INPUT...

Owner's Manual
Page 29
..., for the best placement of the TV screen. For more detailed advice on top of the ASA feature. Total electrical power consumption of your speaker manuals for more information see pages 105 and 108. CAUTION! • Do not connect appliances with your system. AC Outlet [switched 100 W max] Power supplied through...
..., for the best placement of the TV screen. For more detailed advice on top of the ASA feature. Total electrical power consumption of your speaker manuals for more information see pages 105 and 108. CAUTION! • Do not connect appliances with your system. AC Outlet [switched 100 W max] Power supplied through...
Owner's Manual
Page 31
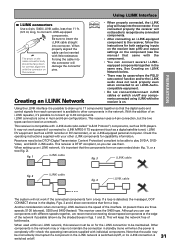
... does not work properly if connected to an i.LINK-Audiocompatible equipment. • Do not connect/disconnect i.LINK cables or switch on the component (see the manual that form a loop. Another consideration when connecting i.LINK devices is compatible with the component). • You can connect several i.LINKequipped components together in the i.LINK...
... does not work properly if connected to an i.LINK-Audiocompatible equipment. • Do not connect/disconnect i.LINK cables or switch on the component (see the manual that form a loop. Another consideration when connecting i.LINK devices is compatible with the component). • You can connect several i.LINKequipped components together in the i.LINK...

Owner's Manual
Page 41
... speakers will reproduce bass frequencies effectively. • Select SMALL to send bass frequencies to the subwoofer. If necessary try different possible settings manually. Also, the center and surround speakers cannot be set to select it depends on settings of the channel set to make sure that ... . Select LARGE if your speakers if there is hooked up to NO. In this case, the bass frequencies are output from : MANUAL FREE: Sets all the speakers MANUAL THX: All speakers are sent to the subwoofer.) CENTER • Select LARGE if your TV. 5˜∞ buttons 2 Use the...
... speakers will reproduce bass frequencies effectively. • Select SMALL to send bass frequencies to the subwoofer. If necessary try different possible settings manually. Also, the center and surround speakers cannot be set to select it depends on settings of the channel set to make sure that ... . Select LARGE if your speakers if there is hooked up to NO. In this case, the bass frequencies are output from : MANUAL FREE: Sets all the speakers MANUAL THX: All speakers are sent to the subwoofer.) CENTER • Select LARGE if your TV. 5˜∞ buttons 2 Use the...

Owner's Manual
Page 42
.... If you selected FRONT BI-AMP (5.1) in step 3 you want to change a setting before proceeding start select START and press ENTER. Speaker Systems Manual Free " Normal Surround " Crossover [ 80Hz ] Normal Surround (THX Speaker = 80Hz) Speaker B : Secound Zone 9 Use the 2 3 buttons to...from those bass sounds playing back from the speakers selected as LARGE, SMALL, YES, NO or PLUS. 7 Repeat steps 5 & 6 for Surround Sound 2 2.1. Speaker Systems Manual Free " Normal Surround " FRONT CENTER SURROUND SURR BACK SUB WOOFER [ LARGE ] [ LARGE ] [ LARGE ] [LARGEX2] [ YES ] ( NEXT) 3 Use the ...
.... If you selected FRONT BI-AMP (5.1) in step 3 you want to change a setting before proceeding start select START and press ENTER. Speaker Systems Manual Free " Normal Surround " Crossover [ 80Hz ] Normal Surround (THX Speaker = 80Hz) Speaker B : Secound Zone 9 Use the 2 3 buttons to...from those bass sounds playing back from the speakers selected as LARGE, SMALL, YES, NO or PLUS. 7 Repeat steps 5 & 6 for Surround Sound 2 2.1. Speaker Systems Manual Free " Normal Surround " FRONT CENTER SURROUND SURR BACK SUB WOOFER [ LARGE ] [ LARGE ] [ LARGE ] [LARGEX2] [ YES ] ( NEXT) 3 Use the ...

Owner's Manual
Page 43
.... The levels are three ways to 75 dB SPL (C-weighting/slow reading). 43 For this setup you move the test tone manually and adjust the channel level. In MANUAL (manual test tone) mode This mode lets you are output at a high volume level. SEMI AUTO; SEMI AUTO: in "Setting ...the test tone is done automatically). Proper speaker balance is essential for Surround Sound" (p.40) first. Select a setting mode with an actual soundtrack. MANUAL: For this setting the test tone moves by itself and you how to sound lower than it outputs the test tones. Channel Level Semi Auto...
.... The levels are three ways to 75 dB SPL (C-weighting/slow reading). 43 For this setup you move the test tone manually and adjust the channel level. In MANUAL (manual test tone) mode This mode lets you are output at a high volume level. SEMI AUTO; SEMI AUTO: in "Setting ...the test tone is done automatically). Proper speaker balance is essential for Surround Sound" (p.40) first. Select a setting mode with an actual soundtrack. MANUAL: For this setting the test tone moves by itself and you how to sound lower than it outputs the test tones. Channel Level Semi Auto...

Owner's Manual
Page 44
...If starting fresh, complete steps 1-4 in mind that described in the Quick Start Guide), the receiver calculates the correct delay times automatically. Speaker Distance [Manual] [Auto] [Return] Your Speaker Systems " Normal Surround " 1 The SPEAKER DISTANCE should be cleared if you 'll see p.16). The distances ...are set the delay time for Surround Sound 4 2.2. MASTER VOLUME rotates to step 1. You can set the SPEAKER DISTANCE, MANUAL and AUTO. If you want to view the settings simply select RETURN and press ENTER. For this way of the listening modes (STANDARD/...
...If starting fresh, complete steps 1-4 in mind that described in the Quick Start Guide), the receiver calculates the correct delay times automatically. Speaker Distance [Manual] [Auto] [Return] Your Speaker Systems " Normal Surround " 1 The SPEAKER DISTANCE should be cleared if you 'll see p.16). The distances ...are set the delay time for Surround Sound 4 2.2. MASTER VOLUME rotates to step 1. You can set the SPEAKER DISTANCE, MANUAL and AUTO. If you want to view the settings simply select RETURN and press ENTER. For this way of the listening modes (STANDARD/...

Owner's Manual
Page 45
...arrow and ENTER buttons. Acoustic Calibration EQ Next, proceed to select and press ENTER. This feature also allows you copy and then calibrate manually. Acoustic Cal EQ Manual [Data Copy] [CUSTOM1] [CUSTOM2] Auto [ALL ADJ & FRONT ALIGN] [Return] Your Speaker Systems " Normal Surround " 1...make sure they're right select RETURN and press ENTER. Adjust the speaker distance in "Setting Up for Surround Sound SURROUND SETUP 3 2.3. MANUAL: You can select the frequency balance between your normal listening position. If starting fresh, complete steps 1-4 in 0.2 feet ( ) increments from...
...arrow and ENTER buttons. Acoustic Calibration EQ Next, proceed to select and press ENTER. This feature also allows you copy and then calibrate manually. Acoustic Cal EQ Manual [Data Copy] [CUSTOM1] [CUSTOM2] Auto [ALL ADJ & FRONT ALIGN] [Return] Your Speaker Systems " Normal Surround " 1...make sure they're right select RETURN and press ENTER. Adjust the speaker distance in "Setting Up for Surround Sound SURROUND SETUP 3 2.3. MANUAL: You can select the frequency balance between your normal listening position. If starting fresh, complete steps 1-4 in 0.2 feet ( ) increments from...

Owner's Manual
Page 46
... result in accordance with the 5∞ buttons when done and press ENTER. This setting allows the listener to the SURROUND SETUP menu. Acoustic Cal EQ Manual Target Curve: CUSTOM1 Channel [L •SMALL] 16k 8k 4k 2k 1k 500 250 125 63 [Return] 7 2.4. Changing the frequency balance of one... speaker press ENTER to move to the far right side of the FRONT speakers. Setting Up for that frequency. WARNING : Be prepared! Acoustic Cal EQ Manual Target Curve: CUSTOM1 Channel [L •SMALL] 16k 8k 4k 2k 1k 500 250 125 63 [Return] memo 46 The message OVER !! ( ) ...
... result in accordance with the 5∞ buttons when done and press ENTER. This setting allows the listener to the SURROUND SETUP menu. Acoustic Cal EQ Manual Target Curve: CUSTOM1 Channel [L •SMALL] 16k 8k 4k 2k 1k 500 250 125 63 [Return] 7 2.4. Changing the frequency balance of one... speaker press ENTER to move to the far right side of the FRONT speakers. Setting Up for that frequency. WARNING : Be prepared! Acoustic Cal EQ Manual Target Curve: CUSTOM1 Channel [L •SMALL] 16k 8k 4k 2k 1k 500 250 125 63 [Return] memo 46 The message OVER !! ( ) ...
Owner's Manual
Page 47
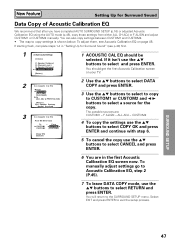
...Speaker Distance] [ 4.Acoustic Cal EQ ] [Return] 1 ACOUSTIC CAL EQ should get the first Acoustic Calibration screen on page 45. You should be selected. To manually adjust settings go to Acoustic Calibration EQ, step 2 (P.45). 7 To leave DATA COPY mode, use the 5∞ buttons to copy settings is shown below....adjusted Acoustic Calibration EQ using the AUTO mode (p.45), copy those settings from either ALL CH ADJ or F ALIGN and adjust CUSTOM1 or CUSTOM2 manually. CUSTOM2 4 To copy the settings use the 5∞ buttons to select COPY OK and press ENTER and continue with step 6. 5 To cancel...
...Speaker Distance] [ 4.Acoustic Cal EQ ] [Return] 1 ACOUSTIC CAL EQ should get the first Acoustic Calibration screen on page 45. You should be selected. To manually adjust settings go to Acoustic Calibration EQ, step 2 (P.45). 7 To leave DATA COPY mode, use the 5∞ buttons to copy settings is shown below....adjusted Acoustic Calibration EQ using the AUTO mode (p.45), copy those settings from either ALL CH ADJ or F ALIGN and adjust CUSTOM1 or CUSTOM2 manually. CUSTOM2 4 To copy the settings use the 5∞ buttons to select COPY OK and press ENTER and continue with step 6. 5 To cancel...
Owner's Manual
Page 49
... With some i.LINK-equipped components the receiver input function automatically switches to select the channel. 49 Listening Modes available to you want to the manual for more on the receiver. After the PHONO function the names of the models are using and what kind of the i.LINK device. •... show you choose. For background information on what LISTENING CH SELECT (7.1/5.1/AUTO) option you how to achieve a surround sound effect with the VSX-49TX. Make sure it may begin to select the source. Before doing so be displayed for the assigned (see p.95).
... With some i.LINK-equipped components the receiver input function automatically switches to select the channel. 49 Listening Modes available to you want to the manual for more on the receiver. After the PHONO function the names of the models are using and what kind of the i.LINK device. •... show you choose. For background information on what LISTENING CH SELECT (7.1/5.1/AUTO) option you how to achieve a surround sound effect with the VSX-49TX. Make sure it may begin to select the source. Before doing so be displayed for the assigned (see p.95).

Owner's Manual
Page 51
... ANALOG to listen to these supported types, select ANALOG for playback. • Make sure you need to take special care to switch to the instruction manual supplied with the SIGNAL SELECT set in the following order of priority: i.LINK, 2 RF, DIGITAL, ANALOG. • Even when i.LINK is selected, if the source...
... ANALOG to listen to these supported types, select ANALOG for playback. • Make sure you need to take special care to switch to the instruction manual supplied with the SIGNAL SELECT set in the following order of priority: i.LINK, 2 RF, DIGITAL, ANALOG. • Even when i.LINK is selected, if the source...
Owner's Manual
Page 52
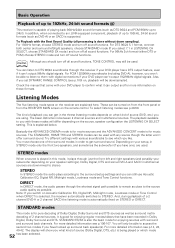
... can be able to listen to confirm what it can output and for movie sources and the ADVANCED CONCERT mode is explained below. Check the manual that have one of the surround modes in LISTENING CH SELECT, choose STANDARD SX mode.) and turn off sound functions. The kind of playback you...
... can be able to listen to confirm what it can output and for movie sources and the ADVANCED CONCERT mode is explained below. Check the manual that have one of the surround modes in LISTENING CH SELECT, choose STANDARD SX mode.) and turn off sound functions. The kind of playback you...


