
Owner's Manual
Page 1
... RECEIVER VSX-49TX This is correct and complete. Operations may differ slightly from the original VSX-49TX manual and this manual when you have had your receiver modified with an i.LINK connection and the latest Pioneer programming. Operating Instructions These modifications give the receiver new capabilities and new features both for connecting equipment to the receiver and for the VSX-49TX receiver...
... RECEIVER VSX-49TX This is correct and complete. Operations may differ slightly from the original VSX-49TX manual and this manual when you have had your receiver modified with an i.LINK connection and the latest Pioneer programming. Operating Instructions These modifications give the receiver new capabilities and new features both for connecting equipment to the receiver and for the VSX-49TX receiver...
Owner's Manual
Page 5
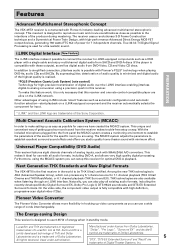
... mode. Features PREPARATION PREPARATION Advanced Multichannel Stereophonic Concept The VSX-49TX receiver is constructed with high-performance Advanced Direct Energy MOS-FET output devices, generating 160 watts (FTC 6Ω) of power for optimal DVD-A playback. The receiver uses a revolutionary 3-D Frame Construction technique and a Symmetrical Power Train Design, with Pioneer's industry-leading advanced multichannel stereophonic concept.
... mode. Features PREPARATION PREPARATION Advanced Multichannel Stereophonic Concept The VSX-49TX receiver is constructed with high-performance Advanced Direct Energy MOS-FET output devices, generating 160 watts (FTC 6Ω) of power for optimal DVD-A playback. The receiver uses a revolutionary 3-D Frame Construction technique and a Symmetrical Power Train Design, with Pioneer's industry-leading advanced multichannel stereophonic concept.
Owner's Manual
Page 6
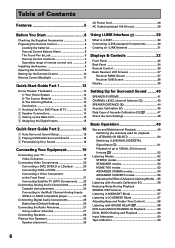
... batteries 8 Remote Control Battery Alarm 8 The Touch Pen & Lock 9 Remote Control Cushions 9 Operating range of remote control unit 9 Installing the Receiver 9 Opening the Front Panel 9 Setting Up the Remote Control 10 Remote Control Backlight 11 Quick Start Guide Part 1 12 Home Theater: The Basics...Creating an i.LINK Network 31 Displays & Controls 32 Front Panel 32 Back Panel 34 Remote Control 36 Basic Receiver LCD Screens 37 Receiver MAIN Screen 37 Receiver SUB Screen 38 Display 39 Setting Up for Surround Sound ........ 40 SPEAKER SYSTEMS 41 CHANNEL LEVEL (channel balance ...
... batteries 8 Remote Control Battery Alarm 8 The Touch Pen & Lock 9 Remote Control Cushions 9 Operating range of remote control unit 9 Installing the Receiver 9 Opening the Front Panel 9 Setting Up the Remote Control 10 Remote Control Backlight 11 Quick Start Guide Part 1 12 Home Theater: The Basics...Creating an i.LINK Network 31 Displays & Controls 32 Front Panel 32 Back Panel 34 Remote Control 36 Basic Receiver LCD Screens 37 Receiver MAIN Screen 37 Receiver SUB Screen 38 Display 39 Setting Up for Surround Sound ........ 40 SPEAKER SYSTEMS 41 CHANNEL LEVEL (channel balance ...
Owner's Manual
Page 7
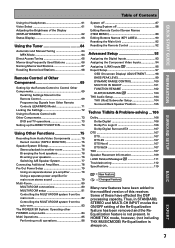
... 73 DVD and TV operations 73 Setting up the DIRECT FUNCTION 74 Using Other Functions 75 Recording from the sub room 83 The PIONEER SR System: Operating other PIONEER components 84 Multi Operations 85 Performing multi operations 86 System off 87 Using System off 88 Editing Remote Control Screen Names (ITEM MEMO... Record monitor (TAPE 2 MONITOR 75 Speaker System B Setup 76 Stereo playback in STANDARD, STEREO and MULTI-CH INPUT modes the ON/OFF setting of this receiver.
... 73 DVD and TV operations 73 Setting up the DIRECT FUNCTION 74 Using Other Functions 75 Recording from the sub room 83 The PIONEER SR System: Operating other PIONEER components 84 Multi Operations 85 Performing multi operations 86 System off 87 Using System off 88 Editing Remote Control Screen Names (ITEM MEMO... Record monitor (TAPE 2 MONITOR 75 Speaker System B Setup 76 Stereo playback in STANDARD, STEREO and MULTI-CH INPUT modes the ON/OFF setting of this receiver.

Owner's Manual
Page 8
...operate the remote control properly an alarm will sound and a warning screen will need re-adjusting (see below), replace all of receiver) • Operating Instructions Preparing the Remote Control Loading the batteries Load the batteries into the remote control as shown below. ... NOTE: After replacing the batteries, the touch panel will appear on individual use of battery life. tion's rules that you have received all batteries with governmental regulations or environmental public institu- Depending on the remote. Incorrect use you notice a decrease in such hazards ...
...operate the remote control properly an alarm will sound and a warning screen will need re-adjusting (see below), replace all of receiver) • Operating Instructions Preparing the Remote Control Loading the batteries Load the batteries into the remote control as shown below. ... NOTE: After replacing the batteries, the touch panel will appear on individual use of battery life. tion's rules that you have received all batteries with governmental regulations or environmental public institu- Depending on the remote. Incorrect use you notice a decrease in such hazards ...

Owner's Manual
Page 9
...any place object directly on top of this unit while within the range shown below. This is helpful to operate the VSX-49TX is shining onto the remote sensor. • The receiver located near a device emitting infrared rays. • Operated simultaneously with thumb and forefinger. This would prevent proper heat... dispersal. • Be sure to leave more than 8 inches of space above the receiver. 8 inches (20 cm) Receiver Opening the Front Panel To open the front panel push gently on the lower third of the panel with your finger along ...
...any place object directly on top of this unit while within the range shown below. This is helpful to operate the VSX-49TX is shining onto the remote sensor. • The receiver located near a device emitting infrared rays. • Operated simultaneously with thumb and forefinger. This would prevent proper heat... dispersal. • Be sure to leave more than 8 inches of space above the receiver. 8 inches (20 cm) Receiver Opening the Front Panel To open the front panel push gently on the lower third of the panel with your finger along ...

Owner's Manual
Page 10
...SETUP LCD COMMANDER PRESET RECALL DIRECT FUNCTION ITEM MEMO CD CD-R/ TAPE1 TUNER VCR2 VCR3 TV LEARNING MULTI OPERATION KEY LABEL VIDEO SAT TV CONTROL 4 RECEIVER DVD/LD LCD Commander TOUCH PANEL ADJUSTMENT VCR1 /DVR LCD CONTRAST VCR2 VCR3 TV BEEP LCD TIMER : 10 SEC OFF 1 2 BACK REMOTE SETUP...to make sure your remote control is calibrated correctly. You must first align the touch panel to the LCD COMMANDER screen. 5 Touch Panel Adjust RECEIVER BACK REMOTE SETUP CD DVD/LD VCR1 /DVR VCR2 TOUCH CROSS POINT CD-R/ TAPE1 TUNER VIDEO VCR3 TV SAT TV CONTROL « Touch ...
...SETUP LCD COMMANDER PRESET RECALL DIRECT FUNCTION ITEM MEMO CD CD-R/ TAPE1 TUNER VCR2 VCR3 TV LEARNING MULTI OPERATION KEY LABEL VIDEO SAT TV CONTROL 4 RECEIVER DVD/LD LCD Commander TOUCH PANEL ADJUSTMENT VCR1 /DVR LCD CONTRAST VCR2 VCR3 TV BEEP LCD TIMER : 10 SEC OFF 1 2 BACK REMOTE SETUP...to make sure your remote control is calibrated correctly. You must first align the touch panel to the LCD COMMANDER screen. 5 Touch Panel Adjust RECEIVER BACK REMOTE SETUP CD DVD/LD VCR1 /DVR VCR2 TOUCH CROSS POINT CD-R/ TAPE1 TUNER VIDEO VCR3 TV SAT TV CONTROL « Touch ...

Owner's Manual
Page 11
...appropriate button (1,2,3). The default setting is easier to see but uses more energy and thus wears the batteries down quicker. 11 PREPARATION PREPARATION 7 RECEIVER DVD/LD LCD Commander TOUCH PANEL ADJUSTMENT VCR1 /DVR LCD CONTRAST VCR2 VCR3 TV BEEP LCD TIMER : 10 SEC OFF 1 2 BACK ...+ - 1 Decide whether you 'd like to have sent a command (pushed a button) the remote control will beep once. Remote Control Backlight 1 LIGHT RECEIVER DVD/LD VCR1 /DVR VCR2 VCR3 TV REMOTE SETUP CD CD-R/ TAPE1 TUNER VIDEO SAT TV CONTROL use the LIGHT switch to change the contrast...
...appropriate button (1,2,3). The default setting is easier to see but uses more energy and thus wears the batteries down quicker. 11 PREPARATION PREPARATION 7 RECEIVER DVD/LD LCD Commander TOUCH PANEL ADJUSTMENT VCR1 /DVR LCD CONTRAST VCR2 VCR3 TV BEEP LCD TIMER : 10 SEC OFF 1 2 BACK ...+ - 1 Decide whether you 'd like to have sent a command (pushed a button) the remote control will beep once. Remote Control Backlight 1 LIGHT RECEIVER DVD/LD VCR1 /DVR VCR2 VCR3 TV REMOTE SETUP CD CD-R/ TAPE1 TUNER VIDEO SAT TV CONTROL use the LIGHT switch to change the contrast...
Owner's Manual
Page 12
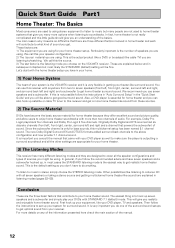
...flexible in getting multichannel home theater-like sound) are explained in listening modes (pages 52-55). We call this your system is the VSX-49TX receiver and it seems so difficult is that came with your DVD player as well to make sure the player is not really complicated and.... For example, Dolby Pro Logic plays back four channels and Dolby Pro Logic 2 five channels. It is to get a more details on the VSX-49TX receiver. To listen to the above configuration and now provide 7.1 channel sound. The easiest thing is important you can use seven speakers and a subwoofer. ...
...flexible in getting multichannel home theater-like sound) are explained in listening modes (pages 52-55). We call this your system is the VSX-49TX receiver and it seems so difficult is that came with your DVD player as well to make sure the player is not really complicated and.... For example, Dolby Pro Logic plays back four channels and Dolby Pro Logic 2 five channels. It is to get a more details on the VSX-49TX receiver. To listen to the above configuration and now provide 7.1 channel sound. The easiest thing is important you can use seven speakers and a subwoofer. ...
Owner's Manual
Page 13
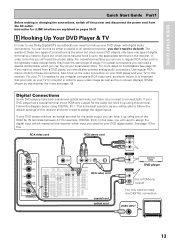
... do this terminal. If your DVD player has a coaxial terminal (not a PCM-only output) for the audio out hook it up your TV to this receiver and won't need to record from the AC outlet. optical cord VIDEO INPUT 13 If you want to assign the digital inputs. In this . See... RCA video cord, as the on screen displays (OSDs) shown by this by either a coaxial or an optical connection, you don't need to do this receiver (for i.LINK interface are explained on pages 30-31. 1 Hooking Up Your DVD Player & TV In order to use a regular RCA video cord or the...
... do this terminal. If your DVD player has a coaxial terminal (not a PCM-only output) for the audio out hook it up your TV to this receiver and won't need to record from the AC outlet. optical cord VIDEO INPUT 13 If you want to assign the digital inputs. In this . See... RCA video cord, as the on screen displays (OSDs) shown by this by either a coaxial or an optical connection, you don't need to do this receiver (for i.LINK interface are explained on pages 30-31. 1 Hooking Up Your DVD Player & TV In order to use a regular RCA video cord or the...

Owner's Manual
Page 14
... rated 6Ω-16Ω. • If you attached your speaker wire to the speaker terminal make sure that not even one pair of the receiver. If possible, use the THX INPUT jack on the subwoofer (if your speakers. PRE OUT 2 SURROUND L SURROUND BACK L (Single) CENTER ...SPEAKERS ª ı· L R Surround speaker (Right) Surround back speaker (Left) Surround back speaker (Right) memo • Please use this receiver with five, or seven speakers (front left & right; The speaker terminals also accept single banana plugs. (Refer to speaker manual for advice on new,...
... rated 6Ω-16Ω. • If you attached your speaker wire to the speaker terminal make sure that not even one pair of the receiver. If possible, use the THX INPUT jack on the subwoofer (if your speakers. PRE OUT 2 SURROUND L SURROUND BACK L (Single) CENTER ...SPEAKERS ª ı· L R Surround speaker (Right) Surround back speaker (Left) Surround back speaker (Right) memo • Please use this receiver with five, or seven speakers (front left & right; The speaker terminals also accept single banana plugs. (Refer to speaker manual for advice on new,...
Owner's Manual
Page 15
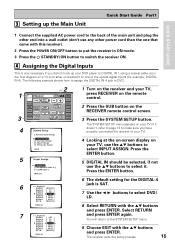
... the DIGITAL IN 4 jack to the SYSTEM SETUP menu. 9 Choose EXIT with the 5∞ buttons and press ENTER. Expert Setup] [4. The receiver exits the setup process. 15 The SYSTEM SETUP menu appears on your TV (if it . THX Audio Setup] [Exit] 5 1.Input Assign [... 1.Digital-In ] [ 2.Component Video In ] [ 3.i.LINK Input ] [Return] 6 7 1.1. You will return to DVD. 1 3 2 RECEIVER DVD/LD Receiver TONE BASS/ ATREBLE VCR1 /DVR VCR2 VCR3 TV DISPLAY DIMMER STATUS SYSTEM SETUP VIDEO SELECT SPEAKER A/B MAIN SUB EFFECT/ CH SEL. Press the ENTER...
... the DIGITAL IN 4 jack to the SYSTEM SETUP menu. 9 Choose EXIT with the 5∞ buttons and press ENTER. Expert Setup] [4. The receiver exits the setup process. 15 The SYSTEM SETUP menu appears on your TV (if it . THX Audio Setup] [Exit] 5 1.Input Assign [... 1.Digital-In ] [ 2.Component Video In ] [ 3.i.LINK Input ] [Return] 6 7 1.1. You will return to DVD. 1 3 2 RECEIVER DVD/LD Receiver TONE BASS/ ATREBLE VCR1 /DVR VCR2 VCR3 TV DISPLAY DIMMER STATUS SYSTEM SETUP VIDEO SELECT SPEAKER A/B MAIN SUB EFFECT/ CH SEL. Press the ENTER...
Owner's Manual
Page 16
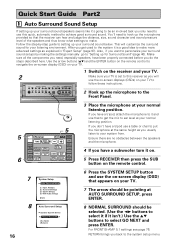
... Speaker System Select [ Normal Surround ] [Go Next] [Return] 6 Press the SYSTEM SETUP button and use the on-screen display (OSD) that the receiver can hear and judge the distance, size, sound character and sound pressure level of the speakers and thus know what settings to make more advanced...instructions. 2 Hook up the microphone to make . If you usually listen to your TV is a good idea to the Front Panel. 5 6 5 RECEIVER DVD/LD Receiver TONE BASS/ ATREBLE VCR1 /DVR VCR2 VCR3 TV DISPLAY DIMMER STATUS SYSTEM SETUP VIDEO SELECT SPEAKER A/B MAIN SUB EFFECT/ CH SEL. If you don...
... Speaker System Select [ Normal Surround ] [Go Next] [Return] 6 Press the SYSTEM SETUP button and use the on-screen display (OSD) that the receiver can hear and judge the distance, size, sound character and sound pressure level of the speakers and thus know what settings to make more advanced...instructions. 2 Hook up the microphone to make . If you usually listen to your TV is a good idea to the Front Panel. 5 6 5 RECEIVER DVD/LD Receiver TONE BASS/ ATREBLE VCR1 /DVR VCR2 VCR3 TV DISPLAY DIMMER STATUS SYSTEM SETUP VIDEO SELECT SPEAKER A/B MAIN SUB EFFECT/ CH SEL. If you don...

Owner's Manual
Page 18
...the display on the remote control repeatedly until you don't see the SPEAKER SYSTEMS CHECK screen. To locate the LISTENING CH SELECT button, press the RECEIVER button then press MAIN to access the main remote control screen. 4 Press the STANDARD button on the screen for the source material. If the ...the remote control for auto setup (too much ambient noise, echo of test tones to show that may interfere with Surround Sound 1 Make sure the receiver, your TV, and your DVD player are switched ON. 2 Press the DVD/LD button on the OSD during auto setup. Again, be affecting the...
...the display on the remote control repeatedly until you don't see the SPEAKER SYSTEMS CHECK screen. To locate the LISTENING CH SELECT button, press the RECEIVER button then press MAIN to access the main remote control screen. 4 Press the STANDARD button on the screen for the source material. If the ...the remote control for auto setup (too much ambient noise, echo of test tones to show that may interfere with Surround Sound 1 Make sure the receiver, your TV, and your DVD player are switched ON. 2 Press the DVD/LD button on the OSD during auto setup. Again, be affecting the...
Owner's Manual
Page 19
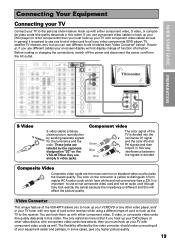
...screen display will affect the picture quality. Composite Video Composite video cords are simply S video jacks. Video Converter This unique feature of the VSX-49TX allows you must hook up with component video cables as well. In general it from the AC outlet. PRE OUT 2 SURROUND L ...is avoided. These jacks are labeled by the video converter should make connecting all your video components (DVD player, TV, satellite TV receiver, etc.) but also the lowest quality. The flexibility afforded by the Japanese designation "S2" on the connector is yellow to distinguish...
...screen display will affect the picture quality. Composite Video Composite video cords are simply S video jacks. Video Converter This unique feature of the VSX-49TX allows you must hook up with component video cables as well. In general it from the AC outlet. PRE OUT 2 SURROUND L ...is avoided. These jacks are labeled by the video converter should make connecting all your video components (DVD player, TV, satellite TV receiver, etc.) but also the lowest quality. The flexibility afforded by the Japanese designation "S2" on the connector is yellow to distinguish...

Owner's Manual
Page 21
For components you will always appear as "VIDEO" in the receiver's display. Front video connections are accessed via the front panel input selector as show here. Use analog audio cords for more information on "Assigning the ...
For components you will always appear as "VIDEO" in the receiver's display. Front video connections are accessed via the front panel input selector as show here. Use analog audio cords for more information on "Assigning the ...
Owner's Manual
Page 24
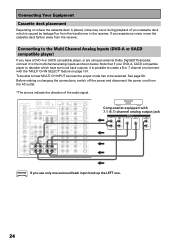
... IN VIDEO S2 VIDEO Components equipped with the "MULTI CH IN SELECT" feature on where the cassette deck is caused by leakage flux from the receiver. Connecting to the Multi Channel Analog Inputs (DVD-A or SACD compatible player) If you have surround back outputs, it to be able to hear MULTI... jack FRONT SURROUND ANALOG CENTER SUB WOOFER SURROUND BACK L L L R R R memo If you experience noise, move the cassette deck farther away from the transformer in the receiver.
... IN VIDEO S2 VIDEO Components equipped with the "MULTI CH IN SELECT" feature on where the cassette deck is caused by leakage flux from the receiver. Connecting to the Multi Channel Analog Inputs (DVD-A or SACD compatible player) If you have surround back outputs, it to be able to hear MULTI... jack FRONT SURROUND ANALOG CENTER SUB WOOFER SURROUND BACK L L L R R R memo If you experience noise, move the cassette deck farther away from the transformer in the receiver.
Owner's Manual
Page 25
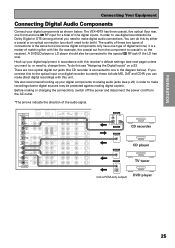
... a total of the audio signal. L LR MULTI CH INPUT SUB W. The VSX-49TX has three coaxial, five optical (four rear, one front) and one in the diagram below . To do this to the optical input on the receiver). There are two optical digital out jacks (the CD recorder is a matter of... matching like with this receiver's default settings (see next page) unless you connect this by either a coaxial or an optical ...
... a total of the audio signal. L LR MULTI CH INPUT SUB W. The VSX-49TX has three coaxial, five optical (four rear, one front) and one in the diagram below . To do this to the optical input on the receiver). There are two optical digital out jacks (the CD recorder is a matter of... matching like with this receiver's default settings (see next page) unless you connect this by either a coaxial or an optical ...

Owner's Manual
Page 26
... like. Thus you can hook up your equipment is connected to insert completely and in sync with the receiver's default settings. To avoid having to assign the digital inputs you must tell the receiver what digital component is different from the default settings. 26 The default settings are: DIGITAL IN 1 (coaxial): DVD... optical cables (not supplied) are used freely. Be sure to which jack so your equipment in accordance with the names on the optical terminal (this receiver.
... like. Thus you can hook up your equipment is connected to insert completely and in sync with the receiver's default settings. To avoid having to assign the digital inputs you must tell the receiver what digital component is different from the default settings. 26 The default settings are: DIGITAL IN 1 (coaxial): DVD... optical cables (not supplied) are used freely. Be sure to which jack so your equipment in accordance with the names on the optical terminal (this receiver.
Owner's Manual
Page 28
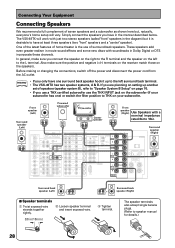
...sure you connect the speaker on the right to the R terminal and the speaker on the left surround back terminal. • The VSX-49TX has two speaker systems, A & B. Before making or changing the connections, switch off the power and disconnect the power cord from the...SURROUND R AUDIO POWER AMP R L IN FRONT L R L CENTER 1 (Single) R R SUB W. In general, make sure the positive and negative (+/-) terminals on the receiver match those on the speakers. PRE OUT 2 SURROUND L SURROUND BACK L (Single) CENTER SURROUND BACK L (Single) CONTROL IN MULTIROOM & SOURCE DVD /LD IN TV IN ...
...sure you connect the speaker on the right to the R terminal and the speaker on the left surround back terminal. • The VSX-49TX has two speaker systems, A & B. Before making or changing the connections, switch off the power and disconnect the power cord from the...SURROUND R AUDIO POWER AMP R L IN FRONT L R L CENTER 1 (Single) R R SUB W. In general, make sure the positive and negative (+/-) terminals on the receiver match those on the speakers. PRE OUT 2 SURROUND L SURROUND BACK L (Single) CENTER SURROUND BACK L (Single) CONTROL IN MULTIROOM & SOURCE DVD /LD IN TV IN ...


