Owner's Manual
Page 6
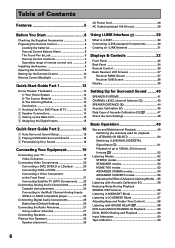
... 30 Creating an i.LINK Network 31 Displays & Controls 32 Front Panel 32 Back Panel 34 Remote Control 36 Basic Receiver LCD Screens 37 Receiver MAIN Screen 37 Receiver SUB Screen 38 Display 39 Setting Up for Surround Sound ........ 40 SPEAKER SYSTEMS 41 CHANNEL LEVEL (channel balance 43 SPEAKER...Calibration EQ 47 Check the Auto Settings 48 Basic Operation 49 Stereo and Multichannel Playback 49 Switching the channels used for playback (LISTENING CH SELECT 50 Switching i.LINK/ANALOG/DIGITAL Signal Input 51 Playback of up to 192kHz, 24-bit sound formats 52 Listening Modes 52...
... 30 Creating an i.LINK Network 31 Displays & Controls 32 Front Panel 32 Back Panel 34 Remote Control 36 Basic Receiver LCD Screens 37 Receiver MAIN Screen 37 Receiver SUB Screen 38 Display 39 Setting Up for Surround Sound ........ 40 SPEAKER SYSTEMS 41 CHANNEL LEVEL (channel balance 43 SPEAKER...Calibration EQ 47 Check the Auto Settings 48 Basic Operation 49 Stereo and Multichannel Playback 49 Switching the channels used for playback (LISTENING CH SELECT 50 Switching i.LINK/ANALOG/DIGITAL Signal Input 51 Playback of up to 192kHz, 24-bit sound formats 52 Listening Modes 52...
Owner's Manual
Page 7
...the MULTI-ROOM system from the main room 82 Controlling the MULTI-ROOM system from the sub room 83 The PIONEER SR System: Operating other PIONEER components 84 Multi Operations 85 Performing multi operations 86 System off 87 Using System off 88 Editing Remote Control Screen...Components 75 Record monitor (TAPE 2 MONITOR 75 Speaker System B Setup 76 Stereo playback in STANDARD, STEREO and MULTI-CH INPUT modes the ON/OFF setting of this receiver. In HOME THX mode, however, (not including THX MUSICMODE) Re-Equalization is not present. QUICK SPTRAERPTAGRAUTIDIOEN PREPARATION ...
...the MULTI-ROOM system from the main room 82 Controlling the MULTI-ROOM system from the sub room 83 The PIONEER SR System: Operating other PIONEER components 84 Multi Operations 85 Performing multi operations 86 System off 87 Using System off 88 Editing Remote Control Screen...Components 75 Record monitor (TAPE 2 MONITOR 75 Speaker System B Setup 76 Stereo playback in STANDARD, STEREO and MULTI-CH INPUT modes the ON/OFF setting of this receiver. In HOME THX mode, however, (not including THX MUSICMODE) Re-Equalization is not present. QUICK SPTRAERPTAGRAUTIDIOEN PREPARATION ...

Owner's Manual
Page 11
PREPARATION PREPARATION 7 RECEIVER DVD/LD LCD Commander TOUCH PANEL ADJUSTMENT VCR1 /DVR LCD CONTRAST VCR2 VCR3 TV BEEP LCD TIMER : 10 SEC ...You can choose the sound of 5-60 seconds. Use the - /+ buttons to make and press those buttons. Remote Control Backlight 1 LIGHT RECEIVER DVD/LD VCR1 /DVR VCR2 VCR3 TV REMOTE SETUP CD CD-R/ TAPE1 TUNER VIDEO SAT TV CONTROL use the LIGHT switch to adjust the... the BACK button to go back to stay on or not and use lock TV CONTROL FUNCTION CH + CH - If you 'd like to save the battery a timer will stay on the remote control screen.
PREPARATION PREPARATION 7 RECEIVER DVD/LD LCD Commander TOUCH PANEL ADJUSTMENT VCR1 /DVR LCD CONTRAST VCR2 VCR3 TV BEEP LCD TIMER : 10 SEC ...You can choose the sound of 5-60 seconds. Use the - /+ buttons to make and press those buttons. Remote Control Backlight 1 LIGHT RECEIVER DVD/LD VCR1 /DVR VCR2 VCR3 TV REMOTE SETUP CD CD-R/ TAPE1 TUNER VIDEO SAT TV CONTROL use the LIGHT switch to adjust the... the BACK button to go back to stay on or not and use lock TV CONTROL FUNCTION CH + CH - If you 'd like to save the battery a timer will stay on the remote control screen.
Owner's Manual
Page 13
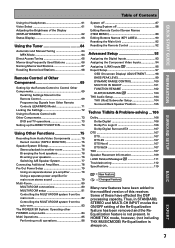
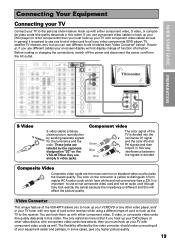
... and your TV (or monitor) in order to see page 19). L LR MULTI CH INPUT SUB W. The quality of these connections. For optical connections you will need to assign the digital input (which means tell the receiver which input you used for i.LINK interface are explained on screen displays (OSDs) shown... to hook up the video connection on cords/cables See page 26. In this terminal. Instruction for your TV it up using one of this receiver. For more see a video image as well as the on pages 30-31. 1 Hooking Up Your DVD Player & TV In order to use a regular...
... and your TV (or monitor) in order to see page 19). L LR MULTI CH INPUT SUB W. The quality of these connections. For optical connections you will need to assign the digital input (which means tell the receiver which input you used for i.LINK interface are explained on screen displays (OSDs) shown... to hook up the video connection on cords/cables See page 26. In this terminal. Instruction for your TV it up using one of this receiver. For more see a video image as well as the on pages 30-31. 1 Hooking Up Your DVD Player & TV In order to use a regular...

Owner's Manual
Page 14
... any dialog. These speakers are important to take full advantage of surround speakers connect them up all the sound channels on the back of the receiver. For the subwoofer use a mono (single plug) RCA cord and for details.) 14 The speaker terminals also accept single banana plugs. (Refer... on your subwoofer. • When you have two speakers hook them to digital soundtracks you can be setup with fewer speakers. L LR MULTI CH INPUT SUB W. surround left to the L terminal. If you attached your subwoofer has one) or switch the filter position to speaker manual for ...
... any dialog. These speakers are important to take full advantage of surround speakers connect them up all the sound channels on the back of the receiver. For the subwoofer use a mono (single plug) RCA cord and for details.) 14 The speaker terminals also accept single banana plugs. (Refer... on your subwoofer. • When you have two speakers hook them to digital soundtracks you can be setup with fewer speakers. L LR MULTI CH INPUT SUB W. surround left to the L terminal. If you attached your subwoofer has one) or switch the filter position to speaker manual for ...
Owner's Manual
Page 15
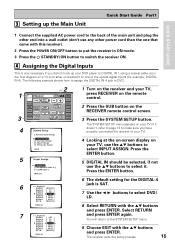
.../LD Receiver TONE BASS/ ATREBLE VCR1 /DVR VCR2 VCR3 TV DISPLAY DIMMER STATUS SYSTEM SETUP VIDEO SELECT SPEAKER A/B MAIN SUB EFFECT/ CH SEL. THX Audio Setup] [Exit] 5 1.Input Assign [ 1.Digital-In ] [ 2.Component Video In ] [ 3.i.LINK Input ] [Return]... 6 7 1.1. Digital-In Digital-1 [ OFF ] Digital-2 [ TV ] Digital-3 [ CD ] Digital-4 [ DVD/LD ] Digital-5 [ VCR1 ] Digital-6 [ VCR2 ] Digital-7 [ CD-R ] RF IN [ DVD/LD ] [Return] 1 Turn on the receiver...
.../LD Receiver TONE BASS/ ATREBLE VCR1 /DVR VCR2 VCR3 TV DISPLAY DIMMER STATUS SYSTEM SETUP VIDEO SELECT SPEAKER A/B MAIN SUB EFFECT/ CH SEL. THX Audio Setup] [Exit] 5 1.Input Assign [ 1.Digital-In ] [ 2.Component Video In ] [ 3.i.LINK Input ] [Return]... 6 7 1.1. Digital-In Digital-1 [ OFF ] Digital-2 [ TV ] Digital-3 [ CD ] Digital-4 [ DVD/LD ] Digital-5 [ VCR1 ] Digital-6 [ VCR2 ] Digital-7 [ CD-R ] RF IN [ DVD/LD ] [Return] 1 Turn on the receiver...
Owner's Manual
Page 16
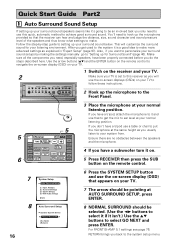
.../LD Receiver TONE BASS/ ATREBLE VCR1 /DVR VCR2 VCR3 TV DISPLAY DIMMER STATUS SYSTEM SETUP VIDEO SELECT SPEAKER A/B MAIN SUB EFFECT/ CH SEL. After you only need to hook up your normal listening position. THX Audio Setup] [Exit] Auto Surround Setup Speaker System Select [... Normal Surround ] [Go Next] [Return] 6 Press the SYSTEM SETUP button and use this receiver as you will customize the surround...
.../LD Receiver TONE BASS/ ATREBLE VCR1 /DVR VCR2 VCR3 TV DISPLAY DIMMER STATUS SYSTEM SETUP VIDEO SELECT SPEAKER A/B MAIN SUB EFFECT/ CH SEL. After you only need to hook up your normal listening position. THX Audio Setup] [Exit] Auto Surround Setup Speaker System Select [... Normal Surround ] [Go Next] [Return] 6 Press the SYSTEM SETUP button and use this receiver as you will customize the surround...

Owner's Manual
Page 18
... Your Sound 1 Use the Surround Listening Mode buttons to normal use. If you don't see "7.1" in the display on the receiver. 3 Press the LISTENING CH SELECT button on the remote control repeatedly until you leave CHECK!! If the room environment is not optimal for three minutes, or ...you good surround sound. To locate the LISTENING CH SELECT button, press the RECEIVER button then press MAIN to establish the proper channel level, speaker distance and acoustic calibration EQ. You should now have ...
... Your Sound 1 Use the Surround Listening Mode buttons to normal use. If you don't see "7.1" in the display on the receiver. 3 Press the LISTENING CH SELECT button on the remote control repeatedly until you leave CHECK!! If the room environment is not optimal for three minutes, or ...you good surround sound. To locate the LISTENING CH SELECT button, press the RECEIVER button then press MAIN to establish the proper channel level, speaker distance and acoustic calibration EQ. You should now have ...
Owner's Manual
Page 19
...power cord from regular RCA audio cords which have white and red connectors (see p.23). L LR MULTI CH INPUT SUB W. PRE OUT 2 SURROUND L SURROUND BACK L (Single) CENTER SURROUND BACK L (Single) ...change of your video components (DVD player, TV, satellite TV receiver, etc.) but also the lowest quality. If you use one type of cord to the receiver. DIGITAL PCM/2DIGITAL /DTS 2 OUT S400 (AUDIO) OUT 1...then output. In general it from the AC outlet. Video Converter This unique feature of the VSX-49TX allows you can hook them up your TV tuner with one kind of video cord for the ...
...power cord from regular RCA audio cords which have white and red connectors (see p.23). L LR MULTI CH INPUT SUB W. PRE OUT 2 SURROUND L SURROUND BACK L (Single) CENTER SURROUND BACK L (Single) ...change of your video components (DVD player, TV, satellite TV receiver, etc.) but also the lowest quality. If you use one type of cord to the receiver. DIGITAL PCM/2DIGITAL /DTS 2 OUT S400 (AUDIO) OUT 1...then output. In general it from the AC outlet. Video Converter This unique feature of the VSX-49TX allows you can hook them up your TV tuner with one kind of video cord for the ...

Owner's Manual
Page 21
L LR MULTI CH INPUT SUB W. Front video connections are accessed via the front panel input selector as "VIDEO" in the receiver's display. memo You cannot assign the name of the signal. See page 93 for the audio) that has a mini optical plug on one end ...PLAY 1 IN (DVD /LD) 2RF IN (DVD /LD) (For LD) ASSIGNABLE FRONT R SURROUND R AUDIO POWER AMP R L IN FRONT L R L CENTER 1 (Single) R R SUB W. CLASS TUNER STATION CH MODE (5ch/7ch) MULTI ROOM & SOURCE CONTROL ON/OFF COLOR BRIGHT MONITOR PHONES DIGITAL OUT (OPTICAL) ON/OFF HOLD VIDEO-IN/OUT AUDIO-IN/OUT...
L LR MULTI CH INPUT SUB W. Front video connections are accessed via the front panel input selector as "VIDEO" in the receiver's display. memo You cannot assign the name of the signal. See page 93 for the audio) that has a mini optical plug on one end ...PLAY 1 IN (DVD /LD) 2RF IN (DVD /LD) (For LD) ASSIGNABLE FRONT R SURROUND R AUDIO POWER AMP R L IN FRONT L R L CENTER 1 (Single) R R SUB W. CLASS TUNER STATION CH MODE (5ch/7ch) MULTI ROOM & SOURCE CONTROL ON/OFF COLOR BRIGHT MONITOR PHONES DIGITAL OUT (OPTICAL) ON/OFF HOLD VIDEO-IN/OUT AUDIO-IN/OUT...
Owner's Manual
Page 24
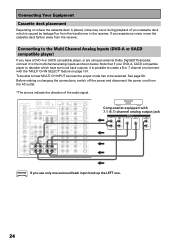
... L AUDIO OUT OUT VCR3 IN IN VIDEO S2 VIDEO Components equipped with the "MULTI CH IN SELECT" feature on where the cassette deck is caused by leakage flux from the receiver. L LR MULTI CH INPUT SUB W. If you experience noise, move the cassette deck farther away from the transformer... in the receiver. Connecting to the Multi Channel Analog Inputs (DVD-A or SACD compatible player) ...
... L AUDIO OUT OUT VCR3 IN IN VIDEO S2 VIDEO Components equipped with the "MULTI CH IN SELECT" feature on where the cassette deck is caused by leakage flux from the receiver. L LR MULTI CH INPUT SUB W. If you experience noise, move the cassette deck farther away from the transformer... in the receiver. Connecting to the Multi Channel Analog Inputs (DVD-A or SACD compatible player) ...
Owner's Manual
Page 25
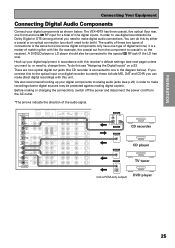
...like Dolby Digital or DTS (among others) you need to do both). L LR MULTI CH INPUT SUB W. The quality of these include MD, DAT and CD-R) you don't need..., switch off the power and disconnect the power cord from the component to coaxial in on the receiver). There are two optical digital out jacks (the CD recorder is a matter of matching like (for...arrows indicate the direction of the audio signal. If you want to, or need to one in the diagram below . The VSX-49TX has three coaxial, five optical (four rear, one front) and one ). PRE OUT 2 SURROUND L SURROUND BACK L ...
...like Dolby Digital or DTS (among others) you need to do both). L LR MULTI CH INPUT SUB W. The quality of these include MD, DAT and CD-R) you don't need..., switch off the power and disconnect the power cord from the component to coaxial in on the receiver). There are two optical digital out jacks (the CD recorder is a matter of matching like (for...arrows indicate the direction of the audio signal. If you want to, or need to one in the diagram below . The VSX-49TX has three coaxial, five optical (four rear, one front) and one ). PRE OUT 2 SURROUND L SURROUND BACK L ...
Owner's Manual
Page 28
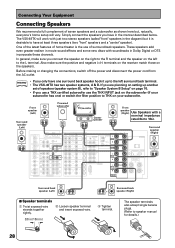
...power cord from the AC outlet. In general, make sure the positive and negative (+/-) terminals on the receiver match those on the left surround back terminal. • The VSX-49TX has two speaker systems, A & B. One of the latest features of home theater is desirable to 16... exposed wire strands together tightly. 2 Loosen speaker terminal and insert exposed wire. 3/8 in Dolby Digital or DTS incorporate these channels. L LR MULTI CH INPUT SUB W. memo • If you connect the speaker on the right to the L terminal. Front speaker (Left) Surround speaker (Left) ...
...power cord from the AC outlet. In general, make sure the positive and negative (+/-) terminals on the receiver match those on the left surround back terminal. • The VSX-49TX has two speaker systems, A & B. One of the latest features of home theater is desirable to 16... exposed wire strands together tightly. 2 Loosen speaker terminal and insert exposed wire. 3/8 in Dolby Digital or DTS incorporate these channels. L LR MULTI CH INPUT SUB W. memo • If you connect the speaker on the right to the L terminal. Front speaker (Left) Surround speaker (Left) ...
Owner's Manual
Page 30
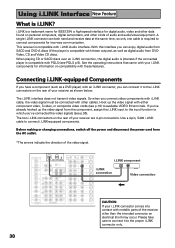
... signal from the component, assign the i.LINK input to the input function to the i.LINK connectors on compatibility with metallic parts of your receiver as a DVD player) with either component video, S video, or composite video cords (see p.19) to connect i.LINK-equipped components...have a component (such as shown below. L LR MULTI CH INPUT SUB W. Connecting i.LINK-equipped Components If you can connect it to connect components for information on the rear of the receiver other cables. This receiver is compatible with other than the intended connector an electrical ...
... signal from the component, assign the i.LINK input to the input function to the i.LINK connectors on compatibility with metallic parts of your receiver as a DVD player) with either component video, S video, or composite video cords (see p.19) to connect i.LINK-equipped components...have a component (such as shown below. L LR MULTI CH INPUT SUB W. Connecting i.LINK-equipped Components If you can connect it to connect components for information on the rear of the receiver other cables. This receiver is compatible with other than the intended connector an electrical ...

Owner's Manual
Page 32
... mode. (Please note that this receiver consumes a small amount of the panel. 1 23 4 5 6 78 9 10 STANDBY/ON OFF ON INPUT SELECTOR AUDIO/VIDEO MULTI-CHANNEL AMPLIFIER VSX-49TX LISTENING MODE SELECTOR PUSH ENTER STANDBY Î DVD/LD TV VIDEO SAT VCR1/DVR VCR2 VCR3 VIDEO AUDIO CD-R/ MULTI CH CD TAPE1/MD TUNER PHONO...
... mode. (Please note that this receiver consumes a small amount of the panel. 1 23 4 5 6 78 9 10 STANDBY/ON OFF ON INPUT SELECTOR AUDIO/VIDEO MULTI-CHANNEL AMPLIFIER VSX-49TX LISTENING MODE SELECTOR PUSH ENTER STANDBY Î DVD/LD TV VIDEO SAT VCR1/DVR VCR2 VCR3 VIDEO AUDIO CD-R/ MULTI CH CD TAPE1/MD TUNER PHONO...

Owner's Manual
Page 33
...together with the INPUT SELECTOR to select the function or use the multi room feature (requires an optional PIONEER Multi-Room Remote Sensor Unit MR-100 or another IR receiver). ON/OFF button: Use to adjust the frequency levels. 14 DIGITAL NR button (see p.56) Switches...inputs/ outputs. AUTO - Depending on or off . DIGITAL - PREPARATION PREPARATION 10 MASTER VOLUME dial Adjusts the overall receiver volume. 11 ACOUSTIC CAL. Press repeatedly to the MULTI CH INPUT terminals. 24 SETUP MIC jack Plug in the following : ANALOG - The button cycles through the speakers). Since...
...together with the INPUT SELECTOR to select the function or use the multi room feature (requires an optional PIONEER Multi-Room Remote Sensor Unit MR-100 or another IR receiver). ON/OFF button: Use to adjust the frequency levels. 14 DIGITAL NR button (see p.56) Switches...inputs/ outputs. AUTO - Depending on or off . DIGITAL - PREPARATION PREPARATION 10 MASTER VOLUME dial Adjusts the overall receiver volume. 11 ACOUSTIC CAL. Press repeatedly to the MULTI CH INPUT terminals. 24 SETUP MIC jack Plug in the following : ANALOG - The button cycles through the speakers). Since...

Owner's Manual
Page 34
...(for connection to i.LINK-equipped players and other kind of digital player. To do so. 9 Video components in a secondary room. L LR MULTI CH INPUT SUB W. These are analog jacks (see p.24) Use these terminals to input the signal from you plan to a sub-system in /out ..., VCR, TV tuners, SAT tuners, etc.) here. 10 MULTI-ROOM & SOURCE OUT terminals These terminals output the audio & video signal to do this receiver. Each i.LINK connector acts simultaneously as per the default settings (see p.26) you need to a different power amplifier (see p.78). DIGITAL PCM/2DIGITAL ...
...(for connection to i.LINK-equipped players and other kind of digital player. To do so. 9 Video components in a secondary room. L LR MULTI CH INPUT SUB W. These are analog jacks (see p.24) Use these terminals to input the signal from you plan to a sub-system in /out ..., VCR, TV tuners, SAT tuners, etc.) here. 10 MULTI-ROOM & SOURCE OUT terminals These terminals output the audio & video signal to do this receiver. Each i.LINK connector acts simultaneously as per the default settings (see p.26) you need to a different power amplifier (see p.78). DIGITAL PCM/2DIGITAL ...

Owner's Manual
Page 36
...source. VOL + VOL - STANDBY/ON : Press to control the DVD menu for the DVD remote control screen. The button will cycle through all PIONEER components. Also, in the sections for how to control your TV. First, when pressed it anywhere on /off all the possible sources. 0 ... the remote control. Displays & Controls Remote Control These pages describe the buttons on the remote control screen. 3 RECEIVER button Press to control the volume of the TV. CH +/- : Use these components even if they are preset to control your other components/functions can be found in ...
...source. VOL + VOL - STANDBY/ON : Press to control the DVD menu for the DVD remote control screen. The button will cycle through all PIONEER components. Also, in the sections for how to control your TV. First, when pressed it anywhere on /off all the possible sources. 0 ... the remote control. Displays & Controls Remote Control These pages describe the buttons on the remote control screen. 3 RECEIVER button Press to control the volume of the TV. CH +/- : Use these components even if they are preset to control your other components/functions can be found in ...
Owner's Manual
Page 37
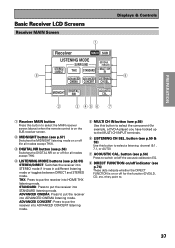
...) you have hooked up to . 37 PREPARATION PREPARATION Basic Receiver LCD Screens Receiver MAIN Screen 1 Displays & Controls Receiver MAIN SUB LISTENING MODE SURROUND (DVD-A /SACD) STEREO /DIRECT THX STANDARD MULTI CH IN 8 8 ADVANCED ADVANCED LISTENING CINEMA CONCERT CH SEL. MIDNIGHT DIGITAL NR ACOUSTIC CAL. 2 3 45 6 7 1 Receiver MAIN button Press this button to select the component (for...
...) you have hooked up to . 37 PREPARATION PREPARATION Basic Receiver LCD Screens Receiver MAIN Screen 1 Displays & Controls Receiver MAIN SUB LISTENING MODE SURROUND (DVD-A /SACD) STEREO /DIRECT THX STANDARD MULTI CH IN 8 8 ADVANCED ADVANCED LISTENING CINEMA CONCERT CH SEL. MIDNIGHT DIGITAL NR ACOUSTIC CAL. 2 3 45 6 7 1 Receiver MAIN button Press this button to select the component (for...
Owner's Manual
Page 38
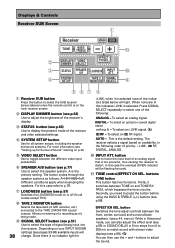
... based on availability, in Advanced mode, you need to select the type of signal being input into the receiver. TONE control/EFFECT CH SEL. button Switches the tone adjust controls between the front, center, surround and surround back speakers. (see... SELECT button (see p.44, memo). Displays & Controls Receiver SUB Screen 1 Receiver MAIN SUB TONE BASS/ TREBLE - 2 DISPLAY VIDEO DIMMER SELECT EFFECT/ CH SEL. 3 STATUS SPEAKER A/B LOUDNESS INPUT ATT. 0 4 SYSTEM SETUP TAPE 2 SIGNAL MONITOR SELECT 9 567 8 1 Receiver SUB button Press this case the overload (OVER) indicator ...
... based on availability, in Advanced mode, you need to select the type of signal being input into the receiver. TONE control/EFFECT CH SEL. button Switches the tone adjust controls between the front, center, surround and surround back speakers. (see... SELECT button (see p.44, memo). Displays & Controls Receiver SUB Screen 1 Receiver MAIN SUB TONE BASS/ TREBLE - 2 DISPLAY VIDEO DIMMER SELECT EFFECT/ CH SEL. 3 STATUS SPEAKER A/B LOUDNESS INPUT ATT. 0 4 SYSTEM SETUP TAPE 2 SIGNAL MONITOR SELECT 9 567 8 1 Receiver SUB button Press this case the overload (OVER) indicator ...


