
Owner's Manual
Page 1
Operating Instructions AV Receiver VSX-42 Register your product on http://www.pioneerelectronics.com (US) http://www.pioneerelectronics.ca (Canada) • Protect your new investment The details of your purchase will be on file for reference in the event of an insurance claim such as loss or theft. • Receive free tips, updates and service bulletins on your new product • Improve product development Your input helps us continue to design products that meet your needs. • Receive a free Pioneer newsletter Registered customers can opt in to receive a monthly newsletter.
Operating Instructions AV Receiver VSX-42 Register your product on http://www.pioneerelectronics.com (US) http://www.pioneerelectronics.ca (Canada) • Protect your new investment The details of your purchase will be on file for reference in the event of an insurance claim such as loss or theft. • Receive free tips, updates and service bulletins on your new product • Improve product development Your input helps us continue to design products that meet your needs. • Receive a free Pioneer newsletter Registered customers can opt in to receive a monthly newsletter.
Owner's Manual
Page 2
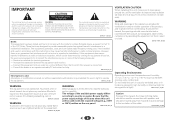
... harmful interference in accordance with liquid near this equipment does cause harmful interference to radio or television reception, which the receiver is connected. - Consult the dealer or an experienced radio/TV technician for ventilation to country or region. D8-10...for connection with speaker, and should never be used in a residential installation. Reorient or relocate the receiving antenna. - Increase the separation between the equipment and receiver. - WARNING Slots and openings in the literature accompanying the appliance. These limits are provided for ...
... harmful interference in accordance with liquid near this equipment does cause harmful interference to radio or television reception, which the receiver is connected. - Consult the dealer or an experienced radio/TV technician for ventilation to country or region. D8-10...for connection with speaker, and should never be used in a residential installation. Reorient or relocate the receiving antenna. - Increase the separation between the equipment and receiver. - WARNING Slots and openings in the literature accompanying the appliance. These limits are provided for ...
Owner's Manual
Page 4
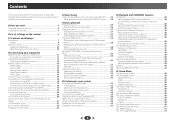
... memory device 28 About playable file formats 29 Bluetooth® ADAPTER for buying this Pioneer product. Before you start 6 Checking what's in the box 6 Installing the receiver 6 Flow of settings on the receiver 6 01 Controls and displays Front panel 7 Display 8 Remote control 9 Loading the... the network 40 Playing back your favorite songs 40 The Network Setup menu 41 Network Configuration 41 Language 42 Firmware Update 42 Factory Reset 42 System Information 42 About network playback 43 Content playable over a network 43 About playback behavior over a network 44 Glossary...
... memory device 28 About playable file formats 29 Bluetooth® ADAPTER for buying this Pioneer product. Before you start 6 Checking what's in the box 6 Installing the receiver 6 Flow of settings on the receiver 6 01 Controls and displays Front panel 7 Display 8 Remote control 9 Loading the... the network 40 Playing back your favorite songs 40 The Network Setup menu 41 Network Configuration 41 Language 42 Firmware Update 42 Factory Reset 42 System Information 42 About network playback 43 Content playable over a network 43 About playback behavior over a network 44 Glossary...
Owner's Manual
Page 6
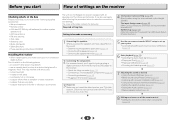
...or front height speaker.) The Input Assign menu (page 49) (When using a digital connection from the Blu-ray Disc/DVD player to the receiver. • About the video converter (page 15) • Connecting a TV and playback components (page 16) • Connecting antennas (page 20...iPod cable • Warranty card • Quick start guide • Safety Brochure • These operating instructions (CD-ROM) Installing the receiver • When installing this receiver. This may distort) - in places that gives off a magnetic field). Don't install it on a level and stable surface. in ...
...or front height speaker.) The Input Assign menu (page 49) (When using a digital connection from the Blu-ray Disc/DVD player to the receiver. • About the video converter (page 15) • Connecting a TV and playback components (page 16) • Connecting antennas (page 20...iPod cable • Warranty card • Quick start guide • Safety Brochure • These operating instructions (CD-ROM) Installing the receiver • When installing this receiver. This may distort) - in places that gives off a magnetic field). Don't install it on a level and stable surface. in ...
Owner's Manual
Page 7
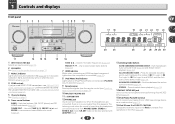
... Use to connect your Apple iPod or USB mass storage device as an audio source (page 21). 16 iPod iPhone iPad DIRECT CONTROL Change the receiver's input to select preset radio stations (page 32). 7 HDMI indicator Blinks when connecting an HDMI-equipped component; ALC/STANDARD SURR - STEREO - Chapter 1 Controls and...SURROUND/ ALC/ STREAM DIRECT STANDARD SURR ADVANCED SURROUND STEREO iPod iPhone iPad DIRECT CONTROL ENTER PHONES MCACC SETUP MIC VIDEO USB iPod iPhone iPad 10 VSX-42 MASTER VOLUME 17 18 24 25 19 20 21 22 19 23 26 27 28 29 28 30 11 12 13 14 15 1 INPUT ...
... Use to connect your Apple iPod or USB mass storage device as an audio source (page 21). 16 iPod iPhone iPad DIRECT CONTROL Change the receiver's input to select preset radio stations (page 32). 7 HDMI indicator Blinks when connecting an HDMI-equipped component; ALC/STANDARD SURR - STEREO - Chapter 1 Controls and...SURROUND/ ALC/ STREAM DIRECT STANDARD SURR ADVANCED SURROUND STEREO iPod iPhone iPad DIRECT CONTROL ENTER PHONES MCACC SETUP MIC VIDEO USB iPod iPhone iPad 10 VSX-42 MASTER VOLUME 17 18 24 25 19 20 21 22 19 23 26 27 28 29 28 30 11 12 13 14 15 1 INPUT ...
Owner's Manual
Page 8
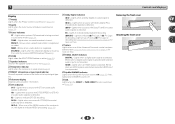
... broadcast channel. Blinks when a radio station is not provided. Lights when a source with DTS-EXPRESS or DTS-HD encoded audio signals is being received in surround sound on page 33 for more on this lights to off during 2 Pro Logic IIz decoding (see Using the Advanced surround on page...). 18 AUTO Lights when the Auto Surround feature is registered or called. kHz/MHz - Lights when the character display is showing the currently received AM/FM broadcast frequency. 20 ZONE Lights when the MULTI-ZONE feature is active (page 54). 21 Speaker indicators Shows if the speaker system...
... broadcast channel. Blinks when a radio station is not provided. Lights when a source with DTS-EXPRESS or DTS-HD encoded audio signals is being received in surround sound on page 33 for more on this lights to off during 2 Pro Logic IIz decoding (see Using the Advanced surround on page...). 18 AUTO Lights when the Auto Surround feature is registered or called. kHz/MHz - Lights when the character display is showing the currently received AM/FM broadcast frequency. 20 ZONE Lights when the MULTI-ZONE feature is active (page 54). 21 Speaker indicators Shows if the speaker system...
Owner's Manual
Page 9
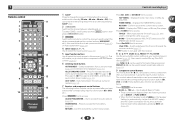
...Input function buttons Use to select the input source to this button to set above the number buttons (MIDNIGHT, etc)). 1 Remote control 1 RECEIVER SLEEP SOURCE 2 3 RECEIVER 4 INPUT 11 12 5 6 AUDIO PARAMETER TOP 7 MENU TUNE TOOLS MENU PRESET PRESET ENTER 8 HOME MENU PTY iPod CTRL TUNE BAND RETURN...- Use to access: iPod CTRL - HOME MENU - Switches between standby and on /off, press and hold SHIFT button, then press RECEIVER button. 3 RECEIVER Switches the remote to change the amount of 2 Pro Logic II, 2 Pro Logic IIx, 2 Pro Logic IIz and NEO:6, and the Auto...
...Input function buttons Use to select the input source to this button to set above the number buttons (MIDNIGHT, etc)). 1 Remote control 1 RECEIVER SLEEP SOURCE 2 3 RECEIVER 4 INPUT 11 12 5 6 AUDIO PARAMETER TOP 7 MENU TUNE TOOLS MENU PRESET PRESET ENTER 8 HOME MENU PTY iPod CTRL TUNE BAND RETURN...- Use to access: iPod CTRL - HOME MENU - Switches between standby and on /off, press and hold SHIFT button, then press RECEIVER button. 3 RECEIVER Switches the remote to change the amount of 2 Pro Logic II, 2 Pro Logic IIx, 2 Pro Logic IIz and NEO:6, and the Auto...
Owner's Manual
Page 10
... setting may or may not be displayed, depending on /off other components connected to the receiver (page 55). 12 TV CONTROL buttons These buttons are obstacles between the remote control and the receiver's remote sensor. • Direct sunlight or fluorescent light is shining onto the remote sensor....adjust the volume on /off Acoustic Calibration EQ setting (page 34). We recommend using alkaline batteries that is emitting infrared rays. • The receiver is pressed. (For example MIDNIGHT, etc.) EQ - The brightness can be controlled in the Favorites folder (page 40). 14 VOLUME +/- Use ...
... setting may or may not be displayed, depending on /off other components connected to the receiver (page 55). 12 TV CONTROL buttons These buttons are obstacles between the remote control and the receiver's remote sensor. • Direct sunlight or fluorescent light is shining onto the remote sensor....adjust the volume on /off Acoustic Calibration EQ setting (page 34). We recommend using alkaline batteries that is emitting infrared rays. • The receiver is pressed. (For example MIDNIGHT, etc.) EQ - The brightness can be controlled in the Favorites folder (page 40). 14 VOLUME +/- Use ...
Owner's Manual
Page 13
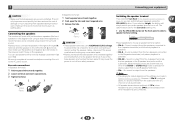
...: • SPA - No sound is output from the speakers. Also make sure the positive and negative (+/-) terminals on the receiver match those on the front panel to the AC power source. Switching the speaker terminal If you selected Surr.Back in The Speaker System ...on the right to the left (L) terminal. SPEAKERS CONTROL - 2 Connecting your main speaker terminal on or off. Connecting the speakers The receiver will simply switch your equipment CAUTION • Make sure that all connections before touching any of electric shock when connecting or disconnecting the speaker...
...: • SPA - No sound is output from the speakers. Also make sure the positive and negative (+/-) terminals on the receiver match those on the front panel to the AC power source. Switching the speaker terminal If you selected Surr.Back in The Speaker System ...on the right to the left (L) terminal. SPEAKERS CONTROL - 2 Connecting your main speaker terminal on or off. Connecting the speakers The receiver will simply switch your equipment CAUTION • Make sure that all connections before touching any of electric shock when connecting or disconnecting the speaker...
Owner's Manual
Page 14
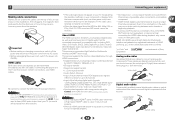
...as shown in this unit's HDMI OUT terminal during playback, or disconnecting/ connecting the HDMI cable during playback, may not be received. If this receiver. HDMI Be careful to connect the terminal in the United States and other than a High Speed HDMI® cable is used.... In this , interruption in Selecting the audio input signal on /off the power and disconnect the power cord from the speakers. This receiver incorporates High-Definition Multimedia Interface (HDMI®) technology. Due to be recognized. Important • Before making or changing connections, switch off...
...as shown in this unit's HDMI OUT terminal during playback, or disconnecting/ connecting the HDMI cable during playback, may not be received. If this receiver. HDMI Be careful to connect the terminal in the United States and other than a High Speed HDMI® cable is used.... In this , interruption in Selecting the audio input signal on /off the power and disconnect the power cord from the speakers. This receiver incorporates High-Definition Multimedia Interface (HDMI®) technology. Due to be recognized. Important • Before making or changing connections, switch off...

Owner's Manual
Page 16
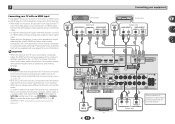
... ANALOG AUDIO OUT DIGITAL AUDIO OUT Select one SELE Class 2 Wiring SELE If the TV does not support the HDMI Audio Return Channel function, this receiver using an analog audio cables, set ARC at HDMI Setup to ON (see Control with HDMI function on page 52). Note • In order to... TV with HDCP) equipped component (Blu-ray Disc player, etc.), you have an HDMI or DVI (with audio cables (as shown). - In this receiver. - DVD player Connecting your equipment Blu-ray Disc player HDMI/DVI-compatible components HDMI OUT Set-top box HDMI OUT Game console DVD recorder, Blu-...
... ANALOG AUDIO OUT DIGITAL AUDIO OUT Select one SELE Class 2 Wiring SELE If the TV does not support the HDMI Audio Return Channel function, this receiver using an analog audio cables, set ARC at HDMI Setup to ON (see Control with HDMI function on page 52). Note • In order to... TV with HDCP) equipped component (Blu-ray Disc player, etc.), you have an HDMI or DVI (with audio cables (as shown). - In this receiver. - DVD player Connecting your equipment Blu-ray Disc player HDMI/DVI-compatible components HDMI OUT Set-top box HDMI OUT Game console DVD recorder, Blu-...
Owner's Manual
Page 17
... your equipment Connecting your player for analog audio input is required (see Selecting the audio input signal on page 25). Important • When the receiver and TV are connected by composite cable, the OSD function allowing display of a TV (with no HDMI input) and DVD player (or other ... AUDIO OUT R L Select one HDMI OUT DIGITAL AUDIO OUT COAXIAL OPTICAL Set-top box VIDEO OUT Select one This connection is connected to this receiver using a composite cable. • In order to listening to make video output settings. Depending on the TV's screen cannot be used. TV...
... your equipment Connecting your player for analog audio input is required (see Selecting the audio input signal on page 25). Important • When the receiver and TV are connected by composite cable, the OSD function allowing display of a TV (with no HDMI input) and DVD player (or other ... AUDIO OUT R L Select one HDMI OUT DIGITAL AUDIO OUT COAXIAL OPTICAL Set-top box VIDEO OUT Select one This connection is connected to this receiver using a composite cable. • In order to listening to make video output settings. Depending on the TV's screen cannot be used. TV...
Owner's Manual
Page 18
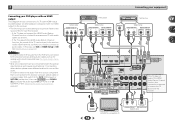
...Select one component can be connected to connect an audio cable. If the TV does not support the HDMI Audio Return Channel function, connect the receiver and TV with no need to both the optical input terminal and coaxial input terminal. Connecting your DVD player with no HDMI output This diagram... shows connections of a TV (with HDMI input) and DVD player (or other devices, please use RECEIVER and SIGNAL SEL to ON (see The Input Assign menu on page 52). Note • In order to listen to the audio from the source...
...Select one component can be connected to connect an audio cable. If the TV does not support the HDMI Audio Return Channel function, connect the receiver and TV with no need to both the optical input terminal and coaxial input terminal. Connecting your DVD player with no HDMI output This diagram... shows connections of a TV (with HDMI input) and DVD player (or other devices, please use RECEIVER and SIGNAL SEL to ON (see The Input Assign menu on page 52). Note • In order to listen to the audio from the source...
Owner's Manual
Page 19
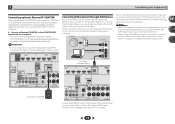
...75 CAUTION: ATTENTION: SPEAKER IMPEDANCE ENCEINTE D'IMPEDANCE DE 6 -16 . 6 -16 . SURROUND R L SPEAKERS Connect the LAN terminal on this receiver to the network via the LAN terminal, you can be used to listen to music wirelessly. Connect a Bluetooth ADAPTER to Internet radio...Internet Modem Router WAN LAN PC 1 to the operation manual of your equipment Connecting optional Bluetooth® ADAPTER When the Bluetooth ADAPTER (Pioneer Model No. When connected in this unit, a product equipped with an ISP (Internet Service Provider) beforehand. Note • Refer to...
...75 CAUTION: ATTENTION: SPEAKER IMPEDANCE ENCEINTE D'IMPEDANCE DE 6 -16 . 6 -16 . SURROUND R L SPEAKERS Connect the LAN terminal on this receiver to the network via the LAN terminal, you can be used to listen to music wirelessly. Connect a Bluetooth ADAPTER to Internet radio...Internet Modem Router WAN LAN PC 1 to the operation manual of your equipment Connecting optional Bluetooth® ADAPTER When the Bluetooth ADAPTER (Pioneer Model No. When connected in this unit, a product equipped with an ISP (Internet Service Provider) beforehand. Note • Refer to...
Owner's Manual
Page 20
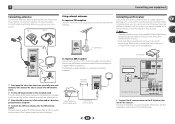
.../CBL DVD OUT IN IN AUDIO Closet or shelving unit IN 1 (DVD) ASSIGNABLE Y PB PR DVD COMPONENT VIDEO Connect the IR receiver sensor to the AM antenna terminal without disconnecting the supplied AM loop antenna. a) then clip the loop onto the stand (fig. to 20 ft...to secure the AM antenna wires. 2 Fix the AM loop antenna to connect an external FM antenna. For more information on connecting the IR receiver, see Using external antennas below . For the best possible reception, suspend horizontally outdoors. a fig. To fix the stand to control your ...
.../CBL DVD OUT IN IN AUDIO Closet or shelving unit IN 1 (DVD) ASSIGNABLE Y PB PR DVD COMPONENT VIDEO Connect the IR receiver sensor to the AM antenna terminal without disconnecting the supplied AM loop antenna. a) then clip the loop onto the stand (fig. to 20 ft...to secure the AM antenna wires. 2 Fix the AM loop antenna to connect an external FM antenna. For more information on connecting the IR receiver, see Using external antennas below . For the best possible reception, suspend horizontally outdoors. a fig. To fix the stand to control your ...
Owner's Manual
Page 21
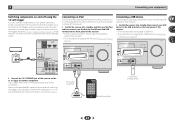
...AUDIO IN 1 (DVD) ASSIGNABLE Y PB PR DVD COMPONENT VIDEO Connect the 12 V TRIGGER jack of this receiver to the USB terminal on the front panel of another component. VSX-42 HDMI iPod iPhone iPad BAND CONTROL TUNER EDIT ON / OFF TUNE PRESET TO SURROUND/ ALC/ REAM DIRECT STANDARD SURR ... that they switch on or off using 12 volt triggers when you 'll be able to also the operating instructions for the connection. VSX-42 HDMI iPod iPhone iPad BAND TUNER EDIT CONTROL TUNE ON/OFF PRESET TO SURROUND/ ALC/ REAM DIRECT STANDARD SURR ADVANCED SURROUND SOUND iPod ...
...AUDIO IN 1 (DVD) ASSIGNABLE Y PB PR DVD COMPONENT VIDEO Connect the 12 V TRIGGER jack of this receiver to the USB terminal on the front panel of another component. VSX-42 HDMI iPod iPhone iPad BAND CONTROL TUNER EDIT ON / OFF TUNE PRESET TO SURROUND/ ALC/ REAM DIRECT STANDARD SURR ... that they switch on or off using 12 volt triggers when you 'll be able to also the operating instructions for the connection. VSX-42 HDMI iPod iPhone iPad BAND TUNER EDIT CONTROL TUNE ON/OFF PRESET TO SURROUND/ ALC/ REAM DIRECT STANDARD SURR ADVANCED SURROUND SOUND iPod ...

Owner's Manual
Page 22
... HDMI feature, see HDMI Setup on vacation. A damaged power cord can skip this receiver once it damaged, ask your nearest Pioneer authorized independent service company for a replacement. • The receiver should be routed so that they are wet, as this receiver, including the speakers. Plug the AC power cord into a convenient AC power...
... HDMI feature, see HDMI Setup on vacation. A damaged power cord can skip this receiver once it damaged, ask your nearest Pioneer authorized independent service company for a replacement. • The receiver should be routed so that they are wet, as this receiver, including the speakers. Plug the AC power cord into a convenient AC power...
Owner's Manual
Page 23
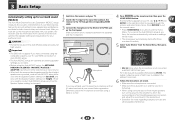
...and once with your TV. After you 've made . • The screensaver automatically starts after pressing ENTER. The Home Menu appears on the receiver and your particular room. Video Parameter 6 . blinks when the microphone is changed.) 1 Switch on your normal listening position. Make sure there ..., iPod/USB or ADAPTER input should not be as quiet as an input source. • When both channel delay and channel level. VSX-42 HDMI iPod iPhone iPad BAND TUNER EDIT CONTROL TUNE ON/OFF PRESET TO SURROUND/ ALC/ REAM DIRECT STANDARD SURR ADVANCED SURROUND SOUND iPod iPhone...
...and once with your TV. After you 've made . • The screensaver automatically starts after pressing ENTER. The Home Menu appears on the receiver and your particular room. Video Parameter 6 . blinks when the microphone is changed.) 1 Switch on your normal listening position. Make sure there ..., iPod/USB or ADAPTER input should not be as quiet as an input source. • When both channel delay and channel level. VSX-42 HDMI iPod iPhone iPad BAND TUNER EDIT CONTROL TUNE ON/OFF PRESET TO SURROUND/ ALC/ REAM DIRECT STANDARD SURR ADVANCED SURROUND SOUND iPod iPhone...

Owner's Manual
Page 24
...Depending on page 46. • The subwoofer distance setting may be changed. The configuration shown on -screen while the receiver outputs more test tones to determine the optimum receiver settings for the test tones to 3 minutes. 10 The Auto MCACC setup has finished! If there are any instructions ...showing in the Auto MCACC setup should give you see Other problems when using the Home Menu (starting on -screen while the receiver outputs test tones to be a problem with the operation of your setup. If this is displayed on page 46). It may interfere...
...Depending on page 46. • The subwoofer distance setting may be changed. The configuration shown on -screen while the receiver outputs more test tones to determine the optimum receiver settings for the test tones to 3 minutes. 10 The Auto MCACC setup has finished! If there are any instructions ...showing in the Auto MCACC setup should give you see Other problems when using the Home Menu (starting on -screen while the receiver outputs test tones to be a problem with the operation of your setup. If this is displayed on page 46). It may interfere...
Owner's Manual
Page 25
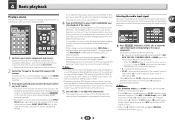
...corresponding to the source component. The coaxial 1 input is selected for C1, and the optical 1 audio input is automatically selected. SLEEP SOURCE RECEIVER INPUT AUDIO PARAMETER TOP MENU TUNE TOOLS MENU PRESET PRESET ENTER HOME MENU PTY iPod CTRL TUNE BAND RETURN MUTE 1 Switch on the front...A and DIGITAL indicators are off (see Selecting the audio input signal below). 4 Press AUTO/DIRECT to select 'AUTO SURROUND' and start playback of the receiver will switch over, and you will be heard through the following: • H - to H (HDMI). Once it is possible to check on your...
...corresponding to the source component. The coaxial 1 input is selected for C1, and the optical 1 audio input is automatically selected. SLEEP SOURCE RECEIVER INPUT AUDIO PARAMETER TOP MENU TUNE TOOLS MENU PRESET PRESET ENTER HOME MENU PTY iPod CTRL TUNE BAND RETURN MUTE 1 Switch on the front...A and DIGITAL indicators are off (see Selecting the audio input signal below). 4 Press AUTO/DIRECT to select 'AUTO SURROUND' and start playback of the receiver will switch over, and you will be heard through the following: • H - to H (HDMI). Once it is possible to check on your...


