Owner's Manual
Page 4
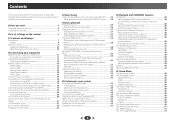
... sound quality 11 Connecting the speakers 13 Switching the speaker terminal 13 Making cable connections 14 HDMI cables 14 About HDMI 14 Analog audio cables 14 Digital audio cables 14 Video cables 15 About the video converter 15 Connecting a TV and playback components 16 Connecting using HDMI 16 Connecting your TV with no HDMI input 17 Connecting your DVD player with no HDMI output . . . . 18 Connecting optional Bluetooth® ADAPTER 19 Connecting to the network through LAN interface 19 Connecting antennas 20 Using external antennas 20 Connecting an IR receiver...
... sound quality 11 Connecting the speakers 13 Switching the speaker terminal 13 Making cable connections 14 HDMI cables 14 About HDMI 14 Analog audio cables 14 Digital audio cables 14 Video cables 15 About the video converter 15 Connecting a TV and playback components 16 Connecting using HDMI 16 Connecting your TV with no HDMI input 17 Connecting your DVD player with no HDMI output . . . . 18 Connecting optional Bluetooth® ADAPTER 19 Connecting to the network through LAN interface 19 Connecting antennas 20 Using external antennas 20 Connecting an IR receiver...
Owner's Manual
Page 6
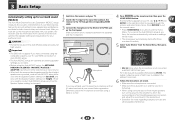
...; Connecting the speakers (page 13) • Switching the speaker terminal (page 13) 2 Connecting the components For surround sound, you'll want to hook up using a digital connection from the Blu-ray Disc/DVD player to the receiver. • About the video converter (page 15) • Connecting a TV and playback components (page 16) • Connecting antennas (page 20) • Plugging in the receiver (page 22) 3 Power On Make sure you've set the video input on...
...; Connecting the speakers (page 13) • Switching the speaker terminal (page 13) 2 Connecting the components For surround sound, you'll want to hook up using a digital connection from the Blu-ray Disc/DVD player to the receiver. • About the video converter (page 15) • Connecting a TV and playback components (page 16) • Connecting antennas (page 20) • Plugging in the receiver (page 22) 3 Power On Make sure you've set the video input on...
Owner's Manual
Page 7
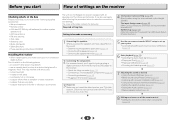
.... Switches between Auto surround mode (page 33) and Stream Direct playback (page 34). lights when the component is connected (page 16). 8 iPod iPhone iPad indicator Lights when an iPod/iPhone/iPad is connected and iPod/USB input is selected (page 27). 9 Remote sensor Receives the signals from the remote control (see Using the MULTI-ZONE controls on page 54). 5 Character display See Display on page 8. 6 Tuner control buttons BAND - Chapter 1 Controls and displays Front panel 1 23 4 5 6 7 89 INPUT SELECTOR STANDBY / ON MCACC HDMI iPod iPhone iPad SPEAKERS CONTROL MULTI-ZONE...
.... Switches between Auto surround mode (page 33) and Stream Direct playback (page 34). lights when the component is connected (page 16). 8 iPod iPhone iPad indicator Lights when an iPod/iPhone/iPad is connected and iPod/USB input is selected (page 27). 9 Remote sensor Receives the signals from the remote control (see Using the MULTI-ZONE controls on page 54). 5 Character display See Display on page 8. 6 Tuner control buttons BAND - Chapter 1 Controls and displays Front panel 1 23 4 5 6 7 89 INPUT SELECTOR STANDBY / ON MCACC HDMI iPod iPhone iPad SPEAKERS CONTROL MULTI-ZONE...
Owner's Manual
Page 9
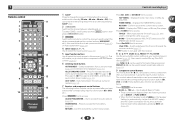
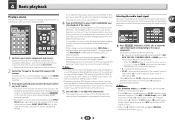
...). Use to access: BASS +/-, TRE +/- - HOME MENU - RETURN - HOME MENU - Confirm and exit the current menu screen. BAND - Use TUNE / can be used to find radio frequencies and PRESET / can be used with the remote control (page 55). 6 Listening mode buttons AUTO/DIRECT - This will be accessed after you have selected the corresponding input function button (BD, DVD, etc.). ALC/STANDARD SURR - Press RECEIVER first to access: TOP MENU - Displays the HOME MENU screen. MENU - Switches between AM, FM ST (stereo...
...). Use to access: BASS +/-, TRE +/- - HOME MENU - RETURN - HOME MENU - Confirm and exit the current menu screen. BAND - Use TUNE / can be used to find radio frequencies and PRESET / can be used with the remote control (page 55). 6 Listening mode buttons AUTO/DIRECT - This will be accessed after you have selected the corresponding input function button (BD, DVD, etc.). ALC/STANDARD SURR - Press RECEIVER first to access: TOP MENU - Displays the HOME MENU screen. MENU - Switches between AM, FM ST (stereo...
Owner's Manual
Page 10
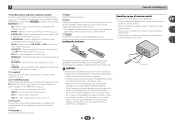
... excessively hot place, such as leakage and bursting. Operating range of this system assign it to select ON, AUTO or OFF the surround back channel (page 35). Press to the TV button. Press to select the audio input signal of the component to set the listening volume. 15 MUTE Mutes/unmutes the sound. 16 DISP Switches the display of remote control The remote control may result in such hazards as inside a car...
... excessively hot place, such as leakage and bursting. Operating range of this system assign it to select ON, AUTO or OFF the surround back channel (page 35). Press to the TV button. Press to select the audio input signal of the component to set the listening volume. 15 MUTE Mutes/unmutes the sound. 16 DISP Switches the display of remote control The remote control may result in such hazards as inside a car...
Owner's Manual
Page 12
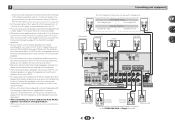
... FERDVR/BDR VIDEO COAXIAL ASSIGNABLE IN 1 (CD) OPTICAL ASSIGNABLE IN 1 (TV) 2 V AX) SAT/CBL DVD IN IN AUDIO PRE OUT SUB WOOFER ADAPTER PORT (OUTPUT 5 V 0.1 A MAX) L ZONE 2 ANTENNA OUT A R FRONT L R AM LOOP L FRONT IN R L R SURROUND SURROUND BACK R L R L CENTER SURROUND R L SURROUND BACK R L(Single) FRONT HEIGHT/ B R L PB PR ONENT VIDEO DVD SAT/CBL ANALOG IN 1 (CD) ASSIGNABLE FM UNBAL 75 CAUTION: ATTENTION: SPEAKER IMPEDANCE ENCEINTE D'IMPEDANCE DE 6 -16 . 6 -16 . left Front right Center Front left Speaker B setting Speaker B - 2 - If not...
... FERDVR/BDR VIDEO COAXIAL ASSIGNABLE IN 1 (CD) OPTICAL ASSIGNABLE IN 1 (TV) 2 V AX) SAT/CBL DVD IN IN AUDIO PRE OUT SUB WOOFER ADAPTER PORT (OUTPUT 5 V 0.1 A MAX) L ZONE 2 ANTENNA OUT A R FRONT L R AM LOOP L FRONT IN R L R SURROUND SURROUND BACK R L R L CENTER SURROUND R L SURROUND BACK R L(Single) FRONT HEIGHT/ B R L PB PR ONENT VIDEO DVD SAT/CBL ANALOG IN 1 (CD) ASSIGNABLE FM UNBAL 75 CAUTION: ATTENTION: SPEAKER IMPEDANCE ENCEINTE D'IMPEDANCE DE 6 -16 . 6 -16 . left Front right Center Front left Speaker B setting Speaker B - 2 - If not...
Owner's Manual
Page 13
... speaker cables, disconnect the power cord before connecting this unit to choose a speaker terminal option: • SPA - Sound is output from the subwoofer (the LFE channel is not downmixed). • All speaker terminals are switched off (SP) when headphones are connected. Note • The subwoofer output depends on the settings you selected Height, the button will work with a nominal impedance between speakers using at least three speakers is recommended, and a complete setup is selected...
... speaker cables, disconnect the power cord before connecting this unit to choose a speaker terminal option: • SPA - Sound is output from the subwoofer (the LFE channel is not downmixed). • All speaker terminals are switched off (SP) when headphones are connected. Note • The subwoofer output depends on the settings you selected Height, the button will work with a nominal impedance between speakers using at least three speakers is recommended, and a complete setup is selected...
Owner's Manual
Page 14
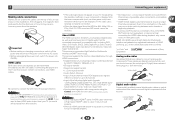
... video (contents protected by the transformers in the proper direction. HDMI cables Both video and sound signals can be displayed. "x.v.Color" and Corporation. Coaxial digital audio cable COAINXIAL OPTINICAL Optical cable 14 are only possible when connected to a compatible component. • HDMI format digital audio transmissions require a longer time to 8 channels • Input of this receiver). • If the video signal does not appear on your TV, try adjusting the resolution settings on /off the power and disconnect the power cord...
... video (contents protected by the transformers in the proper direction. HDMI cables Both video and sound signals can be displayed. "x.v.Color" and Corporation. Coaxial digital audio cable COAINXIAL OPTINICAL Optical cable 14 are only possible when connected to a compatible component. • HDMI format digital audio transmissions require a longer time to 8 channels • Input of this receiver). • If the video signal does not appear on your TV, try adjusting the resolution settings on /off the power and disconnect the power cord...
Owner's Manual
Page 19
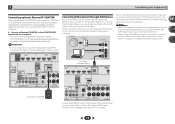
... (Internet Service Provider) beforehand. DVD SAT/CBL BD GAME DVR/BDR VIDEO PRE OUT SUB WOOFER IR ADAPTER PORT IN OUT 12 V TRIGGER (OUTPUT 12 V 50 mA MAX) VIDEO MONITOR SAT/CBL DVD OUT IN IN AUDIO (OUTPUT 5 V 0.1 A MAX) L ZONE 2 ANTENNA OUT A R FRONT L CEN R AM LOOP IN 1 (DVD) ASSIGNABLE Y PB PR COMPONENT VIDEO L IN R DVD SAT/CBL ANALOG IN 1 (CD) ASSIGNABLE FM UNBAL 75 CAUTION: ATTENTION: SPEAKER IMPEDANCE ENCEINTE D'IMPEDANC 6 -16 . 6 -16 . 2 Connecting your...
... (Internet Service Provider) beforehand. DVD SAT/CBL BD GAME DVR/BDR VIDEO PRE OUT SUB WOOFER IR ADAPTER PORT IN OUT 12 V TRIGGER (OUTPUT 12 V 50 mA MAX) VIDEO MONITOR SAT/CBL DVD OUT IN IN AUDIO (OUTPUT 5 V 0.1 A MAX) L ZONE 2 ANTENNA OUT A R FRONT L CEN R AM LOOP IN 1 (DVD) ASSIGNABLE Y PB PR COMPONENT VIDEO L IN R DVD SAT/CBL ANALOG IN 1 (CD) ASSIGNABLE FM UNBAL 75 CAUTION: ATTENTION: SPEAKER IMPEDANCE ENCEINTE D'IMPEDANC 6 -16 . 6 -16 . 2 Connecting your...
Owner's Manual
Page 20
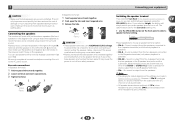
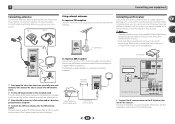
... antenna wires. 2 Fix the AM loop antenna to the attached stand. IR receiver Other component IR IN HDMI OUT DVD SAT/CBL IR IN OUT 12 V TRIGGER (OUTPUT 12 V 50 mA MAX) VIDEO MONITOR SAT/CBL DVD OUT IN IN AUDIO Closet or shelving unit IN 1 (DVD) ASSIGNABLE Y PB PR DVD COMPONENT VIDEO Connect the IR receiver sensor to the IR IN jack on the rear of vinyl-coated wire to the antenna...
... antenna wires. 2 Fix the AM loop antenna to the attached stand. IR receiver Other component IR IN HDMI OUT DVD SAT/CBL IR IN OUT 12 V TRIGGER (OUTPUT 12 V 50 mA MAX) VIDEO MONITOR SAT/CBL DVD OUT IN IN AUDIO Closet or shelving unit IN 1 (DVD) ASSIGNABLE Y PB PR DVD COMPONENT VIDEO Connect the IR receiver sensor to the IR IN jack on the rear of vinyl-coated wire to the antenna...
Owner's Manual
Page 21
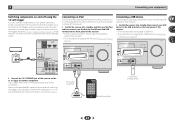
... MASTER VOLUME USB mass storage device 21 VSX-42 HDMI iPod iPhone iPad BAND CONTROL TUNER EDIT ON / OFF TUNE PRESET TO SURROUND/ ALC/ REAM DIRECT STANDARD SURR ADVANCED SURROUND SOUND iPod iPhone iPad RETRIEVER AIR DIRECT CONTROL ENTER MCACC SETUP MIC VIDEO USB iPod iPhone iPad MASTER VOLUME iPod cable (supplied) iPod/iPhone/iPad Connecting a USB device It is possible to switch the component on or off using the The 12 V Trigger Setting on page 27. After you select an input function. HDMI OUT DVD...
... MASTER VOLUME USB mass storage device 21 VSX-42 HDMI iPod iPhone iPad BAND CONTROL TUNER EDIT ON / OFF TUNE PRESET TO SURROUND/ ALC/ REAM DIRECT STANDARD SURR ADVANCED SURROUND SOUND iPod iPhone iPad RETRIEVER AIR DIRECT CONTROL ENTER MCACC SETUP MIC VIDEO USB iPod iPhone iPad MASTER VOLUME iPod cable (supplied) iPod/iPhone/iPad Connecting a USB device It is possible to switch the component on or off using the The 12 V Trigger Setting on page 27. After you select an input function. HDMI OUT DVD...
Owner's Manual
Page 23
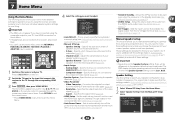
... input should not be selected as possible after three minutes of inactivity. 5 Select 'Auto MCACC' from a series of test tones to optimize the speaker settings and equalization for your particular room. The Home Menu appears on the power to the amplifier to which the surround back or front height speakers are connected, and adjust the sound level to exit the Home Menu. Manual SP Setup 3 . HDMI Setup 7 . ZONE2 Setup 10 . 12V Trigger • Mic In! blinks when the microphone...
... input should not be selected as possible after three minutes of inactivity. 5 Select 'Auto MCACC' from a series of test tones to optimize the speaker settings and equalization for your particular room. The Home Menu appears on the power to the amplifier to which the surround back or front height speakers are connected, and adjust the sound level to exit the Home Menu. Manual SP Setup 3 . HDMI Setup 7 . ZONE2 Setup 10 . 12V Trigger • Mic In! blinks when the microphone...

Owner's Manual
Page 24
.... 1 . You can correct the setting manually using the Auto MCACC setup below). 3 Basic Setup 7 Wait for the test tones to change the setting. Try to the next step. If selecting RETRY doesn't fix the problem, turn off if necessary. The settings made in the Auto MCACC setup should give you see Other problems when using the Speaker Setting on -screen while the receiver outputs more test tones to determine the optimum receiver settings for channel level, speaker distance, and Acoustic Calibration...
.... 1 . You can correct the setting manually using the Auto MCACC setup below). 3 Basic Setup 7 Wait for the test tones to change the setting. Try to the next step. If selecting RETRY doesn't fix the problem, turn off if necessary. The settings made in the Auto MCACC setup should give you see Other problems when using the Speaker Setting on -screen while the receiver outputs more test tones to determine the optimum receiver settings for channel level, speaker distance, and Acoustic Calibration...
Owner's Manual
Page 25
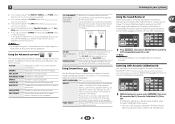
... TUNE BAND RETURN MUTE 1 Switch on your TV so that connects this receiver. Start by using INPUT SELECT buttons on the remote control, or by switching on your home theater system. Note • You may only get digital 2 channel stereo and analog sound. It should hear surround sound. When H (HDMI) or C1/O1 (digital) is selected and the selected audio input is not provided, A (analog) is an MPEG audio option, set this receiver to the VIDEO jacks on the playback component (for example a DVD player...
... TUNE BAND RETURN MUTE 1 Switch on your TV so that connects this receiver. Start by using INPUT SELECT buttons on the remote control, or by switching on your home theater system. Note • You may only get digital 2 channel stereo and analog sound. It should hear surround sound. When H (HDMI) or C1/O1 (digital) is selected and the selected audio input is not provided, A (analog) is an MPEG audio option, set this receiver to the VIDEO jacks on the playback component (for example a DVD player...
Owner's Manual
Page 34
... music sources. The S.R AIR listening mode can also adjust the C.WIDTH, DIMEN., and PNRM. PURE DIRECT Analog and PCM sources are heard according to compressed 2-channel audio by using STEREO button on page 36). Refer to see Setting the Audio options on Acoustic Calibration Equalization. You can only selected when the ADAPTER input. Try different modes with dual mono settings. SPORTS Suitable for sports programs. CLASSICAL Gives a large concert hall-type sound...
... music sources. The S.R AIR listening mode can also adjust the C.WIDTH, DIMEN., and PNRM. PURE DIRECT Analog and PCM sources are heard according to compressed 2-channel audio by using STEREO button on page 36). Refer to see Setting the Audio options on Acoustic Calibration Equalization. You can only selected when the ADAPTER input. Try different modes with dual mono settings. SPORTS Suitable for sports programs. CLASSICAL Gives a large concert hall-type sound...
Owner's Manual
Page 36
... PCM signal on the operational status of non-PCM sources. The LOUDNESS is used to get good bass and treble from front speakers F.PCM (Fixed PCM) OFF This is useful if you find there is unavailable due to the current source, settings and status of sync with an HDMI cable. Channel 1 is heard only CH1 CH2 - Both channels heard from music sources at low volumes. AUTOe MAX MID OFF LFE ATT (LFE Attenuate) Some Dolby Digital and DTS audio sources include ultra-low bass tones. Set...
... PCM signal on the operational status of non-PCM sources. The LOUDNESS is used to get good bass and treble from front speakers F.PCM (Fixed PCM) OFF This is useful if you find there is unavailable due to the current source, settings and status of sync with an HDMI cable. Channel 1 is heard only CH1 CH2 - Both channels heard from music sources at low volumes. AUTOe MAX MID OFF LFE ATT (LFE Attenuate) Some Dolby Digital and DTS audio sources include ultra-low bass tones. Set...
Owner's Manual
Page 46
... output from the Manual SP Setup menu. 2 . Setup the volume level of the audio from the 12 V trigger terminal (see The Auto Power Down menu on page 51). Manual SP Setup a . Use HDMI connection for several hours (see The 12 V Trigger Setting on page 50). • Network Standby - Input Assign 4 . Analog Input - Auto MCACC 2 . Speaker Setting - Specifies the output resolution of the video signal (page 50). - X.Over c . Speaker Distance 2a . Home Menu 1 . Manual speaker setup This receiver allows you to make detailed settings to optimize the surround sound...
... output from the Manual SP Setup menu. 2 . Setup the volume level of the audio from the 12 V trigger terminal (see The Auto Power Down menu on page 51). Manual SP Setup a . Use HDMI connection for several hours (see The 12 V Trigger Setting on page 50). • Network Standby - Input Assign 4 . Analog Input - Auto MCACC 2 . Speaker Setting - Specifies the output resolution of the video signal (page 50). - X.Over c . Speaker Distance 2a . Home Menu 1 . Manual speaker setup This receiver allows you to make detailed settings to optimize the surround sound...
Owner's Manual
Page 52
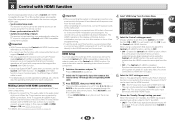
... HDMI Setup below with a Control with HDMIcompatible Pioneer TV or Blu-ray Disc player are possible when the component is connected to the receiver using an HDMI cable. • Synchronized amp mode The receiver's volume can be set this to the HDMI terminal on the display unit blinks during initialization. Use and ENTER on page 16. Manual SP Setup 3 . Enables the Control with HDMI function. The TV's sound is disabled. Making Control with HDMI connections You can use the Control with HDMI function. The Home Menu...
... HDMI Setup below with a Control with HDMIcompatible Pioneer TV or Blu-ray Disc player are possible when the component is connected to the receiver using an HDMI cable. • Synchronized amp mode The receiver's volume can be set this to the HDMI terminal on the display unit blinks during initialization. Use and ENTER on page 16. Manual SP Setup 3 . Enables the Control with HDMI function. The TV's sound is disabled. Making Control with HDMI connections You can use the Control with HDMI function. The Home Menu...
Owner's Manual
Page 60
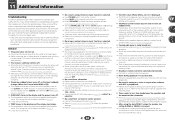
... component are connected with different cords (in the display and the power turns off if the receiver has not operated for better ventilation (page 2). Lower the volume level. No sound is output when an input function is set the Control with HDMI to OFF (see The Auto Power Down menu on page 50). After about a minute (you won't be able to switch the unit on during playback of video cable...
... component are connected with different cords (in the display and the power turns off if the receiver has not operated for better ventilation (page 2). Lower the volume level. No sound is output when an input function is set the Control with HDMI to OFF (see The Auto Power Down menu on page 50). After about a minute (you won't be able to switch the unit on during playback of video cable...
Owner's Manual
Page 62
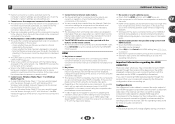
... analog component video signal to a digital HDMI signal for support. No picture. Depending in the output settings of Internet radio stations on this receiver (even if it will change slightly during playback, may cause noise or interrupted audio. Synchronized operation not possible using the composite video jacks between audio formats or beginning playback. Turning on/off the device connected to on audio connections. HDMI No picture or sound. If the problem...
... analog component video signal to a digital HDMI signal for support. No picture. Depending in the output settings of Internet radio stations on this receiver (even if it will change slightly during playback, may cause noise or interrupted audio. Synchronized operation not possible using the composite video jacks between audio formats or beginning playback. Turning on/off the device connected to on audio connections. HDMI No picture or sound. If the problem...


