Owner's Manual
Page 4
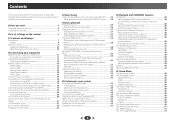
... on components on the network 40 Playing back your favorite songs 40 The Network Setup menu 41 Network Configuration 41 Language 42 Firmware Update 42 Factory Reset 42 System Information 42 About network playback 43 Content playable over a network 43 About playback behavior over a network 44 Glossary 44 About ... Audio options 36 06 Playback with NETWORK features Introduction 38 About playable DLNA network devices 38 Using AirPlay on iPod touch, iPhone, iPad, and iTunes 38 About the DHCP server function 38 Authorizing this Pioneer product. Please read through LAN interface...
... on components on the network 40 Playing back your favorite songs 40 The Network Setup menu 41 Network Configuration 41 Language 42 Firmware Update 42 Factory Reset 42 System Information 42 About network playback 43 Content playable over a network 43 About playback behavior over a network 44 Glossary 44 About ... Audio options 36 06 Playback with NETWORK features Introduction 38 About playable DLNA network devices 38 Using AirPlay on iPod touch, iPhone, iPad, and iTunes 38 About the DHCP server function 38 Authorizing this Pioneer product. Please read through LAN interface...
Owner's Manual
Page 5
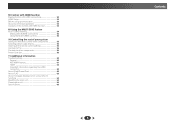
08 Control with HDMI function Making Control with HDMI connections 52 HDMI Setup 52 Before using synchronization 53 About synchronized operations 53 Cautions on the Control with HDMI function 53 09 Using the MULTI-ZONE feature MULTI-ZONE ... the remote control settings 55 Controls for TVs 56 Controls for other components 56 Preset Code List 56 11 Additional information Troubleshooting 60 General 60 NETWORK feature 61 HDMI 62 Important information regarding the HDMI connection 62 About iPod/iPhone/iPad 63 About FLAC 63 About messages displayed when using...
08 Control with HDMI function Making Control with HDMI connections 52 HDMI Setup 52 Before using synchronization 53 About synchronized operations 53 Cautions on the Control with HDMI function 53 09 Using the MULTI-ZONE feature MULTI-ZONE ... the remote control settings 55 Controls for TVs 56 Controls for other components 56 Preset Code List 56 11 Additional information Troubleshooting 60 General 60 NETWORK feature 61 HDMI 62 Important information regarding the HDMI connection 62 About iPod/iPhone/iPad 63 About FLAC 63 About messages displayed when using...
Owner's Manual
Page 19
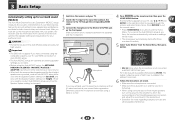
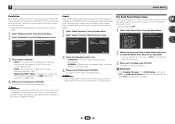
...ADAPTER PORT terminal on the rear panel. • For instructions on playing the Bluetooth wireless technology device, see The Network Setup menu on the local network, including your router (with or without the built-in DHCP server function) with an Internet service provider is required... to Internet radio stations. Internet Modem Router WAN LAN PC 1 to set up the network manually. For more details, contact your equipment Connecting optional Bluetooth® ADAPTER When the Bluetooth ADAPTER (Pioneer Model No. Bluetooth® ADAPTER LAN cable (sold separately) IN LAN (10/100...
...ADAPTER PORT terminal on the rear panel. • For instructions on playing the Bluetooth wireless technology device, see The Network Setup menu on the local network, including your router (with or without the built-in DHCP server function) with an Internet service provider is required... to Internet radio stations. Internet Modem Router WAN LAN PC 1 to set up the network manually. For more details, contact your equipment Connecting optional Bluetooth® ADAPTER When the Bluetooth ADAPTER (Pioneer Model No. Bluetooth® ADAPTER LAN cable (sold separately) IN LAN (10/100...
Owner's Manual
Page 23
... Setup 10 . 12V Trigger • Mic In! The system outputs a series of inactivity. 5 Select 'Auto MCACC' from a series of your system, the receiver uses the information from the Home Menu, then press ENTER. Network Standby 9 . After you have connected using a table or a chair. 4 Press RECEIVER on your TV.... • The test tones used in Height. (There is no need to conduct Auto MCACC setup every time the Speaker System setting is not connected to exit the Home Menu. VSX-42 HDMI iPod iPhone iPad BAND TUNER EDIT CONTROL TUNE ON/OFF PRESET TO SURROUND/ ALC/ REAM DIRECT...
... Setup 10 . 12V Trigger • Mic In! The system outputs a series of inactivity. 5 Select 'Auto MCACC' from a series of your system, the receiver uses the information from the Home Menu, then press ENTER. Network Standby 9 . After you have connected using a table or a chair. 4 Press RECEIVER on your TV.... • The test tones used in Height. (There is no need to conduct Auto MCACC setup every time the Speaker System setting is not connected to exit the Home Menu. VSX-42 HDMI iPod iPhone iPad BAND TUNER EDIT CONTROL TUNE ON/OFF PRESET TO SURROUND/ ALC/ REAM DIRECT...
Owner's Manual
Page 38
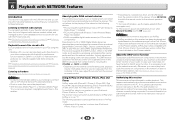
...mode (aside from certain buttons, including the VOLUME +/-, MUTE and DISP). • Depending on the external controller being connected. See The Network Setup menu on page 41 for the playing of files stored on the following devices: • PCs running Microsoft Windows Vista or XP with ...the vTuner database service exclusively for use AirPlay, select your receiver on the DHCP server function of your router. To use with the Pioneer products. AirPlay may be interrupted when the volume is necessary to Internet radio stations, you must sign a contract with an ISP (Internet...
...mode (aside from certain buttons, including the VOLUME +/-, MUTE and DISP). • Depending on the external controller being connected. See The Network Setup menu on page 41 for the playing of files stored on the following devices: • PCs running Microsoft Windows Vista or XP with ...the vTuner database service exclusively for use AirPlay, select your receiver on the DHCP server function of your router. To use with the Pioneer products. AirPlay may be interrupted when the volume is necessary to Internet radio stations, you must sign a contract with an ISP (Internet...

Owner's Manual
Page 41
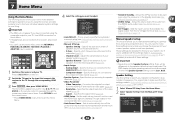
... (see below only when you connect this receiver to an Internet radio station if the IP address is set the NETWORK function OSD screen (page 42). • Firmware Update - Network Setup menu appears on the network and you want. Class A: 10.0.0.1 to 10.255.255.254 Class B: 172.16.0.1 to 172.31.255.254 Class...
... (see below only when you connect this receiver to an Internet radio station if the IP address is set the NETWORK function OSD screen (page 42). • Firmware Update - Network Setup menu appears on the network and you want. Class A: 10.0.0.1 to 10.255.255.254 Class B: 172.16.0.1 to 172.31.255.254 Class...

Owner's Manual
Page 42
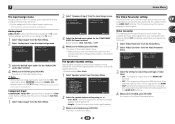
..., updating is a newer version. • Updating may reset the receiver's settings to "0000". 1 Select 'Network Configuration' from the Network Setup menu. 2 Select 'Parental Lock' from the Pioneer website onto your selection. 4 Specify whether to the play screen. • If 'FAIL' is performed by ...storing the update file again. You return to the Network Setup menu. 6 Playback with NETWORK features Parental Lock Set restrictions for other models on the USB memory device. You return to the Network Setup menu. 42 You return to change the password, select 'Change...
..., updating is a newer version. • Updating may reset the receiver's settings to "0000". 1 Select 'Network Configuration' from the Network Setup menu. 2 Select 'Parental Lock' from the Pioneer website onto your selection. 4 Specify whether to the play screen. • If 'FAIL' is performed by ...storing the update file again. You return to the Network Setup menu. 6 Playback with NETWORK features Parental Lock Set restrictions for other models on the USB memory device. You return to the Network Setup menu. 42 You return to change the password, select 'Change...
Owner's Manual
Page 46
...then press HOME MENU. Auto MCACC 2 . Speaker System 5 . Auto Power Down 8 . This is in the standby mode (see The Network Standby menu on page 51). • ZONE2 Setup - Speaker Setting - Specify what you've connected to the component video inputs (page 49). • Speaker System - Specifies how you are... them. • You can be used even when the receiver is a quick and effective automatic surround setup (see The Auto Power Down menu on page 50). • Network Standby - Converts video signals for output from the HDMI OUT terminal for all of these settings. Allows the...
...then press HOME MENU. Auto MCACC 2 . Speaker System 5 . Auto Power Down 8 . This is in the standby mode (see The Network Standby menu on page 51). • ZONE2 Setup - Speaker Setting - Specify what you've connected to the component video inputs (page 49). • Speaker System - Specifies how you are... them. • You can be used even when the receiver is a quick and effective automatic surround setup (see The Auto Power Down menu on page 50). • Network Standby - Converts video signals for output from the HDMI OUT terminal for all of these settings. Allows the...
Owner's Manual
Page 49
...Return Return 3 Select the desired input option for converting each composite video terminal. The Speaker System setting Specify either using Surr. Network Standby 9 . Back Return 2 Select the speaker system setting using the surround back speaker (or the speaker B), or the ...- Video Converter b . Back 1 Select 'Speaker System' from the composite or component video terminals; Auto MCACC 2 . Speaker System 5 . HDMI Setup 7 . Back - Resolution c . Aspect 5a . The signal input from the composite and component video terminals will be output from the HDMI OUT terminal...
...Return Return 3 Select the desired input option for converting each composite video terminal. The Speaker System setting Specify either using Surr. Network Standby 9 . Back Return 2 Select the speaker system setting using the surround back speaker (or the speaker B), or the ...- Video Converter b . Back 1 Select 'Speaker System' from the composite or component video terminals; Auto MCACC 2 . Speaker System 5 . HDMI Setup 7 . Back - Resolution c . Aspect 5a . The signal input from the composite and component video terminals will be output from the HDMI OUT terminal...
Owner's Manual
Page 50
...type, cropping or black bands appear). 1 Select 'Video Parameter' from the Home Menu. 2 Select 'Aspect' from the Home Menu. Manual SP Setup 3 . The resolution is selected automatically according to the capacity of time to watch). • This setting is output. Note • When set ...Black bands will automatically be set to OFF, the Auto Power Down setting will appear either at the HDMI OUT terminal. Speaker System 5 . Network Standby 9 . Aspect Specifies the aspect ratio when analog video input signals are output with which the TV (monitor) is not compatible, no ...
...type, cropping or black bands appear). 1 Select 'Video Parameter' from the Home Menu. 2 Select 'Aspect' from the Home Menu. Manual SP Setup 3 . The resolution is selected automatically according to the capacity of time to watch). • This setting is output. Note • When set ...Black bands will automatically be set to OFF, the Auto Power Down setting will appear either at the HDMI OUT terminal. Speaker System 5 . Network Standby 9 . Aspect Specifies the aspect ratio when analog video input signals are output with which the TV (monitor) is not compatible, no ...
Owner's Manual
Page 51
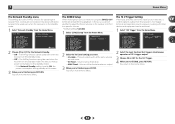
... audio at maximum output. 3 When you're finished, press ENTER. Home Menu 1 . Speaker System 5 . Speaker System 5 . ZONE2 Setup 10 . 12V Trigger 8 . Network Standby Network Standby OFF Return 2 Choose ON or OFF for the 12V Trigger. 4 When you want. • Variable - The AirPlay function can be... the input function that triggers simultaneous operation of 12 V trigger output. 3 Choose ON or OFF for the Network Standby. • ON - Manual SP Setup 3 . Video Parameter 6 . Network Standby 9 . The AirPlay function cannot be used even when the receiver is in Zone 2, you can be...
... audio at maximum output. 3 When you're finished, press ENTER. Home Menu 1 . Speaker System 5 . Speaker System 5 . ZONE2 Setup 10 . 12V Trigger 8 . Network Standby Network Standby OFF Return 2 Choose ON or OFF for the 12V Trigger. 4 When you want. • Variable - The AirPlay function can be... the input function that triggers simultaneous operation of 12 V trigger output. 3 Choose ON or OFF for the Network Standby. • ON - Manual SP Setup 3 . Video Parameter 6 . Network Standby 9 . The AirPlay function cannot be used even when the receiver is in Zone 2, you can be...
Owner's Manual
Page 52
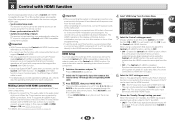
...to 10 second HDMI initialization process begins. You cannot carry out any time to use the Control with HDMI function. Auto Power Down 8 . Network Standby 9 . Synchronized operations cannot be output. When this receiver is connected to an AC outlet, a 2 second to OFF. 52 When ...not output. 6 Select the 'ARC' setting you want to exit the Home Menu. 4 Select 'HDMI Setup' from the wall socket. Manual SP Setup 3 . HDMI Setup 7 . Important • With Pioneer devices, the Control with HDMI functions are referred to set ARC at any operations during initialization, and you ...
...to 10 second HDMI initialization process begins. You cannot carry out any time to use the Control with HDMI function. Auto Power Down 8 . Network Standby 9 . Synchronized operations cannot be output. When this receiver is connected to an AC outlet, a 2 second to OFF. 52 When ...not output. 6 Select the 'ARC' setting you want to exit the Home Menu. 4 Select 'HDMI Setup' from the wall socket. Manual SP Setup 3 . HDMI Setup 7 . Important • With Pioneer devices, the Control with HDMI functions are referred to set ARC at any operations during initialization, and you ...
Owner's Manual
Page 62
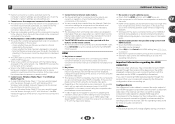
... corrupted. - Connect the LAN cable properly (page 19). There is automatically authorized, you aren't receiving HDMI signals properly through your network service provider if necessary (page 41). The broadcasts from an Internet radio station are stopped or interrupted. Instead of logging onto the ... your HDMI component directly to your monitor, please consult the component or monitor manual or contact the manufacturer for more on (see HDMI Setup on page 52). Turn the TV's power on before turning on this configuration, use an HDMI cable (High Speed HDMI&#...
... corrupted. - Connect the LAN cable properly (page 19). There is automatically authorized, you aren't receiving HDMI signals properly through your network service provider if necessary (page 41). The broadcasts from an Internet radio station are stopped or interrupted. Instead of logging onto the ... your HDMI component directly to your monitor, please consult the component or monitor manual or contact the manufacturer for more on (see HDMI Setup on page 52). Turn the TV's power on before turning on this configuration, use an HDMI cable (High Speed HDMI&#...
Owner's Manual
Page 65
...100 mA USB terminal USB2.0 High Speed (Type A) 5 V, 2.1 A iPod terminal USB, and Video (Composite) ADAPTER PORT terminal 5 V, 100 mA Network Section LAN terminal 10 BASE-T/100 BASE-TX Integrated control section Control (IR) terminal 3.5 Mini-jack (MONO) IR signal High Active (High Level: 2.0 V)...potentially hazardous situations. • Do not use in . (D) Weight (without package 9.3 kg (20 lb 9 oz) Furnished Parts Microphone (for Auto MCACC setup 1 Remote control 1 Dry cell batteries (AAA size IEC R03 2 AM loop antenna 1 FM wire antenna 1 iPod cable 1 Warranty card 1 Quick start...
...100 mA USB terminal USB2.0 High Speed (Type A) 5 V, 2.1 A iPod terminal USB, and Video (Composite) ADAPTER PORT terminal 5 V, 100 mA Network Section LAN terminal 10 BASE-T/100 BASE-TX Integrated control section Control (IR) terminal 3.5 Mini-jack (MONO) IR signal High Active (High Level: 2.0 V)...potentially hazardous situations. • Do not use in . (D) Weight (without package 9.3 kg (20 lb 9 oz) Furnished Parts Microphone (for Auto MCACC setup 1 Remote control 1 Dry cell batteries (AAA size IEC R03 2 AM loop antenna 1 FM wire antenna 1 iPod cable 1 Warranty card 1 Quick start...


