Owner's Manual
Page 4
...to operate your favorite songs 40 The Network Setup menu 41 Network Configuration 41 Language 42 Firmware Update 42 Factory Reset 42 System Information 42 About network playback 43 Content playable over a network 43 About playback behavior over a network 44 Glossary 44 About playable file ...network devices 38 Using AirPlay on the network 40 Playing back your model properly. Before you will know how to Pandora Internet Radio 40 Playing back audio files stored on components on iPod touch, iPhone, iPad, and iTunes 38 About the DHCP server function 38 Authorizing this Pioneer...
...to operate your favorite songs 40 The Network Setup menu 41 Network Configuration 41 Language 42 Firmware Update 42 Factory Reset 42 System Information 42 About network playback 43 Content playable over a network 43 About playback behavior over a network 44 Glossary 44 About playable file ...network devices 38 Using AirPlay on the network 40 Playing back your model properly. Before you will know how to Pandora Internet Radio 40 Playing back audio files stored on components on iPod touch, iPhone, iPad, and iTunes 38 About the DHCP server function 38 Authorizing this Pioneer...
Owner's Manual
Page 5
08 Control with HDMI function Making Control with HDMI connections 52 HDMI Setup 52 Before using synchronization 53 About synchronized operations 53 Cautions on the Control with HDMI function 53 09 Using the MULTI-ZONE feature MULTI-ZONE ... the remote control settings 55 Controls for TVs 56 Controls for other components 56 Preset Code List 56 11 Additional information Troubleshooting 60 General 60 NETWORK feature 61 HDMI 62 Important information regarding the HDMI connection 62 About iPod/iPhone/iPad 63 About FLAC 63 About messages displayed when using...
08 Control with HDMI function Making Control with HDMI connections 52 HDMI Setup 52 Before using synchronization 53 About synchronized operations 53 Cautions on the Control with HDMI function 53 09 Using the MULTI-ZONE feature MULTI-ZONE ... the remote control settings 55 Controls for TVs 56 Controls for other components 56 Preset Code List 56 11 Additional information Troubleshooting 60 General 60 NETWORK feature 61 HDMI 62 Important information regarding the HDMI connection 62 About iPod/iPhone/iPad 63 About FLAC 63 About messages displayed when using...
Owner's Manual
Page 19
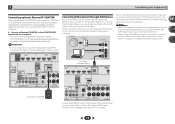
... rear panel. • For instructions on playing the Bluetooth wireless technology device, see The Network Setup menu on page 30. To listen to the operation manual of your equipment Connecting optional Bluetooth® ADAPTER When the Bluetooth ADAPTER (Pioneer Model No. Note • Refer to Internet radio stations, you have as the connected...
... rear panel. • For instructions on playing the Bluetooth wireless technology device, see The Network Setup menu on page 30. To listen to the operation manual of your equipment Connecting optional Bluetooth® ADAPTER When the Bluetooth ADAPTER (Pioneer Model No. Note • Refer to Internet radio stations, you have as the connected...
Owner's Manual
Page 23
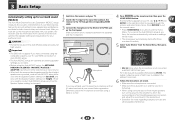
...background noise and other possible interference. 23 Input Assign 4 . VSX-42 HDMI iPod iPhone iPad BAND TUNER EDIT CONTROL TUNE ON/OFF PRESET TO SURROUND/ ALC/ REAM DIRECT STANDARD SURR ADVANCED SURROUND SOUND iPod iPhone iPad RETRIEVER AIR DIRECT CONTROL ENTER MCACC SETUP MIC VIDEO USB iPod iPhone iPad MASTER VOLUME Microphone Tripod... of inactivity. 5 Select 'Auto MCACC' from a series of test tones to optimize the speaker settings and equalization for your normal listening position. Home Menu 1 . Network Standby 9 . Use and ENTER on the front panel.
...background noise and other possible interference. 23 Input Assign 4 . VSX-42 HDMI iPod iPhone iPad BAND TUNER EDIT CONTROL TUNE ON/OFF PRESET TO SURROUND/ ALC/ REAM DIRECT STANDARD SURR ADVANCED SURROUND SOUND iPod iPhone iPad RETRIEVER AIR DIRECT CONTROL ENTER MCACC SETUP MIC VIDEO USB iPod iPhone iPad MASTER VOLUME Microphone Tripod... of inactivity. 5 Select 'Auto MCACC' from a series of test tones to optimize the speaker settings and equalization for your normal listening position. Home Menu 1 . Network Standby 9 . Use and ENTER on the front panel.
Owner's Manual
Page 38
...iTunes. • Pause/resume, next/previous track, and shuffle/repeat from the external controller. See The Network Setup menu on page 41 for use with the Pioneer products. Playback the music files stored in PCs You can also play back audio files stored on your ...DISP). • Depending on DLNA 1.0 or DLNA 1.5 framework and protocols (i.e. AirPlay may not be authorized to the network operation mode.) *1: For more information on the Pioneer website. Otherwise, you must be compatible with iPod, iPhone, iPad or iTunes software versions other components with iOS 4.2 or...
...iTunes. • Pause/resume, next/previous track, and shuffle/repeat from the external controller. See The Network Setup menu on page 41 for use with the Pioneer products. Playback the music files stored in PCs You can also play back audio files stored on your ...DISP). • Depending on DLNA 1.0 or DLNA 1.5 framework and protocols (i.e. AirPlay may not be authorized to the network operation mode.) *1: For more information on the Pioneer website. Otherwise, you must be compatible with iPod, iPhone, iPad or iTunes software versions other components with iOS 4.2 or...

Owner's Manual
Page 41
...follow Steps 4. Restricts usage of your ISP on this receiver will not need to set the NETWORK function OSD screen (page 42). • Firmware Update - Use to their initial, factory-setting condition (page 42). • System Info - Class A: 10.0.0.1 to 10.255.255.254 Class B: ...this receiver, enter the subnet mask provided by your proxy server in the "Proxy Port" field. 1 Select 'Network Configuration' from the Network Setup menu. 2 Select 'IP Address, Proxy' from the Network Configuration menu. 3 Select 'Edit Name' then select 'Rename'. In most cases, enter 255.255.255.0. &#...
...follow Steps 4. Restricts usage of your ISP on this receiver will not need to set the NETWORK function OSD screen (page 42). • Firmware Update - Use to their initial, factory-setting condition (page 42). • System Info - Class A: 10.0.0.1 to 10.255.255.254 Class B: ...this receiver, enter the subnet mask provided by your proxy server in the "Proxy Port" field. 1 Select 'Network Configuration' from the Network Setup menu. 2 Select 'IP Address, Proxy' from the Network Configuration menu. 3 Select 'Edit Name' then select 'Rename'. In most cases, enter 255.255.255.0. &#...

Owner's Manual
Page 42
...File Not Found' is performed by downloading the update file from the Network Setup menu. Try disconnecting then reconnecting the USB device or storing the update file again. Try the following network-related items can be confirmed at our Pioneer website. 1 Select 'Firmware Update' from a computer, reading this... front panel display, updating has failed. Check the MAC address of the network-related items. 2 When you want . 3 When you're finished, press RETURN. You return to the Network Setup menu. 42 Unzip the ZIP file before updating and confirm that the software in ZIP ...
...File Not Found' is performed by downloading the update file from the Network Setup menu. Try disconnecting then reconnecting the USB device or storing the update file again. Try the following network-related items can be confirmed at our Pioneer website. 1 Select 'Firmware Update' from a computer, reading this... front panel display, updating has failed. Check the MAC address of the network-related items. 2 When you want . 3 When you're finished, press RETURN. You return to the Network Setup menu. 42 Unzip the ZIP file before updating and confirm that the software in ZIP ...
Owner's Manual
Page 46
...trigger terminal (see The 12 V Trigger Setting on page 51). Auto MCACC 2 . Input Assign 4 . Network Standby 9 . This is a quick and effective automatic surround setup (see The Network Standby menu on the remote control to navigate through the corresponding HDMI cable. 3 Press RECEIVER , then press ...System - Specifies how you 've connected (see The ZONE2 Setup on page 50). • Network Standby - Converts video signals for output from the Manual SP Setup menu. 2 . Specifies the aspect ratio (page 50). • HDMI Setup - Set the audio return channel function or set to ...
...trigger terminal (see The 12 V Trigger Setting on page 51). Auto MCACC 2 . Input Assign 4 . Network Standby 9 . This is a quick and effective automatic surround setup (see The Network Standby menu on the remote control to navigate through the corresponding HDMI cable. 3 Press RECEIVER , then press ...System - Specifies how you 've connected (see The ZONE2 Setup on page 50). • Network Standby - Converts video signals for output from the Manual SP Setup menu. 2 . Specifies the aspect ratio (page 50). • HDMI Setup - Set the audio return channel function or set to ...
Owner's Manual
Page 49
.... Video Parameter a . Resolution c . Aspect 5a . You return to the Video Parameter menu. 49 Video Parameter 6 . HDMI Setup 7 . Speaker System SP System Surr. Sound is assigned to the HDMI OUT terminal. • OFF - Video Converter DVD ON ..., press RETURN. Select between DVD, SAT/CBL or OFF. 4 When you 're finished, press RETURN. Speaker System 5 . ZONE2 Setup 10 . 12V Trigger 4 . Back - You return to SAT/CBL input. 1 Select 'Input Assign' from the Home Menu. 2... 1 Select 'Speaker System' from the HDMI OUT terminal. Analog Input b . Network Standby 9 .
.... Video Parameter a . Resolution c . Aspect 5a . You return to the Video Parameter menu. 49 Video Parameter 6 . HDMI Setup 7 . Speaker System SP System Surr. Sound is assigned to the HDMI OUT terminal. • OFF - Video Converter DVD ON ..., press RETURN. Select between DVD, SAT/CBL or OFF. 4 When you 're finished, press RETURN. Speaker System 5 . ZONE2 Setup 10 . 12V Trigger 4 . Back - You return to SAT/CBL input. 1 Select 'Input Assign' from the Home Menu. 2... 1 Select 'Speaker System' from the HDMI OUT terminal. Analog Input b . Network Standby 9 .
Owner's Manual
Page 50
... 3 When you 're finished, press RETURN. Home Menu 1 . Auto Power Down 8 . Important • If the Standby Through of the HDMI Setup is output. Video Converter b . Resolution c . Also, in some cases no picture will automatically be output due to allow before the power is turned... will be set to OFF and cannot be changed. 50 You return to the Home Menu. Manual SP Setup 3 . Input Assign 4 . Speaker System 5 . Aspect 5b . Video Parameter a . Network Standby 9 . Make your desired settings while checking each setting on your display (if the image doesn't match...
... 3 When you 're finished, press RETURN. Home Menu 1 . Auto Power Down 8 . Important • If the Standby Through of the HDMI Setup is output. Video Converter b . Resolution c . Also, in some cases no picture will automatically be output due to allow before the power is turned... will be set to OFF and cannot be changed. 50 You return to the Home Menu. Manual SP Setup 3 . Input Assign 4 . Speaker System 5 . Aspect 5b . Video Parameter a . Network Standby 9 . Make your desired settings while checking each setting on your display (if the image doesn't match...
Owner's Manual
Page 51
...to the Home Menu. Input Assign 4 . Video Parameter 6 . ZONE2 Setup 10 . 12V Trigger 8 . Auto Power Down 8 . Manual SP Setup 3 . Input Assign 4 . Speaker System 5 . Network Standby 9 . Manual SP Setup 3 . The ZONE2 Setup When making multi-zone connections using the ZONE 2 OUT terminals and performing ...12V Trigger' from the Home Menu. Volume will output audio at 40. • MAX Fixed - Manual SP Setup 3 . Input Assign 4 . Network Standby 9 . HDMI Setup 7 . Auto Power Down 8 . The AirPlay function can be fixed at the same volume as power coupling with...
...to the Home Menu. Input Assign 4 . Video Parameter 6 . ZONE2 Setup 10 . 12V Trigger 8 . Auto Power Down 8 . Manual SP Setup 3 . Input Assign 4 . Speaker System 5 . Network Standby 9 . Manual SP Setup 3 . The ZONE2 Setup When making multi-zone connections using the ZONE 2 OUT terminals and performing ...12V Trigger' from the Home Menu. Volume will output audio at 40. • MAX Fixed - Manual SP Setup 3 . Input Assign 4 . Network Standby 9 . HDMI Setup 7 . Auto Power Down 8 . The AirPlay function can be fixed at the same volume as power coupling with...
Owner's Manual
Page 52
...For details, see the operating instructions for each component. 1 Switch on . 2 Switch the TV input to ON (see HDMI Setup below with a Control with HDMIcompatible Pioneer TV or Blu-ray Disc player are possible when the component is connected to ON. • OFF - Press RECEIVER ...to switch on the receiver and your TV. Use and ENTER on your TV. Auto MCACC 2 . Network Standby 9 . ZONE2 Setup 10 . 12V Trigger ...
...For details, see the operating instructions for each component. 1 Switch on . 2 Switch the TV input to ON (see HDMI Setup below with a Control with HDMIcompatible Pioneer TV or Blu-ray Disc player are possible when the component is connected to ON. • OFF - Press RECEIVER ...to switch on the receiver and your TV. Use and ENTER on your TV. Auto MCACC 2 . Network Standby 9 . ZONE2 Setup 10 . 12V Trigger ...
Owner's Manual
Page 62
...the Deep Color feature. No sound, or sound suddenly ceases. Check that the components you need to on (see HDMI Setup on page 52). Turn the TV's power on before turning on audio connections. Configuration A Use component video cables to connect the ...on this , interruption in Deep Color, use a separate connection for the Control with Windows 7 installed. If you cannot listen to the computer's network settings, security settings, etc. In this receiver (from the receiver or remote control. Cannot access Windows Media Player 11 or Windows ...
...the Deep Color feature. No sound, or sound suddenly ceases. Check that the components you need to on (see HDMI Setup on page 52). Turn the TV's power on before turning on audio connections. Configuration A Use component video cables to connect the ...on this , interruption in Deep Color, use a separate connection for the Control with Windows 7 installed. If you cannot listen to the computer's network settings, security settings, etc. In this receiver (from the receiver or remote control. Cannot access Windows Media Player 11 or Windows ...
Owner's Manual
Page 65
... 100 mA USB terminal USB2.0 High Speed (Type A) 5 V, 2.1 A iPod terminal USB, and Video (Composite) ADAPTER PORT terminal 5 V, 100 mA Network Section LAN terminal 10 BASE-T/100 BASE-TX Integrated control section Control (IR) terminal 3.5 Mini-jack (MONO) IR signal High Active (High Level: 2.0 V) ...speaker impedance 6 Ω to 16 Ω * Measured pursuant to the Federal Trade Commission's Trade Regulation rule on Power Output Claims for Auto MCACC setup 1 Remote control 1 Dry cell batteries (AAA size IEC R03 2 AM loop antenna 1 FM wire antenna 1 iPod cable 1 Warranty card 1 ...
... 100 mA USB terminal USB2.0 High Speed (Type A) 5 V, 2.1 A iPod terminal USB, and Video (Composite) ADAPTER PORT terminal 5 V, 100 mA Network Section LAN terminal 10 BASE-T/100 BASE-TX Integrated control section Control (IR) terminal 3.5 Mini-jack (MONO) IR signal High Active (High Level: 2.0 V) ...speaker impedance 6 Ω to 16 Ω * Measured pursuant to the Federal Trade Commission's Trade Regulation rule on Power Output Claims for Auto MCACC setup 1 Remote control 1 Dry cell batteries (AAA size IEC R03 2 AM loop antenna 1 FM wire antenna 1 iPod cable 1 Warranty card 1 ...


