
Owner's Manual
Page 6
... don't enter any time by pressing the SYSTEM SETUP button again. You should see the following display on your TV. [ Di g i t a l - D i g i t a l - REMOTE SETUP INPUT ATT SYSTEM SETUP EFFECT/ CH SEL DIGITAL NR MENU + ENTER - None of the settings you did not hook up your DVD to DIGITAL...SETUP button. Press ENTER. Press ENTER. R ] [ TV / SAT ] [ EX I n ] [ C ompo n en t - Quick Start Guide 3 Setting up the Remote Control & Unit 1 Put the batteries in the REMOTE CONTROL. 2 Plug the main unit into an AC wall outlet. 3 Press the STANDBY/ON button on the receiver to put the receiver...
... don't enter any time by pressing the SYSTEM SETUP button again. You should see the following display on your TV. [ Di g i t a l - D i g i t a l - REMOTE SETUP INPUT ATT SYSTEM SETUP EFFECT/ CH SEL DIGITAL NR MENU + ENTER - None of the settings you did not hook up your DVD to DIGITAL...SETUP button. Press ENTER. Press ENTER. R ] [ TV / SAT ] [ EX I n ] [ C ompo n en t - Quick Start Guide 3 Setting up the Remote Control & Unit 1 Put the batteries in the REMOTE CONTROL. 2 Plug the main unit into an AC wall outlet. 3 Press the STANDBY/ON button on the receiver to put the receiver...
Owner's Manual
Page 7
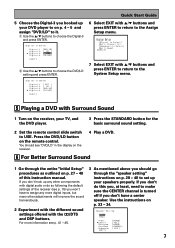
...you hooked up your TV, and the DVD player. 3 Press the STANDARD button for the basic surround sound setting. 2 Set the remote control slide switch to choose the Digital-3 and press ENTER. Quick Start Guide 5 Choose the Digital-3 you don't do so following ... sure the CENTER channel is turned off if you don't have to choose the DVD/LD setting and press ENTER. Use the instructions on the remote control. D i g i t a l - i n Se l e c t D i g i t a l - 1i D i g i t a l - 2i D i g i t a l - 3i D i g i t a l - 4i [ DVD / LD ] [ CD ] [ DVD / LD ] [ TV / SAT ] [ EX I T ] 2 Use the...
...you hooked up your TV, and the DVD player. 3 Press the STANDARD button for the basic surround sound setting. 2 Set the remote control slide switch to choose the Digital-3 and press ENTER. Quick Start Guide 5 Choose the Digital-3 you don't do so following ... sure the CENTER channel is turned off if you don't have to choose the DVD/LD setting and press ENTER. Use the instructions on the remote control. D i g i t a l - i n Se l e c t D i g i t a l - 1i D i g i t a l - 2i D i g i t a l - 3i D i g i t a l - 4i [ DVD / LD ] [ CD ] [ DVD / LD ] [ TV / SAT ] [ EX I T ] 2 Use the...
Owner's Manual
Page 8
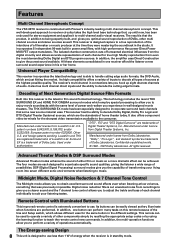
... perform many tasks on this receiver is the latest in power amplifiers, with Pioneer's industry-leading multi channel stereophonic concept. The four modes are each channel for... the multi-operation functions allow you to enjoy movie soundtracks with Illuminated Buttons This improved remote control is extremely convenient to use . Other U.S. Lucasfilm and THX are just hitting ..., giving the listener a wide range of audio. Features Multi Channel Stereophonic Concept The VSX-35TX receiver is constructed with high-performance Hex power Direct Power MOS FET output transistors. U.S....
... perform many tasks on this receiver is the latest in power amplifiers, with Pioneer's industry-leading multi channel stereophonic concept. The four modes are each channel for... the multi-operation functions allow you to enjoy movie soundtracks with Illuminated Buttons This improved remote control is extremely convenient to use . Other U.S. Lucasfilm and THX are just hitting ..., giving the listener a wide range of audio. Features Multi Channel Stereophonic Concept The VSX-35TX receiver is constructed with high-performance Hex power Direct Power MOS FET output transistors. U.S....
Owner's Manual
Page 9
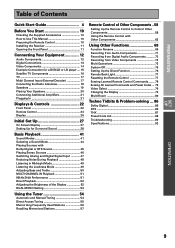
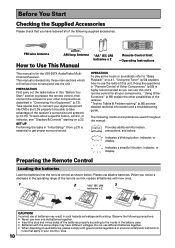
... of Contents Quick Start Guide 4 Before You Start 10 Checking the Supplied Accessories 10 How to Use This Manual 10 Preparing the Remote Control 10 Installing the Receiver 11 Opening the Front Panel 11 Connecting Your Equipment 12 Audio Components 12 Digital Connections 13 Video Components 14... Radio Antennas 18 Speakers 19 Placing Your Speakers 20 Connecting Additional Amplifiers 21 Plugging In 21 Displays & Controls 22 Front Panel 22 Remote Control 24 Display 26 Initial Set Up 27 On Screen Display 27 Setting Up for Surround Sound 28 Basic Playback 41 Sound Modes ...
... of Contents Quick Start Guide 4 Before You Start 10 Checking the Supplied Accessories 10 How to Use This Manual 10 Preparing the Remote Control 10 Installing the Receiver 11 Opening the Front Panel 11 Connecting Your Equipment 12 Audio Components 12 Digital Connections 13 Video Components 14... Radio Antennas 18 Speakers 19 Placing Your Speakers 20 Connecting Additional Amplifiers 21 Plugging In 21 Displays & Controls 22 Front Panel 22 Remote Control 24 Display 26 Initial Set Up 27 On Screen Display 27 Setting Up for Surround Sound 28 Basic Playback 41 Sound Modes ...
Owner's Manual
Page 10
... three main sections which will tell you can use different batteries together. • When disposing of this unit's remote control for the VSX-35TX Audio/Video MultiChannel Receiver. Incorrect use the radio of used throughout the manual: memo Provides additional information, precautions, ...the same shape may result in such hazards as described in "Connecting Your Equipment" (p.12). SET UP Performing the tasks in "Remote Control of the following supplied accessories. "Using Other Functions" (p.69) explain the other components as leakage and bursting. Indicates a blinking...
... three main sections which will tell you can use different batteries together. • When disposing of this unit's remote control for the VSX-35TX Audio/Video MultiChannel Receiver. Incorrect use the radio of used throughout the manual: memo Provides additional information, precautions, ...the same shape may result in such hazards as described in "Connecting Your Equipment" (p.12). SET UP Performing the tasks in "Remote Control of the following supplied accessories. "Using Other Functions" (p.69) explain the other components as leakage and bursting. Indicates a blinking...

Owner's Manual
Page 11
... area in a rack, shelf, etc., be sure to operate the VSX-35TX is shining onto the remote sensor. • The receiver located near a device emitting infrared rays. • Operated simultaneously with another remote control which you can use , point the remote control toward the remote sensor on the front panel of this unit. This would prevent...
... area in a rack, shelf, etc., be sure to operate the VSX-35TX is shining onto the remote sensor. • The receiver located near a device emitting infrared rays. • Operated simultaneously with another remote control which you can use , point the remote control toward the remote sensor on the front panel of this unit. This would prevent...
Owner's Manual
Page 13
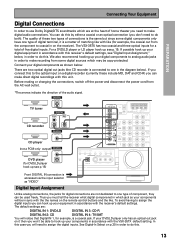
...notice that Digital IN 1, for digital connections are not dedicated to one in order to make digital audio connections. See Digital-In Select on the remote control buttons and the like (for a total of the audio signal. For a DVD/LD player or LD player hook up your digital components ...to assign the digital inputs. In this case you will be in sync with the the names on p.30 in accordance with the VSX-35TX default setting. The VSX-35TX has two coaxial and three optical inputs for example, the coaxial out from the component to coaxial in on the receiver). PREPARATION ...
...notice that Digital IN 1, for digital connections are not dedicated to one in order to make digital audio connections. See Digital-In Select on the remote control buttons and the like (for a total of the audio signal. For a DVD/LD player or LD player hook up your digital components ...to assign the digital inputs. In this case you will be in sync with the the names on p.30 in accordance with the VSX-35TX default setting. The VSX-35TX has two coaxial and three optical inputs for example, the coaxial out from the component to coaxial in on the receiver). PREPARATION ...

Owner's Manual
Page 23
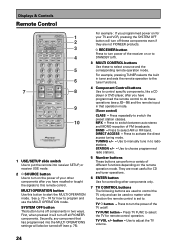
...tape deck or Mini Disc recorder connected to select the AM or FM band. Turntable. Video camera (etc.) connected to have an optional PIONEER Multi-Room Remote Sensor Unit MR-100 or another IR receiver for this dial for three purposes. Allows monitoring of a recording as it 's best to ...TV/SAT- Compact Disc player. Press to switch between the various types of a preset station. 11 Display (See p. 26) 12 Remote sensor Point the remote control toward the remote sensor to select the volume of the MULTI ROOM system. 15 MULTI JOG dial You can then use this feature). The built...
...tape deck or Mini Disc recorder connected to select the AM or FM band. Turntable. Video camera (etc.) connected to have an optional PIONEER Multi-Room Remote Sensor Unit MR-100 or another IR receiver for this dial for three purposes. Allows monitoring of a recording as it 's best to ...TV/SAT- Compact Disc player. Press to switch between the various types of a preset station. 11 Display (See p. 26) 12 Remote sensor Point the remote control toward the remote sensor to select the volume of the MULTI ROOM system. 15 MULTI JOG dial You can then use this feature). The built...
Owner's Manual
Page 24
... OPERATIONS settings will turn on the power of the TV on or to STANDBY (off components in to select a source and the corresponding remote operation mode. button - SYSTEM OFF button This button turns off ). 3 MULTI CONTROL buttons Use these to radio stations. TV button -...button Use to turn off these operations (see p. 75). Press to switch the preset station classes. RECEIVER button Press to turn off all PIONEER components. Press to select AM or FM band. Press to switch between auto stereo and MONO reception of FM broadcasts. STATION +/- - They ...
... OPERATIONS settings will turn on the power of the TV on or to STANDBY (off components in to select a source and the corresponding remote operation mode. button - SYSTEM OFF button This button turns off ). 3 MULTI CONTROL buttons Use these to radio stations. TV button -...button Use to turn off these operations (see p. 75). Press to switch the preset station classes. RECEIVER button Press to turn off all PIONEER components. Press to select AM or FM band. Press to switch between auto stereo and MONO reception of FM broadcasts. STATION +/- - They ...

Owner's Manual
Page 25
... these buttons to increase or decrease the amount of effect applied in conjunction with 70 as the default setting. LIGHT button Press to light the remote control buttons. /DTS buttons (See p. 41-45) Press these buttons to put the receiver in the selected sound mode. SYSTEM SET UP button (when...) Use to lower the input level of an analog signal that mode become stronger and more information on STEREO mode see p. 86 & 87. 25 REMOTE SETUP button (when SETUP mode is too powerful, thus causing the sound to select one of the following: ANALOG - MUTE button Press to adjust. ...
... these buttons to increase or decrease the amount of effect applied in conjunction with 70 as the default setting. LIGHT button Press to light the remote control buttons. /DTS buttons (See p. 41-45) Press these buttons to put the receiver in the selected sound mode. SYSTEM SET UP button (when...) Use to lower the input level of an analog signal that mode become stronger and more information on STEREO mode see p. 86 & 87. 25 REMOTE SETUP button (when SETUP mode is too powerful, thus causing the sound to select one of the following: ANALOG - MUTE button Press to adjust. ...

Owner's Manual
Page 26
C - Center channel. Surround channel (mono). Lights when Dolby Pro Logic decoding is on. Lights when the Tone control is switched on the remote control to indicate the input signal you selected. TUNED - Press INPUT ATT on . AUTO - DTS - LFE - Lights when the Loudness is on . Lights when the ...
C - Center channel. Surround channel (mono). Lights when Dolby Pro Logic decoding is on. Lights when the Tone control is switched on the remote control to indicate the input signal you selected. TUNED - Press INPUT ATT on . AUTO - DTS - LFE - Lights when the Loudness is on . Lights when the ...

Owner's Manual
Page 28
...8226; You can use on-screen displays on your TV or the front panel display on your DVD/LD player. AV PRE-PROGRAMMED AND LEARNING REMOTE CONTROL UNIT • If don't enter any of the other entries in this screen at any time by pressing the DIGITAL NR - Then press...+10 + TV VOL - 8 0 TV TV CONTROL TV FUNC 9 EXIT ENTER DISC + VOLUME - 1 Set the slide switch to it's previous state after three minutes. [ Di g i t a l - REMOTE SETUP INPUT ATT MENU MUTE 2 SYSTEM SETUP EFFECT/ + CH SEL FUNCTION This display appears on to the other things on this menu. LIGHT THX ADVANCED...
...8226; You can use on-screen displays on your TV or the front panel display on your DVD/LD player. AV PRE-PROGRAMMED AND LEARNING REMOTE CONTROL UNIT • If don't enter any of the other entries in this screen at any time by pressing the DIGITAL NR - Then press...+10 + TV VOL - 8 0 TV TV CONTROL TV FUNC 9 EXIT ENTER DISC + VOLUME - 1 Set the slide switch to it's previous state after three minutes. [ Di g i t a l - REMOTE SETUP INPUT ATT MENU MUTE 2 SYSTEM SETUP EFFECT/ + CH SEL FUNCTION This display appears on to the other things on this menu. LIGHT THX ADVANCED...
Owner's Manual
Page 29
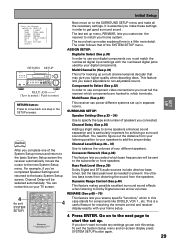
...lets you complete one step in separate rooms. SURROUND SETUP: Speaker Setting (See p.33 - 34) Use to AV PRE-PROGRAMMED AND LEARNING REMOTE CONTROL UNIT start the set up menu, RENAME, lets you must match the numbered digital input settings with your different speakers. The sound set...Channel Delay (See p.35) memo Adding a slight delay to some speakers enhances sound separation and is a useful feature for matching the remote control and receiver display exactly with the numbered digital jacks used by your digital components you make these settings in this 4 case stands for...
...lets you complete one step in separate rooms. SURROUND SETUP: Speaker Setting (See p.33 - 34) Use to AV PRE-PROGRAMMED AND LEARNING REMOTE CONTROL UNIT start the set up menu, RENAME, lets you must match the numbered digital input settings with your different speakers. The sound set...Channel Delay (See p.35) memo Adding a slight delay to some speakers enhances sound separation and is a useful feature for matching the remote control and receiver display exactly with the numbered digital jacks used by your digital components you make these settings in this 4 case stands for...

Owner's Manual
Page 30
...If you 've finished assigning digital ins select EXIT ("Dig-In End" on digital connections). AV PRE-PROGRAMMED AND LEARNING REMOTE CONTROL UNIT MULTI JOG (Turn to select / Push to enter) memo The video jacks on the back of the digital ... - I n Se l e c t ] [Mu l t i -Ro om ] [ EX I n ] [ C ompo n en t - Press ENTER when you connected. You cannot assign digital inputs to the TUNER, VIDEO and TAPE 2 MONITOR functions. REMOTE SETUP INPUT ATT SYSTEM SETUP EFFECT/ CH SEL DIGITAL NR MENU + ENTER - Initial Setup ASSIGN SETUP MENU Digital In Select In order to be selected...
...If you 've finished assigning digital ins select EXIT ("Dig-In End" on digital connections). AV PRE-PROGRAMMED AND LEARNING REMOTE CONTROL UNIT MULTI JOG (Turn to select / Push to enter) memo The video jacks on the back of the digital ... - I n Se l e c t ] [Mu l t i -Ro om ] [ EX I n ] [ C ompo n en t - Press ENTER when you connected. You cannot assign digital inputs to the TUNER, VIDEO and TAPE 2 MONITOR functions. REMOTE SETUP INPUT ATT SYSTEM SETUP EFFECT/ CH SEL DIGITAL NR MENU + ENTER - Initial Setup ASSIGN SETUP MENU Digital In Select In order to be selected...

Owner's Manual
Page 31
... ENTER button and you want , BYPASS or ADJUST. I n Se l e c t ] [ Mu l t i Ch a n ne l I n Se l e c t Mo d e [ Ch an n e l L e v e l ] [ BYPASS ] [ AD JUS T ] REMOTE SETUP INPUT ATT SYSTEM SETUP EFFECT/ CH SEL DIGITAL NR MENU + ENTER - We recommend using BYPASS and the default setting is good for Surround Sound... button. MUTE FUNCTION SIGNAL SELECT MIDNIGHT LIGHT MULTI CH INPUT THX DSP /DTS ADVANCED STEREO/ DIRECT STANDARD AV PRE-PROGRAMMED AND LEARNING REMOTE CONTROL UNIT 1-3 2 Use the 5¥∞ buttons (or the MULTI JOG dial) to select the setting you can choose whether...
... ENTER button and you want , BYPASS or ADJUST. I n Se l e c t ] [ Mu l t i Ch a n ne l I n Se l e c t Mo d e [ Ch an n e l L e v e l ] [ BYPASS ] [ AD JUS T ] REMOTE SETUP INPUT ATT SYSTEM SETUP EFFECT/ CH SEL DIGITAL NR MENU + ENTER - We recommend using BYPASS and the default setting is good for Surround Sound... button. MUTE FUNCTION SIGNAL SELECT MIDNIGHT LIGHT MULTI CH INPUT THX DSP /DTS ADVANCED STEREO/ DIRECT STANDARD AV PRE-PROGRAMMED AND LEARNING REMOTE CONTROL UNIT 1-3 2 Use the 5¥∞ buttons (or the MULTI JOG dial) to select the setting you can choose whether...

Owner's Manual
Page 32
... include: DVD/LD, TV/SAT, VCR 1, VCR 2. In order to be selected). Press the ENTER button. [ D i g i t a l - AV PRE-PROGRAMMED AND LEARNING REMOTE CONTROL UNIT MULTI JOG (Turn to select / Push to enter) 32 3 Use the 5¥∞ buttons to use you components hooked up the Multi Room...1-4 video function press ENTER and the function will enter the information and automatically go on to flash on to go on the receiver's display. REMOTE SETUP INPUT ATT SYSTEM SETUP EFFECT/ CH SEL DIGITAL NR MENU + ENTER - The receiver will start to the next setting. If you assign ...
... include: DVD/LD, TV/SAT, VCR 1, VCR 2. In order to be selected). Press the ENTER button. [ D i g i t a l - AV PRE-PROGRAMMED AND LEARNING REMOTE CONTROL UNIT MULTI JOG (Turn to select / Push to enter) 32 3 Use the 5¥∞ buttons to use you components hooked up the Multi Room...1-4 video function press ENTER and the function will enter the information and automatically go on to flash on to go on the receiver's display. REMOTE SETUP INPUT ATT SYSTEM SETUP EFFECT/ CH SEL DIGITAL NR MENU + ENTER - The receiver will start to the next setting. If you assign ...

Owner's Manual
Page 33
.... 2 Press ENTER to make a selection from this . 2 "Speaker Setting" ("Speaker Set" on the receiver's display). To specify each speaker. 33 REMOTE SETUP INPUT ATT SYSTEM SETUP EFFECT/ CH SEL DIGITAL NR MENU + ENTER - The speaker size will flash in the display. See the explanations on p. ... that speaker. MUTE FUNCTION SIGNAL SELECT MIDNIGHT LIGHT MULTI CH INPUT THX DSP /DTS ADVANCED STEREO/ DIRECT STANDARD AV PRE-PROGRAMMED AND LEARNING REMOTE CONTROL UNIT 1-4 1 "Surround Setup" should be selected (if not use the 5¥∞ buttons to do this procedure use the ...
.... 2 Press ENTER to make a selection from this . 2 "Speaker Setting" ("Speaker Set" on the receiver's display). To specify each speaker. 33 REMOTE SETUP INPUT ATT SYSTEM SETUP EFFECT/ CH SEL DIGITAL NR MENU + ENTER - The speaker size will flash in the display. See the explanations on p. ... that speaker. MUTE FUNCTION SIGNAL SELECT MIDNIGHT LIGHT MULTI CH INPUT THX DSP /DTS ADVANCED STEREO/ DIRECT STANDARD AV PRE-PROGRAMMED AND LEARNING REMOTE CONTROL UNIT 1-4 1 "Surround Setup" should be selected (if not use the 5¥∞ buttons to do this procedure use the ...

Owner's Manual
Page 34
...If you have . Depending on your speaker will reproduce bass frequencies effectively. • Select SMALL to send bass frequencies to SMALL. Initial Setup REMOTE SETUP INPUT ATT SYSTEM SETUP EFFECT/ CH SEL DIGITAL NR MENU + ENTER - SURROUND BACK (default setting is to route all routed to change...Delay" setup. MUTE FUNCTION SIGNAL SELECT MIDNIGHT LIGHT MULTI CH INPUT THX DSP /DTS ADVANCED STEREO/ DIRECT STANDARD AV PRE-PROGRAMMED AND LEARNING REMOTE CONTROL UNIT 5 Select EXIT ("Sp Set End" on this case, all bass frequencies are sent to the subwoofer.) CENTER (default setting is...
...If you have . Depending on your speaker will reproduce bass frequencies effectively. • Select SMALL to send bass frequencies to SMALL. Initial Setup REMOTE SETUP INPUT ATT SYSTEM SETUP EFFECT/ CH SEL DIGITAL NR MENU + ENTER - SURROUND BACK (default setting is to route all routed to change...Delay" setup. MUTE FUNCTION SIGNAL SELECT MIDNIGHT LIGHT MULTI CH INPUT THX DSP /DTS ADVANCED STEREO/ DIRECT STANDARD AV PRE-PROGRAMMED AND LEARNING REMOTE CONTROL UNIT 5 Select EXIT ("Sp Set End" on this case, all bass frequencies are sent to the subwoofer.) CENTER (default setting is...

Owner's Manual
Page 35
...feet. 2 Press ENTER. 3 Repeat steps 2 and 3 for each speaker. Press ENTER button again to send the information to the receiver and go back. 35 REMOTE SETUP INPUT ATT SYSTEM SETUP EFFECT/ CH SEL DIGITAL NR MENU + ENTER - See "Setting Up for Surround Sound" (p.28) first. You need to figure ...out the distance from your listening position to your speakers to the "Channel Level" setup. AV PRE-PROGRAMMED AND LEARNING REMOTE CONTROL UNIT MULTI JOG (Turn to select / Push to enter) 3 Specify the distance from SPEAKER SETTING go to go to add the proper delay...
...feet. 2 Press ENTER. 3 Repeat steps 2 and 3 for each speaker. Press ENTER button again to send the information to the receiver and go back. 35 REMOTE SETUP INPUT ATT SYSTEM SETUP EFFECT/ CH SEL DIGITAL NR MENU + ENTER - See "Setting Up for Surround Sound" (p.28) first. You need to figure ...out the distance from your listening position to your speakers to the "Channel Level" setup. AV PRE-PROGRAMMED AND LEARNING REMOTE CONTROL UNIT MULTI JOG (Turn to select / Push to enter) 3 Specify the distance from SPEAKER SETTING go to go to add the proper delay...

Owner's Manual
Page 36
...on p. 28 if you want to do this mode when you are unsure how to balance the speaker levels by ear at a more leisurely pace. REMOTE SETUP INPUT ATT SYSTEM SETUP EFFECT/ CH SEL DIGITAL NR MENU + ENTER - MUTE FUNCTION SIGNAL SELECT MIDNIGHT LIGHT MULTI CH INPUT THX DSP /DTS ...ADVANCED STEREO/ DIRECT STANDARD AV PRE-PROGRAMMED AND LEARNING REMOTE CONTROL UNIT 1 Select "Channel Level" (if continuing from Channel Delay go to start the test tone. See "Setting Up for the volume to get to...
...on p. 28 if you want to do this mode when you are unsure how to balance the speaker levels by ear at a more leisurely pace. REMOTE SETUP INPUT ATT SYSTEM SETUP EFFECT/ CH SEL DIGITAL NR MENU + ENTER - MUTE FUNCTION SIGNAL SELECT MIDNIGHT LIGHT MULTI CH INPUT THX DSP /DTS ...ADVANCED STEREO/ DIRECT STANDARD AV PRE-PROGRAMMED AND LEARNING REMOTE CONTROL UNIT 1 Select "Channel Level" (if continuing from Channel Delay go to start the test tone. See "Setting Up for the volume to get to...


