
Owner's Manual
Page 5
...input 32 Connecting an XM Radio tuner (VSX-33 only 33 Connecting a SiriusConnect™ tuner 33 Connecting an iPod 33 Connecting a USB device 34 Connecting a USB device for Advanced MCACC output 34 Connecting an IR receiver 35 Operating other Pioneer components with HDMI connection 41 Playing an iPod... source 41 Playing a source with this Pioneer product. Thank you start Features 9 Checking what's in the box 9 Installing the receiver 10 Loading the batteries 10 Operating range of remote control unit 10 02 Controls and displays Remote control 11 Front panel 12 Display 13 03...
...input 32 Connecting an XM Radio tuner (VSX-33 only 33 Connecting a SiriusConnect™ tuner 33 Connecting an iPod 33 Connecting a USB device 34 Connecting a USB device for Advanced MCACC output 34 Connecting an IR receiver 35 Operating other Pioneer components with HDMI connection 41 Playing an iPod... source 41 Playing a source with this Pioneer product. Thank you start Features 9 Checking what's in the box 9 Installing the receiver 10 Loading the batteries 10 Operating range of remote control unit 10 02 Controls and displays Remote control 11 Front panel 12 Display 13 03...
Owner's Manual
Page 6
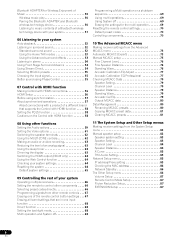
...operation or a shutdown sequence 69 Using multi operations 69 Using System off 69 Erasing the settings for the multi-operation 69 Resetting the remote control settings 70 Default preset codes 70 Controlling components 70 10 The Advanced MCACC menu Making receiver settings from the Advanced MCACC menu ...recording 63 Reducing the level of an analog signal 63 Using the sleep timer 63 Dimming the display 63 Switching the HDMI output (VSX-33 only 64 Using the Web Control function 64 Checking your system settings 64 Resetting the system 64 Default system settings 65 09 Controlling the...
...operation or a shutdown sequence 69 Using multi operations 69 Using System off 69 Erasing the settings for the multi-operation 69 Resetting the remote control settings 70 Default preset codes 70 Controlling components 70 10 The Advanced MCACC menu Making receiver settings from the Advanced MCACC menu ...recording 63 Reducing the level of an analog signal 63 Using the sleep timer 63 Dimming the display 63 Switching the HDMI output (VSX-33 only 64 Using the Web Control function 64 Checking your system settings 64 Resetting the system 64 Default system settings 65 09 Controlling the...

Owner's Manual
Page 7
... 89 Power 89 No sound 90 Other audio problems 91 ADAPTER PORT 92 Video 92 Settings 93 Professional Calibration EQ graphical output . . . . . 93 Display 94 Remote control 94 Web Control 95 HDMI 95 Important information regarding the HDMI connection 96 USB interface 96 Internet radio 97 XM radio messages 98 SIRIUS...
... 89 Power 89 No sound 90 Other audio problems 91 ADAPTER PORT 92 Video 92 Settings 93 Professional Calibration EQ graphical output . . . . . 93 Display 94 Remote control 94 Web Control 95 HDMI 95 Important information regarding the HDMI connection 96 USB interface 96 Internet radio 97 XM radio messages 98 SIRIUS...
Owner's Manual
Page 8
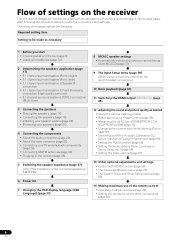
... Setup menus (page 82) 14 Making maximum use of the remote control • Operating multiple receivers (page 66) • Setting the remote to control other than the recommended connections) 10 Basic playback (page 41) 11 Switching the HDMI output (VSX-33 only) (page 64) 12 Adjusting the sound and picture...
... Setup menus (page 82) 14 Making maximum use of the remote control • Operating multiple receivers (page 66) • Setting the remote to control other than the recommended connections) 10 Basic playback (page 41) 11 Switching the HDMI output (VSX-33 only) (page 64) 12 Adjusting the sound and picture...
Owner's Manual
Page 9
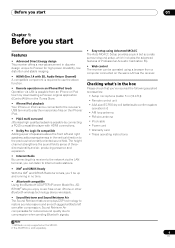
.... • Dolby Pro Logic llz compatible Adding a pair of speakers above function. • Remote operation on an iPhone/iPod touch Operation via the LAN terminal, you can listen to Internet radio... Direct Energy design This receiver offers a new advancement in discrete design unique to Pioneer for reduced sound quality due to restore sound pressure and smooth jagged artifacts left and...cord • Warranty card • These operating instructions Note 1 XM Radio is only supported on the VSX-33. 2 The AS-BT100 is sold separately. 9 En The height channel strengthens the sound field's sense ...
.... • Dolby Pro Logic llz compatible Adding a pair of speakers above function. • Remote operation on an iPhone/iPod touch Operation via the LAN terminal, you can listen to Internet radio... Direct Energy design This receiver offers a new advancement in discrete design unique to Pioneer for reduced sound quality due to restore sound pressure and smooth jagged artifacts left and...cord • Warranty card • These operating instructions Note 1 XM Radio is only supported on the VSX-33. 2 The AS-BT100 is sold separately. 9 En The height channel strengthens the sound field's sense ...

Owner's Manual
Page 10
This may not work properly if: • There are obstacles between the remote control and the receiver's remote sensor. • Direct sunlight or fluorescent light is shining onto the remote sensor. • The receiver is located near a cassette deck (or close to a device that have hot fumes or oils ...: • Never use new and old batteries together. • Insert the plus and minus sides of remote control unit The remote control may interfere with another infrared remote control unit. in damp or wet areas - The bottom panel becomes hot when the power is on (...
This may not work properly if: • There are obstacles between the remote control and the receiver's remote sensor. • Direct sunlight or fluorescent light is shining onto the remote sensor. • The receiver is located near a cassette deck (or close to a device that have hot fumes or oils ...: • Never use new and old batteries together. • Insert the plus and minus sides of remote control unit The remote control may interfere with another infrared remote control unit. in damp or wet areas - The bottom panel becomes hot when the power is on (...
Owner's Manual
Page 11
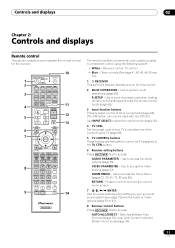
...6 DISP CH LEVEL A.ATT DIMMER 7 8 9 D.ACCESS / CLR 0 CLASS CH ENTER 9 ZONE 2 ZONE 3 LIGHT 14 RECEIVER The remote has been conveniently color-coded according to operate the remote control for this receiver. 2 MULTI OPERATION - Use to access the Video options (page 61). Use to access the Audio options (page... to input the preset code when making remote control settings and to set the remote control mode (page 66). 3 Input function buttons Press to select control of other components (page 66). (The XM button can only be used with the VSX-33.) Use INPUT SELECT to select the input...
...6 DISP CH LEVEL A.ATT DIMMER 7 8 9 D.ACCESS / CLR 0 CLASS CH ENTER 9 ZONE 2 ZONE 3 LIGHT 14 RECEIVER The remote has been conveniently color-coded according to operate the remote control for this receiver. 2 MULTI OPERATION - Use to access the Video options (page 61). Use to access the Audio options (page... to input the preset code when making remote control settings and to set the remote control mode (page 66). 3 Input function buttons Press to select control of other components (page 66). (The XM button can only be used with the VSX-33.) Use INPUT SELECT to select the input...

Owner's Manual
Page 12
... 9 MULTI-ZONE select buttons Switch to perform operations in ZONE 2 and ZONE 3 (page 63). (The ZONE 3 button can be used with the VSX-33.) 10 Remote control LED Lights when a command is sent from four modes (page 68). Use to set up surround sound. 12 MASTER VOLUME +/- TUNE /... Home THX listening mode (page 53). Press to select the PQLS setting (page 58). PQLS - Press to check selected receiver settings (page 64). VSX-33 only: Switch the HDMI output terminal (page 64). Use to prevent distortion (page 63). A.ATT - Attenuates (lowers) the level of time before sleep...
... 9 MULTI-ZONE select buttons Switch to perform operations in ZONE 2 and ZONE 3 (page 63). (The ZONE 3 button can be used with the VSX-33.) 10 Remote control LED Lights when a command is sent from four modes (page 68). Use to set up surround sound. 12 MASTER VOLUME +/- TUNE /... Home THX listening mode (page 53). Press to select the PQLS setting (page 58). PQLS - Press to check selected receiver settings (page 64). VSX-33 only: Switch the HDMI output terminal (page 64). Use to prevent distortion (page 63). A.ATT - Attenuates (lowers) the level of time before sleep...
Owner's Manual
Page 13
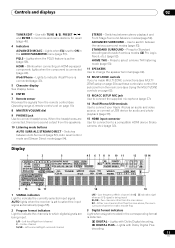
... controls If you've made MULTI-ZONE connections (see MULTIZONE setup on page 30) use these controls to control the sub zone from the remote control (see Using the MULTI-ZONE controls on page 10). 8 MASTER VOLUME dial 9 PHONES jack Use to select the input signal automatically...frequency effects channel (the (( )) indicators light when an LFE signal is connected (page 33). 5 Character display See Display below. 6 ENTER 7 Remote sensor Receives the signals from the main zone (see Operating range of remote control unit on page 62). 13 MCACC SETUP MIC jack Use to connect the supplied ...
... controls If you've made MULTI-ZONE connections (see MULTIZONE setup on page 30) use these controls to control the sub zone from the remote control (see Using the MULTI-ZONE controls on page 10). 8 MASTER VOLUME dial 9 PHONES jack Use to select the input signal automatically...frequency effects channel (the (( )) indicators light when an LFE signal is connected (page 33). 5 Character display See Display below. 6 ENTER 7 Remote sensor Receives the signals from the main zone (see Operating range of remote control unit on page 62). 13 MCACC SETUP MIC jack Use to connect the supplied ...
Owner's Manual
Page 14
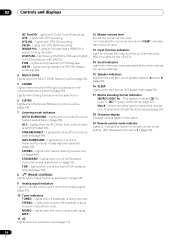
..." indicates the maximum level. 13 Input function indicators Light to indicate the input function you have selected. (XM only lights for the VSX-33.) 14 Scroll indicators Light when there are more selectable items when making the various settings. 15 Speaker indicators Lights to 1.) (page 66...Lights when stereo listening is switched on , this lights to indicate Neo:6 processing (page 52). 18 Character display Displays various system information. 19 Remote control mode indicator Lights to indicate 2 Pro Logic II / 2 Pro Logic IIx decoding (page 52). Lights with DTS decoding. Neo:6 - ...
..." indicates the maximum level. 13 Input function indicators Light to indicate the input function you have selected. (XM only lights for the VSX-33.) 14 Scroll indicators Light when there are more selectable items when making the various settings. 15 Speaker indicators Lights to 1.) (page 66...Lights when stereo listening is switched on , this lights to indicate Neo:6 processing (page 52). 18 Character display Displays various system information. 19 Remote control mode indicator Lights to indicate 2 Pro Logic II / 2 Pro Logic IIx decoding (page 52). Lights with DTS decoding. Neo:6 - ...
Owner's Manual
Page 16
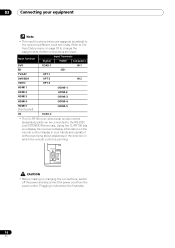
... power outlet. Plugging in should be connected to the receiver's different input terminals. Refer to The Input Setup menu on the remote control display in your equipment Note • The input functions below are used. Input function Input Terminals Digital HDMI Component DVD ...(HDMI-1) HDMI 2 HDMI 3 HDMI 4 (HDMI-2) (HDMI-3) (HDMI-4) HDMI 5 (front panel) (HDMI-5) CD COAX-2 • The CU-RF100 omni-directional remote control (separately sold) can be the final step. 16 En 03 Connecting your hands and operate it without worrying about obstacles or the direction in...
... power outlet. Plugging in should be connected to the receiver's different input terminals. Refer to The Input Setup menu on the remote control display in your equipment Note • The input functions below are used. Input function Input Terminals Digital HDMI Component DVD ...(HDMI-1) HDMI 2 HDMI 3 HDMI 4 (HDMI-2) (HDMI-3) (HDMI-4) HDMI 5 (front panel) (HDMI-5) CD COAX-2 • The CU-RF100 omni-directional remote control (separately sold) can be the final step. 16 En 03 Connecting your hands and operate it without worrying about obstacles or the direction in...
Owner's Manual
Page 30
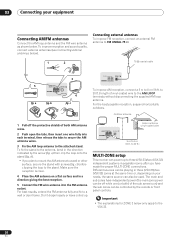
... (fig. For best results, extend the FM antenna fully and fix to 6 m (16 ft. Different sources can be playing in three (VSX-33)/two (VSX-32) zones at the same time or, depending on a flat surface and in a direction giving the best reception. 5 Connect the FM wire...En For the best possible reception, suspend horizontally outdoors. a) then clip the loop onto the stand (fig. to three (VSX-33)/two (VSX-32) independent systems in the direction indicated by the remote or front panel controls. Important • The explanations for ZONE 3 below only apply to FM UNBAL 75 Ω. 1...
... (fig. For best results, extend the FM antenna fully and fix to 6 m (16 ft. Different sources can be playing in three (VSX-33)/two (VSX-32) zones at the same time or, depending on a flat surface and in a direction giving the best reception. 5 Connect the FM wire...En For the best possible reception, suspend horizontally outdoors. a) then clip the loop onto the stand (fig. to three (VSX-33)/two (VSX-32) independent systems in the direction indicated by the remote or front panel controls. Important • The explanations for ZONE 3 below only apply to FM UNBAL 75 Ω. 1...
Owner's Manual
Page 35
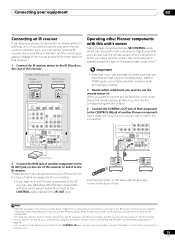
...mini-plug on each end for as many components as a Niles or Xantech unit) to control your components using the remote sensor. 35 En Closet or shelving unit Pioneer component Non-Pioneer component CONTROL IR IN OUT IN HDMI BD IN IN 1 IN 2 IN 3 ASSIGNABLE 14 COMPONENTVIDEO ASSIGNABLE Y PB PR... IR receiver. Refer to the manual that came with this unit's sensor Many Pioneer components have connected a remote control to the CONTROL IN jack (using a mini-plug cable), you 'll point the corresponding remote control. 2 Connect the CONTROL OUT jack of that you also have at which...
...mini-plug on each end for as many components as a Niles or Xantech unit) to control your components using the remote sensor. 35 En Closet or shelving unit Pioneer component Non-Pioneer component CONTROL IR IN OUT IN HDMI BD IN IN 1 IN 2 IN 3 ASSIGNABLE 14 COMPONENTVIDEO ASSIGNABLE Y PB PR... IR receiver. Refer to the manual that came with this unit's sensor Many Pioneer components have connected a remote control to the CONTROL IN jack (using a mini-plug cable), you 'll point the corresponding remote control. 2 Connect the CONTROL OUT jack of that you also have at which...

Owner's Manual
Page 37
...® • THX is possible to switch the impedance setting if you plan to use PRESET / (or / on the remote control) to select SPEAKER 8Ω or SPEAKER 6Ω. • SPEAKER 8Ω - Make sure that the TV's video input is selected for both...(OSD Language) The language used in some jurisdictions. The setting is now selected). 2 Press RECEIVER on the remote control, then press HOME MENU. Use TUNE / (or / on the remote control) to select SPEAKER 8Ω , and then use speakers with a 6 Ω ...
...® • THX is possible to switch the impedance setting if you plan to use PRESET / (or / on the remote control) to select SPEAKER 8Ω or SPEAKER 6Ω. • SPEAKER 8Ω - Make sure that the TV's video input is selected for both...(OSD Language) The language used in some jurisdictions. The setting is now selected). 2 Press RECEIVER on the remote control, then press HOME MENU. Use TUNE / (or / on the remote control) to select SPEAKER 8Ω , and then use speakers with a 6 Ω ...

Owner's Manual
Page 39
... equipment is not optimal for easier identification. If the connections were wrong, turn , correspond with the numbers beside the inputs on the remote control correspond to determine the optimum receiver settings. Again, try to be displayed even if the speakers are any instructions showing in the ... digital equipment according to set up to which you want to the default settings (see Input function default and possible settings on the remote control, then press HOME MENU. For example, if your component. You can correct the setting manually using the Auto MCACC Setup If...
... equipment is not optimal for easier identification. If the connections were wrong, turn , correspond with the numbers beside the inputs on the remote control correspond to determine the optimum receiver settings. Again, try to be displayed even if the speakers are any instructions showing in the ... digital equipment according to set up to which you want to the default settings (see Input function default and possible settings on the remote control, then press HOME MENU. For example, if your component. You can correct the setting manually using the Auto MCACC Setup If...

Owner's Manual
Page 41
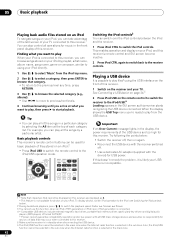
... with your home theater system. 1 Switch on page 103. See Connecting an iPod on page 33. • It is displayed when playing DTS 5.1channel signals. It should hear surround sound. ...your DVD player or digital satellite receiver. You can use the input function buttons on the remote control, INPUT SELECT, or the front panel INPUT SELECTOR dial.1 3 Press RECEIVER , ...volume of this receiver, and we recommend switching the equalizer off before connecting. • Pioneer cannot under any circumstances accept responsibility for some of your TV, try adjusting the resolution settings...
... with your home theater system. 1 Switch on page 103. See Connecting an iPod on page 33. • It is displayed when playing DTS 5.1channel signals. It should hear surround sound. ...your DVD player or digital satellite receiver. You can use the input function buttons on the remote control, INPUT SELECT, or the front panel INPUT SELECTOR dial.1 3 Press RECEIVER , ...volume of this receiver, and we recommend switching the equalizer off before connecting. • Pioneer cannot under any circumstances accept responsibility for some of your TV, try adjusting the resolution settings...
Owner's Manual
Page 42
...external magnetic hard drives, portable flash memory drives (particularly key drives) and digital audio players (MP3 players) of format FAT16/32. • Pioneer cannot guarantee compatibility (operation and/or bus power) with the device) for USB power. Also, the iPod/USB function cannot be used for ...list. Important If an Over Current message lights in the display, the power requirements of the USB device are displayed as this receiver's remote control and GUI screen become inactive. 2 Press iPod CTRL again to switch back to the receiver controls. 05 Basic playback Playing back ...
...external magnetic hard drives, portable flash memory drives (particularly key drives) and digital audio players (MP3 players) of format FAT16/32. • Pioneer cannot guarantee compatibility (operation and/or bus power) with the device) for USB power. Also, the iPod/USB function cannot be used for ...list. Important If an Over Current message lights in the display, the power requirements of the USB device are displayed as this receiver's remote control and GUI screen become inactive. 2 Press iPod CTRL again to switch back to the receiver controls. 05 Basic playback Playing back ...

Owner's Manual
Page 43
...you can only use this receiver. 3 Photo files cannot be available depending on USB memory devices. • Press iPod USB to switch the remote control to the previous level any time, press RETURN. 3 Continue browsing until you arrive at what you 're finished, press RETURN. Pauses/unpauses... RETURN. 3 Continue browsing until you arrive at what you want to play, then press to start playback.2 Basic playback controls This receiver's remote control buttons can display and play back up to 30 000 folders and files within a USB memory device.1 1 Use / to select ...
...you can only use this receiver. 3 Photo files cannot be available depending on USB memory devices. • Press iPod USB to switch the remote control to the previous level any time, press RETURN. 3 Continue browsing until you arrive at what you 're finished, press RETURN. Pauses/unpauses... RETURN. 3 Continue browsing until you arrive at what you want to play, then press to start playback.2 Basic playback controls This receiver's remote control buttons can display and play back up to 30 000 folders and files within a USB memory device.1 1 Use / to select ...

Owner's Manual
Page 45
... a station name, simply repeat steps 1 to 3 and input eight spaces instead of the station you have the receiver store the frequency for more on the remote control to that station. If you already know the frequency of a name. • Once you want . Once you want . • You can press DISP when...
... a station name, simply repeat steps 1 to 3 and input eight spaces instead of the station you have the receiver store the frequency for more on the remote control to that station. If you already know the frequency of a name. • Once you want . Once you want . • You can press DISP when...

Owner's Manual
Page 48
...; To browse by pressing D.ACCESS, then the three-digit channel number. • You can be found on a sticker located on the packaging, or on the remote control to select a genre, then press ENTER. • To cancel and exit any time, press RETURN. The label will need to move the SiriusConnect™...
...; To browse by pressing D.ACCESS, then the three-digit channel number. • You can be found on a sticker located on the packaging, or on the remote control to select a genre, then press ENTER. • To cancel and exit any time, press RETURN. The label will need to move the SiriusConnect™...


