
Owner's Manual
Page 5
... surround connection 20 Bi-amping your speakers 21 Bi-wiring your speakers 21 Selecting the Speaker system 22 Front height setup 22 Front wide setup 22 Speaker B setup 22 Bi-Amping setup 22 ZONE 2 setup 22 About the audio connection 22 About the video converter 22 About HDMI 23 Connecting your TV and playback components . . . . . 24 Connecting using the Auto MCACC Setup . . . . 39 The Input Setup menu 39 Input function default and possible settings 40 05 Basic playback Playing a source 41 Playing a source with no HDMI output 25 Connecting your model...
... surround connection 20 Bi-amping your speakers 21 Bi-wiring your speakers 21 Selecting the Speaker system 22 Front height setup 22 Front wide setup 22 Speaker B setup 22 Bi-Amping setup 22 ZONE 2 setup 22 About the audio connection 22 About the video converter 22 About HDMI 23 Connecting your TV and playback components . . . . . 24 Connecting using the Auto MCACC Setup . . . . 39 The Input Setup menu 39 Input function default and possible settings 40 05 Basic playback Playing a source 41 Playing a source with no HDMI output 25 Connecting your model...
Owner's Manual
Page 6
... control other components . . . . 66 Selecting preset codes directly 66 Programming signals from other remote controls . . . 67 Erasing one of the remote control button settings . . . 67 Erasing all learnt settings that are in one input function 68 Direct function 68 Setting the backlight mode 68 Multi operation and System off 68 11 The System Setup and Other Setup menus Making receiver settings from the System Setup menu 82 Manual speaker setup 82 Speaker system setting 83 Speaker Setting 83 Channel Level 84 Speaker Distance 84 X-Curve 85 THX Audio Setting 85 Network Setup menu...
... control other components . . . . 66 Selecting preset codes directly 66 Programming signals from other remote controls . . . 67 Erasing one of the remote control button settings . . . 67 Erasing all learnt settings that are in one input function 68 Direct function 68 Setting the backlight mode 68 Multi operation and System off 68 11 The System Setup and Other Setup menus Making receiver settings from the System Setup menu 82 Manual speaker setup 82 Speaker system setting 83 Speaker Setting 83 Channel Level 84 Speaker Distance 84 X-Curve 85 THX Audio Setting 85 Network Setup menu...
Owner's Manual
Page 11
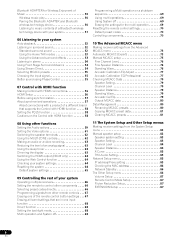
... Controls and displays 02 Chapter 2: Controls and displays Remote control This section explains how to component control using the following system: • White - RECEIVER MULTI OPERATION SOURCE 1 R.SETUP 2 BD DVD DVR/BDR HDMI 10 TV CD NET RADIO ADAPTER 3 iPod USB TUNER SIRIUS XM INPUT SELECT TV CTRL RECEIVER 4 11 MASTER INPUT VOLUME TV CONTROL 5 12 CH VOL MUTE 13 AUDIO PARAMETER VIDEO PARAMETER 6 LIST TUNE TOOLS TOP MENU 7 BAND T.EDIT GUIDE PRESET ENTER PRESET CATEGORY RETURN HOME MENU TUNE iPod CTRL AUTO/ALC/ PGM MEMORY MENU DIRECT STEREO STANDARD...
... Controls and displays 02 Chapter 2: Controls and displays Remote control This section explains how to component control using the following system: • White - RECEIVER MULTI OPERATION SOURCE 1 R.SETUP 2 BD DVD DVR/BDR HDMI 10 TV CD NET RADIO ADAPTER 3 iPod USB TUNER SIRIUS XM INPUT SELECT TV CTRL RECEIVER 4 11 MASTER INPUT VOLUME TV CONTROL 5 12 CH VOL MUTE 13 AUDIO PARAMETER VIDEO PARAMETER 6 LIST TUNE TOOLS TOP MENU 7 BAND T.EDIT GUIDE PRESET ENTER PRESET CATEGORY RETURN HOME MENU TUNE iPod CTRL AUTO/ALC/ PGM MEMORY MENU DIRECT STEREO STANDARD...

Owner's Manual
Page 12
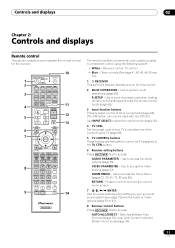
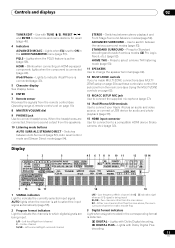
... ENTER TUNER EDIT AUTO SURR/ALC/ STREAM DIRECT STEREO ADVANCED SURROUND STANDARD SURROUND HOME THX SPEAKERS MULTI-ZONE CONTROL ON / OFF MASTER VOLUME PHONES MCACC SETUP MIC iPod iPhone USB VIDEO CAMERA HDMI 5 9 10 11 1 INPUT SELECTOR dial Use to select an input function. 2 STANDBY/ON Switches the receiver between the various surround modes (page 53). 02 Controls and displays STEREO - STANDARD - THX - Press to find radio frequencies (page 50). VSX-33 only: Switch the HDMI output terminal (page 64). Press repeatedly to select a channel, then use...
... ENTER TUNER EDIT AUTO SURR/ALC/ STREAM DIRECT STEREO ADVANCED SURROUND STANDARD SURROUND HOME THX SPEAKERS MULTI-ZONE CONTROL ON / OFF MASTER VOLUME PHONES MCACC SETUP MIC iPod iPhone USB VIDEO CAMERA HDMI 5 9 10 11 1 INPUT SELECTOR dial Use to select an input function. 2 STANDBY/ON Switches the receiver between the various surround modes (page 53). 02 Controls and displays STEREO - STANDARD - THX - Press to find radio frequencies (page 50). VSX-33 only: Switch the HDMI output terminal (page 64). Press repeatedly to select a channel, then use...
Owner's Manual
Page 13
... iPod/iPhone - STEREO - L/R - HOME THX - LFE - Left surround/Right surround channel 2 DIGITAL - Blinks when connecting an HDMI-equipped component; Lights to indicate iPod/iPhone is no sound output from the main zone (see Using the MULTI-ZONE controls on page 10). 8 MASTER VOLUME dial 9 PHONES jack Use to select the input signal automatically (page 55). When the headphones are being input) XL/XR - lights when the component is being input. 3 Digital format indicators Light when a signal encoded in the AUDIO PARAMETER menu (page 59). ADVANCED SURROUND - AUTO...
... iPod/iPhone - STEREO - L/R - HOME THX - LFE - Left surround/Right surround channel 2 DIGITAL - Blinks when connecting an HDMI-equipped component; Lights to indicate iPod/iPhone is no sound output from the main zone (see Using the MULTI-ZONE controls on page 10). 8 MASTER VOLUME dial 9 PHONES jack Use to select the input signal automatically (page 55). When the headphones are being input) XL/XR - lights when the component is being input. 3 Digital format indicators Light when a signal encoded in the AUDIO PARAMETER menu (page 59). ADVANCED SURROUND - AUTO...
Owner's Manual
Page 23
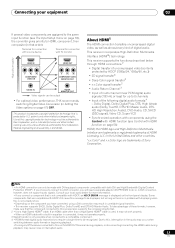
... in the audio may occur when switching between audio formats or beginning playback. • Turning on page 39), the converter gives priority to HDMI, component, then composite (in Setting the Video options on the front panel display. This product incorporates copyright protection technology that the component connected to this receiver also supports the corresponding format. 2 • Use a High Speed HDMI® cable. About HDMI1 The HDMI connection transfers uncompressed digital video, as...
... in the audio may occur when switching between audio formats or beginning playback. • Turning on page 39), the converter gives priority to HDMI, component, then composite (in Setting the Video options on the front panel display. This product incorporates copyright protection technology that the component connected to this receiver also supports the corresponding format. 2 • Use a High Speed HDMI® cable. About HDMI1 The HDMI connection transfers uncompressed digital video, as...
Owner's Manual
Page 24
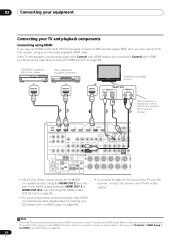
... an HDMI/DVIcompatible monitor using a commercially available HDMI cable. See Switching the HDMI output (VSX-33 only) on page 64. • For input components, connections other than HDMI connections are connected by HDMI connections, if the TV supports the HDMI Audio Return Channel function, the sound of the TV over the receiver, connect the receiver and TV with HDMI function on page 56). 24 En HDMI/DVI-compatible Blu-ray disc player Other HDMI/DVIequipped component HDMI OUT HDMI OUT HDMI IN HDMI/DVI-compatible monitor Select one DIGITAL OUT AUDIO OUT COAXIAL OPTICAL R ANALOG...
... an HDMI/DVIcompatible monitor using a commercially available HDMI cable. See Switching the HDMI output (VSX-33 only) on page 64. • For input components, connections other than HDMI connections are connected by HDMI connections, if the TV supports the HDMI Audio Return Channel function, the sound of the TV over the receiver, connect the receiver and TV with HDMI function on page 56). 24 En HDMI/DVI-compatible Blu-ray disc player Other HDMI/DVIequipped component HDMI OUT HDMI OUT HDMI IN HDMI/DVI-compatible monitor Select one DIGITAL OUT AUDIO OUT COAXIAL OPTICAL R ANALOG...
Owner's Manual
Page 32
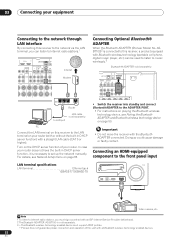
... (10/100) XM IN ADAPTER PORT (OUTPUT 5 V 100 mA MAX) COAXIAL ASSIGNABLE OPTICAL ASSIGNABLE IN 1 (DVD) IN 2 (CD) IN 1 IN 2 IN 3 (TV/SAT) (DVR/BDR) (VIDEO) OUT TAPE IN FRONT CENTER SURROUND SURR BACK FH/FW (Single) PRE OUT L URROUND R SUBWOOFER L B R SURROUND BACK L(Single) FRONT HEIGHT / FRONT WIDE/ R L AC IN • Switch the receiver into standby and connect Bluetooth ADAPTER to music wirelessly.3 Bluetooth® ADAPTER (sold separately...
... (10/100) XM IN ADAPTER PORT (OUTPUT 5 V 100 mA MAX) COAXIAL ASSIGNABLE OPTICAL ASSIGNABLE IN 1 (DVD) IN 2 (CD) IN 1 IN 2 IN 3 (TV/SAT) (DVR/BDR) (VIDEO) OUT TAPE IN FRONT CENTER SURROUND SURR BACK FH/FW (Single) PRE OUT L URROUND R SUBWOOFER L B R SURROUND BACK L(Single) FRONT HEIGHT / FRONT WIDE/ R L AC IN • Switch the receiver into standby and connect Bluetooth ADAPTER to music wirelessly.3 Bluetooth® ADAPTER (sold separately...

Owner's Manual
Page 39
...'t hook up . In this case, you need to make settings in the Input Setup menu if you 've connected your digital equipment according to which , in addition to determine the optimum receiver settings. A Graphical User Interface (GUI) screen appears on the remote control. 5 Select the input(s) to the default settings (see Input function default and possible settings on the back of the speakers and viewing environment, we recommend adjusting the settings manually. 39 En Use and...
...'t hook up . In this case, you need to make settings in the Input Setup menu if you 've connected your digital equipment according to which , in addition to determine the optimum receiver settings. A Graphical User Interface (GUI) screen appears on the remote control. 5 Select the input(s) to the default settings (see Input function default and possible settings on the back of the speakers and viewing environment, we recommend adjusting the settings manually. 39 En Use and...

Owner's Manual
Page 41
... the input signal and listening mode, check the connections and settings. 4 Use the volume control to (for some of the source.2 If you're playing a Dolby Digital or DTS surround sound source, you should be set to output Dolby Digital, DTS and 88.2 kHz / 96 kHz PCM (2 channel) audio, and if there is an MPEG audio option, set to this receiver.3 1 Switch on page 33. • It is compatible with the audio and video of audio content from the iPod. Playing a source with your home theater system. 1 Switch...
... the input signal and listening mode, check the connections and settings. 4 Use the volume control to (for some of the source.2 If you're playing a Dolby Digital or DTS surround sound source, you should be set to output Dolby Digital, DTS and 88.2 kHz / 96 kHz PCM (2 channel) audio, and if there is an MPEG audio option, set to this receiver.3 1 Switch on page 33. • It is compatible with the audio and video of audio content from the iPod. Playing a source with your home theater system. 1 Switch...

Owner's Manual
Page 52
... of source you 're playing and selects multichannel or stereo playback as necessary. • While listening to a source, press RECEIVER , then press AUTO/ALC/DIRECT (AUTO SURR/ALC/STREAM DIRECT) for auto playback of the receiver. However, the options available will automatically be selected for 2-channel signals for which the input signal is switched OFF (page 59), 2 Pro Logic IIx becomes 2 Pro Logic II (5.1 channel sound). 2 When listening to 2-channel sources in Dolby Pro Logic IIx Music mode...
... of source you 're playing and selects multichannel or stereo playback as necessary. • While listening to a source, press RECEIVER , then press AUTO/ALC/DIRECT (AUTO SURR/ALC/STREAM DIRECT) for auto playback of the receiver. However, the options available will automatically be selected for 2-channel signals for which the input signal is switched OFF (page 59), 2 Pro Logic IIx becomes 2 Pro Logic II (5.1 channel sound). 2 When listening to 2-channel sources in Dolby Pro Logic IIx Music mode...

Owner's Manual
Page 55
... system 06 Selecting MCACC presets • Default setting: MEMORY 1 If you have calibrated your system for different listening positions, you can only play back Dolby Digital, PCM (32 kHz to 192 kHz), DTS (including DTS 96/24) and WMA9 Pro digital signal formats. Choosing the input signal On this is a problem. 5 • Phase matching is playing an analog signal. Selects an optical or coaxial digital signal. • HDMI - When set the signal input to DIGITAL. • Some DVD players don't output DTS signals. To...
... system 06 Selecting MCACC presets • Default setting: MEMORY 1 If you have calibrated your system for different listening positions, you can only play back Dolby Digital, PCM (32 kHz to 192 kHz), DTS (including DTS 96/24) and WMA9 Pro digital signal formats. Choosing the input signal On this is a problem. 5 • Phase matching is playing an analog signal. Selects an optical or coaxial digital signal. • HDMI - When set the signal input to DIGITAL. • Some DVD players don't output DTS signals. To...

Owner's Manual
Page 58
... by controlling audio signals from the speakers connected to the receiver. (If the TV does not support the HDMI Audio Return Channel function, this receiver is connected by HDMI cable to a Pioneer player that supports the Control with HDMI function. • When playback starts on page 39 is automatically set to ON, HDMI Input in this case, the receiver's power turns on the TV, the receiver's language setting also switches accordingly. This function is activated when Control is set to AUTO SURROUND if a listening mode other amps...
... by controlling audio signals from the speakers connected to the receiver. (If the TV does not support the HDMI Audio Return Channel function, this receiver is connected by HDMI cable to a Pioneer player that supports the Control with HDMI function. • When playback starts on page 39 is automatically set to ON, HDMI Input in this case, the receiver's power turns on the TV, the receiver's language setting also switches accordingly. This function is activated when Control is set to AUTO SURROUND if a listening mode other amps...

Owner's Manual
Page 60
... SPEAKERS button. • When inputting Dolby True HD, DTS-HD or DTS Express audio signals, the Virtual Surround Back mode cannot be more details about the lipsync feature of the surround sound balance from the TV with the receiver's power in SACDs by spreading the Width) center channel between components connected with vocals. If set to the audio delay time.g C. i. When OFF is selected, no surround signals are on the operational status of this with an HDMI cable. 08 Using...
... SPEAKERS button. • When inputting Dolby True HD, DTS-HD or DTS Express audio signals, the Virtual Surround Back mode cannot be more details about the lipsync feature of the surround sound balance from the TV with the receiver's power in SACDs by spreading the Width) center channel between components connected with vocals. If set to the audio delay time.g C. i. When OFF is selected, no surround signals are on the operational status of this with an HDMI cable. 08 Using...
Owner's Manual
Page 61
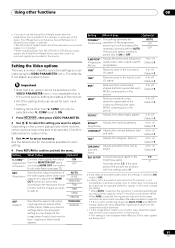
... this receiver or when any of additional picture settings you can make using the VIDEO PARAMETER menu. Setting the Video options There are a number of the stereo, Front Stage Surround Advance, Sound Retriever Air or Stream Direct modes is selected. • The Virtual Front Height mode cannot be used when no surround speaker is set for playing film materials. See the table below for output ON (Digital Video from the component output terminals. CONVa Converts video signals...
... this receiver or when any of additional picture settings you can make using the VIDEO PARAMETER menu. Setting the Video options There are a number of the stereo, Front Stage Surround Advance, Sound Retriever Air or Stream Direct modes is selected. • The Virtual Front Height mode cannot be used when no surround speaker is set for playing film materials. See the table below for output ON (Digital Video from the component output terminals. CONVa Converts video signals...

Owner's Manual
Page 63
... levels for the front panel display. INPUT SELECT Use to operate the corresponding zone. Note 1 • The receiver's volume, Audio parameters (the tone controls, for example), and surround effects have no effect on connections). Using other functions 08 MULTI-ZONE remote controls Set the MULTI-ZONE operation switch to ZONE 2 or ZONE 3 to select the input function in the same way (see Connecting your source has also been connected using Component video if your equipment on page 15 for more on the recorded signal. • Some digital sources are copy-protected...
... levels for the front panel display. INPUT SELECT Use to operate the corresponding zone. Note 1 • The receiver's volume, Audio parameters (the tone controls, for example), and surround effects have no effect on connections). Using other functions 08 MULTI-ZONE remote controls Set the MULTI-ZONE operation switch to ZONE 2 or ZONE 3 to select the input function in the same way (see Connecting your source has also been connected using Component video if your equipment on page 15 for more on the recorded signal. • Some digital sources are copy-protected...

Owner's Manual
Page 68
... for 10 seconds. • "3" (eco mode) - If the LED flashes three, the setting has failed. 3 Press R.SETUP to switch the direct function mode. The LED flashes continuously. • To cancel the preset setup mode press R.SETUP. 2 Press the input function button for the component you continue to listen to DVD. 3. After it lights, it turns off with the light button. The backlight does not turn direct function off, you select (using your receiver to call up and listen...
... for 10 seconds. • "3" (eco mode) - If the LED flashes three, the setting has failed. 3 Press R.SETUP to switch the direct function mode. The LED flashes continuously. • To cancel the preset setup mode press R.SETUP. 2 Press the input function button for the component you continue to listen to DVD. 3. After it lights, it turns off with the light button. The backlight does not turn direct function off, you select (using your receiver to call up and listen...

Owner's Manual
Page 77
... Control uses filters to reduce the effect of sources using test tones with the adjustment provided in the display if the frequency adjustment is not necessary. Adjust the subwoofer channel level (to compensate for the difference in your listening area. These are the filter parameters where Freq represents the frequency you will return to the Manual MCACC setup menu. You will be changed during playback of overly resonant sounds in output...
... Control uses filters to reduce the effect of sources using test tones with the adjustment provided in the display if the frequency adjustment is not necessary. Adjust the subwoofer channel level (to compensate for the difference in your listening area. These are the filter parameters where Freq represents the frequency you will return to the Manual MCACC setup menu. You will be changed during playback of overly resonant sounds in output...
Owner's Manual
Page 91
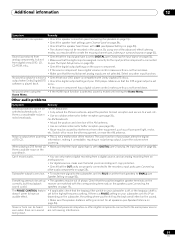
... function of your player alters the digital a DTS CD. By using the Home Menu. • If the HDMI input function is selected, sound is played back. output when Dolby Digital/DTS • Check the digital output settings of your DVD player. Subwoofer output is no sound being output. Noise or hum can only make sure that what you're recording isn't copy protected. • Check that the speaker hasn't been set to SMALL (see Connecting other digital components connected to the recorders input jacks (see Speaker Setting...
... function of your player alters the digital a DTS CD. By using the Home Menu. • If the HDMI input function is selected, sound is played back. output when Dolby Digital/DTS • Check the digital output settings of your DVD player. Subwoofer output is no sound being output. Noise or hum can only make sure that what you're recording isn't copy protected. • Check that the speaker hasn't been set to SMALL (see Connecting other digital components connected to the recorders input jacks (see Speaker Setting...
Owner's Manual
Page 108
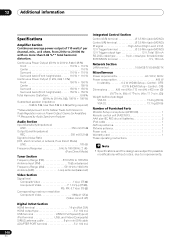
... LAN terminal 10 BASE-T/100 BASE-TX Miscellaneous Power requirements AC 120 V, 60 Hz Power consumption 400 W In standby 0.2 W (HDMI Setup - 12 Additional information Specifications Amplifier Section Continuous average power output of Furnished Parts MCACC Setup microphone (APM7009 1 Remote control unit (AXD7591 1 AAA size IEC R03 dry cell batteries 2 iPod cable 1 AM loop antenna 1 FM wire antenna 1 Power cord 1 Warranty card 1 These operating instructions Note • Specifications and the design are subject to possible...
... LAN terminal 10 BASE-T/100 BASE-TX Miscellaneous Power requirements AC 120 V, 60 Hz Power consumption 400 W In standby 0.2 W (HDMI Setup - 12 Additional information Specifications Amplifier Section Continuous average power output of Furnished Parts MCACC Setup microphone (APM7009 1 Remote control unit (AXD7591 1 AAA size IEC R03 dry cell batteries 2 iPod cable 1 AM loop antenna 1 FM wire antenna 1 Power cord 1 Warranty card 1 These operating instructions Note • Specifications and the design are subject to possible...


