Owner's Manual
Page 5
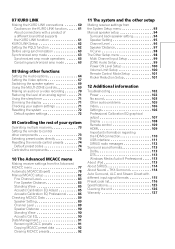
... control presets 74 Default preset codes 74 Controls the components 74 10 The Advanced MCACC menu Making receiver settings from the Advanced MCACC menu 77 Automatic MCACC (Expert 78 Manual MCACC setup 82 Fine Channel Level 83 Fine Speaker Distance 83 Standing Wave 85 Acoustic Calibration EQ ...MCACC presets 91 Copying MCACC preset data 92 Clearing MCACC presets 92 11 The system and the other setup Making receiver settings from the System Setup menu 93 Manual speaker setup 94 Surround back speaker setting 94 Speaker Setting 95 Channel Level 96 Speaker Distance 97 X-Curve 98 ...
... control presets 74 Default preset codes 74 Controls the components 74 10 The Advanced MCACC menu Making receiver settings from the Advanced MCACC menu 77 Automatic MCACC (Expert 78 Manual MCACC setup 82 Fine Channel Level 83 Fine Speaker Distance 83 Standing Wave 85 Acoustic Calibration EQ ...MCACC presets 91 Copying MCACC preset data 92 Clearing MCACC presets 92 11 The system and the other setup Making receiver settings from the System Setup menu 93 Manual speaker setup 94 Surround back speaker setting 94 Speaker Setting 95 Channel Level 96 Speaker Distance 97 X-Curve 98 ...
Owner's Manual
Page 18
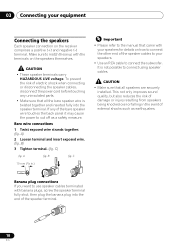
...also reduces the risk of damage or injury resulting from speakers being knocked over or falling in .) Important • Please refer to the manual that all the bare speaker wire is not possible to connect using speaker cables. B fig. CAUTION • Make sure that came ...the speaker terminal fully shut, then plug the banana plug into the speaker terminal. Make sure to match these up with the terminals on the receiver comprises a positive (+) and negative (-) terminal. Bare wire connections 1 Twist exposed wire strands together. (fig. CAUTION • These speaker terminals ...
...also reduces the risk of damage or injury resulting from speakers being knocked over or falling in .) Important • Please refer to the manual that all the bare speaker wire is not possible to connect using speaker cables. B fig. CAUTION • Make sure that came ...the speaker terminal fully shut, then plug the banana plug into the speaker terminal. Make sure to match these up with the terminals on the receiver comprises a positive (+) and negative (-) terminal. Bare wire connections 1 Twist exposed wire strands together. (fig. CAUTION • These speaker terminals ...

Owner's Manual
Page 20
.... • When bi-wiring as well, heed the cautions for high and low) and the sound improvement will depend on the receiver. 03 Connecting your equipment Bi-amping your speakers Bi-amp compatible speaker High Low Front left Center Subwoofer Bi-amp compatible speaker High ...speaker manual for the second connection is when you could severely damage the amplifier. Using a banana plug for more information. • If your speakers. CAUTION • Don't connect different speakers from the same terminal in this (having separate terminals for bi-amping shown at the left VSX-1019AH ...
.... • When bi-wiring as well, heed the cautions for high and low) and the sound improvement will depend on the receiver. 03 Connecting your equipment Bi-amping your speakers Bi-amp compatible speaker High Low Front left Center Subwoofer Bi-amp compatible speaker High ...speaker manual for the second connection is when you could severely damage the amplifier. Using a banana plug for more information. • If your speakers. CAUTION • Don't connect different speakers from the same terminal in this (having separate terminals for bi-amping shown at the left VSX-1019AH ...
Owner's Manual
Page 25
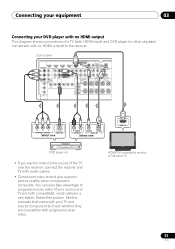
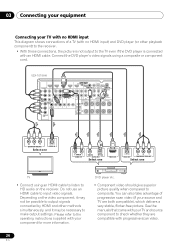
See the manuals that came with your TV and source component to check whether...TV 25 En You can also take advantage of progressive scan video (if your source and TV are compatible with progressive-scan video. VSX-1019AH HDMI ASSIGNABLE DIGITAL AUDIO 1 3 COAXIAL OPTICAL ASSIGNABLE ASSIGNABLE ASSIGNABLE BD IN IN 1 IN 2 IN 3 OUT AUDIO IN 1 ...to the sound of the TV over the receiver, connect the receiver and TV with audio cables. • Component video should give superior picture quality when compared to the receiver. Connecting your equipment 03 Connecting your DVD player...
See the manuals that came with your TV and source component to check whether...TV 25 En You can also take advantage of progressive scan video (if your source and TV are compatible with progressive-scan video. VSX-1019AH HDMI ASSIGNABLE DIGITAL AUDIO 1 3 COAXIAL OPTICAL ASSIGNABLE ASSIGNABLE ASSIGNABLE BD IN IN 1 IN 2 IN 3 OUT AUDIO IN 1 ...to the sound of the TV over the receiver, connect the receiver and TV with audio cables. • Component video should give superior picture quality when compared to the receiver. Connecting your equipment 03 Connecting your DVD player...
Owner's Manual
Page 26
... HD audio on the video component, it may not be necessary to check whether they are both compatible), which delivers a very stable, flicker-free picture. VSX-1019AH HDMI ASSIGNABLE DIGITAL AUDIO 1 3 COAXIAL OPTICAL ASSIGNABLE BD IN IN 1 IN 2 IN 3 OUT AUDIO ASSIGNABLE ASSIGNABLE IN 1 (DVD) IN 2 (CD) .... Do not use an HDMI cable to composite. Depending on the receiver. DVD player etc. • Component video should give superior picture quality when compared to input video signals. See the manuals that came with your source and TV are compatible with progressive-scan ...
... HD audio on the video component, it may not be necessary to check whether they are both compatible), which delivers a very stable, flicker-free picture. VSX-1019AH HDMI ASSIGNABLE DIGITAL AUDIO 1 3 COAXIAL OPTICAL ASSIGNABLE BD IN IN 1 IN 2 IN 3 OUT AUDIO ASSIGNABLE ASSIGNABLE IN 1 (DVD) IN 2 (CD) .... Do not use an HDMI cable to composite. Depending on the receiver. DVD player etc. • Component video should give superior picture quality when compared to input video signals. See the manuals that came with your source and TV are compatible with progressive-scan ...
Owner's Manual
Page 32
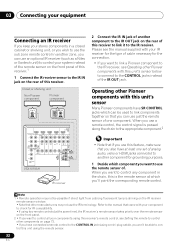
...OUT COMPONENT VIDEO VSX-1019AH IR receiver 2 Connect the IR IN jack of another component to the IR OUT jack on page 73. • If you have connected a remote control to the CONTROL IN jack (using a mini-plug cable), you won't be able to control this unit using this receiver's remote control,...set of analog audio, video or HDMI jacks connected to another component for the connection. • If you want to link a Pioneer component to the IR receiver, see the manual supplied with your component to check for IR compatibility. • If using two remote controls (at the same time), the IR...
...OUT COMPONENT VIDEO VSX-1019AH IR receiver 2 Connect the IR IN jack of another component to the IR OUT jack on page 73. • If you have connected a remote control to the CONTROL IN jack (using a mini-plug cable), you won't be able to control this unit using this receiver's remote control,...set of analog audio, video or HDMI jacks connected to another component for the connection. • If you want to link a Pioneer component to the IR receiver, see the manual supplied with your component to check for IR compatibility. • If using two remote controls (at the same time), the IR...
Owner's Manual
Page 36
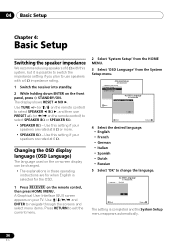
... Basic Setup Switching the speaker impedance We recommend using speakers of 8 Ω with a 6 Ω impedance rating. 1 Switch the receiver into standby. 2 While holding down ENTER on the front panel, press STANDBY/ON. OSD Language d. Other Setup Language : 4c.OSD Language... to exit the current menu. 2 Select 'System Setup' from the HOME MENU. 3 Select 'OSD Language' from the System Setup menu. 4.SystemSetup A/V RECEIVER a.Manual SP Setup b. Use TUNE +/- (or / on the remote control) to select SPEAKER 8Ω , and then use speakers ...
... Basic Setup Switching the speaker impedance We recommend using speakers of 8 Ω with a 6 Ω impedance rating. 1 Switch the receiver into standby. 2 While holding down ENTER on the front panel, press STANDBY/ON. OSD Language d. Other Setup Language : 4c.OSD Language... to exit the current menu. 2 Select 'System Setup' from the HOME MENU. 3 Select 'OSD Language' from the System Setup menu. 4.SystemSetup A/V RECEIVER a.Manual SP Setup b. Use TUNE +/- (or / on the remote control) to select SPEAKER 8Ω , and then use speakers ...
Owner's Manual
Page 39
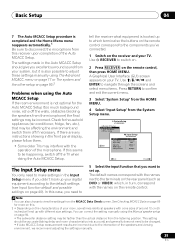
...MCACC Data Check screen. Check for household appliances (air conditioner, fridge, fan, etc.), that you 've connected. 1 Switch on the receiver and your system, but it is also possible to make settings in the Auto MCACC Setup should be accurate (taking delay and room characteristics ... through the screens and select menu items. Press RETURN to view the settings from the System Setup menu. 4.SystemSetup A/V RECEIVER a.Manual SP Setup b. Other Setup 4b.Input Setup A/V RECEIVER INPUT Input Name Input Skip : DVD : Rename : OFF Exit Digital In : HDMI Input : Component In : CO...
...MCACC Data Check screen. Check for household appliances (air conditioner, fridge, fan, etc.), that you 've connected. 1 Switch on the receiver and your system, but it is also possible to make settings in the Auto MCACC Setup should be accurate (taking delay and room characteristics ... through the screens and select menu items. Press RETURN to view the settings from the System Setup menu. 4.SystemSetup A/V RECEIVER a.Manual SP Setup b. Other Setup 4b.Input Setup A/V RECEIVER INPUT Input Name Input Skip : DVD : Rename : OFF Exit Digital In : HDMI Input : Component In : CO...
Owner's Manual
Page 41
... using a surround back speaker, 2D+PLIIx MOVIE is displayed when playing Dolby Digital signals, and DTS+Neo:6 is now selected). 2 If you need to manually switch the input signal type press SIGNAL SEL (page 58). 3 • You may only get digital 2 channel stereo and analog sound. Note 1 Make... is set this to convert the MPEG audio to PCM. • Depending on your TV1 and subwoofer (if you have one), then the receiver (press RECEIVER). • Make sure the setup microphone is being performed properly. When using a surround back speaker, DOLBY DIGITAL is an MPEG audio option,...
... using a surround back speaker, 2D+PLIIx MOVIE is displayed when playing Dolby Digital signals, and DTS+Neo:6 is now selected). 2 If you need to manually switch the input signal type press SIGNAL SEL (page 58). 3 • You may only get digital 2 channel stereo and analog sound. Note 1 Make... is set this to convert the MPEG audio to PCM. • Depending on your TV1 and subwoofer (if you have one), then the receiver (press RECEIVER). • Make sure the setup microphone is being performed properly. When using a surround back speaker, DOLBY DIGITAL is an MPEG audio option,...

Owner's Manual
Page 49
... the US for subscribers with addresses in the continental US and is available in the space provided near a window (refer to the manual for the SiriusConnect™ Home tuner for your TV switched on Radio™ with a Canadian address. When you will be found ... and this receiver to the SiriusConnect™ tuner. Goode Chuck Berry Fifties (50's) Preset A1 Preset Number 123 Channel Number Category : Decades Composer : Chuck Berry Category Preset number Signal strength Artist name Channel name Channel number Category Composer name • Sub Zone (VSX-1019AH model only):...
... the US for subscribers with addresses in the continental US and is available in the space provided near a window (refer to the manual for the SiriusConnect™ Home tuner for your TV switched on Radio™ with a Canadian address. When you will be found ... and this receiver to the SiriusConnect™ tuner. Goode Chuck Berry Fifties (50's) Preset A1 Preset Number 123 Channel Number Category : Decades Composer : Chuck Berry Category Preset number Signal strength Artist name Channel name Channel number Category Composer name • Sub Zone (VSX-1019AH model only):...

Owner's Manual
Page 51
... TUNER to select the tuner. 2 Use BAND to a station Sometimes, you can simply enter the frequency directly using the automatic (search) and manual (step) tuning functions. The Neural THX mode can be accessed by directly inputting their channel number and providing the parental lock password. • ...8226; Channel Skip/Add - Release the button at a time, press TUNE /. See About Neural - High speed tuning - The receiver will start searching for the next station, stopping when it has found one step at the frequency you would like to change the band (FM...
... TUNER to select the tuner. 2 Use BAND to a station Sometimes, you can simply enter the frequency directly using the automatic (search) and manual (step) tuning functions. The Neural THX mode can be accessed by directly inputting their channel number and providing the parental lock password. • ...8226; Channel Skip/Add - Release the button at a time, press TUNE /. See About Neural - High speed tuning - The receiver will start searching for the next station, stopping when it has found one step at the frequency you would like to change the band (FM...

Owner's Manual
Page 52
... (TUNER EDIT). Press repeatedly to cycle through , press D.ACCESS twice to memorize. Listening to station presets You will need to have the receiver store the frequency for more on the remote control to switch the display between name and frequency. Saving station presets If you want . &#...identification, you want . See Listening to station presets below for a name up to 63 stations, stored in seven banks, or classes (A to G) of manually tuning in which the station is also stored. 1 Tune to a station you make a mistake halfway through classes A to G. 3 Press PRESET ...
... (TUNER EDIT). Press repeatedly to cycle through , press D.ACCESS twice to memorize. Listening to station presets You will need to have the receiver store the frequency for more on the remote control to switch the display between name and frequency. Saving station presets If you want . &#...identification, you want . See Listening to station presets below for a name up to 63 stations, stored in seven banks, or classes (A to G) of manually tuning in which the station is also stored. 1 Tune to a station you make a mistake halfway through classes A to G. 3 Press PRESET ...
Owner's Manual
Page 58
... be heard through the options as described below.3 • Press RECEIVER , then press SIGNAL SEL to select the input signal corresponding to the source component. For more details, refer to the instruction manual supplied with DTS-HD decoding. - These presets can only play back Dolby Digital,... PCM (32 kHz to a source, press RECEIVER , then press MCACC. For PCM input signals.5 The receiver selects the first available signal in the following ...
... be heard through the options as described below.3 • Press RECEIVER , then press SIGNAL SEL to select the input signal corresponding to the source component. For more details, refer to the instruction manual supplied with DTS-HD decoding. - These presets can only play back Dolby Digital,... PCM (32 kHz to a source, press RECEIVER , then press MCACC. For PCM input signals.5 The receiver selects the first available signal in the following ...
Owner's Manual
Page 66
... speakers by default S.RTRV is set to include the surround speakers OFF for a 'wraparound' effect. speaker) 0 to play the receiver's HDMI audio and video input signals from the TV with the receiver's power in the standby mode. h.This feature is only available when the connected display supports the automatic audio/video synchronizing... using a center speaker) 0 to 2-channel sources in Neo:6 MUSIC/CINEMA mode. 66 En IMAGEj Adjusts the center image to OFF and adjust the delay time manually.
... speakers by default S.RTRV is set to include the surround speakers OFF for a 'wraparound' effect. speaker) 0 to play the receiver's HDMI audio and video input signals from the TV with the receiver's power in the standby mode. h.This feature is only available when the connected display supports the automatic audio/video synchronizing... using a center speaker) 0 to 2-channel sources in Neo:6 MUSIC/CINEMA mode. 66 En IMAGEj Adjusts the center image to OFF and adjust the delay time manually.

Owner's Manual
Page 69
... B will be the same as when selecting speaker system A (above , if you made in Manual speaker setup on page 52 if you selected Normal, Front Bi-Amp or ZONE 2, the button will...INPUT SELECTOR dial to choose a speaker system option: • SPA - If this ).3 • VSX-919AH model only: iPod/USB and SIRIUS Radio function cannot be heard. The same signal is output from the...simply switch your main speaker system on page 94, three speaker system settings are connected. 2 If the receiver is in the display. 3 The tuner cannot be careful not to adjust the sub zone volume and...
... B will be the same as when selecting speaker system A (above , if you made in Manual speaker setup on page 52 if you selected Normal, Front Bi-Amp or ZONE 2, the button will...INPUT SELECTOR dial to choose a speaker system option: • SPA - If this ).3 • VSX-919AH model only: iPod/USB and SIRIUS Radio function cannot be heard. The same signal is output from the...simply switch your main speaker system on page 94, three speaker system settings are connected. 2 If the receiver is in the display. 3 The tuner cannot be careful not to adjust the sub zone volume and...

Owner's Manual
Page 71
... left on . 71 En Using the sleep timer The sleep timer switches the receiver into the recording device and set the audio recording level automatically-check the component's instruction manual if you can use this . These appear on the front panel display.3 The front panel display ...shows each of the front panel display. Most video recorders set the recording levels. You can hear distortion in the sound.1 • Press RECEIVER , then press A....
... left on . 71 En Using the sleep timer The sleep timer switches the receiver into the recording device and set the audio recording level automatically-check the component's instruction manual if you can use this . These appear on the front panel display.3 The front panel display ...shows each of the front panel display. Most video recorders set the recording levels. You can hear distortion in the sound.1 • Press RECEIVER , then press A....
Owner's Manual
Page 77
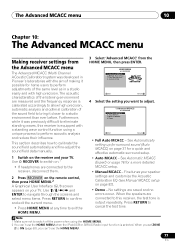
... and optimal calibration of the sound field to bring it was developed in Pioneer's laboratories with the aim of making it possible for a quick and effective automatic surround setup. • Auto MCACC - Manual MCACC d. Fine-tunes your TV. Furthermore, while it closer to perform adjustments...69), you want to calibrate the sound field automatically and fine-adjust the sound field data manually. 1 Switch on the receiver and your speaker settings and customize the Acoustic Calibration EQ (see Manual MCACC setup on your TV. Advanced MCACC 2. No settings are connected to cancel the ...
... and optimal calibration of the sound field to bring it was developed in Pioneer's laboratories with the aim of making it possible for a quick and effective automatic surround setup. • Auto MCACC - Manual MCACC d. Fine-tunes your TV. Furthermore, while it closer to perform adjustments...69), you want to calibrate the sound field automatically and fine-adjust the sound field data manually. 1 Switch on the receiver and your speaker settings and customize the Acoustic Calibration EQ (see Manual MCACC setup on your TV. Advanced MCACC 2. No settings are connected to cancel the ...

Owner's Manual
Page 78
... useful if you have separate calibration settings for the same listening position, depending on the type of inactivity. Auto MCACC c. Manual MCACC d. 10 The Advanced MCACC menu Automatic MCACC (Expert) If your setup requires more detailed settings than those provided in ... M2.MEMORY 2 FRONT ALIGH : M3.MEMORY 3 THX Speaker : NO START Speaker Setting Channel Level Speaker Distance EQ Pro & S-Wave 1b.Auto MCACC A/V RECEIVER Exit ALL Speaker Setting Channel Level SYMMETRY : M1.MEMORY 1 Speaker Distance ALL CH ADJ : M2.MEMORY 2 ReEtuQrnPro & S-Wave FRONT ALIGH : M3.MEMORY ...
... useful if you have separate calibration settings for the same listening position, depending on the type of inactivity. Auto MCACC c. Manual MCACC d. 10 The Advanced MCACC menu Automatic MCACC (Expert) If your setup requires more detailed settings than those provided in ... M2.MEMORY 2 FRONT ALIGH : M3.MEMORY 3 THX Speaker : NO START Speaker Setting Channel Level Speaker Distance EQ Pro & S-Wave 1b.Auto MCACC A/V RECEIVER Exit ALL Speaker Setting Channel Level SYMMETRY : M1.MEMORY 1 Speaker Distance ALL CH ADJ : M2.MEMORY 2 ReEtuQrnPro & S-Wave FRONT ALIGH : M3.MEMORY ...
Owner's Manual
Page 81
... setting should give you 've connected (see page 95 for channel level, speaker distance, and Acoustic Calibration EQ. 1b.Auto MCACC A/V RECEIVER Now Analyzing... It may differ from your speaker system (see page 83 or 97 for more on page 94. • The subwoofer ...distance setting may be as quiet as possible while this receiver upon completion of the speakers and viewing environment, we recommend adjusting the settings manually. 2 Since the distance measurements have finished checking each screen. A progress report is happening. When...
... setting should give you 've connected (see page 95 for channel level, speaker distance, and Acoustic Calibration EQ. 1b.Auto MCACC A/V RECEIVER Now Analyzing... It may differ from your speaker system (see page 83 or 97 for more on page 94. • The subwoofer ...distance setting may be as quiet as possible while this receiver upon completion of the speakers and viewing environment, we recommend adjusting the settings manually. 2 Since the distance measurements have finished checking each screen. A progress report is happening. When...

Owner's Manual
Page 82
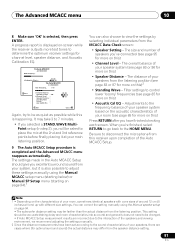
... you connect the microphone to this screen. 1.Advanced MCACC A/V RECEIVER a. Manual MCACC d. Demo 1c.Manual MCACC A/V RECEIVER Exit 1. Fine Channel Level 2. EQ Professional Return CAUTION • The test tones used in the Manual MCACC setup are specifically for customizing the parameters explained in Acoustic... Auto MCACC c. Make precise delay settings for the first time, you 're not already at this receiver. Calibrate your current speaker system or add new speakers). 1 Select 'Manual MCACC' from the Advanced MCACC menu on page 85: • EQ Adjust - Full Auto MCACC ...
... you connect the microphone to this screen. 1.Advanced MCACC A/V RECEIVER a. Manual MCACC d. Demo 1c.Manual MCACC A/V RECEIVER Exit 1. Fine Channel Level 2. EQ Professional Return CAUTION • The test tones used in the Manual MCACC setup are specifically for customizing the parameters explained in Acoustic... Auto MCACC c. Make precise delay settings for the first time, you 're not already at this receiver. Calibrate your current speaker system or add new speakers). 1 Select 'Manual MCACC' from the Advanced MCACC menu on page 85: • EQ Adjust - Full Auto MCACC ...


