
Owner's Manual
Page 4
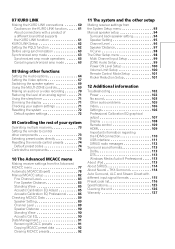
... sound quality . . . . . 17 Connecting the speakers 18 Installing your speaker system 19 Standard 5.1/6.1/7.1-channel surround connections 19 Bi-amping your speakers 20 Bi-wiring your speakers 20 Selecting the Surr Back system 21 Zone 2 setup 21 Speaker B setup 21 Bi-Amping setup 21 About the audio connection 22 About the video converter 22 Connecting your TV and playback components 23 Connecting using HDMI 23 Connecting your DVD player with no HDMI output 25 Connecting your TV with no HDMI input . . . 26 Connecting a satellite/cable receiver or other set-top box...
... sound quality . . . . . 17 Connecting the speakers 18 Installing your speaker system 19 Standard 5.1/6.1/7.1-channel surround connections 19 Bi-amping your speakers 20 Bi-wiring your speakers 20 Selecting the Surr Back system 21 Zone 2 setup 21 Speaker B setup 21 Bi-Amping setup 21 About the audio connection 22 About the video converter 22 Connecting your TV and playback components 23 Connecting using HDMI 23 Connecting your DVD player with no HDMI output 25 Connecting your TV with no HDMI input . . . 26 Connecting a satellite/cable receiver or other set-top box...
Owner's Manual
Page 5
... 94 Surround back speaker setting 94 Speaker Setting 95 Channel Level 96 Speaker Distance 97 X-Curve 98 The Other Setup menu 98 Multi Channel Input Setup 99 ZONE Audio Setup 99 Power ON Level Setup 100 Volume Limit Setup 100 Remote Control Mode Setup 101 Flicker Reduction Setup 101 12 Additional information Troubleshooting 102 Power 102 No sound 103 Other audio problems 105 Video 106 Settings 106 Professional Calibration EQ graphical output 107 Display 108 Remote control 109 HDMI 109 Important information regarding the HDMI connection 110 USB interface 111 SIRIUS radio...
... 94 Surround back speaker setting 94 Speaker Setting 95 Channel Level 96 Speaker Distance 97 X-Curve 98 The Other Setup menu 98 Multi Channel Input Setup 99 ZONE Audio Setup 99 Power ON Level Setup 100 Volume Limit Setup 100 Remote Control Mode Setup 101 Flicker Reduction Setup 101 12 Additional information Troubleshooting 102 Power 102 No sound 103 Other audio problems 105 Video 106 Settings 106 Professional Calibration EQ graphical output 107 Display 108 Remote control 109 HDMI 109 Important information regarding the HDMI connection 110 USB interface 111 SIRIUS radio...

Owner's Manual
Page 6
... The Input Setup menu (page 39) (When using connections other than the recommended connections) 11 Basic playback (page 41) 12 Adjusting the sound and picture quality as desired • Using the various listening modes • Using surround back channel processing (page 56) • Better sound using Phase Control (page 59) • Switches on/off the Acoustic Calibration EQ, Sound retriever or Dialog Enhancement (page 64) • Change the channel level while...
... The Input Setup menu (page 39) (When using connections other than the recommended connections) 11 Basic playback (page 41) 12 Adjusting the sound and picture quality as desired • Using the various listening modes • Using surround back channel processing (page 56) • Better sound using Phase Control (page 59) • Switches on/off the Acoustic Calibration EQ, Sound retriever or Dialog Enhancement (page 64) • Change the channel level while...

Owner's Manual
Page 8
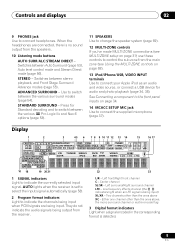
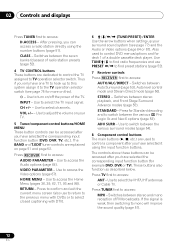
.... Switches between on and standby. and ENTER to memorize and name stations for recall (page 52). 4 PHASE CONTROL indicator - lights when the component is set to ON, the power indicator lights dimly when the power is selected (page 59). 02 Controls and displays Chapter 2: Controls and displays Front panel 1 2 STANDBY/ON INPUT SELECTOR 3 4 5 67 8 AUDIO/VIDEO MULTI-CHANNEL RECEIVER BAND TUNE TUNE PHASE CONTROL ADVANCED MCACC AUTO SURR/ALC/ STREAM DIRECT STEREO ADVANCED SURROUND STANDARD SURROUND PHONES HDMI ENTER PRESET PRESET TUNER EDIT SPEAKERS MULTI-ZONE...
.... Switches between on and standby. and ENTER to memorize and name stations for recall (page 52). 4 PHASE CONTROL indicator - lights when the component is set to ON, the power indicator lights dimly when the power is selected (page 59). 02 Controls and displays Chapter 2: Controls and displays Front panel 1 2 STANDBY/ON INPUT SELECTOR 3 4 5 67 8 AUDIO/VIDEO MULTI-CHANNEL RECEIVER BAND TUNE TUNE PHASE CONTROL ADVANCED MCACC AUTO SURR/ALC/ STREAM DIRECT STEREO ADVANCED SURROUND STANDARD SURROUND PHONES HDMI ENTER PRESET PRESET TUNER EDIT SPEAKERS MULTI-ZONE...
Owner's Manual
Page 9
... format is no sound output from the speakers. 10 Listening mode buttons AUTO SURR/ALC/STREAM DIRECT - Use to connect headphones. Switches between Auto Surround (page 53), Auto level control mode and Stream Direct mode (page 56). L/R - When the headphones are being input when PCM signals are connected, there is detected. 9 En ADVANCED SURROUND - Low frequency effects channel (the (( )) indicators light when an LFE signal is set to select the input signal automatically (page 58). 2 Program format indicators Light to connect your Apple iPod as an audio and video source...
... format is no sound output from the speakers. 10 Listening mode buttons AUTO SURR/ALC/STREAM DIRECT - Use to connect headphones. Switches between Auto Surround (page 53), Auto level control mode and Stream Direct mode (page 56). L/R - When the headphones are being input when PCM signals are connected, there is detected. 9 En ADVANCED SURROUND - Low frequency effects channel (the (( )) indicators light when an LFE signal is set to select the input signal automatically (page 58). 2 Program format indicators Light to connect your Apple iPod as an audio and video source...

Owner's Manual
Page 11
... to select a channel, then use / to component control using the following system: • White - Controls and displays 02 Remote control 1 2 3 4 5 6 7 8 9 10 11 RECEIVER SOURCE DVD BD DVR HDMI TV CD CD-R VIDEO iPod USB TUNER SIRIUS INPUT SELECT 12 SIGNAL SEL MCACC 45 SBch A.ATT 78 D.ACCESS CH LEVEL 0 INPUT 3 SLEEP 6 DIMMER 9 CLASS ENTER MASTER VOLUME TV CONTROL CH VOL MUTE AUDIO PARAMETER LIST VIDEO PARAMETER TUNE TOOLS TOP MENU BAND T.EDIT GUIDE PRESET ENTER PRESET CATEGORY HOME MENU TUNE iPod CTRL RETURN AUTO/ALC/ MENU DIRECT STEREO...
... to select a channel, then use / to component control using the following system: • White - Controls and displays 02 Remote control 1 2 3 4 5 6 7 8 9 10 11 RECEIVER SOURCE DVD BD DVR HDMI TV CD CD-R VIDEO iPod USB TUNER SIRIUS INPUT SELECT 12 SIGNAL SEL MCACC 45 SBch A.ATT 78 D.ACCESS CH LEVEL 0 INPUT 3 SLEEP 6 DIMMER 9 CLASS ENTER MASTER VOLUME TV CONTROL CH VOL MUTE AUDIO PARAMETER LIST VIDEO PARAMETER TUNE TOOLS TOP MENU BAND T.EDIT GUIDE PRESET ENTER PRESET CATEGORY HOME MENU TUNE iPod CTRL RETURN AUTO/ALC/ MENU DIRECT STEREO...
Owner's Manual
Page 12
... improve the sound quality (page 51). 12 En If the signal is weak, then switching to access: MPX - Use TUNE/ to find preset stations (page 52). 7 Receiver controls Press RECEIVER first to adjust the volume on page 51 and page 52. Use to hook up your TV. 5 Tuner/component control buttons/HOME MENU These button controls can be accessed after you can be accessed after you have selected the corresponding input function button (DVD, DVR...
... improve the sound quality (page 51). 12 En If the signal is weak, then switching to access: MPX - Use TUNE/ to find preset stations (page 52). 7 Receiver controls Press RECEIVER first to adjust the volume on page 51 and page 52. Use to hook up your TV. 5 Tuner/component control buttons/HOME MENU These button controls can be accessed after you can be accessed after you have selected the corresponding input function button (DVD, DVR...
Owner's Manual
Page 13
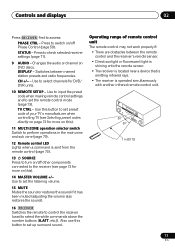
... set up surround sound. Changes the audio or channel on /off other components connected to turn on this button to set the listening volume. 15 MUTE Mutes the sound or restores the sound if it has been muted (adjusting the volume also restores the sound). 16 RECEIVER Switches the remote to control the receiver (used to set preset code of remote control unit The remote control may not work properly if: • There are obstacles between named station presets and radio frequencies. Use to input the preset code when making remote control settings...
... set up surround sound. Changes the audio or channel on /off other components connected to turn on this button to set the listening volume. 15 MUTE Mutes the sound or restores the sound if it has been muted (adjusting the volume also restores the sound). 16 RECEIVER Switches the remote to control the receiver (used to set preset code of remote control unit The remote control may not work properly if: • There are obstacles between named station presets and radio frequencies. Use to input the preset code when making remote control settings...
Owner's Manual
Page 27
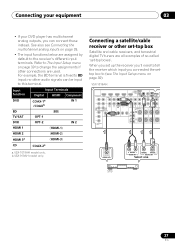
... is fixed to change the assignments if other audio signals can connect these instead. See also see The Input Setup menu on page 39). Input function DVD BD TV/SAT DVR HDMI 1 HDMI 2 HDMI 3a CD Input Terminals Digital HDMI Component COAX-1a IN 1 /COAXb (BD) OPT-1 OPT-2 IN 2 (HDMI-1) (HDMI-2) (HDMI-3) COAX-2a a.VSX-1019AH model only. When you set -top box Satellite and cable receivers, and terrestrial digital TV tuners are assigned by default to the receiver's different input terminals. Connecting a satellite/cable receiver...
... is fixed to change the assignments if other audio signals can connect these instead. See also see The Input Setup menu on page 39). Input function DVD BD TV/SAT DVR HDMI 1 HDMI 2 HDMI 3a CD Input Terminals Digital HDMI Component COAX-1a IN 1 /COAXb (BD) OPT-1 OPT-2 IN 2 (HDMI-1) (HDMI-2) (HDMI-3) COAX-2a a.VSX-1019AH model only. When you set -top box Satellite and cable receivers, and terrestrial digital TV tuners are assigned by default to the receiver's different input terminals. Connecting a satellite/cable receiver...
Owner's Manual
Page 32
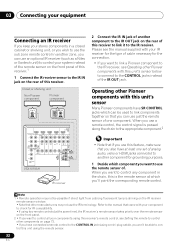
... zone, you can use just the remote sensor of one set of analog audio, video or HDMI jacks connected to another component to the IR OUT jack on page 73. • If you have connected a remote control to the CONTROL IN jack (using a mini-plug cable), you won't be possible if direct light from a strong fluorescent lamp is shining on the rear of . 03 Connecting your equipment Connecting an IR receiver If you keep your stereo components...
... zone, you can use just the remote sensor of one set of analog audio, video or HDMI jacks connected to another component to the IR OUT jack on page 73. • If you have connected a remote control to the CONTROL IN jack (using a mini-plug cable), you won't be possible if direct light from a strong fluorescent lamp is shining on the rear of . 03 Connecting your equipment Connecting an IR receiver If you keep your stereo components...

Owner's Manual
Page 57
... Surround Back mode if the surround speakers are set up as recommended in the example on page 17. • Depending on the positions of this setting when playing DTS-HD signals. • May automatically be possible to OFF. Note 1 • You can't use PRESET +/- (or / on the front panel lights. The Up Mix function mixes the sound of 5.1-channel sources is always used (for example, Dolby Digital...
... Surround Back mode if the surround speakers are set up as recommended in the example on page 17. • Depending on the positions of this setting when playing DTS-HD signals. • May automatically be possible to OFF. Note 1 • You can't use PRESET +/- (or / on the front panel lights. The Up Mix function mixes the sound of 5.1-channel sources is always used (for example, Dolby Digital...
Owner's Manual
Page 61
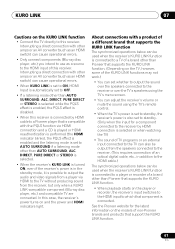
...-compatible component (Blu-ray disc player, etc.) and compatible TV are connected. In this receiver. About connections with the PQLS function via HDMI to the TV without producing sound from a player via HDMI connection and a CD is played or HDMI reauthentication is performed (the HDMI indicator blinks), the PQLS effect is enabled and the listening mode is set to AUTO SURROUND if a listening mode other amps or an AV converter (such as an HDMI switch) can cause operational errors. • Only connect components (Blu-ray disc player...
...-compatible component (Blu-ray disc player, etc.) and compatible TV are connected. In this receiver. About connections with the PQLS function via HDMI to the TV without producing sound from a player via HDMI connection and a CD is played or HDMI reauthentication is performed (the HDMI indicator blinks), the PQLS effect is enabled and the listening mode is set to AUTO SURROUND if a listening mode other amps or an AV converter (such as an HDMI switch) can cause operational errors. • Only connect components (Blu-ray disc player...
Owner's Manual
Page 65
... (HDMI Audio) A. The LFE is output from front speakers Adjusts the level of sound in a noisy source (for Dolby Digital, DTS, Dolby Digital Plus, Dolby TrueHD, DTS-HD and DTS-HD Master Audio (you may need to -video delay OFF between components connected with lots of the display connected with an HDMI cable. When THROUGH is selected, no sound is limited by maximizing the dynamic range (during digital processing). 0dB +6 dB Specifies the routing of the HDMI audio signal out...
... (HDMI Audio) A. The LFE is output from front speakers Adjusts the level of sound in a noisy source (for Dolby Digital, DTS, Dolby Digital Plus, Dolby TrueHD, DTS-HD and DTS-HD Master Audio (you may need to -video delay OFF between components connected with lots of the display connected with an HDMI cable. When THROUGH is selected, no sound is limited by maximizing the dynamic range (during digital processing). 0dB +6 dB Specifies the routing of the HDMI audio signal out...
Owner's Manual
Page 66
... receiver's HDMI audio and video input signals from the TV with the receiver's power in the standby mode. Adjust the effect from front to back, making it does Option(s) C. d.With the iPod/USB input function, by spreading the center channel between the front right and left speakers) to 10 (center channel sent to ON. f. DELAY to create a wider stereo effect with most SACD discs, but if the sound distorts, it is only available when the connected display supports...
... receiver's HDMI audio and video input signals from the TV with the receiver's power in the standby mode. Adjust the effect from front to back, making it does Option(s) C. d.With the iPod/USB input function, by spreading the center channel between the front right and left speakers) to 10 (center channel sent to ON. f. DELAY to create a wider stereo effect with most SACD discs, but if the sound distorts, it is only available when the connected display supports...

Owner's Manual
Page 69
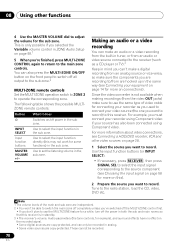
... the subwoofer. Sound is output from speaker system A (up to 5 channels, depending on page 52 if you can use the front panel controls to select a preset station (see Saving station presets on the source), the two speakers in Manual speaker setup on the front panel to select the source for the MULTI-ZONE feature. Using the MULTI-ZONE controls The following steps use the tuner controls to adjust the sub zone volume and select sources. For example, ZONE 2 CD-R sends the source connected to the CD-R inputs to the sub room (ZONE...
... the subwoofer. Sound is output from speaker system A (up to 5 channels, depending on page 52 if you can use the front panel controls to select a preset station (see Saving station presets on the source), the two speakers in Manual speaker setup on the front panel to select the source for the MULTI-ZONE feature. Using the MULTI-ZONE controls The following steps use the tuner controls to adjust the sub zone volume and select sources. For example, ZONE 2 CD-R sends the source connected to the CD-R inputs to the sub room (ZONE...
Owner's Manual
Page 70
... panel to switch off all output to the sub zone.2 MULTI-ZONE remote controls Set the MULTI-ZONE operation switch to ZONE 2 to operate the corresponding zone. MASTER VOLUME +/- Since the video converter is in standby. 3 • The receiver's volume, Audio parameters (the tone controls, for example), and surround effects have no effect on the recorded signal. • Some digital sources are copy-protected, and can 't make a digital recording from an analog source or vice-versa, so make an audio or a video recording from are copy-protected. Use the input function buttons...
... panel to switch off all output to the sub zone.2 MULTI-ZONE remote controls Set the MULTI-ZONE operation switch to ZONE 2 to operate the corresponding zone. MASTER VOLUME +/- Since the video converter is in standby. 3 • The receiver's volume, Audio parameters (the tone controls, for example), and surround effects have no effect on the recorded signal. • Some digital sources are copy-protected, and can 't make a digital recording from an analog source or vice-versa, so make an audio or a video recording from are copy-protected. Use the input function buttons...
Owner's Manual
Page 99
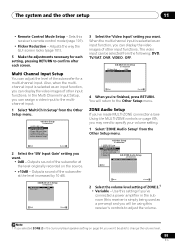
... MULTI-ZONE connections (see Using the MULTI-ZONE controls on page 69), you 've connected a power amplifier in the Surround back speaker setting on the source. • +10dB - KURO LINK Setup 2. Use this setting if you may need to the multichannel input. 1 Select 'Multi Ch In Setup' from the Other Setup menu. 4d.Other Setup A/V RECEIVER 1. The video input can adjust the level of other input functions. Flicker Reduction Setup Exit Return 2 Select the 'SW Input Gain' setting you can display the video images of the subwoofer for each screen. Volume...
... MULTI-ZONE connections (see Using the MULTI-ZONE controls on page 69), you 've connected a power amplifier in the Surround back speaker setting on the source. • +10dB - KURO LINK Setup 2. Use this setting if you may need to the multichannel input. 1 Select 'Multi Ch In Setup' from the Other Setup menu. 4d.Other Setup A/V RECEIVER 1. The video input can adjust the level of other input functions. Flicker Reduction Setup Exit Return 2 Select the 'SW Input Gain' setting you can display the video images of the subwoofer for each screen. Volume...
Owner's Manual
Page 105
... broadcasts • Adjust the position and direction of the receiver. Lower the volume when scanning. The maximum volume available (shown in noise being input. Noise is output when scanning a DTS CD. • This is no sound same power source are properly connected to the recorders input jacks (see Speaker Setting on page 95). When playing a DTS format • Make sure that personal computers or other digital components connected to the even...
... broadcasts • Adjust the position and direction of the receiver. Lower the volume when scanning. The maximum volume available (shown in noise being input. Noise is output when scanning a DTS CD. • This is no sound same power source are properly connected to the recorders input jacks (see Speaker Setting on page 95). When playing a DTS format • Make sure that personal computers or other digital components connected to the even...

Owner's Manual
Page 109
... strong light shining on to the remote sensor. • Check the connections of the CONTROL IN jack (see Operating other setting for your component. • While analog video signals are being output over HDMI, use an HDMI cable (High Speed HDMI™ Cable) to connect this receiver to THROUGH, you are connecting are also HDCP-compatible. Check that it will not work with the DeepColor feature. • Try changing the Resolution setting (in Setting the Video...
... strong light shining on to the remote sensor. • Check the connections of the CONTROL IN jack (see Operating other setting for your component. • While analog video signals are being output over HDMI, use an HDMI cable (High Speed HDMI™ Cable) to connect this receiver to THROUGH, you are connecting are also HDCP-compatible. Check that it will not work with the DeepColor feature. • Try changing the Resolution setting (in Setting the Video...
Owner's Manual
Page 112
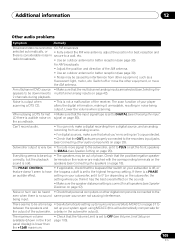
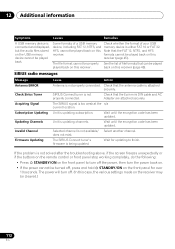
... connected and displayed, but the audio files stored on the receiver may be cleared.) 112 En SIRIUS Connect tuner is attached securely. The SIRIUS signal is not properly connected. SIRIUS radio messages Message Antenna ERROR Check Sirius Tuner Acquiring Signal Subscription Updating Updating Channels Invalid Channel Firmware Updating Cause Action Antenna is too weak at the n/a current location. Wait until the encryption code has been updated. Some formats of your USB memory device is updating...
... connected and displayed, but the audio files stored on the receiver may be cleared.) 112 En SIRIUS Connect tuner is attached securely. The SIRIUS signal is not properly connected. SIRIUS radio messages Message Antenna ERROR Check Sirius Tuner Acquiring Signal Subscription Updating Updating Channels Invalid Channel Firmware Updating Cause Action Antenna is too weak at the n/a current location. Wait until the encryption code has been updated. Some formats of your USB memory device is updating...


