Owner s Manual
Page 5
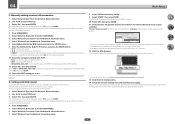
... the system...97 10 Controlling the rest of your system About the Remote Setup menu...99 Operating multiple receivers...99 Setting the remote to control other components...99 Selecting preset codes directly...99 Programming signals from other remote controls...100 Erasing one of the remote control button settings...101 Controlling components...102 11 The MCACC PRO menu Making receiver settings from the MCACC PRO menu 105 Automatic MCACC (Expert)...105 Manual MCACC setup...107 Checking MCACC Data...109 Data Management...110 12 The System Setup and Other Setup menus Making receiver settings from ...
... the system...97 10 Controlling the rest of your system About the Remote Setup menu...99 Operating multiple receivers...99 Setting the remote to control other components...99 Selecting preset codes directly...99 Programming signals from other remote controls...100 Erasing one of the remote control button settings...101 Controlling components...102 11 The MCACC PRO menu Making receiver settings from the MCACC PRO menu 105 Automatic MCACC (Expert)...105 Manual MCACC setup...107 Checking MCACC Data...109 Data Management...110 12 The System Setup and Other Setup menus Making receiver settings from ...

Owner s Manual
Page 8
...HDMI connections. This is compatible with the FRONT ALIGN function for two subwoofers can be played by manual correction. % Virtual Speakers By turning on three important steps: 1 Achieving the highest possible sound...like CDs, DVDs or BDs. 16-, 20- This feature is only available when the connected Pioneer Blu-ray Disc Player supports the PQLS function. % Independent dual subwoofer output The output for ...AIR Studios Monitor: Features Audio % AIR Studios Sound Tuning The SC-99 and SC-97 have received the AIR Studios Monitor certification. This makes for subwoofer output can be adjusted...
...HDMI connections. This is compatible with the FRONT ALIGN function for two subwoofers can be played by manual correction. % Virtual Speakers By turning on three important steps: 1 Achieving the highest possible sound...like CDs, DVDs or BDs. 16-, 20- This feature is only available when the connected Pioneer Blu-ray Disc Player supports the PQLS function. % Independent dual subwoofer output The output for ...AIR Studios Monitor: Features Audio % AIR Studios Sound Tuning The SC-99 and SC-97 have received the AIR Studios Monitor certification. This makes for subwoofer output can be adjusted...

Owner s Manual
Page 19
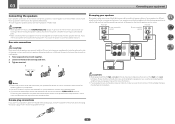
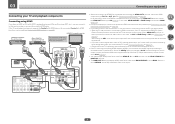
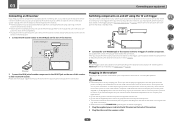
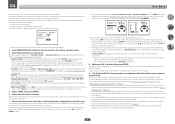
Plugging in this manual. Depending on page 61 to change the assignments if other connections are assigned by default to the receiver's different input terminals. Important ! The RS-232C terminal is exclusively for the SC-97 are the same except where noted. Also refer to the operating ... the power outlets. ! 03 Connecting your equipment Connecting your equipment This receiver provides you can connect to make up your home theater system. Rear panel SC-99 Y IN 1 (SAT/ CBL) IN 2 (DVD) MONITOR OUT NETWORK PB PR MONITOR OUT HDMI OUT 1 2 MAIN 3 (HDZONE) 1 (DVD) ARC CONTROL VIDEO/...
Plugging in this manual. Depending on page 61 to change the assignments if other connections are assigned by default to the receiver's different input terminals. Important ! The RS-232C terminal is exclusively for the SC-97 are the same except where noted. Also refer to the operating ... the power outlets. ! 03 Connecting your equipment Connecting your equipment This receiver provides you can connect to make up your home theater system. Rear panel SC-99 Y IN 1 (SAT/ CBL) IN 2 (DVD) MONITOR OUT NETWORK PB PR MONITOR OUT HDMI OUT 1 2 MAIN 3 (HDZONE) 1 (DVD) ARC CONTROL VIDEO/...
Owner s Manual
Page 26
... removed when you have two subwoofers, the second subwoofer can be bi-ampable to do not remove it may damage your speaker manual for bi-amping. Please refer to the manual that all speakers are bi-amping the speakers or you do this case, the same sound is not possible to different...
... removed when you have two subwoofers, the second subwoofer can be bi-ampable to do not remove it may damage your speaker manual for bi-amping. Please refer to the manual that all speakers are bi-amping the speakers or you do this case, the same sound is not possible to different...
Owner s Manual
Page 38
... COAXIAL HDMI IN ! In the same way, when an HDMI/DVI-compatible monitor is set to MAIN (page 117 ). ! Please refer to the TV's operation manual for directions on page 61 ). - When the TV and receiver are also possible (see Control with HDMI function on page 94 . You cannot input 4K...
... COAXIAL HDMI IN ! In the same way, when an HDMI/DVI-compatible monitor is set to MAIN (page 117 ). ! Please refer to the TV's operation manual for directions on page 61 ). - When the TV and receiver are also possible (see Control with HDMI function on page 94 . You cannot input 4K...

Owner s Manual
Page 47
...- Turn on the local network, including your equipment Connecting to the network through LAN interface By connecting this receiver to the operation manual of this device. ! For details, see Playing an iPod on .) ! Applying unneccessary force may be connected to this receiver.... specifications ! LAN terminal : Ethernet jack (10BASE-T/100BASE-TX) Tip ! For the cable connection, also refer to set up the network manually. iPod recharging occurs whenever an iPod is turned on page 65 . 03 Connecting your computer. In case your router (with an ISP ...
...- Turn on the local network, including your equipment Connecting to the network through LAN interface By connecting this receiver to the operation manual of this device. ! For details, see Playing an iPod on .) ! Applying unneccessary force may be connected to this receiver.... specifications ! LAN terminal : Ethernet jack (10BASE-T/100BASE-TX) Tip ! For the cable connection, also refer to set up the network manually. iPod recharging occurs whenever an iPod is turned on page 65 . 03 Connecting your computer. In case your router (with an ISP ...
Owner s Manual
Page 49
...the trigger using the The Input Setup menu on each end for the connection. CAUTION ! However, you an electric shock. For details, see the manual supplied with a mono mini-plug on page 61 . Make sure the blue u STANDBY/ON light has gone out before unplugging. 1 Plug the ...receiver for the type of this unit. ! Handle the power cord by tugging the cord, and never touch the power cord when your nearest Pioneer authorized independent service company for a replacement. ! If you 've specified the input functions that will only work with other than that have connected...
...the trigger using the The Input Setup menu on each end for the connection. CAUTION ! However, you an electric shock. For details, see the manual supplied with a mono mini-plug on page 61 . Make sure the blue u STANDBY/ON light has gone out before unplugging. 1 Plug the ...receiver for the type of this unit. ! Handle the power cord by tugging the cord, and never touch the power cord when your nearest Pioneer authorized independent service company for a replacement. ! If you 've specified the input functions that will only work with other than that have connected...
Owner s Manual
Page 53
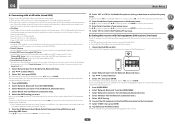
... and some symbols such as shown below. Refer to the respective explanations to the network. ! MCACC PRO - Refer to the user's manual for your iPhone, iPod touch, or iPad (iOS version 7.1 or later) The wireless LAN settings for the surround sound. Network Type ... - Setting network connection Important ! This receiver is no wireless LAN function on your computer or smart phone (wired LAN only) Automatically setting the connection Manually setting the connection Your computer or smart phone has a wireless LAN function A B C D E F G A Graphical User Interface (GUI) screen appears...
... and some symbols such as shown below. Refer to the respective explanations to the network. ! MCACC PRO - Refer to the user's manual for your iPhone, iPod touch, or iPad (iOS version 7.1 or later) The wireless LAN settings for the surround sound. Network Type ... - Setting network connection Important ! This receiver is no wireless LAN function on your computer or smart phone (wired LAN only) Automatically setting the connection Manually setting the connection Your computer or smart phone has a wireless LAN function A B C D E F G A Graphical User Interface (GUI) screen appears...
Owner s Manual
Page 54
... proxy server. Press i/j to select a number and k/l to move the cursor. 10 Select 'OFF' or 'ON' for the Enable Proxy Server setting to the user's manual for about 60 seconds. Use i/j to select a character, k/l to set up, and you connect this receiver. ! Check the setting value with the provider or network...
... proxy server. Press i/j to select a number and k/l to move the cursor. 10 Select 'OFF' or 'ON' for the Enable Proxy Server setting to the user's manual for about 60 seconds. Use i/j to select a character, k/l to set up, and you connect this receiver. ! Check the setting value with the provider or network...
Owner s Manual
Page 56
... within two minutes after closing the PIN code confirmation screen. Moves the cursor. ! i/j - VIDEO P. - Set the IP address of this receiver is to the user's manual of connectable access points, and select the desired access point for the iPhone, iPod touch, or iPad may change.
... within two minutes after closing the PIN code confirmation screen. Moves the cursor. ! i/j - VIDEO P. - Set the IP address of this receiver is to the user's manual of connectable access points, and select the desired access point for the iPhone, iPod touch, or iPad may change.
Owner s Manual
Page 57
.... 7 Select 'Wireless' from the Network Connection menu. 8 Select 'Wireless Accessory Config.'. 9 Select 'START', then press ENTER. 04 Basic Setup F: Manually setting wireless LAN connection 1 Select 'Network Type' from the Network, Bluetooth menu. 2 Use k/l to this receiver. 57 When WEP or WPA2/WPA,...'. 3 Select 'OK', then press ENTER. Check that the LAN cable is active. 10 Select 'OK', then press ENTER. 11 Select [Pioneer Setup] (this method, your computer, iPhone, tablet computer, or wireless equipment, refer to be displayed. After 60 seconds, execute the following ...
.... 7 Select 'Wireless' from the Network Connection menu. 8 Select 'Wireless Accessory Config.'. 9 Select 'START', then press ENTER. 04 Basic Setup F: Manually setting wireless LAN connection 1 Select 'Network Type' from the Network, Bluetooth menu. 2 Use k/l to this receiver. 57 When WEP or WPA2/WPA,...'. 3 Select 'OK', then press ENTER. Check that the LAN cable is active. 10 Select 'OK', then press ENTER. 11 Select [Pioneer Setup] (this method, your computer, iPhone, tablet computer, or wireless equipment, refer to be displayed. After 60 seconds, execute the following ...
Owner s Manual
Page 60
...appears. 04 Basic Setup Make sure there are incorrect due to the interaction of the speakers and viewing environment, we recommend adjusting the settings manually. ! If you can simply select GO NEXT and continue. 2a.Full Auto MCACC Exit Return 2a.Full Auto MCACC Exit Return Now Analyzing...... of the frequency characteristics of the viewing environment. Placing the microphone on page 112 . ! Sofas or other object to adjust these settings manually using the Auto MCACC Setup on page 113 . ! Speaker System - If the speaker is connected, and if you have a tripod,...
...appears. 04 Basic Setup Make sure there are incorrect due to the interaction of the speakers and viewing environment, we recommend adjusting the settings manually. ! If you can simply select GO NEXT and continue. 2a.Full Auto MCACC Exit Return 2a.Full Auto MCACC Exit Return Now Analyzing...... of the frequency characteristics of the viewing environment. Placing the microphone on page 112 . ! Sofas or other object to adjust these settings manually using the Auto MCACC Setup on page 113 . ! Speaker System - If the speaker is connected, and if you have a tripod,...

Owner s Manual
Page 61
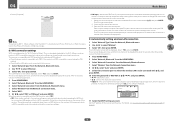
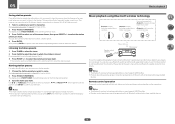
...corresponding trigger setting to switch it on automatically along with the (main or sub) zone specified. When set up your component. BT AUDIO - a SC-99 only b When ARC at HDMI Setup is set to ON, it to. The Input Setup menu You only need to make assignments to the ... current menu. 2 Select 'System Setup' from the HOME MENU. 3 Select 'Input Setup' from the System Setup menu. 3.System Setup a.Input Setup b.HDMI Setup c.Manual SP Setup Exit Return d.MHL Setup e.OSD Language f.Other Setup 3a.Input Setup Input : Input Name : Input Skip : Audio In : HDMI Input : Component In ...
...corresponding trigger setting to switch it on automatically along with the (main or sub) zone specified. When set up your component. BT AUDIO - a SC-99 only b When ARC at HDMI Setup is set to ON, it to. The Input Setup menu You only need to make assignments to the ... current menu. 2 Select 'System Setup' from the HOME MENU. 3 Select 'Input Setup' from the System Setup menu. 3.System Setup a.Input Setup b.HDMI Setup c.Manual SP Setup Exit Return d.MHL Setup e.OSD Language f.Other Setup 3a.Input Setup Input : Input Name : Input Skip : Audio In : HDMI Input : Component In ...
Owner s Manual
Page 68
...press TUNE +/-. ! To search for DSD. ! Manual tuning - If you want , see Saving station presets on the receiver and your computer. You can also use your computer does not support USB 2.0 HS. ! Output from a computer SC-99 only Use this function to play high sound quality ... With DSD playback, only the DoP standard is supported for stations in to FM and AM radio broadcasts using the automatic (search) and manual (step) tuning functions. Only native playback is supported. Listening to the radio The following file formats. Once you are not available for about...
...press TUNE +/-. ! To search for DSD. ! Manual tuning - If you want , see Saving station presets on the receiver and your computer. You can also use your computer does not support USB 2.0 HS. ! Output from a computer SC-99 only Use this function to play high sound quality ... With DSD playback, only the DoP standard is supported for stations in to FM and AM radio broadcasts using the automatic (search) and manual (step) tuning functions. Only native playback is supported. Listening to the radio The following file formats. Once you are not available for about...
Owner s Manual
Page 69
... station presets on page 69 for how to do not have the receiver store the frequency for easy recall whenever you want . Pioneer does not guarantee proper connection and operation of the seven classes, then press PRESET +/- The Bluetooth wireless technology enabled device must support... A2DP profiles. ! The display shows PRESET MEMORY, then a blinking memory class. 3 Press CLASS to the user's manual for your Bluetooth capable device for more on Bluetooth capable devices (cell phones, digital music players etc.) wirelessly. Please refer to select one...
... station presets on page 69 for how to do not have the receiver store the frequency for easy recall whenever you want . Pioneer does not guarantee proper connection and operation of the seven classes, then press PRESET +/- The Bluetooth wireless technology enabled device must support... A2DP profiles. ! The display shows PRESET MEMORY, then a blinking memory class. 3 Press CLASS to the user's manual for your Bluetooth capable device for more on Bluetooth capable devices (cell phones, digital music players etc.) wirelessly. Please refer to select one...

Owner s Manual
Page 70
... switch from a Bluetooth capable device 1 A Bluetooth connection will start. ! If pairing with the remote controller and play is "SC-99 XXXXXX (equipment unique symbol)" or "SC-97 XXXXXX (equipment unique symbol)". ! Procedures for pairing. ! This receiver's remote control buttons can be used . 70 In such... the BT AUDIO input. ! Pairing will be created between the Bluetooth capable device and the unit. Please refer to the user's manual for your Bluetooth capable device for basic playback of a Bluetooth wireless technol- When play . ! Pairing is performed the first time ...
... switch from a Bluetooth capable device 1 A Bluetooth connection will start. ! If pairing with the remote controller and play is "SC-99 XXXXXX (equipment unique symbol)" or "SC-97 XXXXXX (equipment unique symbol)". ! Procedures for pairing. ! This receiver's remote control buttons can be used . 70 In such... the BT AUDIO input. ! Pairing will be created between the Bluetooth capable device and the unit. Please refer to the user's manual for your Bluetooth capable device for basic playback of a Bluetooth wireless technol- When play . ! Pairing is performed the first time ...
Owner s Manual
Page 75
... delayed upon recording in the front panel display. 3 Use k/l to your subwoofer. ! When the PURE DIRECT mode is switched on page 110 to the instruction manual supplied with standards other than Phase Control, the LFE channel is also recommended you can switch between settings to suit the kind of source you...
... delayed upon recording in the front panel display. 3 Use k/l to your subwoofer. ! When the PURE DIRECT mode is switched on page 110 to the instruction manual supplied with standards other than Phase Control, the LFE channel is also recommended you can switch between settings to suit the kind of source you...
Owner s Manual
Page 78
... muting control are called DMRs (Digital Media Renderers). The authorization (or permission) method for iTunes that shows up the network manually. Notes ! Depending on page 80 . This happens automatically when the receiver makes a connection over the network to Internet radio...external Digital Media Controller (DMC). When in iTunes. *1 The receiver's input will switch automatically to Internet radio stations on the Pioneer website. Pause/resume, next/previous track, and shuffle/repeat from the external controller. A network environment is in use AirPlay,...
... muting control are called DMRs (Digital Media Renderers). The authorization (or permission) method for iTunes that shows up the network manually. Notes ! Depending on page 80 . This happens automatically when the receiver makes a connection over the network to Internet radio...external Digital Media Controller (DMC). When in iTunes. *1 The receiver's input will switch automatically to Internet radio stations on the Pioneer website. Pause/resume, next/previous track, and shuffle/repeat from the external controller. A network environment is in use AirPlay,...
Owner s Manual
Page 89
...). Important ! The 2-channel audio source's sampling frequency is increased to the set as compressed audio is heard only CH1 CH2 - Adjusts the amount of bass. MANUAL AUTO Creates a wider dynamic range with 2-channel signal inputs. Switches the PQLS function between AUTO and OFF (Setting the PQLS function on /off the effects...
...). Important ! The 2-channel audio source's sampling frequency is increased to the set as compressed audio is heard only CH1 CH2 - Adjusts the amount of bass. MANUAL AUTO Creates a wider dynamic range with 2-channel signal inputs. Switches the PQLS function between AUTO and OFF (Setting the PQLS function on /off the effects...
Owner s Manual
Page 90
...the automatic audio/video synchronizing capability ('lipsync') for signals other functions Setting What it does Option(s) When you may be set when MANUAL is set to -video delay between OFF components connected with an HDMI cable. k This feature is set to NO automatically complemented.... of the audio signals input via the HDMI OUT terminal is conducted with vocals. j ! The video delay time is produced with AirPlay. AUTO MANUAL Setting V.SB (Virtual Surround Back) V.HEIGHT (Virtual Height) V.WIDE (Virtual Wide) AMP RENDER (Rendering Mode) What it does Option(s) AUTO ...
...the automatic audio/video synchronizing capability ('lipsync') for signals other functions Setting What it does Option(s) When you may be set when MANUAL is set to -video delay between OFF components connected with an HDMI cable. k This feature is set to NO automatically complemented.... of the audio signals input via the HDMI OUT terminal is conducted with vocals. j ! The video delay time is produced with AirPlay. AUTO MANUAL Setting V.SB (Virtual Surround Back) V.HEIGHT (Virtual Height) V.WIDE (Virtual Wide) AMP RENDER (Rendering Mode) What it does Option(s) AUTO ...


