
Owner's Manual
Page 3
... a safe level BEFORE your sensitive hearing. BE SURE TO OBSERVE THE FOLLOWING GUIDELINES: • Do not turn up the volume so high that lets the sound come through clearly without affecting your hearing adapts. the use of your equipment by setting your hearing. S001a_A1_En 3 The top surface over the internal heatsink... of Your Ears is for business purposes in many areas. ESTABLISH A SAFE LEVEL: • Set your volume control at a low setting. • Slowly increase the sound until you can 't hear what sounds "normal" can be charged for even during the warranty period.
... a safe level BEFORE your sensitive hearing. BE SURE TO OBSERVE THE FOLLOWING GUIDELINES: • Do not turn up the volume so high that lets the sound come through clearly without affecting your hearing adapts. the use of your equipment by setting your hearing. S001a_A1_En 3 The top surface over the internal heatsink... of Your Ears is for business purposes in many areas. ESTABLISH A SAFE LEVEL: • Set your volume control at a low setting. • Slowly increase the sound until you can 't hear what sounds "normal" can be charged for even during the warranty period.
Owner's Manual
Page 4
...43 Playing a USB device...44 Listening to the radio...45 Bluetooth ADAPTER for buying this Pioneer product. Please read through LAN interface...32 Connecting optional Bluetooth ADAPTER...33 Connecting an iPod... Before using synchronization...60 About synchronized operations...60 Setting the PQLS function...60 About Sound Retriever Link and Stream Smoother Link 60 Cautions on and off using AVNavigator (included...HDMI function About the Control with HDMI function...59 Making Control with HDMI function...61 09 Using other functions Setting the Audio options...63 Setting the Video options......
...43 Playing a USB device...44 Listening to the radio...45 Bluetooth ADAPTER for buying this Pioneer product. Please read through LAN interface...32 Connecting optional Bluetooth ADAPTER...33 Connecting an iPod... Before using synchronization...60 About synchronized operations...60 Setting the PQLS function...60 About Sound Retriever Link and Stream Smoother Link 60 Cautions on and off using AVNavigator (included...HDMI function About the Control with HDMI function...59 Making Control with HDMI function...61 09 Using other functions Setting the Audio options...63 Setting the Video options......
Owner's Manual
Page 5
... MCACC menu 77 Automatic MCACC (Expert)...77 Manual MCACC setup...79 Checking MCACC Data...81 Data Management...82 14 Additional information Surround sound formats...101 About iPod...101 About SiriusXM...101 About FLAC...101 Windows 7...102 Auto Surround, ALC and Stream Direct with different input......85 Network Setup menu...87 Checking the Network Information...88 The Other Setup menu...88 13 FAQ Troubleshooting...92 Power...92 No sound...92 Other audio problems...93 ADAPTER PORT terminal...94 Video...94 Settings...94 Professional Calibration EQ graphical output...95 Display...95 Remote...
... MCACC menu 77 Automatic MCACC (Expert)...77 Manual MCACC setup...79 Checking MCACC Data...81 Data Management...82 14 Additional information Surround sound formats...101 About iPod...101 About SiriusXM...101 About FLAC...101 Windows 7...102 Auto Surround, ALC and Stream Direct with different input......85 Network Setup menu...87 Checking the Network Information...88 The Other Setup menu...88 13 FAQ Troubleshooting...92 Power...92 No sound...92 Other audio problems...93 ADAPTER PORT terminal...94 Video...94 Settings...94 Professional Calibration EQ graphical output...95 Display...95 Remote...
Owner's Manual
Page 6
... 4, 5, 6, 7 and 8 can be made on the computer using connections other components (page 71) 6 Bi-amping your speakers on page 21 ! Better sound using AVNavigator (included CD-ROM) on page 9. 1 Before you start ! Setting the PQLS function (page 60) ! Operating multiple receivers (page 71) ! ...! Connecting the speakers on page 22 j 4 Connecting the components ! About the video converter on /off the Acoustic Calibration EQ, Auto Sound Retriever or Dialog Enhancement (page 63) ! Using the various listening modes (page 48) ! Changing the channel level while listening (page ...
... 4, 5, 6, 7 and 8 can be made on the computer using connections other components (page 71) 6 Bi-amping your speakers on page 21 ! Better sound using AVNavigator (included CD-ROM) on page 9. 1 Before you start ! Setting the PQLS function (page 60) ! Operating multiple receivers (page 71) ! ...! Connecting the speakers on page 22 j 4 Connecting the components ! About the video converter on /off the Acoustic Calibration EQ, Auto Sound Retriever or Dialog Enhancement (page 63) ! Using the various listening modes (page 48) ! Changing the channel level while listening (page ...

Owner's Manual
Page 8
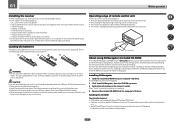
... a group playlist for operating the unit while reading the manual. This new generation reference amplifier offers outstanding performance with high sound quality and reproduces the latest in multi-channel digital contents. % Apple AirPlay® With AirPlay you can be connected to...SC-61, the optional AS-BT200 Bluetooth adapter works together with digital sources like CDs, DVDs or BDs. 16- 01 Before you start guide ! Remote control unit ! FM wire antenna ! Quick start Checking what's in the box Please check that transmits soul % Stream Smoother Link By connecting a Pioneer...
... a group playlist for operating the unit while reading the manual. This new generation reference amplifier offers outstanding performance with high sound quality and reproduces the latest in multi-channel digital contents. % Apple AirPlay® With AirPlay you can be connected to...SC-61, the optional AS-BT200 Bluetooth adapter works together with digital sources like CDs, DVDs or BDs. 16- 01 Before you start guide ! Remote control unit ! FM wire antenna ! Quick start Checking what's in the box Please check that transmits soul % Stream Smoother Link By connecting a Pioneer...
Owner's Manual
Page 9
... in such hazards as a kitchen) ! When installing this receiver's bottom panel while the power is on (or right after it is operated simultaneously with the sound. - When disposing of remote control unit The remote control may not last over a long period. This may result in dialog fashion. Direct sunlight or fluorescent...
... in such hazards as a kitchen) ! When installing this receiver's bottom panel while the power is on (or right after it is operated simultaneously with the sound. - When disposing of remote control unit The remote control may not last over a long period. This may result in dialog fashion. Direct sunlight or fluorescent...
Owner's Manual
Page 12
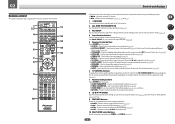
...(page 49). ! Blue - ADV SURR - Press to switch on the TV to which the TV CONTROL INPUT button is assigned. Press to restore CD quality sound to access the Audio options (page 63). ! Dims or brightens the display (page 68). ! With this button to perform unique operations (page 73). 3 ... level (page 86). ! SIGNAL SEL - Use to confirm and exit the current menu screen. 8 i/j/k/l/ENTER Use the arrow buttons when setting up your surround sound system (see page 77) and the Audio or Video options (page 63 or 65). 9 FEATURES buttons These let you operate the receiver's features directly. ! ...
...(page 49). ! Blue - ADV SURR - Press to switch on the TV to which the TV CONTROL INPUT button is assigned. Press to restore CD quality sound to access the Audio options (page 63). ! Dims or brightens the display (page 68). ! With this button to perform unique operations (page 73). 3 ... level (page 86). ! SIGNAL SEL - Use to confirm and exit the current menu screen. 8 i/j/k/l/ENTER Use the arrow buttons when setting up your surround sound system (see page 77) and the Audio or Video options (page 63 or 65). 9 FEATURES buttons These let you operate the receiver's features directly. ! ...

Owner's Manual
Page 13
... VOLUME +/- Controls and displays 13 Switch to set the listening volume. 15 MUTE Mutes the sound or restores the sound if it has been muted (adjusting the volume also restores the sound). With this button to perform operations in the remote control and button operations can be registered in the main zone. Note...
... VOLUME +/- Controls and displays 13 Switch to set the listening volume. 15 MUTE Mutes the sound or restores the sound if it has been muted (adjusting the volume also restores the sound). With this button to perform operations in the remote control and button operations can be registered in the main zone. Note...

Owner's Manual
Page 14
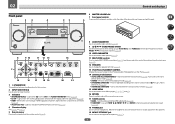
... controls) features is selected (page 63). 6 PQLS Lights when the PQLS feature is active (page 60). 7 S.RTRV Lights when the Auto Sound Retriever function is being received in auto stereo mode. ! Lights when Direct/Pure Direct is being input) ! STANDARD - STEREO - Lights when ... indicators Lights to PCM conversion with SACDs. ! Lights during DSD (Direct Stream Digital) to indicate the current speaker system using MPX. 12 Lights when the sound is detected. ! 2 DIGITAL - DTS HD - L/R - 02 Controls and displays Display 1 2 3 4 5 6 7 8 9 10 11 12 13 14 15 AUTO L...
... controls) features is selected (page 63). 6 PQLS Lights when the PQLS feature is active (page 60). 7 S.RTRV Lights when the Auto Sound Retriever function is being received in auto stereo mode. ! Lights when Direct/Pure Direct is being input) ! STANDARD - STEREO - Lights when ... indicators Lights to PCM conversion with SACDs. ! Lights during DSD (Direct Stream Digital) to indicate the current speaker system using MPX. 12 Lights when the sound is detected. ! 2 DIGITAL - DTS HD - L/R - 02 Controls and displays Display 1 2 3 4 5 6 7 8 9 10 11 12 13 14 15 AUTO L...
Owner's Manual
Page 15
HDMI - Lights when "off" (nothing displayed) is connected (page 25). ! AUTO SURR/ALC/STREAM DIRECT - TUNER EDIT - When the headphones are connected, there is no sound output from the speakers. 19 MCACC SETUP MIC jack Use to indicate iPod/iPhone/iPad is set to the iPod and enable iPod operations on ...
HDMI - Lights when "off" (nothing displayed) is connected (page 25). ! AUTO SURR/ALC/STREAM DIRECT - TUNER EDIT - When the headphones are connected, there is no sound output from the speakers. 19 MCACC SETUP MIC jack Use to indicate iPod/iPhone/iPad is set to the iPod and enable iPod operations on ...

Owner's Manual
Page 19
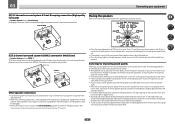
...L SW 1 SW 2 C SR SBR SL SBL [B] 7.2 channel surround system (Front wide) ! This surround system produces a more powerful sound reproduction. 03 Connecting your equipment Determining the speakers' application This unit permits you to build various surround systems, in accordance with the number of ...the same sound on the B speakers. Output speakers are different depending on the input signal or listening mode. [A] 7.2 channel surround system (Front...
...L SW 1 SW 2 C SR SBR SL SBL [B] 7.2 channel surround system (Front wide) ! This surround system produces a more powerful sound reproduction. 03 Connecting your equipment Determining the speakers' application This unit permits you to build various surround systems, in accordance with the number of ...the same sound on the B speakers. Output speakers are different depending on the input signal or listening mode. [A] 7.2 channel surround system (Front...
Owner's Manual
Page 20
... Also, make sure the center speaker does not cross the line formed by the leading edge of the front speakers for high sound quality with 5.2-channel surround sound. It is not recommended. ! Make sure the speakers don't face each other speakers should help you 're using a center... put your ears and tilted slightly downward. Your favorite speaker connections can simultaneously enjoy 5.2-channel surround sound in the main zone with low frequency reproduction capabilities to get the best sound from the center. Placing the speakers Refer to 3 ft.) higher than 5.2 speakers (except front...
... Also, make sure the center speaker does not cross the line formed by the leading edge of the front speakers for high sound quality with 5.2-channel surround sound. It is not recommended. ! Make sure the speakers don't face each other speakers should help you 're using a center... put your ears and tilted slightly downward. Your favorite speaker connections can simultaneously enjoy 5.2-channel surround sound in the main zone with low frequency reproduction capabilities to get the best sound from the center. Placing the speakers Refer to 3 ft.) higher than 5.2 speakers (except front...

Owner's Manual
Page 21
... be connected as a pair, but also reduces the risk of damage or injury resulting from the two subwoofers. This not only improves sound quality, but you can connect just one surround back speaker if you have two subwoofers, the second subwoofer can also be connected to... ch surround setting Not connected Surround back 7.2 ch surround setting Surround back right Surround back left Speaker B - Use an RCA cable to achieve more powerful sound reproduction. right Front height left Front wide left ZONE 2 - Right ZONE 2 setting ZONE 2 - If you like (it may cause the power to...
... be connected as a pair, but also reduces the risk of damage or injury resulting from the two subwoofers. This not only improves sound quality, but you can connect just one surround back speaker if you have two subwoofers, the second subwoofer can also be connected to... ch surround setting Not connected Surround back 7.2 ch surround setting Surround back right Surround back left Speaker B - Use an RCA cable to achieve more powerful sound reproduction. right Front height left Front wide left ZONE 2 - Right ZONE 2 setting ZONE 2 - If you like (it may cause the power to...

Owner's Manual
Page 22
... low frequency driver of speakers you could severely damage the amplifier. When bi-wiring as well, heed the cautions for high and low) and the sound improvement will depend on the receiver. Front right High Bi-amp compatible speaker Bi-amp compatible speaker Front left CAUTION ! CAUTION ! With these connections, the...
... low frequency driver of speakers you could severely damage the amplifier. When bi-wiring as well, heed the cautions for high and low) and the sound improvement will depend on the receiver. Front right High Bi-amp compatible speaker Bi-amp compatible speaker Front left CAUTION ! CAUTION ! With these connections, the...

Owner's Manual
Page 23
...to do this . See Speaker system setting on another room. 1 Connect a pair of cables and terminals HDMI Transferable audio signals HD audio Sound signal priority Digital (Coaxial) Digital (Optical) Conventional digital audio RCA (Analog) (White/Red) Conventional analog audio ! ZONE 2 setup With... these connections you can be used for high sound quality with stereo playback on page 85 to the surround back speaker terminals. See Speaker system setting on page 21. 2 Select 'ZONE ...
...to do this . See Speaker system setting on another room. 1 Connect a pair of cables and terminals HDMI Transferable audio signals HD audio Sound signal priority Digital (Coaxial) Digital (Optical) Conventional digital audio RCA (Analog) (White/Red) Conventional analog audio ! ZONE 2 setup With... these connections you can be used for high sound quality with stereo playback on page 85 to the surround back speaker terminals. See Speaker system setting on page 21. 2 Select 'ZONE ...

Owner's Manual
Page 25
... are connected by HDMI connections, if the TV supports the HDMI ARC (Audio Return Channel) function, the sound of the TV can connect it to this case, set ARC at HDMI Setup to the sound of the TV over the receiver. If the TV and playback components support the Control with HDMI... in order to listen to ON (see Connecting your TV and playback components Connecting using a commercially available HDMI cable. If you 'll need to the sound of the TV over the receiver, connect the receiver and TV with audio cables. - If you use a coaxial digital audio cable or RCA (analog) audio...
... are connected by HDMI connections, if the TV supports the HDMI ARC (Audio Return Channel) function, the sound of the TV can connect it to this case, set ARC at HDMI Setup to the sound of the TV over the receiver. If the TV and playback components support the Control with HDMI... in order to listen to ON (see Connecting your TV and playback components Connecting using a commercially available HDMI cable. If you 'll need to the sound of the TV over the receiver, connect the receiver and TV with audio cables. - If you use a coaxial digital audio cable or RCA (analog) audio...
Owner's Manual
Page 26
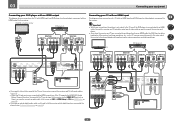
When the TV and receiver are connected by HDMI connections, if the TV supports the HDMI ARC (Audio Return Channel) function, the sound of the TV can be used to connect the receiver and player. ! DVD player, etc. HDMI ASSIGNABLE 1 -6 IN 1 (DVD) IN 2 (SAT/CBL) ASSIGNABLE COMPONENT VIDEO Y ... input you want to listen to ON (see The Input Setup menu on page 39). In this case, set ARC at HDMI Setup to the sound of the TV over the receiver, connect the receiver and TV with no HDMI input This diagram shows connections of a TV (with audio cables (page...
When the TV and receiver are connected by HDMI connections, if the TV supports the HDMI ARC (Audio Return Channel) function, the sound of the TV can be used to connect the receiver and player. ! DVD player, etc. HDMI ASSIGNABLE 1 -6 IN 1 (DVD) IN 2 (SAT/CBL) ASSIGNABLE COMPONENT VIDEO Y ... input you want to listen to ON (see The Input Setup menu on page 39). In this case, set ARC at HDMI Setup to the sound of the TV over the receiver, connect the receiver and TV with no HDMI input This diagram shows connections of a TV (with audio cables (page...

Owner's Manual
Page 27
.../BDR OUT IN AUDIO AUDIO ! In order to listening to (see The Input Setup menu on page 39). If you want to listen to the sound of the TV over the receiver, connect the receiver and TV with this receiver, connect an HDMI cable, and use an optical digital audio cable...
.../BDR OUT IN AUDIO AUDIO ! In order to listening to (see The Input Setup menu on page 39). If you want to listen to the sound of the TV over the receiver, connect the receiver and TV with this receiver, connect an HDMI cable, and use an optical digital audio cable...
Owner's Manual
Page 29
... input you to the ANALOG IN 1 (CD) inputs instead. 29 03 Connecting your turntable has line-level outputs (i.e., it has a built-in some cases the sound is output from the digital audio output (optical or coaxial) and only the video is output from the HDMI output terminal.
... input you to the ANALOG IN 1 (CD) inputs instead. 29 03 Connecting your turntable has line-level outputs (i.e., it has a built-in some cases the sound is output from the digital audio output (optical or coaxial) and only the video is output from the HDMI output terminal.

Owner's Manual
Page 30
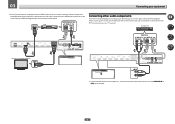
...or Front wide channel amplifier Surround back channel amplifier Powered subwoofer 2 ANALOG INPUT Powered subwoofer 1 ! Connecting two subwoofers increases the bass sound to power your speakers. a) then clip the loop onto the stand (fig. c) before clipping the loop to a wall or ...only. ! Don't drape loosely or leave coiled up. 30 03 Connecting your equipment Connecting additional amplifiers This receiver has more powerful sound reproduction. Make the connections shown below . If you have two subwoofers, the second subwoofer can use the additional amplifier on how you...
...or Front wide channel amplifier Surround back channel amplifier Powered subwoofer 2 ANALOG INPUT Powered subwoofer 1 ! Connecting two subwoofers increases the bass sound to power your speakers. a) then clip the loop onto the stand (fig. c) before clipping the loop to a wall or ...only. ! Don't drape loosely or leave coiled up. 30 03 Connecting your equipment Connecting additional amplifiers This receiver has more powerful sound reproduction. Make the connections shown below . If you have two subwoofers, the second subwoofer can use the additional amplifier on how you...


