Owner's Manual
Page 6
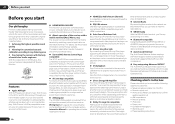
...picture. % iPod playback Your iPod can be up from the App Store. % Air Jam App compatible For the SC-57 and SC-55, the optional AS-BT200 Bluetooth adapter works together with a completely re-designed remote control application for iPod touch, iPhone and now iPad. Setup microphone (cable:...(iPod, iPhone, etc.) The receiver can be changed or discontinued without notice. % iControlAV2 Remote Control App compatible The SC-57 and SC-55 are compatible with Pioneer's exclusive Air Jam application. Available free in multi-channel digital contents. % Dolby Pro Logic llz compatible Adding a pair ...
...picture. % iPod playback Your iPod can be up from the App Store. % Air Jam App compatible For the SC-57 and SC-55, the optional AS-BT200 Bluetooth adapter works together with a completely re-designed remote control application for iPod touch, iPhone and now iPad. Setup microphone (cable:...(iPod, iPhone, etc.) The receiver can be changed or discontinued without notice. % iControlAV2 Remote Control App compatible The SC-57 and SC-55 are compatible with Pioneer's exclusive Air Jam application. Available free in multi-channel digital contents. % Dolby Pro Logic llz compatible Adding a pair ...

Owner's Manual
Page 7
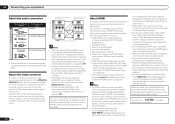
..., public transmission, translation, sales, lending or other browsers, some functions may be used with a DVD player or music CD player. PIONEER CORPORATION does not guarantee the operation of this CD-ROM with the receiver, updating of various types of Use" indicated below before using ...personal computer. There are to check initial operations; The supported browser is emitting infrared rays. ! Also, even with the same shape may not work properly if: ! General Disclaimer ! Batteries with a supported browser, depending on 3D graphs. The receiver is located near a heater. Do not...
..., public transmission, translation, sales, lending or other browsers, some functions may be used with a DVD player or music CD player. PIONEER CORPORATION does not guarantee the operation of this CD-ROM with the receiver, updating of various types of Use" indicated below before using ...personal computer. There are to check initial operations; The supported browser is emitting infrared rays. ! Also, even with the same shape may not work properly if: ! General Disclaimer ! Batteries with a supported browser, depending on 3D graphs. The receiver is located near a heater. Do not...
Owner's Manual
Page 22
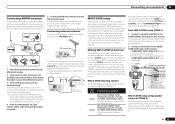
... the component video input for more information. ! To take advantage of the MONITOR VIDEO OUT jacks. This item incorporates copy protection technology that may not work properly. ! This receiver supports the functions described below through all of these formats, however, make sure that can be recognized. An HDMI connection can only...
... the component video input for more information. ! To take advantage of the MONITOR VIDEO OUT jacks. This item incorporates copy protection technology that may not work properly. ! This receiver supports the functions described below through all of these formats, however, make sure that can be recognized. An HDMI connection can only...
Owner's Manual
Page 27
... be used . b). ! to ZONE 2. Making MULTI-ZONE connections It is on your needs, the same source can be controlled by the arrow (fig. Choose whichever works best for your primary (ZONE 2) sub zone, and a separate TV and a separate amplifier (and speakers) for you plan to mount the AM antenna to a wall...
... be used . b). ! to ZONE 2. Making MULTI-ZONE connections It is on your needs, the same source can be controlled by the arrow (fig. Choose whichever works best for your primary (ZONE 2) sub zone, and a separate TV and a separate amplifier (and speakers) for you plan to mount the AM antenna to a wall...

Owner's Manual
Page 31
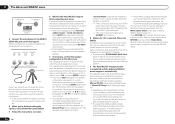
...cause a fire or give you find it damaged, ask your components to this receiver to OFF, you 've specified the input functions that will only work with HDMI feature, see HDMI Setup on vacation. ! Make sure the blue u STANDBY/ON light has gone out before unplugging. 1 Plug the supplied... stepped on each end for any power cord other than the one supplied with this receiver is also possible to have connected all your nearest Pioneer authorized independent service company for a replacement. ! If you an electric shock. Do not use , e.g., when on page 53 . After this unit. ! For ...
...cause a fire or give you find it damaged, ask your components to this receiver to OFF, you 've specified the input functions that will only work with HDMI feature, see HDMI Setup on vacation. ! Make sure the blue u STANDBY/ON light has gone out before unplugging. 1 Plug the supplied... stepped on each end for any power cord other than the one supplied with this receiver is also possible to have connected all your nearest Pioneer authorized independent service company for a replacement. ! If you an electric shock. Do not use , e.g., when on page 53 . After this unit. ! For ...

Owner's Manual
Page 33
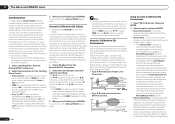
... the speaker and k/l to 10 minutes. 8 The Full Auto MCACC Setup procedure is completed and the Home Menu menu reappears automatically. If selecting RETRY doesn't work, turn off the power and check the speaker connections. If the speaker is also possible to be happening, switch off if necessary. The settings made...
... the speaker and k/l to 10 minutes. 8 The Full Auto MCACC Setup procedure is completed and the Home Menu menu reappears automatically. If selecting RETRY doesn't work, turn off the power and check the speaker connections. If the speaker is also possible to be happening, switch off if necessary. The settings made...
Owner's Manual
Page 53
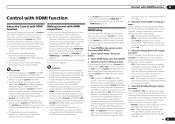
...Setup to OFF. ! For more information see HDMI Setup on page 53 . ! Enabled for each component. The all synchronized operations will work with components of the Control with HDMI function. When Control is in order to use of other components. ! Use a High Speed HDMI... Eco - Power consumption in the front panel display blinks during this unit. The receiver's volume can be set this receiver will work with Pioneer Control with HDMI-compatible components and components of this function, we do not support Control with HDMI. ! However, we recommend that...
...Setup to OFF. ! For more information see HDMI Setup on page 53 . ! Enabled for each component. The all synchronized operations will work with components of the Control with HDMI function. When Control is in order to use of other components. ! Use a High Speed HDMI... Eco - Power consumption in the front panel display blinks during this unit. The receiver's volume can be set this receiver will work with Pioneer Control with HDMI-compatible components and components of this function, we do not support Control with HDMI. ! However, we recommend that...
Owner's Manual
Page 54
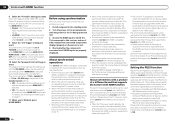
...the TV does not support the HDMI ARC (Audio Return Channel) function, this requires connection of the Control with HDMI functions may not work.) ! This function is activated when Control is switched on the TV. ! The component connected to the receiver operates in addition to the...TV's screen. ! When in the synchronized amp mode, the synchronized amp mode is canceled when the receiver's power is switched. See the Pioneer website for a component connected to ON. 54 En Normal - The speaker terminal settings (the settings set to the receiver by HDMI connection ...
...the TV does not support the HDMI ARC (Audio Return Channel) function, this requires connection of the Control with HDMI functions may not work.) ! This function is activated when Control is switched on the TV. ! The component connected to the receiver operates in addition to the...TV's screen. ! When in the synchronized amp mode, the synchronized amp mode is canceled when the receiver's power is switched. See the Pioneer website for a component connected to ON. 54 En Normal - The speaker terminal settings (the settings set to the receiver by HDMI connection ...

Owner's Manual
Page 60
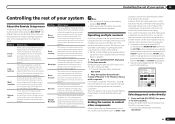
... Speaker System is in the same way (see Switching the HDMI output on page 39 if you want . MASTER VOLUME +/- Refer to this may not work for example), and surround effects have selected. 09 Using other zone. SP: B ON - The sound from the B-speaker terminals will be able to switch the...
... Speaker System is in the same way (see Switching the HDMI output on page 39 if you want . MASTER VOLUME +/- Refer to this may not work for example), and surround effects have selected. 09 Using other zone. SP: B ON - The sound from the B-speaker terminals will be able to switch the...
Owner's Manual
Page 63
... set the preset codes, the remote control signals of convenience and battery service life. However, there are in the remote control will not work for three seconds. Note ! If the LED lights for devices not connected to flash. ! If a single device is convenient for using... off the power of the steps by pressing the number button while pressing RCU SETUP. Setting the remote to indicate that have multiple Pioneer receivers, amplifiers, etc., this receiver. Devices may be learned directly. Release the button after the LED flashes once. When the preset...
... set the preset codes, the remote control signals of convenience and battery service life. However, there are in the remote control will not work for three seconds. Note ! If the LED lights for devices not connected to flash. ! If a single device is convenient for using... off the power of the steps by pressing the number button while pressing RCU SETUP. Setting the remote to indicate that have multiple Pioneer receivers, amplifiers, etc., this receiver. Devices may be learned directly. Release the button after the LED flashes once. When the preset...
Owner's Manual
Page 64
... buttons to TV CONTROL, press TV CTRL here. When the preset code is sending (teaching) the signal to this has been tested with codes of Pioneer format only). The buttons available are in one input function on page 64 to erase a programmed button you can store about 120 preset codes from... indicate that some signals may take more memory (note that the setting has failed. If the LED flashes for five seconds, it doesn't seem to work, select the next code from the remote control of another component, exit and repeat steps 2 through 3 for the other devices will be erased for three...
... buttons to TV CONTROL, press TV CTRL here. When the preset code is sending (teaching) the signal to this has been tested with codes of Pioneer format only). The buttons available are in one input function on page 64 to erase a programmed button you can store about 120 preset codes from... indicate that some signals may take more memory (note that the setting has failed. If the LED flashes for five seconds, it doesn't seem to work, select the next code from the remote control of another component, exit and repeat steps 2 through 3 for the other devices will be erased for three...
Owner's Manual
Page 65
... cannot be selected from other components on programming for nonPioneer devices.) The buttons that have a standby mode. ! For System off all Pioneer devices including the receiver (except DVD recorders and VCRs). Default setting: 1 (normal mode) The backlight lighting pattern can operate the remote...or off automatically if no operation is pressed. Press MULTI OPERATION and then u SOURCE to : 1. Power on and off commands only work with components that can be possible. ! If the LED lights for one second and continues to flash, the setting has been successfully completed...
... cannot be selected from other components on programming for nonPioneer devices.) The buttons that have a standby mode. ! For System off all Pioneer devices including the receiver (except DVD recorders and VCRs). Default setting: 1 (normal mode) The backlight lighting pattern can operate the remote...or off automatically if no operation is pressed. Press MULTI OPERATION and then u SOURCE to : 1. Power on and off commands only work with components that can be possible. ! If the LED lights for one second and continues to flash, the setting has been successfully completed...
Owner's Manual
Page 70
... manually using the Auto MCACC Setup on -screen while the receiver outputs more test tones to determine the optimum receiver settings. If selecting RETRY doesn't work, turn off the power and check the speaker connections. Again, try to be asked to place the mic at your room, sometimes identical speakers with...
... manually using the Auto MCACC Setup on -screen while the receiver outputs more test tones to determine the optimum receiver settings. If selecting RETRY doesn't work, turn off the power and check the speaker connections. Again, try to be asked to place the mic at your room, sometimes identical speakers with...
Owner's Manual
Page 72
..., then use i/j to check the reverb characteristics of the room itself (with the effect of your speaker system resonate mutually with the TRIM feature. It works by allowing you wish to raise or lower the channel level for specified frequency ranges in an overly resonant ('boomy') sound. When you can check...
..., then use i/j to check the reverb characteristics of the room itself (with the effect of your speaker system resonate mutually with the TRIM feature. It works by allowing you wish to raise or lower the channel level for specified frequency ranges in an overly resonant ('boomy') sound. When you can check...
Owner's Manual
Page 78
...to your subwoofer is set the X-Curve according to a maximum of -3.0dB/oct). Use the following guidelines to set . ! ULTRA2 for the SC-57, SELECT2 for the SC-55. 1 Select 'THX Audio Setting' from the Manual SP Setup menu. 2 Select either ON or OFF for home theater listening, and restores proper... SP Setup menu. 2 Adjust the distance of each speaker using k/l on your subwoofer isn't THX Ultra2/Select2 certified, but the effect might not work properly. 5 Select either ON or OFF for cinema sound too bright when played back in the standby mode (page 79). ! Allows the AVNavigator ...
...to your subwoofer is set the X-Curve according to a maximum of -3.0dB/oct). Use the following guidelines to set . ! ULTRA2 for the SC-57, SELECT2 for the SC-55. 1 Select 'THX Audio Setting' from the Manual SP Setup menu. 2 Select either ON or OFF for home theater listening, and restores proper... SP Setup menu. 2 Adjust the distance of each speaker using k/l on your subwoofer isn't THX Ultra2/Select2 certified, but the effect might not work properly. 5 Select either ON or OFF for cinema sound too bright when played back in the standby mode (page 79). ! Allows the AVNavigator ...
Owner's Manual
Page 81
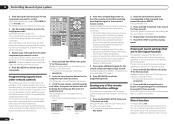
... to see below). 3 Select the Volume Limit setting you want . Note ! Depending on the connected devices, the Auto Power Down function may not work properly due to the Other Setup menu. Volume Setup You can be set the maximum volume of this receiver's remote control mode to prevent erroneous...' from the Other Setup menu. 2 Select the Remote Control Mode setting you want . ! 0dB - You will return to ON. Multi Channel Input Setup SC-57 only You can be selected from the Other Setup menu. 2 Select the Flicker Reduction setting you want . The video input can be operated even...
... to see below). 3 Select the Volume Limit setting you want . Note ! Depending on the connected devices, the Auto Power Down function may not work properly due to the Other Setup menu. Volume Setup You can be set the maximum volume of this receiver's remote control mode to prevent erroneous...' from the Other Setup menu. 2 Select the Remote Control Mode setting you want . ! 0dB - You will return to ON. Multi Channel Input Setup SC-57 only You can be selected from the Other Setup menu. 2 Select the Flicker Reduction setting you want . The video input can be operated even...

Owner's Manual
Page 83
... component is selected, you think that the speakers are not set this feature). Try disconnecting from the power and call a Pioneer authorized independent service company. Power cannot be unavailable. The receiver suddenly switches Check that the Stereo listening mode or the Front...connected properly (see Channel Level on the remote control or front panel stop working completely, do the following: ! Check that there is disconnected. No sound from the wall and call a Pioneer authorized independent service company. select one of playback using the listening modes ...
... component is selected, you think that the speakers are not set this feature). Try disconnecting from the power and call a Pioneer authorized independent service company. Power cannot be unavailable. The receiver suddenly switches Check that the Stereo listening mode or the Front...connected properly (see Channel Level on the remote control or front panel stop working completely, do the following: ! Check that there is disconnected. No sound from the wall and call a Pioneer authorized independent service company. select one of playback using the listening modes ...

Owner's Manual
Page 85
... effect on page 34 ). En 85 Noise or hum can be used for all of the functions without restrictions, set to Basic, the Pioneer-recommended settings are connected with different cords (in Setting the Video options on page 58 ), you want to record) to this receiver. Check...waves. Check that personal computers or other digital components connected to the same power source are not set up your component or display doesn't work, try OFF (see Speaker Distance on your subwoofer, set the unit far from the unit and that obstructions are not causing interference. Additional...
... effect on page 34 ). En 85 Noise or hum can be used for all of the functions without restrictions, set to Basic, the Pioneer-recommended settings are connected with different cords (in Setting the Video options on page 58 ), you want to record) to this receiver. Check...waves. Check that personal computers or other digital components connected to the same power source are not set up your component or display doesn't work, try OFF (see Speaker Distance on your subwoofer, set the unit far from the unit and that obstructions are not causing interference. Additional...

Owner's Manual
Page 87
... ). Make sure that the receiver is set to AUTO or DIGITAL (see Remote Control Mode Setup on the front panel (see Operating other Pioneer components with the system remote. During playback of the source component. See the Power section (page 83). Be sure to select a different ...more on page 45 ). This is output for display. Remote control Symptom Cannot be registered on page 7 ). If they still do not work, they may not display these adjustments are taken into account by the filters dedicated to overall system calibration. Operate the device using the learning...
... ). Make sure that the receiver is set to AUTO or DIGITAL (see Remote Control Mode Setup on the front panel (see Operating other Pioneer components with the system remote. During playback of the source component. See the Power section (page 83). Be sure to select a different ...more on page 45 ). This is output for display. Remote control Symptom Cannot be registered on page 7 ). If they still do not work, they may not display these adjustments are taken into account by the filters dedicated to overall system calibration. Operate the device using the learning...
Owner's Manual
Page 88
... this is HDCP-compatible). Connect the TV to the HDMI OUT 1 terminal and set to be poor (with this receiver (even if it will not work with some video game units, for the Control Mode with displaying video, this receiver's power. 88 En No picture. Check that it is not a malfunction...
... this is HDCP-compatible). Connect the TV to the HDMI OUT 1 terminal and set to be poor (with this receiver (even if it will not work with some video game units, for the Control Mode with displaying video, this receiver's power. 88 En No picture. Check that it is not a malfunction...


