Owner's Manual
Page 5
... station presets 43 Listening to station presets 43 07 The System Setup menu Making receiver settings from the System Setup menu 44 Automatic MCACC (Expert 44 Speaker output setting 47 Manual MCACC setup 48 Fine Channel Level 48 Fine Speaker Distance 49 Fine-adjusting the... external antennas 31 Plugging in a safe place for future reference. Contents 01 Before you for buying this Pioneer product. Thank you start Checking what's in the box 8 Installing the receiver 8 Loading the batteries 8 02 Simple Home Theater Guide Introduction to home theater 9 Listening to Surround Sound...
... station presets 43 Listening to station presets 43 07 The System Setup menu Making receiver settings from the System Setup menu 44 Automatic MCACC (Expert 44 Speaker output setting 47 Manual MCACC setup 48 Fine Channel Level 48 Fine Speaker Distance 49 Fine-adjusting the... external antennas 31 Plugging in a safe place for future reference. Contents 01 Before you for buying this Pioneer product. Thank you start Checking what's in the box 8 Installing the receiver 8 Loading the batteries 8 02 Simple Home Theater Guide Introduction to home theater 9 Listening to Surround Sound...
Owner's Manual
Page 6
... the speaker system 68 Switching the speaker system according to the playback environment (Application Manual) . . . . 69 Setting the speaker system for high sound quality multi-channel...ZONE controls 74 Connecting an IR receiver 74 Switching components on and off using the 12 volt trigger 75 Using this receiver with a Pioneer plasma display . . . 75 Using the SR+ mode with a Pioneer plasma display . . . ...8482; Audio/Video/Image Player . . . . 78 Supported file formats 78 Connecting to the network through LAN interface. . . . 79 Using the USB interface 80 Confirming the IP Address ...
... the speaker system 68 Switching the speaker system according to the playback environment (Application Manual) . . . . 69 Setting the speaker system for high sound quality multi-channel...ZONE controls 74 Connecting an IR receiver 74 Switching components on and off using the 12 volt trigger 75 Using this receiver with a Pioneer plasma display . . . 75 Using the SR+ mode with a Pioneer plasma display . . . ...8482; Audio/Video/Image Player . . . . 78 Supported file formats 78 Connecting to the network through LAN interface. . . . 79 Using the USB interface 80 Confirming the IP Address ...

Owner's Manual
Page 9
... from the DVD player to the receiver. 4 Plug in mind. The HDMI indicator in the middle of the action or concert. However, before connecting this unit to an AC power source. 1 Select the speaker usage method. Check the manual that DVD/LD is showing in Listening to your system ... operations during this process, and you can turn on page 21 to do this. • Set the subwoofer volume to Surround Sound This receiver has been designed with multichannel surround sound) are several other possibilities (like you're in the front LCD display blinks during this process. Listening...
... from the DVD player to the receiver. 4 Plug in mind. The HDMI indicator in the middle of the action or concert. However, before connecting this unit to an AC power source. 1 Select the speaker usage method. Check the manual that DVD/LD is showing in Listening to your system ... operations during this process, and you can turn on page 21 to do this. • Set the subwoofer volume to Surround Sound This receiver has been designed with multichannel surround sound) are several other possibilities (like you're in the front LCD display blinks during this process. Listening...

Owner's Manual
Page 14
...Make sure 'OK' is being performed properly. Start by switching on page 44).2 Problems when using the Manual speaker setup on your TV3 and subwoofer (if you have one), then the receiver (press RECEIVER). • Make sure the setup mic is disconnected. 2 Select the input source you need to ...• Some older TVs may only get digital 2 channel stereo and analog sound. In this receiver to 10 minutes. 7 The Auto MCACC Setup has finished! You can correct the setting manually using the Auto MCACC Setup If the room environment is displayed on page 36 if you want ...
...Make sure 'OK' is being performed properly. Start by switching on page 44).2 Problems when using the Manual speaker setup on your TV3 and subwoofer (if you have one), then the receiver (press RECEIVER). • Make sure the setup mic is disconnected. 2 Select the input source you need to ...• Some older TVs may only get digital 2 channel stereo and analog sound. In this receiver to 10 minutes. 7 The Auto MCACC Setup has finished! You can correct the setting manually using the Auto MCACC Setup If the room environment is displayed on page 36 if you want ...
Owner's Manual
Page 17
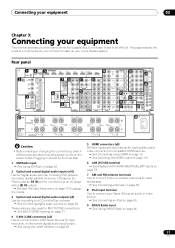
...assign the inputs. 3 Optical and coaxial digital audio outputs (x3) Use for digital audio sources, including DVD players/ recorders, digital satellite receivers, CD players, etc. Plugging in should be difficult. These jacks are also used for MULTI-ZONE connections. See MULTI-ZONE listening...OUT 2 COMPONENT OUT VIDEO 3 20CONTROL IN OUT OUT 4 IR 23SPEAKERS R1 R2 R3 R4 R5 L5 SELECTABLEE R1 R5 L1 L5 SEE INSTRUCTION MANUAL VOIR LE MODE D'EMPLOI Normal FRONT SURROUND-A SURROUND-B SURROUND BACK CENTER LOW HIGH All ch Bi-Amp. Rear panel 1 XM IN 2COAXIAL ...
...assign the inputs. 3 Optical and coaxial digital audio outputs (x3) Use for digital audio sources, including DVD players/ recorders, digital satellite receivers, CD players, etc. Plugging in should be difficult. These jacks are also used for MULTI-ZONE connections. See MULTI-ZONE listening...OUT 2 COMPONENT OUT VIDEO 3 20CONTROL IN OUT OUT 4 IR 23SPEAKERS R1 R2 R3 R4 R5 L5 SELECTABLEE R1 R5 L1 L5 SEE INSTRUCTION MANUAL VOIR LE MODE D'EMPLOI Normal FRONT SURROUND-A SURROUND-B SURROUND BACK CENTER LOW HIGH All ch Bi-Amp. Rear panel 1 XM IN 2COAXIAL ...

Owner's Manual
Page 25
...the component video outputs of ASSIGNABLE COMPONENT VIDEO inputs. Connect using a three-way component video cable. • Since they are compatible with progressive-scan video. 1 SC-09TX XM IN COAXIAL ASSIGNABLE 14 IN 1 (DVD/LD) IN 2 (BD) IN 3 (CD) IN 4 (SACD) ZONE2 OUT ZONE3 /SOURCE OUT SOURCE OUT... iPod IN LAN (10/100) SIRIUS IN R SURROUND SURROUND BACK R LR (Single) L SUB W. PR PB Y COMPONENT VIDEO 25 En See the manuals that came with your TV and source component to composite or S-Video. Connecting your source and TV are both compatible), which source. You can also...
...the component video outputs of ASSIGNABLE COMPONENT VIDEO inputs. Connect using a three-way component video cable. • Since they are compatible with progressive-scan video. 1 SC-09TX XM IN COAXIAL ASSIGNABLE 14 IN 1 (DVD/LD) IN 2 (BD) IN 3 (CD) IN 4 (SACD) ZONE2 OUT ZONE3 /SOURCE OUT SOURCE OUT... iPod IN LAN (10/100) SIRIUS IN R SURROUND SURROUND BACK R LR (Single) L SUB W. PR PB Y COMPONENT VIDEO 25 En See the manuals that came with your TV and source component to composite or S-Video. Connecting your source and TV are both compatible), which source. You can also...

Owner's Manual
Page 28
... layouts and usage patterns are necessary. Note that your speaker system To take full advantage of the receiver's surround sound capabilities connect front, center, surround A, surround B and surround back speakers, as well...OUT 4 IR SPEAKERS R1 R2 R3 R4 R5 L5 SELECTABLEE R1 R5 L1 L5 SEE INSTRUCTION MANUAL VOIR LE MODE D'EMPLOI Normal FRONT SURROUND-A SURROUND-B SURROUND BACK CENTER LOW HIGH All ch ... LOW SURROUND L HIGH LOW FRONT L AC IN SC-09TX Surround right A Surround right B Surround back right Surround back left Surround left B Surround left surround back...
... layouts and usage patterns are necessary. Note that your speaker system To take full advantage of the receiver's surround sound capabilities connect front, center, surround A, surround B and surround back speakers, as well...OUT 4 IR SPEAKERS R1 R2 R3 R4 R5 L5 SELECTABLEE R1 R5 L1 L5 SEE INSTRUCTION MANUAL VOIR LE MODE D'EMPLOI Normal FRONT SURROUND-A SURROUND-B SURROUND BACK CENTER LOW HIGH All ch ... LOW SURROUND L HIGH LOW FRONT L AC IN SC-09TX Surround right A Surround right B Surround back right Surround back left Surround left B Surround left surround back...

Owner's Manual
Page 29
B). Placing the speakers Where you put your subwoofer. 29 En The following guidelines should be placed on the floor. to the manual that all the bare speaker wire is twisted together and inserted fully into the end of the sound. The angle depends on the speakers ... on the quality of the speaker terminal. Use less of the speaker cables to your speakers. • If you to them very high on the receiver comprises a positive (+) and negative (-) terminal. Make sure the speakers don't face each wire, and the exposed wire strands twisted together (fig. If any uninsulated...
B). Placing the speakers Where you put your subwoofer. 29 En The following guidelines should be placed on the floor. to the manual that all the bare speaker wire is twisted together and inserted fully into the end of the sound. The angle depends on the speakers ... on the quality of the speaker terminal. Use less of the speaker cables to your speakers. • If you to them very high on the receiver comprises a positive (+) and negative (-) terminal. Make sure the speakers don't face each wire, and the exposed wire strands twisted together (fig. If any uninsulated...

Owner's Manual
Page 39
...signal.5 • HDMI - Only PCM signals are connected. • You can also press / to select the MCACC preset. 4 • This receiver can use all LDs. These presets can switch between settings to suit the kind of non-PCM sources. To prevent noise, make the proper digital...Speaker B in Automatically setting up for unassigned i.LINK-equipped components is playing an analog signal. For more details, refer to the instruction manual supplied with DTS is fixed to DIGITAL. • Some DVD players don't output DTS signals. See Checking the i.LINK inputs on ...
...signal.5 • HDMI - Only PCM signals are connected. • You can also press / to select the MCACC preset. 4 • This receiver can use all LDs. These presets can switch between settings to suit the kind of non-PCM sources. To prevent noise, make the proper digital...Speaker B in Automatically setting up for unassigned i.LINK-equipped components is playing an analog signal. For more details, refer to the instruction manual supplied with DTS is fixed to DIGITAL. • Some DVD players don't output DTS signals. See Checking the i.LINK inputs on ...

Owner's Manual
Page 40
...;a b a b Neo:6 Advanced surround d d Note 1 By using surround back speakers, selecting this receiver or when any of sources (=Sound plays through your system Using surround back channel processing • Default setting: SBch ON You can have the... Digital EX or DTS-ES) • SBch OFF - For details, see Switching the speaker system according to the playback environment (Application Manual) on page 69. 2 • You can't use 6.1 or 7.1 decoding for 6.1 encoded sources (for example, Dolby Digital EX or...
...;a b a b Neo:6 Advanced surround d d Note 1 By using surround back speakers, selecting this receiver or when any of sources (=Sound plays through your system Using surround back channel processing • Default setting: SBch ON You can have the... Digital EX or DTS-ES) • SBch OFF - For details, see Switching the speaker system according to the playback environment (Application Manual) on page 69. 2 • You can't use 6.1 or 7.1 decoding for 6.1 encoded sources (for example, Dolby Digital EX or...

Owner's Manual
Page 42
...feature uses Neural Surround™, THX® technologies to achieve optimal surround sound from FM radio. • While listening to switch the receiver into mono reception mode. 06 Using the tuner Chapter 6: Using the tuner Listening to the radio The following steps show you can simply... enter the frequency directly using the automatic (search) and manual (step) tuning functions. If you already know the frequency of the station you can be used when receiving AM broadcasts. RECEIVER MAIN ZONE2 DVD BD SOURCE 3 MULTI OPERATION TV SAT DVR1 DVR2 VIDEO1 VIDEO2...
...feature uses Neural Surround™, THX® technologies to achieve optimal surround sound from FM radio. • While listening to switch the receiver into mono reception mode. 06 Using the tuner Chapter 6: Using the tuner Listening to the radio The following steps show you can simply... enter the frequency directly using the automatic (search) and manual (step) tuning functions. If you already know the frequency of the station you can be used when receiving AM broadcasts. RECEIVER MAIN ZONE2 DVD BD SOURCE 3 MULTI OPERATION TV SAT DVR1 DVR2 VIDEO1 VIDEO2...

Owner's Manual
Page 43
This receiver can memorize up to four characters long. The display shows STATION MEMORY, then a blinking memory class. 3 Press CLASS to select one of manually tuning in each . Tip • To erase a station name, simply repeat steps 1 to 3 and input four spaces instead of 10 stations each time....Saving station presets above if you can press DISP when listening to a station to 30 stations, stored in which the station is also stored. RECEIVER MAIN ZONE2 DVD BD SOURCE 3 MULTI OPERATION TV SAT DVR1 DVR2 VIDEO1 VIDEO2 HOME MEDIA GALLERY CD SACD CD-R TUNER XM PHONO SIRIUS iPod...
This receiver can memorize up to four characters long. The display shows STATION MEMORY, then a blinking memory class. 3 Press CLASS to select one of manually tuning in each . Tip • To erase a station name, simply repeat steps 1 to 3 and input four spaces instead of 10 stations each time....Saving station presets above if you can press DISP when listening to a station to 30 stations, stored in which the station is also stored. RECEIVER MAIN ZONE2 DVD BD SOURCE 3 MULTI OPERATION TV SAT DVR1 DVR2 VIDEO1 VIDEO2 HOME MEDIA GALLERY CD SACD CD-R TUNER XM PHONO SIRIUS iPod...

Owner's Manual
Page 44
... HDMI TOP MENU BAND MENU T.EDIT INPUT SELECT XM SIRIUS ST EENnTteErR ST SETUP CATEGORY STATUS TUNE CH LEVEL RETURN 1 Switch on the receiver and your setup options below for a more detailed settings than those provided in Automatically setting up two speaker systems in separate rooms), and ...SIRIUS Radio input source is selected (in either the main or sub zone). Use the RECEIVER button to navigate through copying, renaming or deleting (see The Other Setup menu on page 54). • Manual SP Setup - Use the buttons and ENTER to switch on.1 • If headphones are...
... HDMI TOP MENU BAND MENU T.EDIT INPUT SELECT XM SIRIUS ST EENnTteErR ST SETUP CATEGORY STATUS TUNE CH LEVEL RETURN 1 Switch on the receiver and your setup options below for a more detailed settings than those provided in Automatically setting up two speaker systems in separate rooms), and ...SIRIUS Radio input source is selected (in either the main or sub zone). Use the RECEIVER button to navigate through copying, renaming or deleting (see The Other Setup menu on page 54). • Manual SP Setup - Use the buttons and ENTER to switch on.1 • If headphones are...

Owner's Manual
Page 45
...three minutes of left and right channels). • THX Speaker (only available when the Custom Menu above . See Full Band Phase Control on this receiver, the test tone is EQ Pro. & S-Wave) - If the System Setup screen is given to calibrate your system while leaving your listening area... 4. Manual SP Setup 7. SYMMETRY (default) implements symmetric correction for each of Auto MCACC. Simply choose an unused preset for now (you can rename it set to Making receiver settings from the System Setup menu above is adjusted. In the demo mode, no settings are saved and no special ...
...three minutes of left and right channels). • THX Speaker (only available when the Custom Menu above . See Full Band Phase Control on this receiver, the test tone is EQ Pro. & S-Wave) - If the System Setup screen is given to calibrate your system while leaving your listening area... 4. Manual SP Setup 7. SYMMETRY (default) implements symmetric correction for each of Auto MCACC. Simply choose an unused preset for now (you can rename it set to Making receiver settings from the System Setup menu above is adjusted. In the demo mode, no settings are saved and no special ...

Owner's Manual
Page 47
...parameters from the System Setup menu above if you're not already at this receiver upon completion of your speakers from the listening position (see page 12). 47 En Output Setup 3. Manual SP Setup 7. Output Setup Normal Front :Normal Center :Normal Surr :Array...MENU 1. FULL BAND PHASE CTRL 5. Filter settings to adjust these settings manually using the Manual speaker setup on this ) • FULL BAND PHASE CTRL - See Making receiver settings from the MCACC Data Check screen: • Speaker Setting - Manual MCACC 4. Select for "7.2-channel + Zone 2 connections". • 7....
...parameters from the System Setup menu above if you're not already at this receiver upon completion of your speakers from the listening position (see page 12). 47 En Output Setup 3. Manual SP Setup 7. Output Setup Normal Front :Normal Center :Normal Surr :Array...MENU 1. FULL BAND PHASE CTRL 5. Filter settings to adjust these settings manually using the Manual speaker setup on this ) • FULL BAND PHASE CTRL - See Making receiver settings from the MCACC Data Check screen: • Speaker Setting - Manual MCACC 4. Select for "7.2-channel + Zone 2 connections". • 7....

Owner's Manual
Page 48
.... OSD Language 9. Fine SP Distance c . EQ Professional :Return 48 En The last two settings are output at this receiver. DVD/LD 3. Fine Channel Level b . Standing Wave e . Output Setup 3. Manual MCACC - 55.0dB a . Standing Wave e . EQ Adjust f . Select a memory to make these settings in ...Distance d . You only need to first specify the MCACC preset you want to adjust manually. Press SETUP to display the System Setup menu before pressing SETUP (step 2 in Making receiver settings from the System Setup menu. The volume increases to this screen. 2 Select the...
.... OSD Language 9. Fine SP Distance c . EQ Professional :Return 48 En The last two settings are output at this receiver. DVD/LD 3. Fine Channel Level b . Standing Wave e . Output Setup 3. Manual MCACC - 55.0dB a . Standing Wave e . EQ Adjust f . Select a memory to make these settings in ...Distance d . You only need to first specify the MCACC preset you want to adjust manually. Press SETUP to display the System Setup menu before pressing SETUP (step 2 in Making receiver settings from the System Setup menu. The volume increases to this screen. 2 Select the...

Owner's Manual
Page 49
... use it . 4 When you want to the next channel. • For comparison purposes, the reference speaker will be adjusted). Fine SP Distance c . Manual MCACC - 55.0dB a . Fine Channel Level b . Standing Wave e . The delay is indicated on which speaker you select. • If you ... same time. This will arrive at the listening position at a position slightly in terms of the speakers (Precision Distance) Before using the Manual speaker setup below. 1 Select 'Fine SP Distance' from your speakers very slightly. • For better audibility, the subwoofer emits a ...
... use it . 4 When you want to the next channel. • For comparison purposes, the reference speaker will be adjusted). Fine SP Distance c . Manual MCACC - 55.0dB a . Fine Channel Level b . Standing Wave e . The delay is indicated on which speaker you select. • If you ... same time. This will arrive at the listening position at a position slightly in terms of the speakers (Precision Distance) Before using the Manual speaker setup below. 1 Select 'Fine SP Distance' from your speakers very slightly. • For better audibility, the subwoofer emits a ...

Owner's Manual
Page 50
... Distance) on the overall sound, especially at the Fine-adjusting the positions of your room, it results in a different position from your listening area. Manual MCACC - 55.0dB a . Precision Distance d . EQ Professional :Return DVD/LD - 5 5 . 0dB 3d. Select the channel to compensate ...described here without moving them. • The result of overly resonant sounds in your MCACC presets.3 1 Select 'Standing Wave' from the Manual MCACC setup menu. Standing Wave • Default setting: ON2 Acoustic standing waves occur when, under 10.0, adjust the speaker for the Standing ...
... Distance) on the overall sound, especially at the Fine-adjusting the positions of your room, it results in a different position from your listening area. Manual MCACC - 55.0dB a . Precision Distance d . EQ Professional :Return DVD/LD - 5 5 . 0dB 3d. Select the channel to compensate ...described here without moving them. • The result of overly resonant sounds in your MCACC presets.3 1 Select 'Standing Wave' from the Manual MCACC setup menu. Standing Wave • Default setting: ON2 Acoustic standing waves occur when, under 10.0, adjust the speaker for the Standing ...

Owner's Manual
Page 51
...your system calibration with the help of a graphical output that can also adjust these settings manually to get a frequency balance that different channels seem to exhibit different reverb characteristics, select ... with the help of one channel too drastically will take longer to be displayed on this receiver.3 Tip • Changing the frequency curve of a graphical output that can be able to...2 This system allows you find that due to your tastes.1 1 Select 'EQ Adjust' from Pioneer - Use / to select TRIM, then use the / buttons to certain ...
...your system calibration with the help of a graphical output that can also adjust these settings manually to get a frequency balance that different channels seem to exhibit different reverb characteristics, select ... with the help of one channel too drastically will take longer to be displayed on this receiver.3 Tip • Changing the frequency curve of a graphical output that can be able to...2 This system allows you find that due to your tastes.1 1 Select 'EQ Adjust' from Pioneer - Use / to select TRIM, then use the / buttons to certain ...

Owner's Manual
Page 52
... RS-232C cable before selecting this option). • Reverb View - calibration range Conventional MCACC EQ calibration range Time 0 80 160 (in each channel. Manual MCACC - 55.0dB a . Fine SP Distance c . Standing Wave e . Advanced EQ Setup e.EQ Professional :Return ENTER:Next :Return 2 Select an...the standing waves eliminated. 07 The System Setup menu Setting Acoustic Calibration EQ Professional according to your room characteristics Using the manual setup, you can set the time period at which the frequency response is analyzed, pinpointing the time that changing the ...
... RS-232C cable before selecting this option). • Reverb View - calibration range Conventional MCACC EQ calibration range Time 0 80 160 (in each channel. Manual MCACC - 55.0dB a . Fine SP Distance c . Standing Wave e . Advanced EQ Setup e.EQ Professional :Return ENTER:Next :Return 2 Select an...the standing waves eliminated. 07 The System Setup menu Setting Acoustic Calibration EQ Professional according to your room characteristics Using the manual setup, you can set the time period at which the frequency response is analyzed, pinpointing the time that changing the ...


