Owner's Manual
Page 5
... the Auto MCACC Setup . . . . . 11 Playing a source 11 Better sound using Phase Control and Full Band Phase Control 12 Using Phase Control 12 Using Full Band Phase Control 13 03 Connecting your equipment Rear panel 15 When making cable connections 16 About the video converter 17 Connecting using HDMI 17 About HDMI 18 Connecting your Blu-ray disc player 19 Connecting your TV and DVD player 20 Connecting a satellite/cable receiver or other set-top box 21 Connecting a DVD/HDD recorder, VCR and other video sources 22 Using the component video jacks 23 Connecting digital audio sources...
... the Auto MCACC Setup . . . . . 11 Playing a source 11 Better sound using Phase Control and Full Band Phase Control 12 Using Phase Control 12 Using Full Band Phase Control 13 03 Connecting your equipment Rear panel 15 When making cable connections 16 About the video converter 17 Connecting using HDMI 17 About HDMI 18 Connecting your Blu-ray disc player 19 Connecting your TV and DVD player 20 Connecting a satellite/cable receiver or other set-top box 21 Connecting a DVD/HDD recorder, VCR and other video sources 22 Using the component video jacks 23 Connecting digital audio sources...
Owner's Manual
Page 6
...; Tuner 62 Listening to SIRIUS Radio 62 Saving channel presets 62 Using the SIRIUS Menu 63 Connecting the multichannel analog inputs 63 Selecting the multichannel analog inputs 63 Speaker B setup 64 Switching the speaker system 64 Bi-amping your speakers 64 Bi-wiring your speakers 65 Connecting additional amplifiers 65 MULTI-ZONE listening 66 Making MULTI-ZONE connections 66 Using the MULTI-ZONE controls 68 Connecting an IR receiver 69 Switching components on and off using the 12 volt trigger 70 Using this receiver with a Pioneer flat panel TV...
...; Tuner 62 Listening to SIRIUS Radio 62 Saving channel presets 62 Using the SIRIUS Menu 63 Connecting the multichannel analog inputs 63 Selecting the multichannel analog inputs 63 Speaker B setup 64 Switching the speaker system 64 Bi-amping your speakers 64 Bi-wiring your speakers 65 Connecting additional amplifiers 65 MULTI-ZONE listening 66 Making MULTI-ZONE connections 66 Using the MULTI-ZONE controls 68 Connecting an IR receiver 69 Switching components on and off using the 12 volt trigger 70 Using this receiver with a Pioneer flat panel TV...

Owner's Manual
Page 10
... microphone is connected.1 1a.Full Auto MCACC A/V RECEIVER Surr Back System : Normal Save SYMMETRY to : M1.MEMORY 1 START Exit Return 3 Make sure 'Normal' is selected,2 select an MCACC preset3, then select START.4 Check that the remote control's operation selector switch is displayed on -screen. A progress report is set to RCV. 4 Follow the instructions on -screen while the receiver outputs test tones to determine the speakers present in the Auto MCACC Setup are used for storing surround sound settings...
... microphone is connected.1 1a.Full Auto MCACC A/V RECEIVER Surr Back System : Normal Save SYMMETRY to : M1.MEMORY 1 START Exit Return 3 Make sure 'Normal' is selected,2 select an MCACC preset3, then select START.4 Check that the remote control's operation selector switch is displayed on -screen. A progress report is set to RCV. 4 Follow the instructions on -screen while the receiver outputs test tones to determine the speakers present in the Auto MCACC Setup are used for storing surround sound settings...

Owner's Manual
Page 12
... Home Theater Guide 3 Set the operation selector switch to RCV, then press AUTO/DIRECT (AUTO SURR/STREAM DIRECT) to select 'AUTO SURROUND' and start playback of these two features, refer to the following explanations. It is being performed properly. If the display does not correspond to the input signal and listening mode, check the connections and settings. 4 Use the volume control to check on each channel are playing a stereo source, you will only hear sound from the speakers connected...
... Home Theater Guide 3 Set the operation selector switch to RCV, then press AUTO/DIRECT (AUTO SURR/STREAM DIRECT) to select 'AUTO SURROUND' and start playback of these two features, refer to the following explanations. It is being performed properly. If the display does not correspond to the input signal and listening mode, check the connections and settings. 4 Use the volume control to check on each channel are playing a stereo source, you will only hear sound from the speakers connected...

Owner's Manual
Page 13
... delay between channels ensure better surround sound integration for instance, the tweeter, the squawker (midrange), and the woofer output sound in the middle- When the PURE DIRECT mode is automatically switched on page 72). 13 En However, the effect you perform the Auto MCACC with the supplied microphone, therefore flattening the analyzed frequency-phase characteristics during audio signal playback. STANDARD ADV SURR BD MENU • Set the operation...
... delay between channels ensure better surround sound integration for instance, the tweeter, the squawker (midrange), and the woofer output sound in the middle- When the PURE DIRECT mode is automatically switched on page 72). 13 En However, the effect you perform the Auto MCACC with the supplied microphone, therefore flattening the analyzed frequency-phase characteristics during audio signal playback. STANDARD ADV SURR BD MENU • Set the operation...
Owner's Manual
Page 15
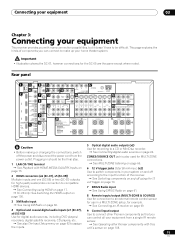
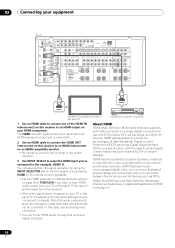
... MANUAL SELECTABLE VOIR LE MODE D'EMPLOI R SURROUND L R SUBWOOFER AR FRONT L CENTER Caution • Before making or changing the connections, switch off using the 12 volt trigger on page 70. 7 SIRIUS Radio input See Using SIRIUS Radio on page 61. 8 Remote inputs/output (MULTI-ZONE & SOURCE) Use for connection to an external remote control sensor for digital audio sources, including DVD players/ recorders, digital satellite receivers, CD players, etc. See also The Input Setup menu on page 92 to assign the inputs. 9 Control input/output Use to connect other Pioneer...
... MANUAL SELECTABLE VOIR LE MODE D'EMPLOI R SURROUND L R SUBWOOFER AR FRONT L CENTER Caution • Before making or changing the connections, switch off using the 12 volt trigger on page 70. 7 SIRIUS Radio input See Using SIRIUS Radio on page 61. 8 Remote inputs/output (MULTI-ZONE & SOURCE) Use for connection to an external remote control sensor for digital audio sources, including DVD players/ recorders, digital satellite receivers, CD players, etc. See also The Input Setup menu on page 92 to assign the inputs. 9 Control input/output Use to connect other Pioneer...
Owner's Manual
Page 18
... HDMI component. L (Single) SELECTABLE SEE INSTRUCTION MANUAL SELECTABLE VOIR LE MODE D'EMPLOI R SURROUND L R SUBWOOFER AR FRONT L CENTER HDMI OUT HDMI IN HDMI/DVI-compatible monitor or flat panel TV HDMI/DVI-equipped component 1 Use an HDMI cable to connect one of several cables and connectors), and communication between the AV source and AV devices such as Digital Visual Interface (DVI) in Setting the Audio options on an HDMI-compatible monitor. • Be careful to connect the terminal in the proper direction. 3 Use INPUT SELECT to select the HDMI input...
... HDMI component. L (Single) SELECTABLE SEE INSTRUCTION MANUAL SELECTABLE VOIR LE MODE D'EMPLOI R SURROUND L R SUBWOOFER AR FRONT L CENTER HDMI OUT HDMI IN HDMI/DVI-compatible monitor or flat panel TV HDMI/DVI-equipped component 1 Use an HDMI cable to connect one of several cables and connectors), and communication between the AV source and AV devices such as Digital Visual Interface (DVI) in Setting the Audio options on an HDMI-compatible monitor. • Be careful to connect the terminal in the proper direction. 3 Use INPUT SELECT to select the HDMI input...
Owner's Manual
Page 33
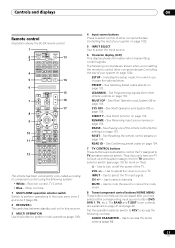
... receiver. 3 MULTI OPERATION Use this ). - Indicates the setup mode, from other remote controls on page 102): SETUP - See Selecting preset codes directly on page 104. DIRECT F - See Renaming input source names on page 102. See Resetting the remote control presets on page 105. Use to turn on/off the power of your system on this button to perform multi operations (page 105). 4 Input source buttons Press to component control using the following controls: AUDIO PARAMETER - Use to select channels. MUTE - Set the operation selector switch to RCV to select the input...
... receiver. 3 MULTI OPERATION Use this ). - Indicates the setup mode, from other remote controls on page 102): SETUP - See Selecting preset codes directly on page 104. DIRECT F - See Renaming input source names on page 102. See Resetting the remote control presets on page 105. Use to turn on/off the power of your system on this button to perform multi operations (page 105). 4 Input source buttons Press to component control using the following controls: AUDIO PARAMETER - Use to select channels. MUTE - Set the operation selector switch to RCV to select the input...

Owner's Manual
Page 38
... a source, press AUTO/DIRECT (AUTO SURROUND/STREAM DIRECT) to select the mode you have calibrated your DVD player. 38 En STATUS PHASE CTRL CH LEVEL THX MPX MEMORY SOURCE TV RCV CH VOL VOL AUTO/ DIRECT PGM STEREO/ A.L.C. Selecting MCACC presets • Default setting: MEMORY 1 If you want to hear the truest possible reproduction of channels in the front panel display to the TV). Selects an optical or coaxial digital signal. To prevent noise, make the proper digital connections (page...
... a source, press AUTO/DIRECT (AUTO SURROUND/STREAM DIRECT) to select the mode you have calibrated your DVD player. 38 En STATUS PHASE CTRL CH LEVEL THX MPX MEMORY SOURCE TV RCV CH VOL VOL AUTO/ DIRECT PGM STEREO/ A.L.C. Selecting MCACC presets • Default setting: MEMORY 1 If you want to hear the truest possible reproduction of channels in the front panel display to the TV). Selects an optical or coaxial digital signal. To prevent noise, make the proper digital connections (page...
Owner's Manual
Page 40
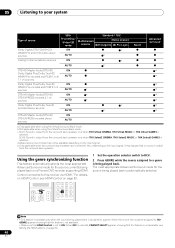
.... SC-05: Sound is output from the surround back speakers. When the source has no sound is automatically selected. e.Only applicable when two surround back speakers are connected. b.Not applicable when using the Virtual Surround Back mode. 05 Listening to your system Type of source SBch Processing / Virtual SB mode Standard / THX Multichannel Stereo sources sources 2 Pro Logic IIx 2 Pro Logic Dolby Digital/DTS/PCM/SACD/ WMA9 Pro and DVD-Audio stereo sources ON AUTO a b Analog 2-channel (stereo) sources...
.... SC-05: Sound is output from the surround back speakers. When the source has no sound is automatically selected. e.Only applicable when two surround back speakers are connected. b.Not applicable when using the Virtual Surround Back mode. 05 Listening to your system Type of source SBch Processing / Virtual SB mode Standard / THX Multichannel Stereo sources sources 2 Pro Logic IIx 2 Pro Logic Dolby Digital/DTS/PCM/SACD/ WMA9 Pro and DVD-Audio stereo sources ON AUTO a b Analog 2-channel (stereo) sources...

Owner's Manual
Page 64
...amping your speakers Bi-amping is output from the surround back channel pre-out terminals. • SPAB - CONTROL ON/OFF SPEAKERS iPod DIRECT USB VIDEO3 INPUT MULTI-ZONE & SOURCE DIGITAL IN S-VIDEO VIDEO L AUDIO R MCACC SETUP MIC PHONES Press repeatedly to 5 channels, depending on page 94. In this (having separate terminals for better crossover performance. SPEAKERS R SURROUND BACK/ B L (Single) R SURROUND L AR FRONT L CENTER SELECTABLE SEE INSTRUCTION MANUAL SELECTABLE VOIR LE MODE D'EMPLOI L R Switching the speaker system If you connect the high frequency...
...amping your speakers Bi-amping is output from the surround back channel pre-out terminals. • SPAB - CONTROL ON/OFF SPEAKERS iPod DIRECT USB VIDEO3 INPUT MULTI-ZONE & SOURCE DIGITAL IN S-VIDEO VIDEO L AUDIO R MCACC SETUP MIC PHONES Press repeatedly to 5 channels, depending on page 94. In this (having separate terminals for better crossover performance. SPEAKERS R SURROUND BACK/ B L (Single) R SURROUND L AR FRONT L CENTER SELECTABLE SEE INSTRUCTION MANUAL SELECTABLE VOIR LE MODE D'EMPLOI L R Switching the speaker system If you connect the high frequency...

Owner's Manual
Page 69
... use the TUNER controls to select a preset station (see Operating other zone. Please be careful not to change stations when recording a radio broadcast. 2 The volume levels of this receiver to link it does Switches on the front panel. 69 En For example, ZONE 2 CD-R sends the source connected to the CD-R inputs to the primary (ZONE 2) sub room. • If you select TUNER, you can use the MULTI-ZONE feature for awhile, turn off power in another component to the MULTI-ZONE & SOURCE...
... use the TUNER controls to select a preset station (see Operating other zone. Please be careful not to change stations when recording a radio broadcast. 2 The volume levels of this receiver to link it does Switches on the front panel. 69 En For example, ZONE 2 CD-R sends the source connected to the CD-R inputs to the primary (ZONE 2) sub room. • If you select TUNER, you can use the MULTI-ZONE feature for awhile, turn off power in another component to the MULTI-ZONE & SOURCE...
Owner's Manual
Page 74
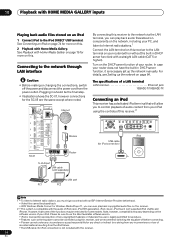
...VIDEO3 INPUT MULTI-ZONE & SOURCE DIGITAL IN S-VIDEO VIDEO L AUDIO R MCACC SETUP MIC PHONES USB cable (for iPod connection) iPod MENU to LAN port LAN cable (sold separately) to LAN port PC1 PC2 Note 1 • To listen to use the latest available software version. • iPod is licensed for iPod connection) is necessary set up the network on this receiver.2 AUDIO PARAMETER (TUNE) VIDEO (ST) ENTER (ST) (TUNE) HOME MENU RETURN AUTO SURR/ HOME STANDARD ADVANCED STEREO/ TUNER EDIT BAND STREAM DIRECT THX SURROUND SURROUND A.L.C. Please be sure to Internet radio stations...
...VIDEO3 INPUT MULTI-ZONE & SOURCE DIGITAL IN S-VIDEO VIDEO L AUDIO R MCACC SETUP MIC PHONES USB cable (for iPod connection) iPod MENU to LAN port LAN cable (sold separately) to LAN port PC1 PC2 Note 1 • To listen to use the latest available software version. • iPod is licensed for iPod connection) is necessary set up the network on this receiver.2 AUDIO PARAMETER (TUNE) VIDEO (ST) ENTER (ST) (TUNE) HOME MENU RETURN AUTO SURR/ HOME STANDARD ADVANCED STEREO/ TUNER EDIT BAND STREAM DIRECT THX SURROUND SURROUND A.L.C. Please be sure to Internet radio stations...

Owner's Manual
Page 75
... you download licenses for protected content, you to play or copy protected content. Playback with HOME MEDIA GALLERY inputs 10 Connecting a USB device It is possible to playback files1 using the USB interface on page 88 for networked devices. CONTROL ON/OFF SPEAKERS iPod DIRECT USB VIDEO3 INPUT MULTI-ZONE & SOURCE DIGITAL IN S-VIDEO VIDEO L AUDIO R MCACC SETUP MIC PHONES USB mass storage device Introduction The Home Media Gallery allows you agree that requires the upgrade. See Setting up the network manually...
... you download licenses for protected content, you to play or copy protected content. Playback with HOME MEDIA GALLERY inputs 10 Connecting a USB device It is possible to playback files1 using the USB interface on page 88 for networked devices. CONTROL ON/OFF SPEAKERS iPod DIRECT USB VIDEO3 INPUT MULTI-ZONE & SOURCE DIGITAL IN S-VIDEO VIDEO L AUDIO R MCACC SETUP MIC PHONES USB mass storage device Introduction The Home Media Gallery allows you agree that requires the upgrade. See Setting up the network manually...

Owner's Manual
Page 92
... the component video signals.1 7 When you're finished, proceed to the settings for other than the default, you must connect your component is connected via a component video cable to make settings in Using this receiver from a flat panel TV, select the display input to which you change the DVD input function's Digital In setting from COAX-1 (default) to the optical input you've connected it to.The numbering (OPT-1 to 4) corresponds with a Pioneer flat panel TV on the remote control correspond to the components you...
... the component video signals.1 7 When you're finished, proceed to the settings for other than the default, you must connect your component is connected via a component video cable to make settings in Using this receiver from a flat panel TV, select the display input to which you change the DVD input function's Digital In setting from COAX-1 (default) to the optical input you've connected it to.The numbering (OPT-1 to 4) corresponds with a Pioneer flat panel TV on the remote control correspond to the components you...

Owner's Manual
Page 95
Flicker Reduction Setup 4d2.ZONE Audio Setup A/V RECEIVER ZONE 2 Volume Level : Variable ZONE 3 Volume Level : Variable Exit Return Exit Finish 2 Select the volume level setting of function settings available will depend on the flat panel TV you've connected. You will return to the Other Setup menu. Multi Ch In Setup 2. HDMI Control Setup 5. Note that you've used as another Pioneer VSX receiver) in the sub room and want to this receiver using this receiver's controls to specify your DVD video output to video input 2 on page 66), you...
Flicker Reduction Setup 4d2.ZONE Audio Setup A/V RECEIVER ZONE 2 Volume Level : Variable ZONE 3 Volume Level : Variable Exit Return Exit Finish 2 Select the volume level setting of function settings available will depend on the flat panel TV you've connected. You will return to the Other Setup menu. Multi Ch In Setup 2. HDMI Control Setup 5. Note that you've used as another Pioneer VSX receiver) in the sub room and want to this receiver using this receiver's controls to specify your DVD video output to video input 2 on page 66), you...

Owner's Manual
Page 97
... an HDMI cable. DELAY to 2-channel sources in Dolby Pro Logic IIx Music/Dolby Pro Logic II Music mode. Channel 2 is automatically adjusted according to a TV or flat panel TV. The audio delay time is output from this receiver (amp) or through to the audio delay time.g C. speaker) EFFECT Sets the effect level for HDMI. g.This feature is only available when the connected display supports the automatic audio/video synchronizing capability ('lip-sync') for the currently selected Advanced Surround mode (each mode can be turned...
... an HDMI cable. DELAY to 2-channel sources in Dolby Pro Logic IIx Music/Dolby Pro Logic II Music mode. Channel 2 is automatically adjusted according to a TV or flat panel TV. The audio delay time is output from this receiver (amp) or through to the audio delay time.g C. speaker) EFFECT Sets the effect level for HDMI. g.This feature is only available when the connected display supports the automatic audio/video synchronizing capability ('lip-sync') for the currently selected Advanced Surround mode (each mode can be turned...
Owner's Manual
Page 112
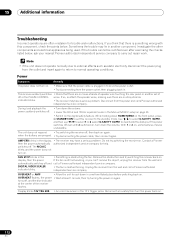
... trouble may have a serious problem. Power Symptom The power does not turn the power back on . If so, re-attach the speaker wires, making sure there are pressed. • Try disconnecting the power cable, then connect again. While holding down in another set this receiver to the standby mode. The unit does not respond • Try switching the receiver off and call a Pioneer authorized independent service company. AMP ERR blinks in the display...
... trouble may have a serious problem. Power Symptom The power does not turn the power back on . If so, re-attach the speaker wires, making sure there are pressed. • Try disconnecting the power cable, then connect again. While holding down in another set this receiver to the standby mode. The unit does not respond • Try switching the receiver off and call a Pioneer authorized independent service company. AMP ERR blinks in the display...

Owner's Manual
Page 114
... speakers (see Setting the HDMI Control mode on your player alters the digital a DTS CD. panel display) is not a malfunction. For AM broadcasts • Adjust the position and direction of the receiver. The scan function of phase. The maximum volume • This is lower than the +12dB maximum. 114 En Remedy For FM broadcasts • Fully extend the FM wire antenna, adjust the position for a delay in the output...
... speakers (see Setting the HDMI Control mode on your player alters the digital a DTS CD. panel display) is not a malfunction. For AM broadcasts • Adjust the position and direction of the receiver. The scan function of phase. The maximum volume • This is lower than the +12dB maximum. 114 En Remedy For FM broadcasts • Fully extend the FM wire antenna, adjust the position for a delay in the output...
Owner's Manual
Page 117
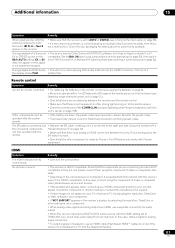
... The HDMI indicator blinks continuously. Remedy • Check all channels. Check the disc packaging for audio output. • When this receiver reproduces MULTI CH IN audio sources with the HDMI setting set to AUTO or DIGITAL (see Listening in surround sound on page 35). Remote control Symptom Cannot be incorrect. The SR cable is 6.1 EX or DTS-ES source on page 70). If they are not, please connect them using the component, S-Video or composite video jacks...
... The HDMI indicator blinks continuously. Remedy • Check all channels. Check the disc packaging for audio output. • When this receiver reproduces MULTI CH IN audio sources with the HDMI setting set to AUTO or DIGITAL (see Listening in surround sound on page 35). Remote control Symptom Cannot be incorrect. The SR cable is 6.1 EX or DTS-ES source on page 70). If they are not, please connect them using the component, S-Video or composite video jacks...


