

Owner's Manual
Page 4
... 17 Installing the plasma display 17 Moving the plasma display 17 Attaching the Pioneer stand 17 Installing the Pioneer speaker 19 Preventing the plasma display from that shown in the explanatory drawings. After you for buying this manual are for the PRO...-110FD unless otherwise specified. Illustrations shown in this Pioneer product. However the method of the remote control unit 31 06 Basic Operations 32 Turning on the power 32 Turning off the power 32 Watching TV...
... 17 Installing the plasma display 17 Moving the plasma display 17 Attaching the Pioneer stand 17 Installing the Pioneer speaker 19 Preventing the plasma display from that shown in the explanatory drawings. After you for buying this manual are for the PRO...-110FD unless otherwise specified. Illustrations shown in this Pioneer product. However the method of the remote control unit 31 06 Basic Operations 32 Turning on the power 32 Turning off the power 32 Watching TV...
Owner's Manual
Page 5
...Clock Setting 49 No Signal off (AV source only 65 10 TV Guide On Screen™ System Operation 50 Using the TV Guide On Screen™ system 50 Screen components 50 The Listings...Automatic image position and clock adjustments (PC source only) ........ 67 Manual image position and clock adjustments (PC source only 67 Reducing video noise 67 Selecting a game mode 68 Selecting...Orbiter 70 Video Pattern 70 11 Adjustments and Settings 59 AV Selection 59 Basic picture adjustments 60 Advanced picture adjustments 61 Using PureCinema 61 Using Intelligent Mode 61 Using the Picture Detail ...
...Clock Setting 49 No Signal off (AV source only 65 10 TV Guide On Screen™ System Operation 50 Using the TV Guide On Screen™ system 50 Screen components 50 The Listings...Automatic image position and clock adjustments (PC source only) ........ 67 Manual image position and clock adjustments (PC source only 67 Reducing video noise 67 Selecting a game mode 68 Selecting...Orbiter 70 Video Pattern 70 11 Adjustments and Settings 59 AV Selection 59 Basic picture adjustments 60 Advanced picture adjustments 61 Using PureCinema 61 Using Intelligent Mode 61 Using the Picture Detail ...

Owner's Manual
Page 7
...an equal or greater amount of time. • Under certain conditions, Parental Control functions of inappropriate materials, please consult each external device's manual to obtain maximum enjoyment from other component. • Images which have both very bright areas and very dark areas side by side should... be assured of or modifications made to its lifetime, the luminosity of the Pioneer PRO150FD/PRO-110FD plasma display will diminish very slowly, such as such, are not covered by using the still picture mode from a TV, VCR, DVD player or any still image, it is best to view ...
...an equal or greater amount of time. • Under certain conditions, Parental Control functions of inappropriate materials, please consult each external device's manual to obtain maximum enjoyment from other component. • Images which have both very bright areas and very dark areas side by side should... be assured of or modifications made to its lifetime, the luminosity of the Pioneer PRO150FD/PRO-110FD plasma display will diminish very slowly, such as such, are not covered by using the still picture mode from a TV, VCR, DVD player or any still image, it is best to view ...

Owner's Manual
Page 10
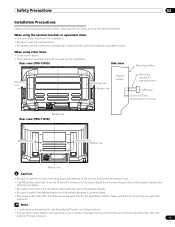
...a power source specified on them . Check the cords at least and use attachments not recommended by the manufacturer. 9. The plasma display used in this manual in the instructions must be routed properly to perform many useful functions, but it can break when the product is unstable,... to prevent potential danger, please observe the following precautions carefully before installing the speakers. 23. a. e. Never expose the screen of time. The plasma display weighs about 66.7 kg (147.0 lbs.) for the PRO-150FD (including the stand and speaker) and about 45.1 kg (99.4 lbs...
...a power source specified on them . Check the cords at least and use attachments not recommended by the manufacturer. 9. The plasma display used in this manual in the instructions must be routed properly to perform many useful functions, but it can break when the product is unstable,... to prevent potential danger, please observe the following precautions carefully before installing the speakers. 23. a. e. Never expose the screen of time. The plasma display weighs about 66.7 kg (147.0 lbs.) for the PRO-150FD (including the stand and speaker) and about 45.1 kg (99.4 lbs...
Owner's Manual
Page 11
... products. • Pioneer shall not be used only for the installation: Rear view (PRO-150FD) Side view Mounting surface Mounting hole 4 5 Mounting hole Median line Plasma display Mounting bracket (or equivalent item) M8 screw 12 mm to 18 mm (0.5 inches to 0.7 inches) Median line Rear ...• For details, see the instruction manual that results from the mounting surface of the plasma display. • Be sure to install the plasma display on a flat surface because it contains glass. • The screw holes other than the optional Pioneer products. 11 En When using the optional...
... products. • Pioneer shall not be used only for the installation: Rear view (PRO-150FD) Side view Mounting surface Mounting hole 4 5 Mounting hole Median line Plasma display Mounting bracket (or equivalent item) M8 screw 12 mm to 18 mm (0.5 inches to 0.7 inches) Median line Rear ...• For details, see the instruction manual that results from the mounting surface of the plasma display. • Be sure to install the plasma display on a flat surface because it contains glass. • The screw holes other than the optional Pioneer products. 11 En When using the optional...
Owner's Manual
Page 35
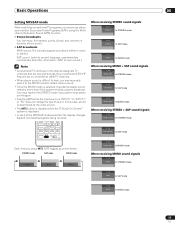
...being received. Basic Operations 06 Setting MTS/SAP mode When watching conventional TV programs, you may manually switch to the MONO mode to obtain clearer sound. • Once the MONO mode is selected, the plasma display sound remains mono even if the system receives a stereo broadcast.... In this manual designate TV channels that are received through the conventional VHF/UHF frequencies or conventional cable TV channels. • When stereo sound is difficult to ...
...being received. Basic Operations 06 Setting MTS/SAP mode When watching conventional TV programs, you may manually switch to the MONO mode to obtain clearer sound. • Once the MONO mode is selected, the plasma display sound remains mono even if the system receives a stereo broadcast.... In this manual designate TV channels that are received through the conventional VHF/UHF frequencies or conventional cable TV channels. • When stereo sound is difficult to ...
Owner's Manual
Page 38
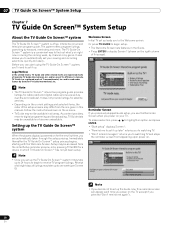
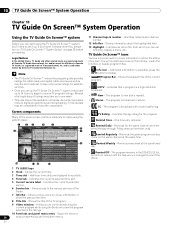
... Screen 1 (shown on . Follow the instructions shown on your viewing and recording selections quickly and easily. Setting up the TV Guide On Screen™ system When the plasma display is a convenient way to watching TV and stops the reminder screen from appearing upon power on the right column of this page). The... screen. Note • If you decide not to set up . Before you can start using the TV Guide On Screen™ system, you'll need to set it up the Guide now, this manual. It does not provide listings for cable-ready and digital cable services as well as over-the...
... Screen 1 (shown on . Follow the instructions shown on your viewing and recording selections quickly and easily. Setting up the TV Guide On Screen™ system When the plasma display is a convenient way to watching TV and stops the reminder screen from appearing upon power on the right column of this page). The... screen. Note • If you decide not to set up . Before you can start using the TV Guide On Screen™ system, you'll need to set it up the Guide now, this manual. It does not provide listings for cable-ready and digital cable services as well as over-the...
Owner's Manual
Page 41
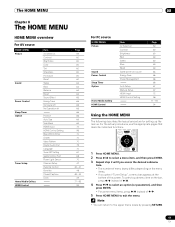
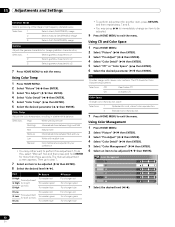
... Video Pattern Digital Audio Out Language Tuner NR Setting Game Control Pref Room Light Sensor Channel Setup Parental Control Favorites Closed Captions Clock Page 59 60 60 60 60 60 60 60 64 64 64 64 65 65 65 66 66 66 69 69 72 96 70 70 70 75 70 67 68 70 42 43 - 47... Control Item AV Selection Contrast Brightness Red Green Blue Reset Same as the AV source Energy Save Power Management Auto Setup Manual Setup HDMI Input HDMI Control Setting Page 59 60 60 60 60 60 60 64 65 66 66 67 67 72 96 77 - 93 94 Using the HOME MENU The following describes the typical procedure...
... Video Pattern Digital Audio Out Language Tuner NR Setting Game Control Pref Room Light Sensor Channel Setup Parental Control Favorites Closed Captions Clock Page 59 60 60 60 60 60 60 60 64 64 64 64 65 65 65 66 66 66 69 69 72 96 70 70 70 75 70 67 68 70 42 43 - 47... Control Item AV Selection Contrast Brightness Red Green Blue Reset Same as the AV source Energy Save Power Management Auto Setup Manual Setup HDMI Input HDMI Control Setting Page 59 60 60 60 60 60 60 64 65 66 66 67 67 72 96 77 - 93 94 Using the HOME MENU The following describes the typical procedure...
Owner's Manual
Page 42
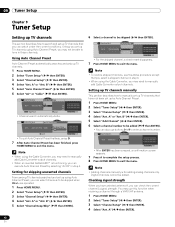
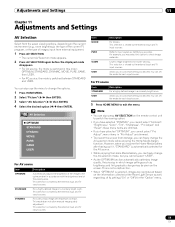
...for adding analog channels only. A" or "Ant. A Channel Keep/Skip Ant. Setting up TV channels manually This section describes how to be able to tune in those channels. Unless you set up TV channels. 1 Press HOME MENU. 2 Select "Tuner Setup" ( / then ENTER). 3 Select...exit the menu. B" ( / then ENTER). 5 Select "Add Channel" ( / then ENTER). 6 Select a channel number to manually set up TV channels that have selected antenna A, you can check the current channel's signal strength. A Add Channel 000 1 xxxxxxxxxxxxxxxxxxxxx xxxxxxxxxxxxxxxxxxxxx xxxxxxxxxxxxxxxxxxxxx Home Menu...
...for adding analog channels only. A" or "Ant. A Channel Keep/Skip Ant. Setting up TV channels manually This section describes how to be able to tune in those channels. Unless you set up TV channels. 1 Press HOME MENU. 2 Select "Tuner Setup" ( / then ENTER). 3 Select...exit the menu. B" ( / then ENTER). 5 Select "Add Channel" ( / then ENTER). 6 Select a channel number to manually set up TV channels that have selected antenna A, you can check the current channel's signal strength. A Add Channel 000 1 xxxxxxxxxxxxxxxxxxxxx xxxxxxxxxxxxxxxxxxxxx xxxxxxxxxxxxxxxxxxxxx Home Menu...
Owner's Manual
Page 43
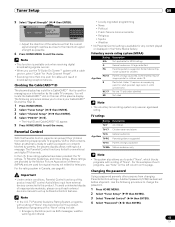
...consult each external device's manual to exit the menu. R Restricted. In the U.S. For the rating system in the Home Media Gallery. TV-Y7 Children seven and above TV-G Age-Base TV-PG General audiences Parental guidance suggested . To avoid unintended display of the plasma display. Note 3 Select ... examples of "None". Using a password prevents other persons from watching inappropriate TV programs, VCR or DVD contents. Use the following procedure allows you to check your information by parents, the plasma display shows nothing but a message. Examples of programs with a rating of...
...consult each external device's manual to exit the menu. R Restricted. In the U.S. For the rating system in the Home Media Gallery. TV-Y7 Children seven and above TV-G Age-Base TV-PG General audiences Parental guidance suggested . To avoid unintended display of the plasma display. Note 3 Select ... examples of "None". Using a password prevents other persons from watching inappropriate TV programs, VCR or DVD contents. Use the following procedure allows you to check your information by parents, the plasma display shows nothing but a message. Examples of programs with a rating of...
Owner's Manual
Page 49
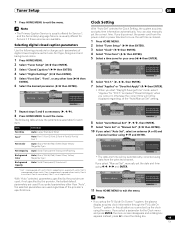
... cannot set time is usually offered for Clock Setting, the system acquires and sets time information automatically. Clock Auto/Manual Set Auto/Manual Set •Auto Set Clock Set Channel Ant. Clock Setting Note • The Primary Caption Service is usually ...then ENTER). 7 Select "Applies" or "Does Not Apply" ( / then ENTER). • When you setup the TV Guide On Screen™ system, the plasma display acquires clock information through the TV Guide On Screen™ system; Note • If you start "Daylight Savings Time" mode, select "Applies" for...
... cannot set time is usually offered for Clock Setting, the system acquires and sets time information automatically. Clock Auto/Manual Set Auto/Manual Set •Auto Set Clock Set Channel Ant. Clock Setting Note • The Primary Caption Service is usually ...then ENTER). 7 Select "Applies" or "Does Not Apply" ( / then ENTER). • When you setup the TV Guide On Screen™ system, the plasma display acquires clock information through the TV Guide On Screen™ system; Note • If you start "Daylight Savings Time" mode, select "Applies" for...
Owner's Manual
Page 50
... the SCHEDULE list, but will locate these icons on page 38 before proceeding. Note • The TV Guide On Screen™ interactive program guide provides listings for the same channel and time every Monday through Friday (manual reminder only). • Remind Regularly - Screen components Many of its affiliates. The program is broadcast...
... the SCHEDULE list, but will locate these icons on page 38 before proceeding. Note • The TV Guide On Screen™ interactive program guide provides listings for the same channel and time every Monday through Friday (manual reminder only). • Remind Regularly - Screen components Many of its affiliates. The program is broadcast...
Owner's Manual
Page 55
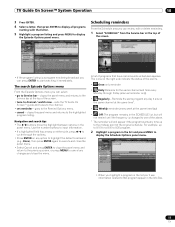
TV Guide On Screen™ System Operation 10 3 Press ENTER. 4 Select a letter, then press ENTER to display all...to the midway point of the screen. • tune to the Service bar at the top of the original schedule. exits the TV Guide On Screen™ guide and tunes to Service bar - Scheduling reminders From the Schedule area you highlight a program in the ... to input information. • If a highlighted field has arrows on either side, press / to cycle through Friday (manual reminder only) • Regularly - A list of programs that have remind events scheduled appears.
TV Guide On Screen™ System Operation 10 3 Press ENTER. 4 Select a letter, then press ENTER to display all...to the midway point of the screen. • tune to the Service bar at the top of the original schedule. exits the TV Guide On Screen™ guide and tunes to Service bar - Scheduling reminders From the Schedule area you highlight a program in the ... to input information. • If a highlighted field has arrows on either side, press / to cycle through Friday (manual reminder only) • Regularly - A list of programs that have remind events scheduled appears.
Owner's Manual
Page 56
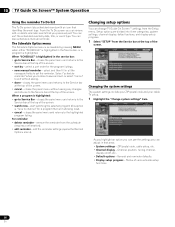
..."schedule reminder" when you previously set the reminder. closes the panel menu without saving. • done - Changing setup options You can change TV Guide On Screen™ settings from the schedule (requires confirmation). • edit reminder - General and reminder defaults • Display setup progress... and then fill in the Service bar, or a program is "tune to channel" for the program listings. • new manual reminder - start watching the selected program (this option is highlighted. Setup options are divided into three categories: system settings, channel ...
..."schedule reminder" when you previously set the reminder. closes the panel menu without saving. • done - Changing setup options You can change TV Guide On Screen™ settings from the schedule (requires confirmation). • edit reminder - General and reminder defaults • Display setup progress... and then fill in the Service bar, or a program is "tune to channel" for the program listings. • new manual reminder - start watching the selected program (this option is highlighted. Setup options are divided into three categories: system settings, channel ...
Owner's Manual
Page 59
... can set the mode for the "Option" menu. 59 En This selection is shared by the external input and TV input sources. This mode does not allow manual image quality adjustment. Reflects input signals as faithfully as desired. Allows you to customize settings as possible. For PC source... Gallery function. OPTIMUM, STANDARD, DYNAMIC, MOVIE, PURE, GAME, then USER. • For PC source, the mode is shared by the external input and TV input sources. For a highly defined image in "Pro Adjust" are dimmed. • To prevent the screen from external equipment. 1 Press AV SELECTION. &#...
... can set the mode for the "Option" menu. 59 En This selection is shared by the external input and TV input sources. This mode does not allow manual image quality adjustment. Reflects input signals as faithfully as desired. Allows you to customize settings as possible. For PC source... Gallery function. OPTIMUM, STANDARD, DYNAMIC, MOVIE, PURE, GAME, then USER. • For PC source, the mode is shared by the external input and TV input sources. For a highly defined image in "Pro Adjust" are dimmed. • To prevent the screen from external equipment. 1 Press AV SELECTION. &#...
Owner's Manual
Page 62
...Select "CTI" or "Color Space" ( / then ENTER). 6 Select the desired parameter ( / then ENTER). CTI Provides images with reddish tone Manual Color temperature adjusted to your preference • You may press / to immediately change an item to be adjusted. 9 Press HOME MENU to exit the...Detail" ( / then ENTER). 5 Select "Color Management" ( / then ENTER). 6 Select an item to perform fine adjustment. To do this, select "Manual" first and then press and hold ENTER for vivid, vibrant color reproduction 2 Standard color reproduction 7 Press HOME MENU to be adjusted ( / then ENTER)....
...Select "CTI" or "Color Space" ( / then ENTER). 6 Select the desired parameter ( / then ENTER). CTI Provides images with reddish tone Manual Color temperature adjusted to your preference • You may press / to immediately change an item to be adjusted. 9 Press HOME MENU to exit the...Detail" ( / then ENTER). 5 Select "Color Management" ( / then ENTER). 6 Select an item to perform fine adjustment. To do this, select "Manual" first and then press and hold ENTER for vivid, vibrant color reproduction 2 Standard color reproduction 7 Press HOME MENU to be adjusted ( / then ENTER)....
Owner's Manual
Page 67
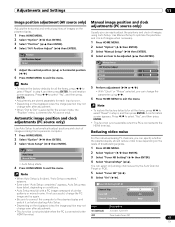
... using Auto Setup. Automatic image position and clock adjustments (PC source only) Use Auto Setup to automatically adjust positions and clock of images on the plasma display. 1 Press HOME MENU. 2 Select "Option" ( / then ENTER). 3 Select "Position" ( / then ENTER). 4 Select "H/V Position Adjust" ( / then ENTER). ...is selected for AV source only). Reducing video noise For the individual analog TV channels, you can easily adjust the positions and clock of similar Channel Map 7 patterns or monochrome. Option Auto Setup Manual Setup • Auto Setup starts. 4 Press HOME MENU to exit ...
... using Auto Setup. Automatic image position and clock adjustments (PC source only) Use Auto Setup to automatically adjust positions and clock of images on the plasma display. 1 Press HOME MENU. 2 Select "Option" ( / then ENTER). 3 Select "Position" ( / then ENTER). 4 Select "H/V Position Adjust" ( / then ENTER). ...is selected for AV source only). Reducing video noise For the individual analog TV channels, you can easily adjust the positions and clock of similar Channel Map 7 patterns or monochrome. Option Auto Setup Manual Setup • Auto Setup starts. 4 Press HOME MENU to exit ...
Owner's Manual
Page 68
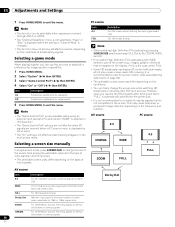
... quality 5 Press HOME MENU to the same number of screen pixels (selectable for the type of input signals. Selecting a screen size manually In single-screen mode, press SCREEN SIZE to exit the menu. PC source Item 4:3 FULL Description Fills the screen without altering the ...input signal aspect ratio Full 16:9 screen display Note • While watching High Definition TV broadcasting, pressing SCREEN SIZE switches among the selectable options for 1080i or 1080p signals only) ZOOM For 16:9 letterbox pictures. However, when...
... quality 5 Press HOME MENU to the same number of screen pixels (selectable for the type of input signals. Selecting a screen size manually In single-screen mode, press SCREEN SIZE to exit the menu. PC source Item 4:3 FULL Description Fills the screen without altering the ...input signal aspect ratio Full 16:9 screen display Note • While watching High Definition TV broadcasting, pressing SCREEN SIZE switches among the selectable options for 1080i or 1080p signals only) ZOOM For 16:9 letterbox pictures. However, when...
Owner's Manual
Page 69
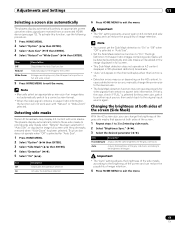
...Option" ( / then ENTER). 3 Select "Side Mask" ( / then ENTER). 4 Select "Detection" ( / ). 5 Select "On" ( / ). Adjustments and Settings 11 Selecting a screen size automatically The plasma display automatically selects an appropriate screen size when video signals are received from a connected HDMI device (see page 72). The...Always sets the same brightness for the screen size, switch to another input source, then switch back to "On". Note • Manually select an appropriate screen size if an image does not automatically switch to exit the menu. 69 En Note • You cannot set...
...Option" ( / then ENTER). 3 Select "Side Mask" ( / then ENTER). 4 Select "Detection" ( / ). 5 Select "On" ( / ). Adjustments and Settings 11 Selecting a screen size automatically The plasma display automatically selects an appropriate screen size when video signals are received from a connected HDMI device (see page 72). The...Always sets the same brightness for the screen size, switch to another input source, then switch back to "On". Note • Manually select an appropriate screen size if an image does not automatically switch to exit the menu. 69 En Note • You cannot set...
Owner's Manual
Page 70
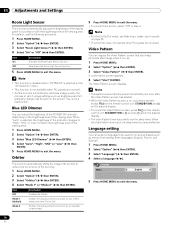
...). 4 Select "Mode 1" or "Mode 2" ( / then ENTER). Orbiter This function automatically shifts the image little by Dot mode, see Selecting a screen size manually on the brightness level of the viewing area. Video Pattern You can select a language to exit the menu. The Video Pattern screen displays. A confirmation screen... This function is disabled when "OPTIMUM" is on, no buttons operate except TVa on the remote control unit, STANDBY/ON and a on the plasma display. • To cancel the Video Pattern screen, press TVa on the remote control unit, STANDBY/ON or a (or slide a up)...
...). 4 Select "Mode 1" or "Mode 2" ( / then ENTER). Orbiter This function automatically shifts the image little by Dot mode, see Selecting a screen size manually on the brightness level of the viewing area. Video Pattern You can select a language to exit the menu. The Video Pattern screen displays. A confirmation screen... This function is disabled when "OPTIMUM" is on, no buttons operate except TVa on the remote control unit, STANDBY/ON and a on the plasma display. • To cancel the Video Pattern screen, press TVa on the remote control unit, STANDBY/ON or a (or slide a up)...


