
Owner's Manual
Page 3
... installation. Operation is subject to the following measures: - Product Name: Plasma Display System Model Number: PRO-150FD/PRO-110FD Product Category: Class B Personal Computers & Peripherals Responsible Party Name: PIONEER ELECTRONICS SERVICE, INC. These limits are used in accordance with the instructions...Class B digital device, pursuant to Part 15 of an accident. Wash hands after handling. Consult the dealer or an experienced radio/TV technician for connections. THE SERIAL NUMBER FOR THIS EQUIPMENT IS LOCATED IN THE REAR. Address: 1925 E. DOMINGUEZ ST., LONG BEACH...
... installation. Operation is subject to the following measures: - Product Name: Plasma Display System Model Number: PRO-150FD/PRO-110FD Product Category: Class B Personal Computers & Peripherals Responsible Party Name: PIONEER ELECTRONICS SERVICE, INC. These limits are used in accordance with the instructions...Class B digital device, pursuant to Part 15 of an accident. Wash hands after handling. Consult the dealer or an experienced radio/TV technician for connections. THE SERIAL NUMBER FOR THIS EQUIPMENT IS LOCATED IN THE REAR. Address: 1925 E. DOMINGUEZ ST., LONG BEACH...

Owner's Manual
Page 4
... Accessories 12 04 Part Names 14 Plasma display 14 Remote control unit 16 05 Preparation 17 Installing the plasma display 17 Moving the plasma display 17 Attaching the Pioneer stand 17 Installing the Pioneer speaker 19 Preventing the plasma display from that shown in the ...explanatory drawings. In some countries or regions, the shape of the power plug and power outlet may sometimes differ from falling over 26 Detaching the Pioneer stand 27 Cable connections for watching digital and/or conventional TV...
... Accessories 12 04 Part Names 14 Plasma display 14 Remote control unit 16 05 Preparation 17 Installing the plasma display 17 Moving the plasma display 17 Attaching the Pioneer stand 17 Installing the Pioneer speaker 19 Preventing the plasma display from that shown in the ...explanatory drawings. In some countries or regions, the shape of the power plug and power outlet may sometimes differ from falling over 26 Detaching the Pioneer stand 27 Cable connections for watching digital and/or conventional TV...
Owner's Manual
Page 5
... Power Control 65 parameters 49 Energy Save 65 Clock Setting 49 No Signal off (AV source only 65 10 TV Guide On Screen™ System Operation 50 Using the TV Guide On Screen™ system 50 Screen components 50 The Listings screen 51 Setting program reminders 51 Searching for ... Room Light Sensor 70 Blue LED Dimmer 70 Orbiter 70 Video Pattern 70 11 Adjustments and Settings 59 AV Selection 59 Basic picture adjustments 60 Advanced picture adjustments 61 Using PureCinema 61 Using Intelligent Mode 61 Using the Picture Detail 61 Using Color Temp 62 Using CTI and Color...
... Power Control 65 parameters 49 Energy Save 65 Clock Setting 49 No Signal off (AV source only 65 10 TV Guide On Screen™ System Operation 50 Using the TV Guide On Screen™ system 50 Screen components 50 The Listings screen 51 Setting program reminders 51 Searching for ... Room Light Sensor 70 Blue LED Dimmer 70 Orbiter 70 Video Pattern 70 11 Adjustments and Settings 59 AV Selection 59 Basic picture adjustments 60 Advanced picture adjustments 61 Using PureCinema 61 Using Intelligent Mode 61 Using the Picture Detail 61 Using Color Temp 62 Using CTI and Color...

Owner's Manual
Page 7
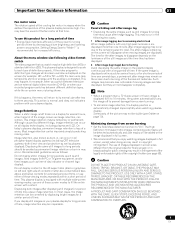
...cause injury. Important User Guidance Information 01 Chapter 1 Important User Guidance Information In order to obtain maximum enjoyment from this Pioneer PRO150FD/PRO-110FD plasma display, please first read and follow the usage guidelines below , you can be held responsible for many factors: inappropriate ...the still picture mode from a TV, VCR, DVD player or any still image, it is best to this product. With the Pioneer PRO-150FD/PRO-110FD, you can be affected by many years to come, please carefully read this Pioneer plasma display incorporates state-of time. ...
...cause injury. Important User Guidance Information 01 Chapter 1 Important User Guidance Information In order to obtain maximum enjoyment from this Pioneer PRO150FD/PRO-110FD plasma display, please first read and follow the usage guidelines below , you can be held responsible for many factors: inappropriate ...the still picture mode from a TV, VCR, DVD player or any still image, it is best to this product. With the Pioneer PRO-150FD/PRO-110FD, you can be affected by many years to come, please carefully read this Pioneer plasma display incorporates state-of time. ...
Owner's Manual
Page 9
...of the picture may be high definition (HD) or standard definition (SD). A PRODUCT AND CART COMBINATION SHOULD BE MOVED WITH THE CARE. This plasma display is displayed continuously for a period of time may hear the sound of a worry. This may be temporary or permanent. FOLLOW THE MANUFACTURER'S.... Displaying dark images after displaying still images for several days, a permanent after -image lagging. Note • When a program menu, TV Guide screen or frozen image is displayed for 5 to 10 minutes, the system automatically turns the image off to prevent damage from PC or...
...of the picture may be high definition (HD) or standard definition (SD). A PRODUCT AND CART COMBINATION SHOULD BE MOVED WITH THE CARE. This plasma display is displayed continuously for a period of time may hear the sound of a worry. This may be temporary or permanent. FOLLOW THE MANUFACTURER'S.... Displaying dark images after displaying still images for several days, a permanent after -image lagging. Note • When a program menu, TV Guide screen or frozen image is displayed for 5 to 10 minutes, the system automatically turns the image off to prevent damage from PC or...
Owner's Manual
Page 14
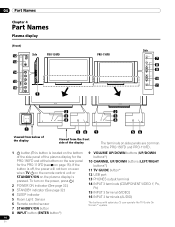
To turn on even when TV a on the remote control unit or STANDBY/ON on the plasma display is pressed. 04 Part Names Chapter 4 Part Names Plasma display (Front) 12 13 Side PRO-150FD 14 15 16 1 PRO-110FD Side 7 .... 1 a button (This button is located on the bottom of the side panel of the plasma display for the PRO-150FD and at the bottom on the rear panel for the PRO-110FD ... button*) 9 VOLUME UP/DOWN buttons (UP/DOWN buttons*) 10 CHANNEL UP/DOWN buttons (LEFT/RIGHT buttons*) 11 TV GUIDE button* 12 USB port 13 PHONES output terminal 14 INPUT 3 terminals (COMPONENT VIDEO: Y, PB, PR) 15...
To turn on even when TV a on the remote control unit or STANDBY/ON on the plasma display is pressed. 04 Part Names Chapter 4 Part Names Plasma display (Front) 12 13 Side PRO-150FD 14 15 16 1 PRO-110FD Side 7 .... 1 a button (This button is located on the bottom of the side panel of the plasma display for the PRO-150FD and at the bottom on the rear panel for the PRO-110FD ... button*) 9 VOLUME UP/DOWN buttons (UP/DOWN buttons*) 10 CHANNEL UP/DOWN buttons (LEFT/RIGHT buttons*) 11 TV GUIDE button* 12 USB port 13 PHONES output terminal 14 INPUT 3 terminals (COMPONENT VIDEO: Y, PB, PR) 15...
Owner's Manual
Page 16
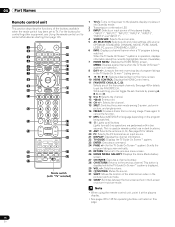
...channel (if available). 7 HOME MENU: Displays the HOME MENU screen. PC source: STANDARD, USER.) 6 INFO: Displays a channel banner when a TV program is displayed. 29 VOL +/-: Sets the volume. 30 M MUTING: Mutes the sound. 31 SHIFT: Moves the location of the small screen when.... 16 En Note • When using the remote control unit, point it into standby mode. 2 Transmission confirmation LED 3 INPUT: Selects an input source of the plasma display. ("INPUT 1", "INPUT 2", "INPUT 3", "INPUT 4", "INPUT 5", "INPUT 6" and "INPUT 7") 4 SCREEN SIZE: Selects the screen size. 5 AV SELECTION: ...
...channel (if available). 7 HOME MENU: Displays the HOME MENU screen. PC source: STANDARD, USER.) 6 INFO: Displays a channel banner when a TV program is displayed. 29 VOL +/-: Sets the volume. 30 M MUTING: Mutes the sound. 31 SHIFT: Moves the location of the small screen when.... 16 En Note • When using the remote control unit, point it into standby mode. 2 Transmission confirmation LED 3 INPUT: Selects an input source of the plasma display. ("INPUT 1", "INPUT 2", "INPUT 3", "INPUT 4", "INPUT 5", "INPUT 6" and "INPUT 7") 4 SCREEN SIZE: Selects the screen size. 5 AV SELECTION: ...
Owner's Manual
Page 29
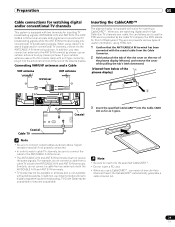
... cable from the Cable Converter. 2 Hold and push the tab of the slot cover on the rear of the plasma display. When you are watching digital and/or High Definition TV channels over cable, the card allows you to use an outdoor antenna to the ANT/CABLE A IN terminal. •... connect coaxial cables as shown; use the POD service provided by the cable TV company; Connecting VHF/UHF antennas and a Cable VHF antenna UHF antenna Inserting the CableCARD™ The plasma display is equipped with satellite systems. In addition, as content providers move to the ANT/CABLE A IN terminal as...
... cable from the Cable Converter. 2 Hold and push the tab of the slot cover on the rear of the plasma display. When you are watching digital and/or High Definition TV channels over cable, the card allows you to use an outdoor antenna to the ANT/CABLE A IN terminal. •... connect coaxial cables as shown; use the POD service provided by the cable TV company; Connecting VHF/UHF antennas and a Cable VHF antenna UHF antenna Inserting the CableCARD™ The plasma display is equipped with satellite systems. In addition, as content providers move to the ANT/CABLE A IN terminal as...
Owner's Manual
Page 32
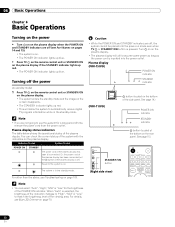
...14 and 15). • The system is on. • The POWER ON indicator lights up blue. • Press TV a on the remote control unit or STANDBY/ON on the plasma display if the STANDBY indicator lights up red. • The POWER ON indicator lights up red. • This will ... If you are not going to automatically receive digital TV program information while in the standby mode. Plasma display status indicators The table below shows the operational status of the plasma display is off. Turn a on on the plasma display. • The plasma display will allow the system to use this system for...
...14 and 15). • The system is on. • The POWER ON indicator lights up blue. • Press TV a on the remote control unit or STANDBY/ON on the plasma display if the STANDBY indicator lights up red. • The POWER ON indicator lights up red. • This will ... If you are not going to automatically receive digital TV program information while in the standby mode. Plasma display status indicators The table below shows the operational status of the plasma display is off. Turn a on on the plasma display. • The plasma display will allow the system to use this system for...
Owner's Manual
Page 33
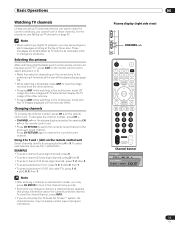
...Using 0 to 9 and • (dot) on the remote control unit Select channels directly by TV stations as CH +/- on the plasma display operates the same as necessary when in the multiscreen mode with two TV images displayed will not have any effect. For the procedure, see emergency alert messages scrolling at... the rear of the plasma display (page 29). • While watching a broadcast, press ANT to view the ...
...Using 0 to 9 and • (dot) on the remote control unit Select channels directly by TV stations as CH +/- on the plasma display operates the same as necessary when in the multiscreen mode with two TV images displayed will not have any effect. For the procedure, see emergency alert messages scrolling at... the rear of the plasma display (page 29). • While watching a broadcast, press ANT to view the ...
Owner's Manual
Page 34
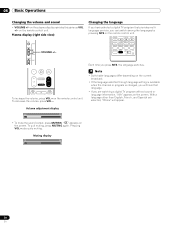
... Volume adjustment display • To mute the sound output, press MUTING. Muting display 34 En Plasma display (right side view) Changing the language If you have selected a digital TV program that language. • If you are selected, "Others" will hear that provides multilanguage... Basic Operations Changing the volume and sound • VOLUME +/- With a language other than English, French, and Spanish are watching a digital TV program without sound or language information, "N/A" appears on the remote control unit. " " appears on the remote control unit. on the remote...
... Volume adjustment display • To mute the sound output, press MUTING. Muting display 34 En Plasma display (right side view) Changing the language If you have selected a digital TV program that language. • If you are selected, "Others" will hear that provides multilanguage... Basic Operations Changing the volume and sound • VOLUME +/- With a language other than English, French, and Spanish are watching a digital TV program without sound or language information, "N/A" appears on the remote control unit. " " appears on the remote control unit. on the remote...
Owner's Manual
Page 35
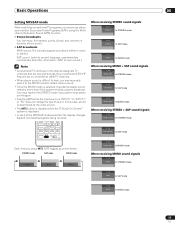
... you want to second language, supplementary commentary and other information. (SAP is mono sound.) Note • Conventional TV channels in mono or stereo). You must reselect the STEREO mode if you may enjoy stereo sound and/or Secondary ...sound is determined by the video source. • The MTS button is disabled while the TV Guide On Screen™ system is displayed. • In each of sound. Basic Operations 06 Setting MTS/SAP... again. • Selecting MTS while the input source is selected, the plasma display sound remains mono even if the system receives a stereo broadcast.
... you want to second language, supplementary commentary and other information. (SAP is mono sound.) Note • Conventional TV channels in mono or stereo). You must reselect the STEREO mode if you may enjoy stereo sound and/or Secondary ...sound is determined by the video source. • The MTS button is disabled while the TV Guide On Screen™ system is displayed. • In each of sound. Basic Operations 06 Setting MTS/SAP... again. • Selecting MTS while the input source is selected, the plasma display sound remains mono even if the system receives a stereo broadcast.

Owner's Manual
Page 36
...following banner to appear. This service presents various types of program information. B) 5 Program title 6 Program time schedule 7 Channel logo 8 TV rating name or icon Note • The above information is not displayed if not included in broadcast signals. • If you press ... the channel banner may not display certain types of useful information, using HTML text. 06 Basic Operations Viewing a channel banner While watching a TV program, pressing INFO causes the following procedure to select the 2-screen or picture-inpicture mode. 2-screen 56 78 1 Station name 2 Current ...
...following banner to appear. This service presents various types of program information. B) 5 Program title 6 Program time schedule 7 Channel logo 8 TV rating name or icon Note • The above information is not displayed if not included in broadcast signals. • If you press ... the channel banner may not display certain types of useful information, using HTML text. 06 Basic Operations Viewing a channel banner While watching a TV program, pressing INFO causes the following procedure to select the 2-screen or picture-inpicture mode. 2-screen 56 78 1 Station name 2 Current ...

Owner's Manual
Page 37
...the two screens shown. Moving image Still image 2 To select the desired input source, press the appropriate input source button. • If watching TV programs, press CH +/- Basic Operations 06 • In 2-screen or picture-in multi-screen mode for an extended period may cause an after -...the small screen in FREEZE mode for five minutes. • Displaying pictures in anti-clockwise. Note • The SPLIT button is disabled while the TV Guide On Screen™ system is displayed. • When the two screens show the same analog broadcasting coming through antenna A and B, the ...
...the two screens shown. Moving image Still image 2 To select the desired input source, press the appropriate input source button. • If watching TV programs, press CH +/- Basic Operations 06 • In 2-screen or picture-in multi-screen mode for an extended period may cause an after -...the small screen in FREEZE mode for five minutes. • Displaying pictures in anti-clockwise. Note • The SPLIT button is disabled while the TV Guide On Screen™ system is displayed. • When the two screens show the same analog broadcasting coming through antenna A and B, the ...
Owner's Manual
Page 38
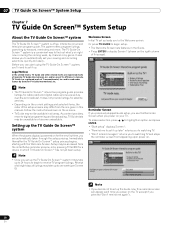
... On Screen™ setup process begins, starting with the Welcome Screen. Welcome Screen Initial TV set your TV. As content providers move to automatically set up the TV Guide On Screen™ system When the plasma display is used under license by keyword, reminders and more. It does not provide listings for satellite services...
... On Screen™ setup process begins, starting with the Welcome Screen. Welcome Screen Initial TV set your TV. As content providers move to automatically set up the TV Guide On Screen™ system When the plasma display is used under license by keyword, reminders and more. It does not provide listings for satellite services...
Owner's Manual
Page 39
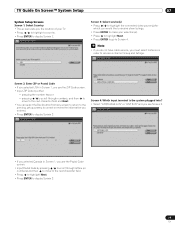
... Setup 07 System Setup Screens Screen 1: Select Country • This screen asks you would like to receive show listings. • Press ENTER to make your TV. • Press / to highlight a country. • Press ENTER to display Screen 2. Screen 4: Which input terminal is the system plugged into? • Select "ANT/CABLE A IN...
... Setup 07 System Setup Screens Screen 1: Select Country • This screen asks you would like to receive show listings. • Press ENTER to make your TV. • Press / to highlight a country. • Press ENTER to display Screen 2. Screen 4: Which input terminal is the system plugged into? • Select "ANT/CABLE A IN...
Owner's Manual
Page 40
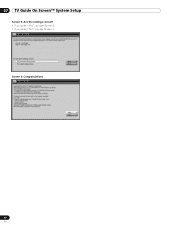
07 TV Guide On Screen™ System Setup Screen 5: Are the settings correct? • If you select "Yes", you see Screen 6. • If you select "No", you see Screen 1. Screen 6: Congratulations 40 En
07 TV Guide On Screen™ System Setup Screen 5: Are the settings correct? • If you select "Yes", you see Screen 6. • If you select "No", you see Screen 1. Screen 6: Congratulations 40 En
Owner's Manual
Page 42
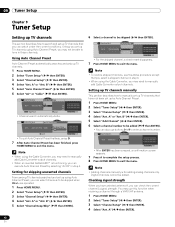
...you have not been set up by selecting "Ant.B" in step 4. A" or "Ant. Setting for skipping unwanted channels From among TV channels searched and set up using Auto Channel Preset, you may need to manually add Cable Converter output channels. • When an... skipped channel, a check mark disappears. 7 Press HOME MENU to be skipped when CH+/- Using Auto Channel Preset Auto Channel Preset automatically searches and sets up TV channels. 1 Press HOME MENU. 2 Select "Tuner Setup" ( / then ENTER). 3 Select "Channel Setup" ( / then ENTER). 4 Select "Ant. are operated. 1 Press HOME MENU...
...you have not been set up by selecting "Ant.B" in step 4. A" or "Ant. Setting for skipping unwanted channels From among TV channels searched and set up using Auto Channel Preset, you may need to manually add Cable Converter output channels. • When an... skipped channel, a check mark disappears. 7 Press HOME MENU to be skipped when CH+/- Using Auto Channel Preset Auto Channel Preset automatically searches and sets up TV channels. 1 Press HOME MENU. 2 Select "Tuner Setup" ( / then ENTER). 3 Select "Channel Setup" ( / then ENTER). 4 Select "Ant. are operated. 1 Press HOME MENU...
Owner's Manual
Page 43
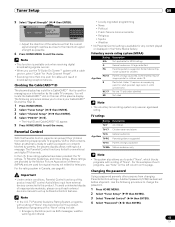
... 100 xxxxxxxxxxxxxxxxxxxxx xxxxxxxxxxxxxxxxxxxxx xxxxxxxxxxxxxxxxxxxxx Home Menu Exit • Adjust the direction of this product. Checking the CableCARD™ ID The plasma display has a slot for television. You will result in the Home Media Gallery. Voluntary movie rating system (MPAA) Rating.... In the U.S. Movie ratings are provided by parents, the plasma display shows nothing but a message. For the rating system in some jurisdictions). TV-Y7 Children seven and above TV-G Age-Base TV-PG General audiences Parental guidance suggested . Using a password prevents other...
... 100 xxxxxxxxxxxxxxxxxxxxx xxxxxxxxxxxxxxxxxxxxx xxxxxxxxxxxxxxxxxxxxx Home Menu Exit • Adjust the direction of this product. Checking the CableCARD™ ID The plasma display has a slot for television. You will result in the Home Media Gallery. Voluntary movie rating system (MPAA) Rating.... In the U.S. Movie ratings are provided by parents, the plasma display shows nothing but a message. For the rating system in some jurisdictions). TV-Y7 Children seven and above TV-G Age-Base TV-PG General audiences Parental guidance suggested . Using a password prevents other...
Owner's Manual
Page 44
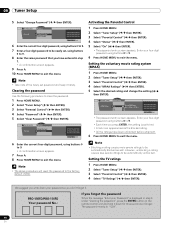
... your four-digit password using buttons 0 to 9. 8 Enter the same password that you don't forget it. Setting the TV ratings 1 Press HOME MENU. 2 Select "Tuner Setup" ( / then ENTER). 3 Select "Parental Control" ( / then ENTER). 4 Select "TV Ratings" ( / then ENTER). 09 Tuner Setup 5 Select "Change Password" ( / then ENTER). Note • Blocking a rating causes more...
... your four-digit password using buttons 0 to 9. 8 Enter the same password that you don't forget it. Setting the TV ratings 1 Press HOME MENU. 2 Select "Tuner Setup" ( / then ENTER). 3 Select "Parental Control" ( / then ENTER). 4 Select "TV Ratings" ( / then ENTER). 09 Tuner Setup 5 Select "Change Password" ( / then ENTER). Note • Blocking a rating causes more...


