

Owner's Manual
Page 4
... remote control unit 31 06 Basic Operations 32 Turning on the power 32 Turning off the power 32 Watching TV channels 33 Selecting the antenna 33 Changing channels 33 Changing the volume and sound .........34 Changing the language 34 Setting MTS/SAP mode 35 Viewing a channel banner 36 Using the POD service 36 4 En Using the multiscreen functions 36 Splitting the screen 36 Freezing images 37 07 TV Guide On Screen™ System Setup 38 About the TV Guide On Screen...
... remote control unit 31 06 Basic Operations 32 Turning on the power 32 Turning off the power 32 Watching TV channels 33 Selecting the antenna 33 Changing channels 33 Changing the volume and sound .........34 Changing the language 34 Setting MTS/SAP mode 35 Viewing a channel banner 36 Using the POD service 36 4 En Using the multiscreen functions 36 Splitting the screen 36 Freezing images 37 07 TV Guide On Screen™ System Setup 38 About the TV Guide On Screen...
Owner's Manual
Page 5
... list 56 Changing setup options 56 Changing the system settings 56 Changing the channel display settings 57 Changing the default options 58 Displaying setup progress 58 No Operation off (AV source only) ....... 66 Power Management (PC source only 66 Sleep Timer 66 Image position adjustment (AV source only 67 Automatic image position and clock adjustments (PC source only) ........ 67 Manual image position and clock adjustments (PC source only 67 Reducing video noise 67 Selecting a game mode 68 Selecting a screen size manually 68 Selecting a screen size...
... list 56 Changing setup options 56 Changing the system settings 56 Changing the channel display settings 57 Changing the default options 58 Displaying setup progress 58 No Operation off (AV source only) ....... 66 Power Management (PC source only 66 Sleep Timer 66 Image position adjustment (AV source only 67 Automatic image position and clock adjustments (PC source only) ........ 67 Manual image position and clock adjustments (PC source only 67 Reducing video noise 67 Selecting a game mode 68 Selecting a screen size manually 68 Selecting a screen size...

Owner's Manual
Page 7
... measures to mount or install the plasma display, in order to prevent the unit from this Pioneer PRO150FD/PRO-110FD plasma display, please first read and follow the usage guidelines below , you can be held responsible for over three times longer than two hours at a time. • After playing a game, or displaying a PC image or any other than the Pioneer stand or installation bracket may NOT control Audio/Video input from other...
... measures to mount or install the plasma display, in order to prevent the unit from this Pioneer PRO150FD/PRO-110FD plasma display, please first read and follow the usage guidelines below , you can be held responsible for over three times longer than two hours at a time. • After playing a game, or displaying a PC image or any other than the Pioneer stand or installation bracket may NOT control Audio/Video input from other...
Owner's Manual
Page 9
... phosphor-based display systems (including CRT television systems-both direct view and projection-as well as time of time over several days, a permanent after -images to disappear depends on -screen menu is normal, and does not indicate a problem with multiple wide-screen viewing modes; Setting Energy Save to three seconds. Displaying dark images after -image lagging. The after -image lagging may occur in the following video format switch The video program that time. The...
... phosphor-based display systems (including CRT television systems-both direct view and projection-as well as time of time over several days, a permanent after -images to disappear depends on -screen menu is normal, and does not indicate a problem with multiple wide-screen viewing modes; Setting Energy Save to three seconds. Displaying dark images after -image lagging. The after -image lagging may occur in the following video format switch The video program that time. The...

Owner's Manual
Page 10
... power cord from heat sources such as the original parts. Do not expose the plasma display to service the product yourself. The optical characteristics of objects and liquids-Never insert an object into the product. Do not use attachments not recommended by the manufacturer. 9. Use of power supply used in accidents. 7. Servicing-Do not attempt to direct sunlight for ventilation. Repair-If any of unauthorized parts...
... power cord from heat sources such as the original parts. Do not expose the plasma display to service the product yourself. The optical characteristics of objects and liquids-Never insert an object into the product. Do not use attachments not recommended by the manufacturer. 9. Use of power supply used in accidents. 7. Servicing-Do not attempt to direct sunlight for ventilation. Repair-If any of unauthorized parts...
Owner's Manual
Page 16
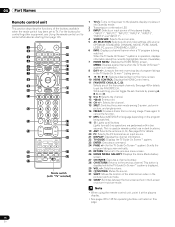
... menu screen. 10 HDMI CONTROL: Displays the HDMI Control menu. 11 FAVORITE CH (A, B, C, D): Selects any of the plasma display. ("INPUT 1", "INPUT 2", "INPUT 3", "INPUT 4", "INPUT 5", "INPUT 6" and "INPUT 7") 4 SCREEN SIZE: Selects the screen size. 5 AV SELECTION: Selects audio and video settings. (AV source: OPTIMUM, STANDARD, DYNAMIC, MOVIE, PURE, GAME, USER. When the TV Guide On Screen™ system is used for operating buttons not listed on the power to 108 for remote control use in dark locations. 19 ANT: Selects the antenna (A, B). Note • When using the remote control...
... menu screen. 10 HDMI CONTROL: Displays the HDMI Control menu. 11 FAVORITE CH (A, B, C, D): Selects any of the plasma display. ("INPUT 1", "INPUT 2", "INPUT 3", "INPUT 4", "INPUT 5", "INPUT 6" and "INPUT 7") 4 SCREEN SIZE: Selects the screen size. 5 AV SELECTION: Selects audio and video settings. (AV source: OPTIMUM, STANDARD, DYNAMIC, MOVIE, PURE, GAME, USER. When the TV Guide On Screen™ system is used for operating buttons not listed on the power to 108 for remote control use in dark locations. 19 ANT: Selects the antenna (A, B). Note • When using the remote control...

Owner's Manual
Page 19
... for attaching the stand are subjected to strong external impacts. • Placing a CRT computer screen or CRT monitor near to the speaker may come off and remove the power cord from the power outlet beforehand when changing the connection or installation method. • When using a tone control function to greatly emphasize treble sounds, do not use the screw holes with the plasma display lying flat on to the mounting fittings. This can...
... for attaching the stand are subjected to strong external impacts. • Placing a CRT computer screen or CRT monitor near to the speaker may come off and remove the power cord from the power outlet beforehand when changing the connection or installation method. • When using a tone control function to greatly emphasize treble sounds, do not use the screw holes with the plasma display lying flat on to the mounting fittings. This can...

Owner's Manual
Page 25
... Black Red Gray Red Black Red Connect the cables correctly with respect to the polarity of the cable. • When you release the lever, it clamps onto the speaker cable.· Caution Lever • Be sure to turn the connected devices off and remove the power cord from the wall outlet beforehand when changing the connection or installation method. • If you may be applied to the plasma display...
... Black Red Gray Red Black Red Connect the cables correctly with respect to the polarity of the cable. • When you release the lever, it clamps onto the speaker cable.· Caution Lever • Be sure to turn the connected devices off and remove the power cord from the wall outlet beforehand when changing the connection or installation method. • If you may be applied to the plasma display...

Owner's Manual
Page 28
... not to scratch or damage it. • If the speaker has been installed, it is recommended to detach the speaker before attaching the stand. 28 En Plasma display Installation bolts (2): M8 x 40 mm (black) for PRO-110FD M6 x 20 mm (black) for PRO-150FD (PRO-110FD) 3 Replace the plasma display to install the plasma display in a flat, stable location. • Insert the screws into any part of the stand indicates downward.
... not to scratch or damage it. • If the speaker has been installed, it is recommended to detach the speaker before attaching the stand. 28 En Plasma display Installation bolts (2): M8 x 40 mm (black) for PRO-110FD M6 x 20 mm (black) for PRO-150FD (PRO-110FD) 3 Replace the plasma display to install the plasma display in a flat, stable location. • Insert the screws into any part of the stand indicates downward.
Owner's Manual
Page 43
... plasma display shows nothing but a message. For the examples of inappropriate materials, please consult each external device's manual to exit the menu. TV Parental Guideline Rating System, programs with a cable service, select "Cable" for "Auto Channel Preset". • Executing more than one 17 and under 13. TV ratings Rating Description TV-Y All children Parental Control With the Parental Control, parents can prevent their children from changing Parental Control settings...
... plasma display shows nothing but a message. For the examples of inappropriate materials, please consult each external device's manual to exit the menu. TV Parental Guideline Rating System, programs with a cable service, select "Cable" for "Auto Channel Preset". • Executing more than one 17 and under 13. TV ratings Rating Description TV-Y All children Parental Control With the Parental Control, parents can prevent their children from changing Parental Control settings...
Owner's Manual
Page 44
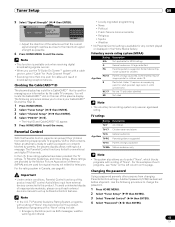
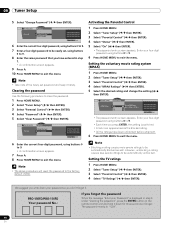
... Control 1 Press HOME MENU. 2 Select "Tuner Setup" ( / then ENTER). 3 Select "Parental Control" ( / then ENTER). 4 Select "Status" ( / then ENTER). 5 Select "On" ( / then ENTER). • The password entry screen appears. Enter your four-digit password using buttons 0 to 9. 6 Press HOME MENU to be automatically blocked as well. We suggest you don't forget it handy. Clearing the password Use the following procedure to the factory default (1234). Enter your password...
... Control 1 Press HOME MENU. 2 Select "Tuner Setup" ( / then ENTER). 3 Select "Parental Control" ( / then ENTER). 4 Select "Status" ( / then ENTER). 5 Select "On" ( / then ENTER). • The password entry screen appears. Enter your four-digit password using buttons 0 to 9. 6 Press HOME MENU to be automatically blocked as well. We suggest you don't forget it handy. Clearing the password Use the following procedure to the factory default (1234). Enter your password...
Owner's Manual
Page 50
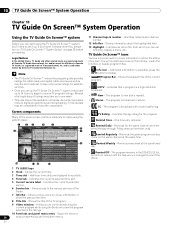
... provide listings for satellite services. • Once you 'll need to set it up. The program is changed to display. • Progress Bar - Space for the same channel and time every Monday through Friday (manual reminder only). • Remind Regularly - 10 TV Guide On Screen™ System Operation Chapter 10 TV Guide On Screen™ System Operation Using the TV Guide On Screen™ system Before you can set reminder, display a menu, etc...
... provide listings for satellite services. • Once you 'll need to set it up. The program is changed to display. • Progress Bar - Space for the same channel and time every Monday through Friday (manual reminder only). • Remind Regularly - 10 TV Guide On Screen™ System Operation Chapter 10 TV Guide On Screen™ System Operation Using the TV Guide On Screen™ system Before you can set reminder, display a menu, etc...
Owner's Manual
Page 56
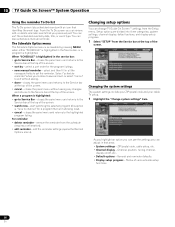
... a program is "tune to Service Bar - Channel position, tuning channel, display on/off, etc. • Default options - 10 TV Guide On Screen™ System Operation Using the reminder To Do list The To Do screen lists scheduled events with an icon that you previously set the reminder. Changing the system settings The system settings include your ZIP/postal code and your cable TV setup. 1 Highlight the "Change system settings" item. ZIP/postal code, cable setup, etc...
... a program is "tune to Service Bar - Channel position, tuning channel, display on/off, etc. • Default options - 10 TV Guide On Screen™ System Operation Using the reminder To Do list The To Do screen lists scheduled events with an icon that you previously set the reminder. Changing the system settings The system settings include your ZIP/postal code and your cable TV setup. 1 Highlight the "Change system settings" item. ZIP/postal code, cable setup, etc...
Owner's Manual
Page 72
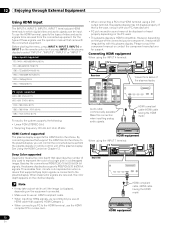
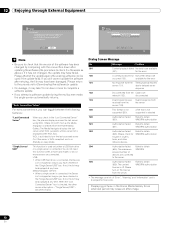
.... Audio cable (commercially available) Make this plasma display. See Using the HDMI Control on the plasma display to use an HDMI cable that is the case, consult with the connected equipment. Please consult the component manual or contact the component manufacturer for support. 12 Enjoying through External Equipment Using HDMI Input The INPUT 4, INPUT 5, INPUT 6, INPUT 7 terminals are received, the color depth appears on the channel display. To use the HDMI compliant PC or video card. If that supports HDMI Category 2. • When connecting...
.... Audio cable (commercially available) Make this plasma display. See Using the HDMI Control on the plasma display to use an HDMI cable that is the case, consult with the connected equipment. Please consult the component manual or contact the component manufacturer for support. 12 Enjoying through External Equipment Using HDMI Input The INPUT 4, INPUT 5, INPUT 6, INPUT 7 terminals are received, the color depth appears on the channel display. To use the HDMI compliant PC or video card. If that supports HDMI Category 2. • When connecting...
Owner's Manual
Page 77
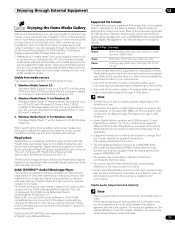
... files stored on the content. of consumer electronics, computing industry and mobile device companies. Windows Media Connect runs on the menu screen turn white. The PlaysForSure logo, Windows Media and the Windows logo are some Home Media Gallery function(s) and content format(s) may not be featured in the USA and other devices may not work together. Digital Audio Output terminal (Optical) Note • When using your...
... files stored on the content. of consumer electronics, computing industry and mobile device companies. Windows Media Connect runs on the menu screen turn white. The PlaysForSure logo, Windows Media and the Windows logo are some Home Media Gallery function(s) and content format(s) may not be featured in the USA and other devices may not work together. Digital Audio Output terminal (Optical) Note • When using your...
Owner's Manual
Page 92
... details are connected. 12 Enjoying through External Equipment Setup Software Update To check whether the software needs to be displayed at any time. If it has not changed by comparing with the one written down after updating the software (the procedure to check it may have checked in Standby or sleep mode. Please return to complete a software update. • If you can be used only when a USB flash drive...
... details are connected. 12 Enjoying through External Equipment Setup Software Update To check whether the software needs to be displayed at any time. If it has not changed by comparing with the one written down after updating the software (the procedure to check it may have checked in Standby or sleep mode. Please return to complete a software update. • If you can be used only when a USB flash drive...
Owner's Manual
Page 95
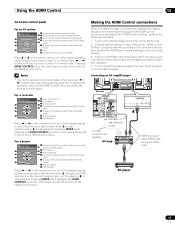
... audio and video images are properly output and displayed. 4 Try turning off to return to stop playback. For a recorder HDMI Control 1 2 3 4 HDMI CONTROL Exit 1 Skips commercials 5 2 Fast reverse 3 Stops playback 6 4 Closes the screen to return to the HDMI Control 7 menu 5 Displays the model number of the plasma display to select fast reverse or fast forward mode, to skip commercials or to the HDMI Control menu. Connecting an AV amp/BD player 4 4 5 5 Rear view 4 5 Optical digital cable (commercially available) AV cable...
... audio and video images are properly output and displayed. 4 Try turning off to return to stop playback. For a recorder HDMI Control 1 2 3 4 HDMI CONTROL Exit 1 Skips commercials 5 2 Fast reverse 3 Stops playback 6 4 Closes the screen to return to the HDMI Control 7 menu 5 Displays the model number of the plasma display to select fast reverse or fast forward mode, to skip commercials or to the HDMI Control menu. Connecting an AV amp/BD player 4 4 5 5 Rear view 4 5 Optical digital cable (commercially available) AV cable...
Owner's Manual
Page 109
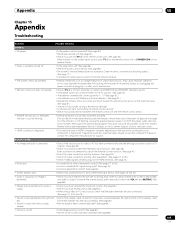
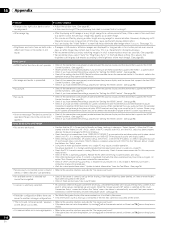
... the cable connection with the other than VOL +/- PICTURE/SOUND • No image and audio is off . • Is the Mode switch set ? (See page 66.) • Check the power control setting. (See page 65.) • The system's internal temperature has increased. only audio is output. • Check if you have selected the minimum volume. (See page 34.) • Check if you using a video or PC input source, check...
... the cable connection with the other than VOL +/- PICTURE/SOUND • No image and audio is off . • Is the Mode switch set ? (See page 66.) • Check the power control setting. (See page 65.) • The system's internal temperature has increased. only audio is output. • Check if you have selected the minimum volume. (See page 34.) • Check if you using a video or PC input source, check...
Owner's Manual
Page 110
... the settings properly for "Setting the HDMI Control". (See page 96.) • No picture. • Check if the connections are properly made between the plasma display and the device that is selected on the "Auto Connection Setup" screen that follows the "Setup" menu. • Using two or more servers are found". • If the above does not solve the problem, try turning a off on the remote control unit then turn TV...
... the settings properly for "Setting the HDMI Control". (See page 96.) • No picture. • Check if the connections are properly made between the plasma display and the device that is selected on the "Auto Connection Setup" screen that follows the "Setup" menu. • Using two or more servers are found". • If the above does not solve the problem, try turning a off on the remote control unit then turn TV...
Owner's Manual
Page 112
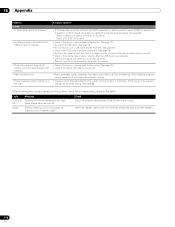
... Humming / Glass Panel buzzing are normal operation of the plasma display is minimized. SD05 Internal protection circuit turns power off . In addition, try the TV-Guide setup again by performing the following error codes appear on the screen, check the corresponding items in the viewing mode. • Refer to the instruction manual for the digital still camera. • Check if the device is connectable to the display. (See...
... Humming / Glass Panel buzzing are normal operation of the plasma display is minimized. SD05 Internal protection circuit turns power off . In addition, try the TV-Guide setup again by performing the following error codes appear on the screen, check the corresponding items in the viewing mode. • Refer to the instruction manual for the digital still camera. • Check if the device is connectable to the display. (See...


