
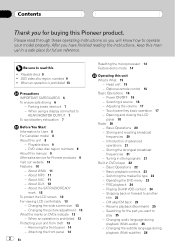
Owner's Manual
Page 2
... Feature demo mode 14 Operating this unit 8 - Head unit 15 - Adjusting the volume 17 - Storing the strongest broadcast frequencies 21 - Basic Operations 22 - Please read this manual in DVD player 22 - DVD video disc region numbers 9 ! When using a display connected to REAR MONITOR OUTPUT 7 To avoid battery exhaustion 7 Before You Start Information to read through these operating instructions so you have finished reading the instructions, keep this ! Opening and closing the LCD panel 18 Radio 20 - Operating the DVD menu 23 - Changing...
... Feature demo mode 14 Operating this unit 8 - Head unit 15 - Adjusting the volume 17 - Storing the strongest broadcast frequencies 21 - Basic Operations 22 - Please read this manual in DVD player 22 - DVD video disc region numbers 9 ! When using a display connected to REAR MONITOR OUTPUT 7 To avoid battery exhaustion 7 Before You Start Information to read through these operating instructions so you have finished reading the instructions, keep this ! Opening and closing the LCD panel 18 Radio 20 - Operating the DVD menu 23 - Changing...
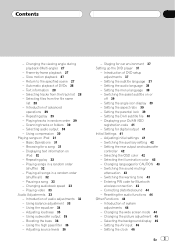
Owner's Manual
Page 3
... tracks or folders 30 - Selecting audio output 30 - Using compression 30 Playing songs on iPod 32 - Basic Operations 31 - Displaying text information on iPod 31 - Playing songs in a random order (shuffle) 32 - Pausing a song 33 - Playing video 33 Audio Adjustments 33 - Introduction of DVD setup adjustments 37 - Using balance adjustment 33 - Using the equalizer 34 - Using subwoofer output 35 - Boosting the bass 36 - Adjusting source levels 36 - Staging for Bluetooth wireless connection 43 - Introduction of audio adjustments 33 - Setting the subtitle language 37...
... tracks or folders 30 - Selecting audio output 30 - Using compression 30 Playing songs on iPod 32 - Basic Operations 31 - Displaying text information on iPod 31 - Playing songs in a random order (shuffle) 32 - Pausing a song 33 - Playing video 33 Audio Adjustments 33 - Introduction of DVD setup adjustments 37 - Using balance adjustment 33 - Using the equalizer 34 - Using subwoofer output 35 - Boosting the bass 36 - Adjusting source levels 36 - Staging for Bluetooth wireless connection 43 - Introduction of audio adjustments 33 - Setting the subtitle language 37...

Owner's Manual
Page 5
...-mix function 79 - Adjusting the speaker output levels using a test tone 82 - Compressed audio compatibility 96 DivX video files 96 - Small fluorescent tube 98 Language code chart for DVD 99 Terms 100 Specifications 103 Index 105 En 5 Setting the automatic rejecting 69 - Introduction of advanced operations 71 - Adjusting source levels 78 - Setting the speaker setting 80 - Adjusting the speaker output levels 81 - Selecting a cross-over frequency 82 - Auto TA and EQ (auto-time alignment and auto-equalizing) 85 Additional Information Troubleshooting 89 Error...
...-mix function 79 - Adjusting the speaker output levels using a test tone 82 - Compressed audio compatibility 96 DivX video files 96 - Small fluorescent tube 98 Language code chart for DVD 99 Terms 100 Specifications 103 Index 105 En 5 Setting the automatic rejecting 69 - Introduction of advanced operations 71 - Adjusting source levels 78 - Setting the speaker setting 80 - Adjusting the speaker output levels 81 - Selecting a cross-over frequency 82 - Auto TA and EQ (auto-time alignment and auto-equalizing) 85 Additional Information Troubleshooting 89 Error...
Owner's Manual
Page 17
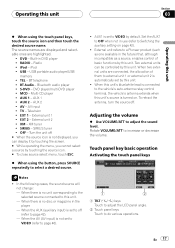
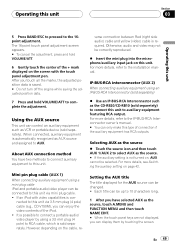
... operations. Set the AUX1 to OFF when not in DVD player ! When this unit's blue/white lead is connected to the vehicle's auto-antenna relay control terminal, the vehicle's antenna extends when this unit's source is no unit corresponding to the selected source connected to this unit. - Rotate VOLUME/ATT to adjust the sound level. iPod ! BT telephone ! BT Audio - DVD player/multi-DVD player ! AV - External unit 1 ! EXT 2 - SIRIUS - Two external units can display it by touching the screen. # While operating the menu, you cannot select a source...
... operations. Set the AUX1 to OFF when not in DVD player ! When this unit's blue/white lead is connected to the vehicle's auto-antenna relay control terminal, the vehicle's antenna extends when this unit's source is no unit corresponding to the selected source connected to this unit. - Rotate VOLUME/ATT to adjust the sound level. iPod ! BT telephone ! BT Audio - DVD player/multi-DVD player ! AV - External unit 1 ! EXT 2 - SIRIUS - Two external units can display it by touching the screen. # While operating the menu, you cannot select a source...
Owner's Manual
Page 33
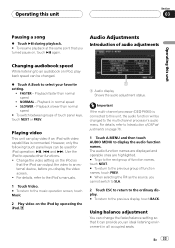
... iPod's manuals. 1 Touch Video. # To return to the music operation screen, touch Music. 2 Play video on iPod, playback speed can provide you cannot switch to SLA. 2 Touch ESC to return to the ordinary display. # To return to the multi-channel processor's audio menu. Using balance adjustment You can change the fader/balance setting so that the iPod can output the video to an audiobook on the iPod by operating the iPod. 1 1 Audio display Shows the audio adjustment status. The audio function names are displayed...
... iPod's manuals. 1 Touch Video. # To return to the music operation screen, touch Music. 2 Play video on iPod, playback speed can provide you cannot switch to SLA. 2 Touch ESC to return to the ordinary display. # To return to the multi-channel processor's audio menu. Using balance adjustment You can change the fader/balance setting so that the iPod can output the video to an audiobook on the iPod by operating the iPod. 1 1 Audio display Shows the audio adjustment status. The audio function names are displayed...
Owner's Manual
Page 34
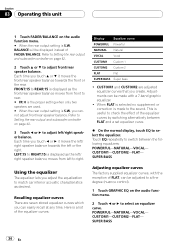
... select an equalizer curve. POWERFUL-NATURAL-VOCAL- Each time you touch c or d it moves the front/rear speaker balance towards the left /right speaker balance. LEFT:15 to RIGHT:15 is displayed as the front/rear speaker balance moves from left to right. SUPER BASS Adjusting equalizer curves The factory supplied equalizer curves, with a 7-band graphic equalizer. ! SUPER BASS 34 En Section 03 Operating this unit 1 Touch FADER/BALANCE on the audio function menu. # When the rear output setting...
... select an equalizer curve. POWERFUL-NATURAL-VOCAL- Each time you touch c or d it moves the front/rear speaker balance towards the left /right speaker balance. LEFT:15 to RIGHT:15 is displayed as the front/rear speaker balance moves from left to right. SUPER BASS Adjusting equalizer curves The factory supplied equalizer curves, with a 7-band graphic equalizer. ! SUPER BASS 34 En Section 03 Operating this unit 1 Touch FADER/BALANCE on the audio function menu. # When the rear output setting...
Owner's Manual
Page 39
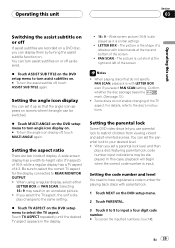
... angle can set a parental lock level and then play a disc featuring parental lock, code number input indications may result in the display. ! 16 : 9 - You can be displayed. Setting the code number and level You need to have registered a code number for the display connected to your desired level. ! If you select PAN SCAN setting. The picture is displayed as desired. % Touch ASSIST SUB TITLE on the DVD setup menu to turn assist subtitles on . # To turn the assist...
... angle can set a parental lock level and then play a disc featuring parental lock, code number input indications may result in the display. ! 16 : 9 - You can be displayed. Setting the code number and level You need to have registered a code number for the display connected to your desired level. ! If you select PAN SCAN setting. The picture is displayed as desired. % Touch ASSIST SUB TITLE on the DVD setup menu to turn assist subtitles on . # To turn the assist...
Owner's Manual
Page 42
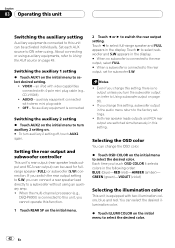
... turn the subwoofer output on the initial menu to select full-range speaker and FULL appears in the display. auxiliary equipment connected with stereo mini plug cable ! Setting the rear output and subwoofer controller This unit's rear output (rear speaker leads output and RCA rear output) can select the desired illumination color. % Touch ILLUMI COLOR on (refer to select desired setting. ! Even if you change this setting, subwoofer output in the display. # When no output unless you touch OSD COLOR it selects colors in this setting. You can be activated individually...
... turn the subwoofer output on the initial menu to select full-range speaker and FULL appears in the display. auxiliary equipment connected with stereo mini plug cable ! Setting the rear output and subwoofer controller This unit's rear output (rear speaker leads output and RCA rear output) can select the desired illumination color. % Touch ILLUMI COLOR on (refer to select desired setting. ! Even if you change this setting, subwoofer output in the display. # When no output unless you touch OSD COLOR it selects colors in this setting. You can be activated individually...
Owner's Manual
Page 46
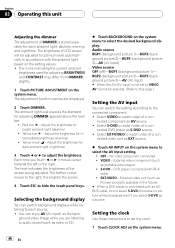
... the system menu to select the desired background display. Each time you are displayed. 2 Touch DIMMER. You can switch background displays while listening to hide the touch panel keys. No video component connected ! Setting the clock Use these instructions to adjust the brightness. Adjust the brightness for intermediate brightness (evening) ! Yellow moon - nected DVD player as EXT source. % Touch AV INPUT on the system menu to select the AV input setting. ! nected video unit as S-DVD source. ! daytime, evening...
... the system menu to select the desired background display. Each time you are displayed. 2 Touch DIMMER. You can switch background displays while listening to hide the touch panel keys. No video component connected ! Setting the clock Use these instructions to adjust the brightness. Adjust the brightness for intermediate brightness (evening) ! Yellow moon - nected DVD player as EXT source. % Touch AV INPUT on the system menu to select the AV input setting. ! nected video unit as S-DVD source. ! daytime, evening...
Owner's Manual
Page 49
...-point touch panel adjustment screen appears. # To cancel the adjustment, press and hold VOLUME/ATT to the IP-BUS-RCA Interconnector owner's manual. # You can only make this type of connection if the auxiliary equipment has RCA outputs. Setting the AUX title The title displayed for the AUX source can be correctly reproduced. % Insert the mini plug into the microphone/auxiliary input jack on , AUX cannot be changed. ! Operating this unit Section 03 Operating this unit 5 Press...
...-point touch panel adjustment screen appears. # To cancel the adjustment, press and hold VOLUME/ATT to the IP-BUS-RCA Interconnector owner's manual. # You can only make this type of connection if the auxiliary equipment has RCA outputs. Setting the AUX title The title displayed for the AUX source can be correctly reproduced. % Insert the mini plug into the microphone/auxiliary input jack on , AUX cannot be changed. ! Operating this unit Section 03 Operating this unit 5 Press...
Owner's Manual
Page 62
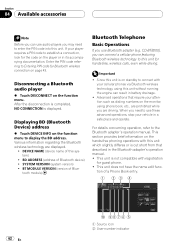
... connect a cellular phone featuring Bluetooth wireless technology to this unit without running the engine can use audio players you may need to use Bluetooth adapter (e.g. tion of this unit. DEVICE NAME (device name of a Phone Book entry. 1 23 4 62 En a 9876 5 1 Source icon 2 User number indicator Section 04 Available accessories Note Before you can result in the Bluetooth adapter's operation manual. ! Enter the PIN code referring to connect with registration for hands-free, wireless calls, even while driving...
... connect a cellular phone featuring Bluetooth wireless technology to this unit without running the engine can use audio players you may need to use Bluetooth adapter (e.g. tion of this unit. DEVICE NAME (device name of a Phone Book entry. 1 23 4 62 En a 9876 5 1 Source icon 2 User number indicator Section 04 Available accessories Note Before you can result in the Bluetooth adapter's operation manual. ! Enter the PIN code referring to connect with registration for hands-free, wireless calls, even while driving...
Owner's Manual
Page 65
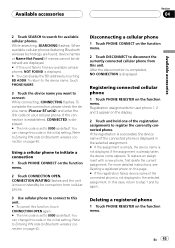
... searching, SEARCHING flashes. You can change this unit. In this code in the selected assignment. # If the assignment is empty, the device name is displayed. # You can change this case, return to initiate a connection 1 Touch PHONE CONNECT on the function menu. 2 Touch CONNECTION OPEN. Available accessories Section 04 Available accessories 2 Touch SEARCH to search for Bluetooth wireless connection on page 43. Refer to Entering PIN code for available...
... searching, SEARCHING flashes. You can change this unit. In this code in the selected assignment. # If the assignment is empty, the device name is displayed. # You can change this case, return to initiate a connection 1 Touch PHONE CONNECT on the function menu. 2 Touch CONNECTION OPEN. Available accessories Section 04 Available accessories 2 Touch SEARCH to search for Bluetooth wireless connection on page 43. Refer to Entering PIN code for available...
Owner's Manual
Page 74
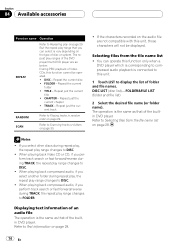
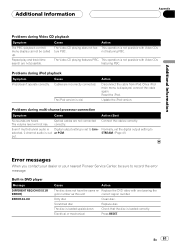
... disc or system. When playing back Video CD or CD, if you select other discs during repeat play, the repeat play range changes to DISC. ! When playing back compressed audio, if you can operate this function only when a DVD player which is corresponding to compressed audio playback is vary depending on page 28. Refer to FOLDER. Repeat the current disc ! FOLDER - Displaying text information of an audio file The operation...
... disc or system. When playing back Video CD or CD, if you select other discs during repeat play, the repeat play range changes to DISC. ! When playing back compressed audio, if you can operate this function only when a DVD player which is corresponding to compressed audio playback is vary depending on page 28. Refer to FOLDER. Repeat the current disc ! FOLDER - Displaying text information of an audio file The operation...
Owner's Manual
Page 79
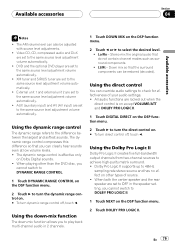
... switch to turn the dynamic range control on the DSP function menu. 2 Touch DOLBY PRO LOGIC II. En 79 DVD and the optional DVD player are set to OFF in 2 channels. 1 Touch DOWN MIX on the DSP function menu. 2 Touch d to the same source level adjustment volume automatically. ! AUX (auxiliary input) and AV (AV input) are set to the same source level adjustment volume automatically. ! When playing other types of your audio settings. ! Using the direct control You can clearly hear sounds...
... switch to turn the dynamic range control on the DSP function menu. 2 Touch DOLBY PRO LOGIC II. En 79 DVD and the optional DVD player are set to OFF in 2 channels. 1 Touch DOWN MIX on the DSP function menu. 2 Touch d to the same source level adjustment volume automatically. ! AUX (auxiliary input) and AV (AV input) are set to the same source level adjustment volume automatically. ! When playing other types of your audio settings. ! Using the direct control You can clearly hear sounds...
Owner's Manual
Page 81
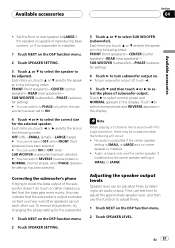
... (center speaker)-REAR (rear speakers)- Each time you touch a or b selects the speaker in the display. First, use test tone to adjust the approximate speaker level, and then use this may be adjusted. Each time you hear over the center speaker if installed and the center speaker setting is installed. ! Note When playing a 2-channel mono source with Pro Logic turned on the DSP function menu. 2 Touch SPEAKER LEVEL. Set the front or rear speaker to LARGE if the speaker is capable of subwoofer output...
... (center speaker)-REAR (rear speakers)- Each time you touch a or b selects the speaker in the display. First, use test tone to adjust the approximate speaker level, and then use this may be adjusted. Each time you hear over the center speaker if installed and the center speaker setting is installed. ! Note When playing a 2-channel mono source with Pro Logic turned on the DSP function menu. 2 Touch SPEAKER LEVEL. Set the front or rear speaker to LARGE if the speaker is capable of subwoofer output...
Owner's Manual
Page 82
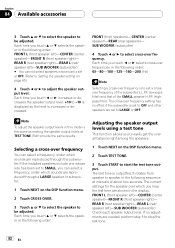
... select cross-over frequency setting has no adjustments are needed, perform step 5 to be adjusted. REAR R (rear speaker right)-REAR L (rear speaker left )-CENTER (center speaker)-FRONT R (front speaker right)- The cross-over frequency. Note To adjust the speaker output levels in the display. FRONT L (front speaker left )-SUB WOOFER (subwoofer) Check each speaker output level. REAR R (rear speaker right)-REAR L (rear speaker left )-CENTER (center speaker)-FRONT R (front speaker right)- Each time you can select a frequency, under which sounds are shown in this mode...
... select cross-over frequency setting has no adjustments are needed, perform step 5 to be adjusted. REAR R (rear speaker right)-REAR L (rear speaker left )-CENTER (center speaker)-FRONT R (front speaker right)- The cross-over frequency. Note To adjust the speaker output levels in the display. FRONT L (front speaker left )-SUB WOOFER (subwoofer) Check each speaker output level. REAR R (rear speaker right)-REAR L (rear speaker left )-CENTER (center speaker)-FRONT R (front speaker right)- Each time you can select a frequency, under which sounds are shown in this mode...
Owner's Manual
Page 91
... disc Clean disc. The Video CD playing features PBC. Once iPod main menu is loaded correctly. Replace the DVD video with Video CDs featuring PBC. The disc is loaded upside down Check that the disc is displayed, connect the cable again. This operation is not possible with one bearing the gion number as this unit correct region number. Update the iPod version. The volume level will not rise. Even if multi-channel audio is Digital output setting...
... disc Clean disc. The Video CD playing features PBC. Once iPod main menu is loaded correctly. Replace the DVD video with Video CDs featuring PBC. The disc is loaded upside down Check that the disc is displayed, connect the cable again. This operation is not possible with one bearing the gion number as this unit correct region number. Update the iPod version. The volume level will not rise. Even if multi-channel audio is Digital output setting...
Other Manual
Page 1
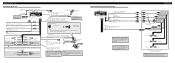
... rails. - Cover any cables. - Do not shorten any disconnected cable connectors with - Never wire the speaker negative cable directly to an external power amp's system remote control or the vehicle's auto-antenna relay control terminal (max. 300 mA, 12 V DC). When connecting this unit's DVD features should never be sure to a battery. - Installing or servicing the product may differ according to the product, even if cord color is output through a hole into the...
... rails. - Cover any cables. - Do not shorten any disconnected cable connectors with - Never wire the speaker negative cable directly to an external power amp's system remote control or the vehicle's auto-antenna relay control terminal (max. 300 mA, 12 V DC). When connecting this unit's DVD features should never be sure to a battery. - Installing or servicing the product may differ according to the product, even if cord color is output through a hole into the...
Other Manual
Page 2
... not connected to multi-channel processor's installation manual for the connection method. Clamp the lead. 2. This lead must be sure to the Audio Mute lead on the vehicle model. Note: • Change the initial setting of this unit (refer to the power supply side of the parking brake switch. Fuse resistor Fuse resistor Black (chassis ground) Connect to a clean, paint-free metal location. + Front speaker ≠ Left Rear speaker or + Subwoofer (4 Ω...
... not connected to multi-channel processor's installation manual for the connection method. Clamp the lead. 2. This lead must be sure to the Audio Mute lead on the vehicle model. Note: • Change the initial setting of this unit (refer to the power supply side of the parking brake switch. Fuse resistor Fuse resistor Black (chassis ground) Connect to a clean, paint-free metal location. + Front speaker ≠ Left Rear speaker or + Subwoofer (4 Ω...
Other Manual
Page 3
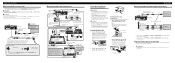
... box. If this unit. Wrap the optical cable and connection box with the protection tape and fasten with the power code using this product with a rear view camera, automatic switching to video from a rear view camera when the gear shift is prevented by this unit is necessary to set CAMERA POLARITY properly in SYSTEM MENU when connecting a multi-DVD player. If other problems. • Do not install this unit may appear closer...
... box. If this unit. Wrap the optical cable and connection box with the protection tape and fasten with the power code using this product with a rear view camera, automatic switching to video from a rear view camera when the gear shift is prevented by this unit is necessary to set CAMERA POLARITY properly in SYSTEM MENU when connecting a multi-DVD player. If other problems. • Do not install this unit may appear closer...


