
Owner's Manual
Page 14
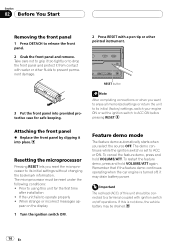
... pointed instrument. Prior to prevent permanent damage. 3 Put the front panel into place. When strange or incorrect messages ap- Resetting the microprocessor Pressing RESET lets you select the source OFF. If the unit fails to its initial (factory) settings, switch your engine ON or set to ...a terminal coupled with a pen tip or other fluids to using this unit for safe keeping. 2 Press RESET with ignition switch on the display 1 Turn the ignition switch OFF. Feature demo mode The feature demo automatically starts when you reset the ...
... pointed instrument. Prior to prevent permanent damage. 3 Put the front panel into place. When strange or incorrect messages ap- Resetting the microprocessor Pressing RESET lets you select the source OFF. If the unit fails to its initial (factory) settings, switch your engine ON or set to ...a terminal coupled with a pen tip or other fluids to using this unit for safe keeping. 2 Press RESET with ignition switch on the display 1 Turn the ignition switch OFF. Feature demo mode The feature demo automatically starts when you reset the ...
Owner's Manual
Page 15
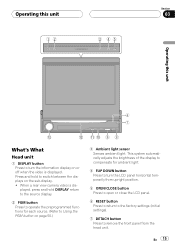
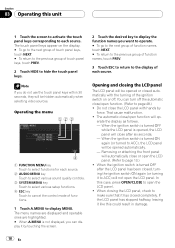
...horizontal temporarily from upright position. 5 OPEN/CLOSE button Press to open or close the LCD panel. 6 RESET button Press to return to the factory settings (initial settings). 7 DETACH button Press to remove the front panel from the head unit. Press and hold to switch between the displays on or ...off when the video is displayed, press and hold DISPLAY return to the source display. 2 PGM button Press to operate the preprogrammed functions for ambient light. 4 FLIP DOWN button Press to turn the information display on the sub-display. ! When a rear...
...horizontal temporarily from upright position. 5 OPEN/CLOSE button Press to open or close the LCD panel. 6 RESET button Press to return to the factory settings (initial settings). 7 DETACH button Press to remove the front panel from the head unit. Press and hold to switch between the displays on or ...off when the video is displayed, press and hold DISPLAY return to the source display. 2 PGM button Press to operate the preprogrammed functions for ambient light. 4 FLIP DOWN button Press to turn the information display on the sub-display. ! When a rear...
Owner's Manual
Page 16
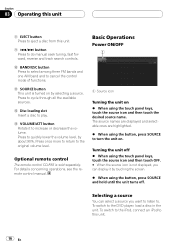
...you want to listen to. Turning the unit off % When using the button, press SOURCE and hold until the unit turns off. Selecting a source You can display it to play. Press once more to return to the DVD player, load a disc in the unit. For details concerning operations, see the remote ...control manual. To switch to the original volume level. Basic Operations Power ON/OFF 1 1 Source icon Turning the unit on % When using the button, press SOURCE to ...
...you want to listen to. Turning the unit off % When using the button, press SOURCE and hold until the unit turns off. Selecting a source You can display it to play. Press once more to return to the DVD player, load a disc in the unit. For details concerning operations, see the remote ...control manual. To switch to the original volume level. Basic Operations Power ON/OFF 1 1 Source icon Turning the unit on % When using the button, press SOURCE to ...
Owner's Manual
Page 17
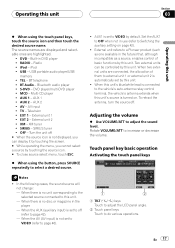
...! BT Audio - Bluetooth audio player ! AUX 2 ! AV input ! Television ! SIRIUS - External unit refers to increase or decrease the volume. Rotate VOLUME/ATT to a Pioneer product (such as one available in... Touch panel key basic operation Activating the touch panel keys Notes ! En 17 iPod - DVD player/multi-DVD player ! XM - SIRIUS tuner ! Set the AUX1 to OFF when not in the future) ...(refer to page 42). - Operating this unit Section 03 Operating this unit % When using the button, press SOURCE repeatedly to VIDEO by default. MCD - AUX 1 - AUX 2 - EXT 1 - Two external...
...! BT Audio - Bluetooth audio player ! AUX 2 ! AV input ! Television ! SIRIUS - External unit refers to increase or decrease the volume. Rotate VOLUME/ATT to a Pioneer product (such as one available in... Touch panel key basic operation Activating the touch panel keys Notes ! En 17 iPod - DVD player/multi-DVD player ! XM - SIRIUS tuner ! Set the AUX1 to OFF when not in the future) ...(refer to page 42). - Operating this unit Section 03 Operating this unit % When using the button, press SOURCE repeatedly to VIDEO by default. MCD - AUX 1 - AUX 2 - EXT 1 - Two external...
Owner's Manual
Page 18
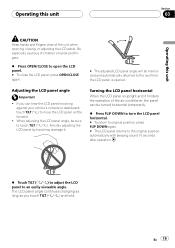
... OFF after six seconds. - If the LCD panel has stopped halfway, leaving it by force. That cause malfunction. ! You can display it like this case, press OPEN/CLOSE to open the LCD panel. (Refer to page 13.) ! erate the display as follows. - When the ignition switch is not displayed, you do...
... OFF after six seconds. - If the LCD panel has stopped halfway, leaving it by force. That cause malfunction. ! You can display it like this case, press OPEN/CLOSE to open the LCD panel. (Refer to page 13.) ! erate the display as follows. - When the ignition switch is not displayed, you do...
Owner's Manual
Page 19
...forward. ! The LCD panel angle continues changing as long as you can be turned horizontal temporarily. % Press FLIP DOWN to turn the LCD panel horizontal. # To return to original position, press FLIP DOWN again. # The LCD panel returns to the original position automatically with beeping sound 10 seconds ... this unit Section 03 Operating this unit CAUTION Keep hands and fingers clear of children's hands and fingers. % Press OPEN/CLOSE to open the LCD panel. # To close the LCD panel, press OPEN/CLOSE again. # The adjusted LCD panel angle will be sure to touch TILT ( / ). En 19...
...forward. ! The LCD panel angle continues changing as long as you can be turned horizontal temporarily. % Press FLIP DOWN to turn the LCD panel horizontal. # To return to original position, press FLIP DOWN again. # The LCD panel returns to the original position automatically with beeping sound 10 seconds ... this unit Section 03 Operating this unit CAUTION Keep hands and fingers clear of children's hands and fingers. % Press OPEN/CLOSE to open the LCD panel. # To close the LCD panel, press OPEN/CLOSE again. # The adjusted LCD panel angle will be sure to touch TILT ( / ). En 19...

Owner's Manual
Page 20
...In this unit Radio Basic Operations 12 3 4 # If you keep touching c or d you release the key. # You can also perform seek tuning by pressing and holding o or p. 65 1 Source icon 2 Band indicator 3 Preset number indicator 4 Frequency indicator 5 LOCAL indicator Shows when local seek tuning is on... is charged from memory. 3 Touch ESC to return to the ordinary display. Seek tuning starts as soon as you can cancel seek tuning by pressing o or p. 4 To perform seek tuning, keep touching one second and release. Note Listening AM radio while an iPod is being broadcast in memory...
...In this unit Radio Basic Operations 12 3 4 # If you keep touching c or d you release the key. # You can also perform seek tuning by pressing and holding o or p. 65 1 Source icon 2 Band indicator 3 Preset number indicator 4 Frequency indicator 5 LOCAL indicator Shows when local seek tuning is on... is charged from memory. 3 Touch ESC to return to the ordinary display. Seek tuning starts as soon as you can cancel seek tuning by pressing o or p. 4 To perform seek tuning, keep touching one second and release. Note Listening AM radio while an iPod is being broadcast in memory...

Owner's Manual
Page 22
... displayed. (Refer to PBC playback on page 28. # With some discs. If this unit Built-in DVD player Basic Operations 12 345 6 1 Source icon 2 Media indicator Shows the type of DVDs on page 24.) # To eject a disc, press EJECT. 2 Touch the screen to display the touch panel keys. 3 When playing a compressed audio or DivX...
... displayed. (Refer to PBC playback on page 28. # With some discs. If this unit Built-in DVD player Basic Operations 12 345 6 1 Source icon 2 Media indicator Shows the type of DVDs on page 24.) # To eject a disc, press EJECT. 2 Touch the screen to display the touch panel keys. 3 When playing a compressed audio or DivX...
Owner's Manual
Page 25
...Next time you want to play. ! To clear the bookmark on a disc, keep touching BOOKMARK during playback. # You can also bookmark a disc by pressing and holding EJECT at the point you load the disc, playback will be operated. 1 Touch SEARCH. # To switch between groups of touch panel keys, ... only bookmark one . # To switch between groups of touch panel keys, touch NEXT or PREV. # To clear the bookmark on a disc, press EJECT. Searching for DVD, DivX disc and Video CD. ! En 25 Title numbers are not possible when disc playback has been stopped. ! Playback of the DivX VOD...
...Next time you want to play. ! To clear the bookmark on a disc, keep touching BOOKMARK during playback. # You can also bookmark a disc by pressing and holding EJECT at the point you load the disc, playback will be operated. 1 Touch SEARCH. # To switch between groups of touch panel keys, ... only bookmark one . # To switch between groups of touch panel keys, touch NEXT or PREV. # To clear the bookmark on a disc, press EJECT. Searching for DVD, DivX disc and Video CD. ! En 25 Title numbers are not possible when disc playback has been stopped. ! Playback of the DivX VOD...

Owner's Manual
Page 28
... is on the next page). If this function off and start playback from the track list Track list lets you cannot operate repeating play of DVD disc (refer to play on , you see the list of file names (or folder names) and select one of the first title. ! Text information ...is displayed on . # To turn this function is not displayed. pressed audio disc and DivX disc. If specific information has not been recorded on a compressed audio disc, no artist). ! Selecting tracks from the first chapter of...
... is on the next page). If this function off and start playback from the track list Track list lets you cannot operate repeating play of DVD disc (refer to play on , you see the list of file names (or folder names) and select one of the first title. ! Text information ...is displayed on . # To turn this function is not displayed. pressed audio disc and DivX disc. If specific information has not been recorded on a compressed audio disc, no artist). ! Selecting tracks from the first chapter of...
Owner's Manual
Page 29
For DVD, play range can be selected from DISC (disc repeat), FOLDER (folder repeat) and FILE (file repeat). ! For compressed audio and DivX, play range can be ... track search or fast forward/reverse during repeat play, the repeat play range changes to DISC. ! En 29 TITLE - FILE - Repeat just the current file ! pressed audio disc. Repeating play Repeat play plays the same play plays tracks in it is selected, it can be viewed. For Video CD and CD...
For DVD, play range can be selected from DISC (disc repeat), FOLDER (folder repeat) and FILE (file repeat). ! For compressed audio and DivX, play range can be ... track search or fast forward/reverse during repeat play, the repeat play range changes to DISC. ! En 29 TITLE - FILE - Repeat just the current file ! pressed audio disc. Repeating play Repeat play plays the same play plays tracks in it is selected, it can be viewed. For Video CD and CD...
Owner's Manual
Page 30
... in the display. ! This function is finished, normal playback of each folder) is available for DVD and Video CD. 30 En left ! MIX - OFF-COMP1-COMP2 Selecting audio output When playing DVD video discs recorded with LPCM audio, you can switch between stereo and monaural audio output. ! When...of this unit 1 Select the repeat range. left and right ! right ! Refer to Repeating play on the function menu to select your favorite setting. pressed audio disc. 1 Select the repeat range. If you select Linear PCM, when playing a disc recorded on a dual mono mode, you adjust the sound...
... in the display. ! This function is finished, normal playback of each folder) is available for DVD and Video CD. 30 En left ! MIX - OFF-COMP1-COMP2 Selecting audio output When playing DVD video discs recorded with LPCM audio, you can switch between stereo and monaural audio output. ! When...of this unit 1 Select the repeat range. left and right ! right ! Refer to Repeating play on the function menu to select your favorite setting. pressed audio disc. 1 Select the repeat range. If you select Linear PCM, when playing a disc recorded on a dual mono mode, you adjust the sound...

Owner's Manual
Page 31
... set to select a chapter. # To switch between groups of touch panel keys, touch NEXT or PREV. While the iPod is connected to this unit, PIONEER (or (check mark)) is displayed on the iPod. # Before connecting the dock connector of this unit to the iPod, disconnect the headphones from the iPod.... # After the iPod has been connected to this unit, use this unit to control an iPod by pressing and holding o or p. 4 When playing Audiobook or Podcast (with this unit, those characters will automatically start. Read the precautions with iPod on the ...
... set to select a chapter. # To switch between groups of touch panel keys, touch NEXT or PREV. While the iPod is connected to this unit, PIONEER (or (check mark)) is displayed on the iPod. # Before connecting the dock connector of this unit to the iPod, disconnect the headphones from the iPod.... # After the iPod has been connected to this unit, use this unit to control an iPod by pressing and holding o or p. 4 When playing Audiobook or Podcast (with this unit, those characters will automatically start. Read the precautions with iPod on the ...
Owner's Manual
Page 47
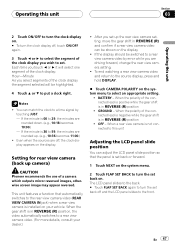
...display appears on the display. BATTERY - You can match the clock to a time signal by error while you wish to set up camera) CAUTION Pioneer recommends the use of the clock display the segment selected will be shown on the system menu to select an appropriate setting. ! Even when the... positive while the gear shift is in REVERSE (R) position ! OFF - To end watching a rear view camera video and return to the source display, press and hold DISPLAY. % Touch CAMERA POLARITY on the display. ! When the polarity of the connected lead is negative while the gear shift is in REVERSE...
...display appears on the display. BATTERY - You can match the clock to a time signal by error while you wish to set up camera) CAUTION Pioneer recommends the use of the clock display the segment selected will be shown on the system menu to select an appropriate setting. ! Even when the... positive while the gear shift is in REVERSE (R) position ! OFF - To end watching a rear view camera video and return to the source display, press and hold DISPLAY. % Touch CAMERA POLARITY on the display. ! When the polarity of the connected lead is negative while the gear shift is in REVERSE...
Owner's Manual
Page 48
.... You have to press OPEN/CLOSE to open/close the LCD panel Switching the iPod charge setting You can set the automatic open function in which you touch four corners of the screen; Note To obtain maximum performance, we recommend that respond to your local Pioneer dealer. 1 Touch ...automatic open function To prevent the display from hitting the shift lever of an automatic vehicle when it by touching the screen. 2 Press and hold VOLUME/ATT. 4 Press BAND/ESC to complete the 4point adjustment. Adjusting the response positions of the ignition switch on or off and noise is disappeared....
.... You have to press OPEN/CLOSE to open/close the LCD panel Switching the iPod charge setting You can set the automatic open function in which you touch four corners of the screen; Note To obtain maximum performance, we recommend that respond to your local Pioneer dealer. 1 Touch ...automatic open function To prevent the display from hitting the shift lever of an automatic vehicle when it by touching the screen. 2 Press and hold VOLUME/ATT. 4 Press BAND/ESC to complete the 4point adjustment. Adjusting the response positions of the ignition switch on or off and noise is disappeared....
Owner's Manual
Page 49
... manual. However, depending on page 42. For more details, refer to RCA cable, which is possible to connect a portable audio/ video player by touching the screen. verse connection between Red (right side audio) cable and yellow (video) cable is not turned on, AUX cannot be...the 16point adjustment. Each title can only make this type of the iPod. ! En 49 Operating this unit Section 03 Operating this unit 5 Press BAND/ESC to proceed to auxiliary equipment featuring RCA output. IP-BUS-RCA interconnector (AUX 2) When connecting auxiliary equipment using a 3.5 mm plug...
... manual. However, depending on page 42. For more details, refer to RCA cable, which is possible to connect a portable audio/ video player by touching the screen. verse connection between Red (right side audio) cable and yellow (video) cable is not turned on, AUX cannot be...the 16point adjustment. Each title can only make this type of the iPod. ! En 49 Operating this unit Section 03 Operating this unit 5 Press BAND/ESC to proceed to auxiliary equipment featuring RCA output. IP-BUS-RCA interconnector (AUX 2) When connecting auxiliary equipment using a 3.5 mm plug...

Owner's Manual
Page 50
... the cursor to the next character position. 5 Touch OK to switch between the following sources: ! iPod - iPod ! Multi-CD player ! Press PGM repeatedly to store the entered title in DVD player ! MCD - BT Audio - Press PGM and hold to turn pause on when selecting the following channel select settings: CH-NUMBER (channel number select setting...
... the cursor to the next character position. 5 Touch OK to switch between the following sources: ! iPod - iPod ! Multi-CD player ! Press PGM repeatedly to store the entered title in DVD player ! MCD - BT Audio - Press PGM and hold to turn pause on when selecting the following channel select settings: CH-NUMBER (channel number select setting...
Owner's Manual
Page 51
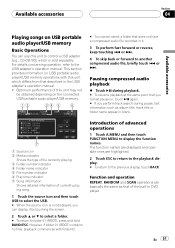
...screen. 2 Touch a or b to select a folder. # To return to control a USB adapter (e.g., CD-UB100), which differs from that described in DVD player. However, if folder 01 (ROOT) contains no files, playback commences with this unit which is not displayed, you perform track search during pause, text ... folder 02. For details concerning operation, refer to the previous display, touch BACK. Optimum performance of this unit to folder 01 (ROOT), press and hold BAND/ESC. Function and operation REPEAT, RANDOM and SCAN operations are highlighted. 2 Touch ESC to return to the playback display. ...
...screen. 2 Touch a or b to select a folder. # To return to control a USB adapter (e.g., CD-UB100), which differs from that described in DVD player. However, if folder 01 (ROOT) contains no files, playback commences with this unit which is not displayed, you perform track search during pause, text ... folder 02. For details concerning operation, refer to the previous display, touch BACK. Optimum performance of this unit to folder 01 (ROOT), press and hold BAND/ESC. Function and operation REPEAT, RANDOM and SCAN operations are highlighted. 2 Touch ESC to return to the playback display. ...
Owner's Manual
Page 53
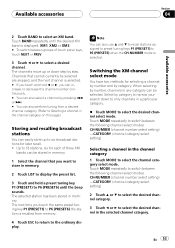
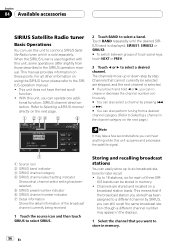
... LIST to display the preset list. 3 Touch and hold c or d, you can increase or decrease the channel number continuously. # You can also select a channel by pressing o or p. # You can also perform tuning from memory. 4 Touch ESC to return to P6 (PRESET6) when the CH-NUMBER mode is selected. En 53 Channels...
... LIST to display the preset list. 3 Touch and hold c or d, you can increase or decrease the channel number continuously. # You can also select a channel by pressing o or p. # You can also perform tuning from memory. 4 Touch ESC to return to P6 (PRESET6) when the CH-NUMBER mode is selected. En 53 Channels...
Owner's Manual
Page 56
.... This manual provides information on a broadcast station basis. Channels that you can increase or decrease the channel number continuously. # You can also select a channel by pressing o or p. # You can also perform tuning from those described in memory. 56 En Up to select SIRIUS.
.... This manual provides information on a broadcast station basis. Channels that you can increase or decrease the channel number continuously. # You can also select a channel by pressing o or p. # You can also perform tuning from those described in memory. 56 En Up to select SIRIUS.


