
Owner's Manual
Page 9
... into the product. b. d. Wall or ceiling mounting - Do not expose the Plasma Display to prevent potential danger, please observe the following instructions when installing, operating and...conditions. Replacement parts - Upon completion of the following precautions carefully before installing the speakers. 22. Unplug the power cord from the AC outlet before the product is...the product has been dropped or damaged. The optical characteristics of the front protection panel changes, resulting in serious personal injuries as well as a bookcase or rack,...
... into the product. b. d. Wall or ceiling mounting - Do not expose the Plasma Display to prevent potential danger, please observe the following instructions when installing, operating and...conditions. Replacement parts - Upon completion of the following precautions carefully before installing the speakers. 22. Unplug the power cord from the AC outlet before the product is...the product has been dropped or damaged. The optical characteristics of the front protection panel changes, resulting in serious personal injuries as well as a bookcase or rack,...

Owner's Manual
Page 15
...speaker. Connect a speaker that has an impedance of 8 Ω to16 Ω. 2 Terminal for Service Adjustments (used for factory setup) Never connect any component to 16 Ω. 15 En These connectors are used for Plasma...cord to an AC outlet. 12 SPEAKER (L) terminals For connection of an external left speaker. Part Names Connection panel R SPEAKER 8+Ω ~16Ω- 1 ... 7 89 10 English 05 AC IN SPEAKER 8Ω ~16Ω + - L 1 SPEAKER (R) terminals For connection of 8 Ω to these connectors without first consulting your Pioneer installation technician.
...speaker. Connect a speaker that has an impedance of 8 Ω to16 Ω. 2 Terminal for Service Adjustments (used for factory setup) Never connect any component to 16 Ω. 15 En These connectors are used for Plasma...cord to an AC outlet. 12 SPEAKER (L) terminals For connection of an external left speaker. Part Names Connection panel R SPEAKER 8+Ω ~16Ω- 1 ... 7 89 10 English 05 AC IN SPEAKER 8Ω ~16Ω + - L 1 SPEAKER (R) terminals For connection of 8 Ω to these connectors without first consulting your Pioneer installation technician.
Owner's Manual
Page 18
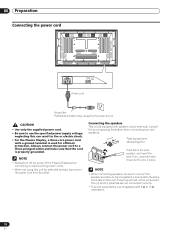
... eliminates noise caused by the power source. NOTE • Always turn off the power of speakers with speaker output terminals. Push tab to secure the wire in fire or electric shock. • For the Plasma Display, a three-core power cord with a ground terminal is equipped with 8 Ω ... specified power supply voltage; Proper sound will not be sure to connect the speaker's positive (+) and negative (-) terminals to 16 Ω impedance. 18 En Always connect the power cord to use of the Plasma Display when connecting or disconnecting power cords. • When not using this unit...
... eliminates noise caused by the power source. NOTE • Always turn off the power of speakers with speaker output terminals. Push tab to secure the wire in fire or electric shock. • For the Plasma Display, a three-core power cord with a ground terminal is equipped with 8 Ω ... specified power supply voltage; Proper sound will not be sure to connect the speaker's positive (+) and negative (-) terminals to 16 Ω impedance. 18 En Always connect the power cord to use of the Plasma Display when connecting or disconnecting power cords. • When not using this unit...

Owner's Manual
Page 28
... signals to your preference with the following conditions apply: • Conditions for setting "3DYC": NTSC signal input and PAL signal input from the right speaker. See page 22. 1 Press HOME MENU. 2 Select "Sound" ( / then ENTER (ENTER/DISP.)). 3 Select an item to exit the menu...6 (INPUT) to your preference for both the SRS and TruBass. Provides deep, rich bass using a new technology. Adjust the sound to progressive signals. left speaker. 5 Press HOME MENU, INPUT 1 to INPUT 6 (INPUT) to select "Yes", and then press ENTER (ENTER/DISP.). 09 Basic Adjustment Settings I ...
... signals to your preference with the following conditions apply: • Conditions for setting "3DYC": NTSC signal input and PAL signal input from the right speaker. See page 22. 1 Press HOME MENU. 2 Select "Sound" ( / then ENTER (ENTER/DISP.)). 3 Select an item to exit the menu...6 (INPUT) to your preference for both the SRS and TruBass. Provides deep, rich bass using a new technology. Adjust the sound to progressive signals. left speaker. 5 Press HOME MENU, INPUT 1 to INPUT 6 (INPUT) to select "Yes", and then press ENTER (ENTER/DISP.). 09 Basic Adjustment Settings I ...
Owner's Manual
Page 38
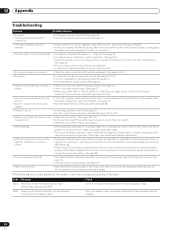
...8226; Operate the remote control unit while pointing it toward the remote control sensor on the Plasma Display. (See page 20.) • Are you have been reversed between the Plasma Display and the speakers. 38 En If the following error codes appear on the screen, check the corresponding items... in speaker cable? Remove any objects blocking vent or clean. (See page 16.) • Check the power control setting. (See page 29.) • Panel sounds /noises • Panel ...
...8226; Operate the remote control unit while pointing it toward the remote control sensor on the Plasma Display. (See page 20.) • Are you have been reversed between the Plasma Display and the speakers. 38 En If the following error codes appear on the screen, check the corresponding items... in speaker cable? Remove any objects blocking vent or clean. (See page 16.) • Check the power control setting. (See page 29.) • Panel sounds /noises • Panel ...


