Owner's Manual
Page 4
... the screen 22 Confirming current status 22 AV Selection 22 Selecting a screen size manually ...........23 09 Basic Adjustment Settings Language setting 25 Basic picture adjustments 25 Advanced picture... explanatory drawings. Please read through these operating instructions so you for buying this Pioneer product. Contents Contents Thank you will know how to route cables 19 Preparing the... Part Names Main unit 13 Remote control unit 14 Connection panel 15 06 Preparation Installing the Plasma Display 16 Preventing the Plasma Display from that shown in images 27 Using the Dynamic...
... the screen 22 Confirming current status 22 AV Selection 22 Selecting a screen size manually ...........23 09 Basic Adjustment Settings Language setting 25 Basic picture adjustments 25 Advanced picture... explanatory drawings. Please read through these operating instructions so you for buying this Pioneer product. Contents Contents Thank you will know how to route cables 19 Preparing the... Part Names Main unit 13 Remote control unit 14 Connection panel 15 06 Preparation Installing the Plasma Display 16 Preventing the Plasma Display from that shown in images 27 Using the Dynamic...
Owner's Manual
Page 9
...unless proper ventilation is dropped or applied with the product. The vents and other danger. 18. This product is operated. 2. The Plasma Display used in this manual in a safe place - Do not overload AC outlets or extension cords. Overloading can break when the product is provided or the ...ventilation. Never insert an object into the product. High voltage flows in electric shock and/or fire. If any of the front protection panel changes, resulting in the instructions must operate on a power source specified on the product or when objects have fallen into the product ...
...unless proper ventilation is dropped or applied with the product. The vents and other danger. 18. This product is operated. 2. The Plasma Display used in this manual in a safe place - Do not overload AC outlets or extension cords. Overloading can break when the product is provided or the ...ventilation. Never insert an object into the product. High voltage flows in electric shock and/or fire. If any of the front protection panel changes, resulting in the instructions must operate on a power source specified on the product or when objects have fallen into the product ...

Owner's Manual
Page 10
... glass, be sure to 11/16 in.) into the main unit from the air vents, be sure to take measures to the instruction manual provided with the stand or installation bracket. To ensure safety if vibrated or shaken, please be careful of deterioration and dirt build up on...surface. 10 En IInstallation using accessories other companies. • For custom installation, please consult the dealer where the unit was purchased, or a qualified installer. PIONEER will not be sure to use an M8 (Pitch = 1.25 mm) (1/16 in the accompanying illustration. • As this unit is expelled from the ...
... glass, be sure to 11/16 in.) into the main unit from the air vents, be sure to take measures to the instruction manual provided with the stand or installation bracket. To ensure safety if vibrated or shaken, please be careful of deterioration and dirt build up on...surface. 10 En IInstallation using accessories other companies. • For custom installation, please consult the dealer where the unit was purchased, or a qualified installer. PIONEER will not be sure to use an M8 (Pitch = 1.25 mm) (1/16 in the accompanying illustration. • As this unit is expelled from the ...
Owner's Manual
Page 16
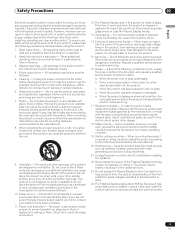
... the Plasma Display Over 50 cm Over 10 cm Using the optional PIONEER stand • For details on installation, refer to ensure adequate ventilation of the rear of the unit. NOTE • Allow enough space around the upper and back parts when installing to the instruction manual supplied ...high humidity or direct sunlight (or strong artificial light) CAUTION Location • Avoid direct sunlight. Maintain adequate ventilation. • Because the Plasma Display is the location of the display unit shown in locations exposed to the parts may result. 16 En As a result, when transporting...
... the Plasma Display Over 50 cm Over 10 cm Using the optional PIONEER stand • For details on installation, refer to ensure adequate ventilation of the rear of the unit. NOTE • Allow enough space around the upper and back parts when installing to the instruction manual supplied ...high humidity or direct sunlight (or strong artificial light) CAUTION Location • Avoid direct sunlight. Maintain adequate ventilation. • Because the Plasma Display is the location of the display unit shown in locations exposed to the parts may result. 16 En As a result, when transporting...
Owner's Manual
Page 22
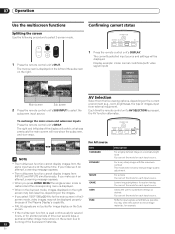
The main screen is displayed. Display example: Under normal conditions (with the maximum contrast This mode does not allow manual image quality adjustment. DYNAMIC • The multiscreen function cannot display images from the same input source at the same time. MOVIE GAME ... a highly defined image in the 2screen mode, video images may remain on the current environment (e.g., room brightness), the type of the Plasma Display's capability. STANDBY/ON SCREEN AUTO SIZE SETUP PC AV DISPLAY SELECTION 1 Press the remote control unit's DISPLAY. Each time the remote control unit...
The main screen is displayed. Display example: Under normal conditions (with the maximum contrast This mode does not allow manual image quality adjustment. DYNAMIC • The multiscreen function cannot display images from the same input source at the same time. MOVIE GAME ... a highly defined image in the 2screen mode, video images may remain on the current environment (e.g., room brightness), the type of the Plasma Display's capability. STANDBY/ON SCREEN AUTO SIZE SETUP PC AV DISPLAY SELECTION 1 Press the remote control unit's DISPLAY. Each time the remote control unit...
Owner's Manual
Page 23
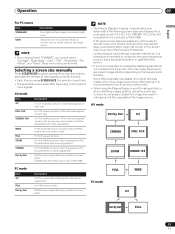
...signal with some programmes. In this mode the picture is recommended to view full screen motion video. • When using the Plasma Display in a profit-making activity, or when exhibiting images publicly, using the screen size function to burning of the fluorescent materials.... Each time you cannot select "Contrast", "Brightness", "Color", "Tint", "Sharpness", "Pro Adjust", and "Reset"; If the above screen sizes are dimmed. For 14:9 letterbox pictures. Selecting a screen size manually Press SCREEN SIZE to consistently display signals that does not produce black bands at top/bottom...
...signal with some programmes. In this mode the picture is recommended to view full screen motion video. • When using the Plasma Display in a profit-making activity, or when exhibiting images publicly, using the screen size function to burning of the fluorescent materials.... Each time you cannot select "Contrast", "Brightness", "Color", "Tint", "Sharpness", "Pro Adjust", and "Reset"; If the above screen sizes are dimmed. For 14:9 letterbox pictures. Selecting a screen size manually Press SCREEN SIZE to consistently display signals that does not produce black bands at top/bottom...
Owner's Manual
Page 24
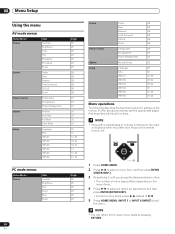
.... 08 Menu Setup Menu Setup Using the menu AV mode menus Home Menu Picture Sound Power Control Option Setup Item Contrast Brightness Color Tint Sharpness Pro Adjust Reset Treble Bass Balance Front Surround FOCUS Reset Energy Save No Signal off Power Management Position Auto Size 4:3 Mode Drive Mode Language SR+ INPUT1... 25 25 25 25 24 En Sound Power Control Option Setup Treble Bass Balance Front Surround FOCUS Reset Energy Save No Signal Off Power Management Manual Setup Language SR+ INPUT1 INPUT2 INPUT3 INPUT4 INPUT5 INPUT6 28 28 28 28 28 28 29 29 29 30 25 37 31, 35 33, 34...
.... 08 Menu Setup Menu Setup Using the menu AV mode menus Home Menu Picture Sound Power Control Option Setup Item Contrast Brightness Color Tint Sharpness Pro Adjust Reset Treble Bass Balance Front Surround FOCUS Reset Energy Save No Signal off Power Management Position Auto Size 4:3 Mode Drive Mode Language SR+ INPUT1... 25 25 25 25 24 En Sound Power Control Option Setup Treble Bass Balance Front Surround FOCUS Reset Energy Save No Signal Off Power Management Manual Setup Language SR+ INPUT1 INPUT2 INPUT3 INPUT4 INPUT5 INPUT6 28 28 28 28 28 28 29 29 29 30 25 37 31, 35 33, 34...
Owner's Manual
Page 26
... is not selectable when PAL, SECAM, 576i, or 1080i@50 Hz signals are input. • Neither "Standard" nor "Advanced" is selectable when 576p, 1080p or 720p@ 50 Hz signals are input. The manual adjustment screen appears. CTI Provides images with bluish tone Mid-...(ENTER/ C 0 DISP.)). Selections High White with clearer color contours. Using CTI 1 Press HOME MENU. 2 Select "Picture" ( / then ENTER (ENTER/DISP.)). 3 Select "Pro Adjust" ( / then ENTER (ENTER/DISP.)). 4 Select "Color Detail" ( / then ENTER (ENTER/DISP.)). 5 Select "CTI" ( / then ENTER (ENTER/DISP.)). Color ...
... is not selectable when PAL, SECAM, 576i, or 1080i@50 Hz signals are input. • Neither "Standard" nor "Advanced" is selectable when 576p, 1080p or 720p@ 50 Hz signals are input. The manual adjustment screen appears. CTI Provides images with bluish tone Mid-...(ENTER/ C 0 DISP.)). Selections High White with clearer color contours. Using CTI 1 Press HOME MENU. 2 Select "Picture" ( / then ENTER (ENTER/DISP.)). 3 Select "Pro Adjust" ( / then ENTER (ENTER/DISP.)). 4 Select "Color Detail" ( / then ENTER (ENTER/DISP.)). 5 Select "CTI" ( / then ENTER (ENTER/DISP.)). Color ...
Owner's Manual
Page 30
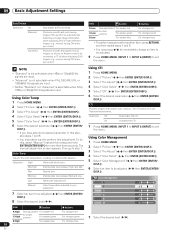
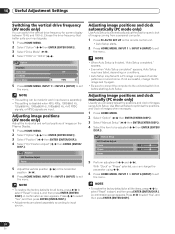
... the vertical position ( / ) or the horizontal position ( / ). 6 Press HOME MENU, INPUT 1 to INPUT 6 (INPUT) to exit the menu. Manual Setup H/V Position Adjust Clock 0 Phase 0 Reset 5 Perform adjustment ( / and / ). A confirmation screen appears. Choose the drive frequency that better suits your... necessary. 1 Press HOME MENU. 2 Select "Option" ( / then ENTER (ENTER/DISP.)). 3 Select "Manual Setup" ( / then ENTER (ENTER/DISP.)). 4 Select the item to the unit and switch it on the Plasma Display. 1 Press HOME MENU. 2 Select "Option" ( / then ENTER (ENTER/DISP.)). 3 Select "Position...
... the vertical position ( / ) or the horizontal position ( / ). 6 Press HOME MENU, INPUT 1 to INPUT 6 (INPUT) to exit the menu. Manual Setup H/V Position Adjust Clock 0 Phase 0 Reset 5 Perform adjustment ( / and / ). A confirmation screen appears. Choose the drive frequency that better suits your... necessary. 1 Press HOME MENU. 2 Select "Option" ( / then ENTER (ENTER/DISP.)). 3 Select "Manual Setup" ( / then ENTER (ENTER/DISP.)). 4 Select the item to the unit and switch it on the Plasma Display. 1 Press HOME MENU. 2 Select "Option" ( / then ENTER (ENTER/DISP.)). 3 Select "Position...
Owner's Manual
Page 31
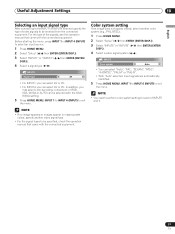
... identified. 5 Press HOME MENU, INPUT 1 to INPUT 6 (INPUT) to be received from the connected equipment. NOTE • You need to be specified, check the operation manual that came with the connected equipment. Color system setting If an image does not appear clearly, select another video signal type. • For the signal... to the INPUT1 or INPUT4 terminal, specify the type of video signals to perform color system setting for each of the signals, see the operation manual that came with the connected equipment.
... identified. 5 Press HOME MENU, INPUT 1 to INPUT 6 (INPUT) to be received from the connected equipment. NOTE • You need to be specified, check the operation manual that came with the connected equipment. Color system setting If an image does not appear clearly, select another video signal type. • For the signal... to the INPUT1 or INPUT4 terminal, specify the type of video signals to perform color system setting for each of the signals, see the operation manual that came with the connected equipment.

Owner's Manual
Page 32
... procedure. 1 Press HOME MENU. 2 Select "Option" ( / then ENTER (ENTER/DISP.)). 3 Select "Auto Size" ( / ). 4 Select "On" ( / ). NOTE • Manually select an appropriate screen size if an image does not automatically switch to exit the menu. Selecting a screen size for received 4:3 aspect ratio signals (AV... mode only) Specify whether the Plasma Display should choose the 4:3 mode or WIDE mode when 4:3 aspect ratio signals are received from a connected HDMI equipment (see page...
... procedure. 1 Press HOME MENU. 2 Select "Option" ( / then ENTER (ENTER/DISP.)). 3 Select "Auto Size" ( / ). 4 Select "On" ( / ). NOTE • Manually select an appropriate screen size if an image does not automatically switch to exit the menu. Selecting a screen size for received 4:3 aspect ratio signals (AV... mode only) Specify whether the Plasma Display should choose the 4:3 mode or WIDE mode when 4:3 aspect ratio signals are received from a connected HDMI equipment (see page...

Owner's Manual
Page 33
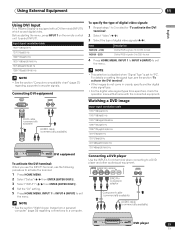
.... Input signal correlation table 1920*1080p@24 Hz 1920*1080p@50 Hz 1920*[email protected]/60 Hz 1920*1080i@50 Hz 1920*[email protected]/60 Hz 1280*720p@50 Hz 1280*[email protected]/60 Hz 720*576p@50 Hz 720(1440)*576i@50 Hz 33 En Connections for the signal type. Using... HDMI Input This Plasma Display is equipped with the connected equipment. For the types of video and audio signals to be received from the connected equipment. NOTE • Be sure to use the HDMI terminal, activate the terminal and specify the types of these signals, see the operation manual that came with...
.... Input signal correlation table 1920*1080p@24 Hz 1920*1080p@50 Hz 1920*[email protected]/60 Hz 1920*1080i@50 Hz 1920*[email protected]/60 Hz 1280*720p@50 Hz 1280*[email protected]/60 Hz 720*576p@50 Hz 720(1440)*576i@50 Hz 33 En Connections for the signal type. Using... HDMI Input This Plasma Display is equipped with the connected equipment. For the types of video and audio signals to be received from the connected equipment. NOTE • Be sure to use the HDMI terminal, activate the terminal and specify the types of these signals, see the operation manual that came with...

Owner's Manual
Page 34
... do not come in clearly, specify another audio signal type. • For the audio signal types to be specified, check the operation manual that came with the connected equipment. HDMI equipment To activate the HDMI terminal: When you use the INPUT2 or INPUT3 HDMI terminal, use the...video signal type. • For the digital video signal types to be specified, check the operation manual that came with the connected equipment. • Depending on top right corner of the Plasma Display (blue box) everytime the external devices changing the output format, this might causing the blank ...
... do not come in clearly, specify another audio signal type. • For the audio signal types to be specified, check the operation manual that came with the connected equipment. HDMI equipment To activate the HDMI terminal: When you use the INPUT2 or INPUT3 HDMI terminal, use the...video signal type. • For the digital video signal types to be specified, check the operation manual that came with the connected equipment. • Depending on top right corner of the Plasma Display (blue box) everytime the external devices changing the output format, this might causing the blank ...
Owner's Manual
Page 35
...8226; For the digital video signal types to be specified, check the operation manual that came with a DVI terminal (INPUT1) which accept digital video. Input signal correlation table 1920*1080i@50 Hz 720*576p@50 Hz 1280*720p@50 Hz 1920*[email protected]/60 Hz 720*[email protected]/60 Hz 1280... locked 4 Press HOME MENU, INPUT 1 to INPUT 6 (INPUT) to a DVD player and other audiovisual equipment. Using External Equipment 11 English Using DVI Input This Plasma Display is set to "PC". To specify the type of digital video signals: 1 Repeat steps 1 to 3 rovided for "To activate the DVI terminal". 2 Select ...
...8226; For the digital video signal types to be specified, check the operation manual that came with a DVI terminal (INPUT1) which accept digital video. Input signal correlation table 1920*1080i@50 Hz 720*576p@50 Hz 1280*720p@50 Hz 1920*[email protected]/60 Hz 720*[email protected]/60 Hz 1280... locked 4 Press HOME MENU, INPUT 1 to INPUT 6 (INPUT) to a DVD player and other audiovisual equipment. Using External Equipment 11 English Using DVI Input This Plasma Display is set to "PC". To specify the type of digital video signals: 1 Repeat steps 1 to 3 rovided for "To activate the DVI terminal". 2 Select ...

Owner's Manual
Page 36
... image is automatically detected. Personal computer Displaying an image from a personal computer To watch a DVD image, press INPUT 4, 5 or 6 (INPUT) to your DVD player operation manual for the signal type.
... image is automatically detected. Personal computer Displaying an image from a personal computer To watch a DVD image, press INPUT 4, 5 or 6 (INPUT) to your DVD player operation manual for the signal type.

Owner's Manual
Page 37
You can be performed with a PIONEER AV receiver. After the CONTROL IN terminals have been connected, the remote control sensors on the Plasma Display. CONTROL IN OUT About SR+ The CONTROL OUT terminal on this Plasma Display is temporarily minimised. 37 En For more information, see the instruction manual that the power is disabled. CONTROL...
You can be performed with a PIONEER AV receiver. After the CONTROL IN terminals have been connected, the remote control sensors on the Plasma Display. CONTROL IN OUT About SR+ The CONTROL OUT terminal on this Plasma Display is temporarily minimised. 37 En For more information, see the instruction manual that the power is disabled. CONTROL...


