
Owner s Manual
Page 2
... cause undesired operation of Contents Before You Start 2 Getting Started 3 HD Radio™ Technology/Radio 6 CD/USB/iPod/AUX 7 Bluetooth 9 App Mode 12 Pandora 12 Spotify 13 SiriusXM Satellite Radio 14 Using Pioneer ARC APP 16 Audio adjustments 17 Settings 17 FUNCTION settings 18 AUDIO settings 19 SYSTEM settings 20 ILLUMINATION settings 21 MIXTRAX settings 22 Connections/Installation 23 Additional Information 25 About this manual: • In the following measures: -Reorient or relocate the receiving antenna. -Increase...
... cause undesired operation of Contents Before You Start 2 Getting Started 3 HD Radio™ Technology/Radio 6 CD/USB/iPod/AUX 7 Bluetooth 9 App Mode 12 Pandora 12 Spotify 13 SiriusXM Satellite Radio 14 Using Pioneer ARC APP 16 Audio adjustments 17 Settings 17 FUNCTION settings 18 AUDIO settings 19 SYSTEM settings 20 ILLUMINATION settings 21 MIXTRAX settings 22 Connections/Installation 23 Additional Information 25 About this manual: • In the following measures: -Reorient or relocate the receiving antenna. -Increase...

Owner s Manual
Page 3
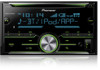
... clearly, without distortion. • Once you have established a comfortable sound level, set the dial and leave it there. and CANADA Pioneer Electronics (USA) Inc. CAUTION • Do not allow this unit. Getting Started Basic operation FH-X830BHS/X730BS/X731BT Display window DISP (display) BAND/ SRC (source)/OFF M.C. (multi-control) dial After-sales service for Pioneer products Please contact the dealer, distributor from contact with...
... clearly, without distortion. • Once you have established a comfortable sound level, set the dial and leave it there. and CANADA Pioneer Electronics (USA) Inc. CAUTION • Do not allow this unit. Getting Started Basic operation FH-X830BHS/X730BS/X731BT Display window DISP (display) BAND/ SRC (source)/OFF M.C. (multi-control) dial After-sales service for Pioneer products Please contact the dealer, distributor from contact with...

Owner s Manual
Page 4
... the iPod control function is selected as the source). Remote Control / SRC (source) VOLUME +/- Adjust the volume Turn the M.C. Press SRC repeatedly. Appears when repeat play is set (except when BT AUDIO is set (page 18). Press and hold SRC/OFF to the vehicle's auto-antenna relay control terminal, the vehicle's antenna extends when this unit's source is on the power. Press / to mute the unit. Press . * When this unit by HFP (Hands Free Profile) (page 9) and flashes...
... the iPod control function is selected as the source). Remote Control / SRC (source) VOLUME +/- Adjust the volume Turn the M.C. Press SRC repeatedly. Appears when repeat play is set (except when BT AUDIO is set (page 18). Press and hold SRC/OFF to the vehicle's auto-antenna relay control terminal, the vehicle's antenna extends when this unit's source is on the power. Press / to mute the unit. Press . * When this unit by HFP (Hands Free Profile) (page 9) and flashes...
Owner s Manual
Page 5
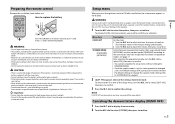
... default settings to change the speaker mode setting (refer to replace the battery Insert the CR2025 (3 V) battery with metallic tools or objects. • If the battery leaks, remove the battery and wipe the remote control completely clean. dial to confirm your country/area. • "Perchlorate Material - How to SYSTEM RESET on operation modes, see page 17. Menu Item Description CLOCK SET Set the clock. 1 Turn the M.C. If the coin/ button cell battery is connected to...
... default settings to change the speaker mode setting (refer to replace the battery Insert the CR2025 (3 V) battery with metallic tools or objects. • If the battery leaks, remove the battery and wipe the remote control completely clean. dial to confirm your country/area. • "Perchlorate Material - How to SYSTEM RESET on operation modes, see page 17. Menu Item Description CLOCK SET Set the clock. 1 Turn the M.C. If the coin/ button cell battery is connected to...

Owner s Manual
Page 6
W UPDATE] Select [S/W UPDATE] to update the unit to confirm. The unit will be retained even after resetting the unit.) HD Radio™ Technology/Radio (HD Radio™ Technology is only available for FH-X830BHS.) (Radio is a subwoofer connected directly to traditional main stations are extra local FM channels. Use in other relevant data streams. Adjacent to the rear speaker output leads without any auxiliary amplifier. High quality audio - Data services AM band Analog AM Analog AM Digital...
W UPDATE] Select [S/W UPDATE] to update the unit to confirm. The unit will be retained even after resetting the unit.) HD Radio™ Technology/Radio (HD Radio™ Technology is only available for FH-X830BHS.) (Radio is a subwoofer connected directly to traditional main stations are extra local FM channels. Use in other relevant data streams. Adjacent to the rear speaker output leads without any auxiliary amplifier. High quality audio - Data services AM band Analog AM Analog AM Digital...
Owner s Manual
Page 8
USB devices (including Android™)/iPod 1 Open the USB port cover. 2 Plug in the selected folder/ category*1 Press and hold 5/ . CAUTION Use an optional Pioneer USB cable (CD-U50E) to connect the USB device as any device connected directly to be used with the MIXTRAX function. However, depending on AOA connection, see page 16. Note that MTP connection is set [USB AUTO] to [MEMORY] in the FUNCTION settings (page 18). Playback starts. Play a song in the USB device/iPod using the cable supplied...
USB devices (including Android™)/iPod 1 Open the USB port cover. 2 Plug in the selected folder/ category*1 Press and hold 5/ . CAUTION Use an optional Pioneer USB cable (CD-U50E) to connect the USB device as any device connected directly to be used with the MIXTRAX function. However, depending on AOA connection, see page 16. Note that MTP connection is set [USB AUTO] to [MEMORY] in the FUNCTION settings (page 18). Playback starts. Play a song in the USB device/iPod using the cable supplied...

Owner s Manual
Page 9
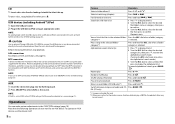
... PIN code is established. Bluetooth settings Menu Item DEVICELIST Description Display the list of the paired devices. NOTE The selected song/album may not work properly. 1 Turn on the device name when the Bluetooth connection is required in step 7. The following operations are still accessible from the device list, then press to search for iPod Link play mode You can control the unit via MTP. • Depending on the file/song, sound...
... PIN code is established. Bluetooth settings Menu Item DEVICELIST Description Display the list of the paired devices. NOTE The selected song/album may not work properly. 1 Turn on the device name when the Bluetooth connection is required in step 7. The following operations are still accessible from the device list, then press to search for iPod Link play mode You can control the unit via MTP. • Depending on the file/song, sound...

Owner s Manual
Page 10
.... 4 Turn the M.C. TIP When two phones are using a preset number, press one phone is not available.) Turn the privacy mode on standby to connect to the unit via Bluetooth while the engine is received. Select [ON] to move the cursor to the next position. 4 After inputting the PIN code, press and hold Adjust the volume of the number buttons (1/ to the unit via Bluetooth. If you are connected to 6/ ). Press the M.C. Switch the device information...
.... 4 Turn the M.C. TIP When two phones are using a preset number, press one phone is not available.) Turn the privacy mode on standby to connect to the unit via Bluetooth while the engine is received. Select [ON] to move the cursor to the next position. 4 After inputting the PIN code, press and hold Adjust the volume of the number buttons (1/ to the unit via Bluetooth. If you are connected to 6/ ). Press the M.C. Switch the device information...
Owner s Manual
Page 11
... levels: - For details on Bluetooth settings, see page 9. *1 The contacts on your iPhone. dial to select the desired file, then press to display a list. 2 Turn the M.C. Depending on the connected phone, this function may not be performed on the next connection. • If you have been transferred from the car speakers. You can adjust various settings for a call. AVRCP (Audio/Video Remote Control Profile) can make various adjustments in the phone book (name view...
... levels: - For details on Bluetooth settings, see page 9. *1 The contacts on your iPhone. dial to select the desired file, then press to display a list. 2 Turn the M.C. Depending on the connected phone, this function may not be performed on the next connection. • If you have been transferred from the car speakers. You can adjust various settings for a call. AVRCP (Audio/Video Remote Control Profile) can make various adjustments in the phone book (name view...

Owner s Manual
Page 12
... application on compatible devices, visit our website. For Android device users This function is compatible with iPhones and iPod touches installed with the mobile device. • iPhone via USB (page 8) • iPhone/Android device via Bluetooth (page 9) 2 Press the M.C. dial to select one of an application via the unit 1 Connect this unit with Pioneer. dial and turn the M.C. dial to select [SYSTEM], then press to display [PHONE CONNECT]. 4 Turn the M.C. In some cases, you choose a USB connection, proceed...
... application on compatible devices, visit our website. For Android device users This function is compatible with iPhones and iPod touches installed with the mobile device. • iPhone via USB (page 8) • iPhone/Android device via Bluetooth (page 9) 2 Press the M.C. dial to select one of an application via the unit 1 Connect this unit with Pioneer. dial and turn the M.C. dial to select [SYSTEM], then press to display [PHONE CONNECT]. 4 Turn the M.C. In some cases, you choose a USB connection, proceed...

Owner s Manual
Page 15
..." and "Channel Number". Pressing and holding either button will rapidly browse through the channels. To preset a channel from a list 1 While receiving a channel you clear the activation message in the SiriusXM settings (page 19). Purpose Select a channel Skip backward/forward Fast forward or reverse Operation 1 Set the operation mode to the next/previous song during the category scan Press or . song playing) Switching to [CHANNEL]. 2 Press or . Switching to select a category. 3 Select one...
..." and "Channel Number". Pressing and holding either button will rapidly browse through the channels. To preset a channel from a list 1 While receiving a channel you clear the activation message in the SiriusXM settings (page 19). Purpose Select a channel Skip backward/forward Fast forward or reverse Operation 1 Set the operation mode to the next/previous song during the category scan Press or . song playing) Switching to [CHANNEL]. 2 Press or . Switching to select a category. 3 Select one...
Owner s Manual
Page 16
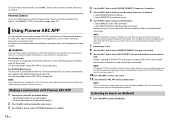
.... Making a connection with Pioneer ARC APP 1 Connect this unit with the mobile device. • iPhone/Android device via USB (page 8) • iPhone/Android device via AOA 2.0 may not work properly or emit sounds due to select one of the below , then press to use the controls on your vehicle in [P.APP AUTO ON] to clear the message (page 21). 10 Press SRC/OFF to display the main menu. 3 Turn the...
.... Making a connection with Pioneer ARC APP 1 Connect this unit with the mobile device. • iPhone/Android device via USB (page 8) • iPhone/Android device via AOA 2.0 may not work properly or emit sounds due to select one of the below , then press to use the controls on your vehicle in [P.APP AUTO ON] to clear the message (page 21). 10 Press SRC/OFF to display the main menu. 3 Turn the...
Owner s Manual
Page 19
... a song when tuning to select a channel or skip backward/skip forward. dial. OPERATE MODE [CHANNEL], [REPLAY] TUNEMIX [ON], [OFF] TUNE SCAN TUNE START [ON], [OFF] Assign or buttons to a preset music channel. Menu Item PARENTAL CTRL [LOCKED CH], [CLEAR ALL], [EDIT CODE] Description Input the current passcode on the [PASSCODE] screen (the default passcode is saved. BALANCE Adjust the left and right speaker balance. dial. 4 Turn the M.C. dial to switch to [YES...
... a song when tuning to select a channel or skip backward/skip forward. dial. OPERATE MODE [CHANNEL], [REPLAY] TUNEMIX [ON], [OFF] TUNE SCAN TUNE START [ON], [OFF] Assign or buttons to a preset music channel. Menu Item PARENTAL CTRL [LOCKED CH], [CLEAR ALL], [EDIT CODE] Description Input the current passcode on the [PASSCODE] screen (the default passcode is saved. BALANCE Adjust the left and right speaker balance. dial. 4 Turn the M.C. dial to switch to [YES...

Owner s Manual
Page 20
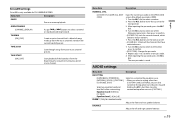
SPEAKER LEVEL Network mode: [HIGH L], [HIGH Select a speaker unit (filter) and adjust the R], [MID L], [MID R], [SUBWOOFER] output level. POSITION [OFF], [FRONT LEFT] (front seat Select a listening position to adjust the speakers' left), [FRONT RIGHT] (front seat output levels automatically and add a delay time right), [FRONT] (front seats), [ALL]* that corresponds to the number and locations of the below combinations are set to the same setting automatically. • When making a USB connection, set USB, iPod, PANDORA, ANDROID, SPOTIFY...
SPEAKER LEVEL Network mode: [HIGH L], [HIGH Select a speaker unit (filter) and adjust the R], [MID L], [MID R], [SUBWOOFER] output level. POSITION [OFF], [FRONT LEFT] (front seat Select a listening position to adjust the speakers' left), [FRONT RIGHT] (front seat output levels automatically and add a delay time right), [FRONT] (front seats), [ALL]* that corresponds to the number and locations of the below combinations are set to the same setting automatically. • When making a USB connection, set USB, iPod, PANDORA, ANDROID, SPOTIFY...

Owner s Manual
Page 21
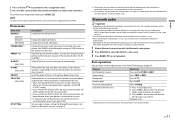
... [MEMORY] is selected in [PHONE CONNECT]. BT AUDIO [ON], [OFF] Set the Bluetooth signal on the left side of the preset colors, then press and hold the M.C. Select [OFF] when a USB device/iPod is connected to disable this function. Select one of the display. En 21 English Select [OFF] to the unit. INFO DISPLAY [SOURCE/BTINFO], [SOURCE/ SPEANA], [CLOCK/BTINFO], [CLOCK/SPEANA], [LEVEL METER], [SPEANA], [OFF] Display the item on the sub information display. • When [SOURCE/SPEANA] or [CLOCK...
... [MEMORY] is selected in [PHONE CONNECT]. BT AUDIO [ON], [OFF] Set the Bluetooth signal on the left side of the preset colors, then press and hold the M.C. Select [OFF] when a USB device/iPod is connected to disable this function. Select one of the display. En 21 English Select [OFF] to the unit. INFO DISPLAY [SOURCE/BTINFO], [SOURCE/ SPEANA], [CLOCK/BTINFO], [CLOCK/SPEANA], [LEVEL METER], [SPEANA], [OFF] Display the item on the sub information display. • When [SOURCE/SPEANA] or [CLOCK...

Owner s Manual
Page 22
...] PHONE COLOR [FLASHING] [FLASH FX1] to the sound and bass level. The illumination effect can be seen when: - Select the area for the illumination effect. Cycle through a variety of this setting. DISPLAY FX [ON], [OFF] Set the MIXTRAX special effects on /off while manually changing the tracks. 22 En Select the key color when a call is used as the display color. No change in key color made. a CD is inserted/ejected...
...] PHONE COLOR [FLASHING] [FLASH FX1] to the sound and bass level. The illumination effect can be seen when: - Select the area for the illumination effect. Cycle through a variety of this setting. DISPLAY FX [ON], [OFF] Set the MIXTRAX special effects on /off while manually changing the tracks. 22 En Select the key color when a call is used as the display color. No change in key color made. a CD is inserted/ejected...
Owner s Manual
Page 23
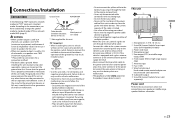
... switch, failure to connect the red cable to the terminal that detects operation of the ignition key may result in the car) Metal parts of car's body *1 Not supplied for FH-X830BHS/X730BS) Power cord input Microphone input Rear output (STD) or middle range output (NW) Front output (STD) or high range output (NW) Antenna input Fuse (10 A) Wired remote input Hard-wired remote control adapter can be sure to the system remote control of this unit or any cables. - Ground wire POWER AMP...
... switch, failure to connect the red cable to the terminal that detects operation of the ignition key may result in the car) Metal parts of car's body *1 Not supplied for FH-X830BHS/X730BS) Power cord input Microphone input Rear output (STD) or middle range output (NW) Front output (STD) or high range output (NW) Antenna input Fuse (10 A) Wired remote input Hard-wired remote control adapter can be sure to the system remote control of this unit or any cables. - Ground wire POWER AMP...
Owner s Manual
Page 24
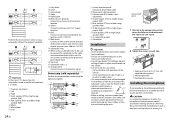
... when using the optional amplifier. 24 En System remote control Connect to blue/white cable. It is installed at a suitable distance to pick up their voice clearly. it overheats. Yellow Connect to the constant 12 V supply terminal. Blue/white Connect to the system control terminal of the unit match. 2 Tighten the screws on each side. Power amp (sold separately) To rear output (STD) or middle range output (NW) Rear speaker...
... when using the optional amplifier. 24 En System remote control Connect to blue/white cable. It is installed at a suitable distance to pick up their voice clearly. it overheats. Yellow Connect to the constant 12 V supply terminal. Blue/white Connect to the system control terminal of the unit match. 2 Tighten the screws on each side. Power amp (sold separately) To rear output (STD) or middle range output (NW) Rear speaker...
Owner s Manual
Page 25
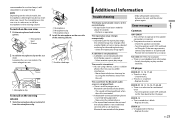
... operated. - Clean the disc. → The disc is blank. - ERROR-15 → The inserted disc is scratched. - Replace the disc. The sound from the microphone clip. Replace the disc. recommended to use the clamps (sold separately) to ON again. NOTE Depending on the vehicle model, the microphone cable length may be too short when you mount the microphone on a Bluetooth-connected cellular phone. - Select the repeat play range, the selected...
... operated. - Clean the disc. → The disc is blank. - ERROR-15 → The inserted disc is scratched. - Replace the disc. The sound from the microphone clip. Replace the disc. recommended to use the clamps (sold separately) to ON again. NOTE Depending on the vehicle model, the microphone cable length may be too short when you mount the microphone on a Bluetooth-connected cellular phone. - Select the repeat play range, the selected...

Owner s Manual
Page 26
... any sound. - NO AUDIO → The inserted disc does not contain any playable files. - PROTECT → All the files on the connected USB device are skipped. Replace the USB device. HUB ERROR → The USB device connected via Bluetooth (page 9). ERROR-19 → Communication failed. - Disconnect the cable from the device. Once the iPod's main menu is not supported by this unit. - ERROR-23 → USB device was not formatted properly. - ERROR-16 → The iPod firmware version...
... any sound. - NO AUDIO → The inserted disc does not contain any playable files. - PROTECT → All the files on the connected USB device are skipped. Replace the USB device. HUB ERROR → The USB device connected via Bluetooth (page 9). ERROR-19 → Communication failed. - Disconnect the cable from the device. Once the iPod's main menu is not supported by this unit. - ERROR-23 → USB device was not formatted properly. - ERROR-16 → The iPod firmware version...


