
Operating Instructions
Page 1
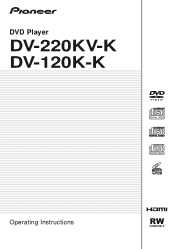
DVD Player DV-220KV-K DV-120K-K Operating Instructions
DVD Player DV-220KV-K DV-120K-K Operating Instructions
Operating Instructions
Page 2
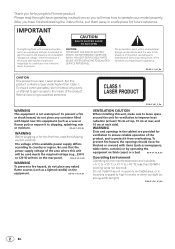
... RISK OF ELECTRIC SHOCK, DO NOT REMOVE COVER (OR BACK). NO USER-SERVICEABLE PARTS INSIDE. To prevent a fire or shock hazard, do not place any container filled with liquid near this unit, make sure to leave space around the unit for the first time, read through these operating instructions so you will be used meets the required voltage (e.g., 230 V or...
... RISK OF ELECTRIC SHOCK, DO NOT REMOVE COVER (OR BACK). NO USER-SERVICEABLE PARTS INSIDE. To prevent a fire or shock hazard, do not place any container filled with liquid near this unit, make sure to leave space around the unit for the first time, read through these operating instructions so you will be used meets the required voltage (e.g., 230 V or...
Operating Instructions
Page 4
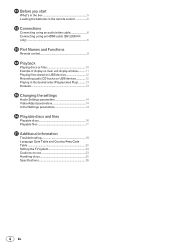
... box 5 Loading the batteries in the remote control 5 Connections Connecting using an audio/video cable 6 Connecting using an HDMI cable (DV-220KV-K only 6 Part Names and Functions Remote control 8 Playback Playing discs or files 10 Example of display on main unit display window...........11 Playing files stored on USB devices 12 Recording audio CD tracks on USB devices 12 Playing in the desired order (Programmed Play)...........13 Karaoke 13 Changing the settings Audio Settings parameters 14 Video Adjust parameters 14 Initial Settings parameters 14 Playable discs and files Playable...
... box 5 Loading the batteries in the remote control 5 Connections Connecting using an audio/video cable 6 Connecting using an HDMI cable (DV-220KV-K only 6 Part Names and Functions Remote control 8 Playback Playing discs or files 10 Example of display on main unit display window...........11 Playing files stored on USB devices 12 Recording audio CD tracks on USB devices 12 Playing in the desired order (Programmed Play)...........13 Karaoke 13 Changing the settings Audio Settings parameters 14 Video Adjust parameters 14 Initial Settings parameters 14 Playable discs and files Playable...
Operating Instructions
Page 5
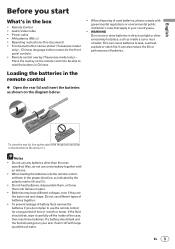
... use or store batteries in direct sunlight or other than the ones specified. Notes Do not use any batteries other excessively hot place, such as inside of battery fluid, remove the batteries if you start What's in the box Remote Control Audio/video cable Power cable AA batteries (R6) x 2 Operating instructions (this document) Front panel button names sticker (Taiwanese model only) - Do not use different types of batteries...
... use or store batteries in direct sunlight or other than the ones specified. Notes Do not use any batteries other excessively hot place, such as inside of battery fluid, remove the batteries if you start What's in the box Remote Control Audio/video cable Power cable AA batteries (R6) x 2 Operating instructions (this document) Front panel button names sticker (Taiwanese model only) - Do not use different types of batteries...
Operating Instructions
Page 6
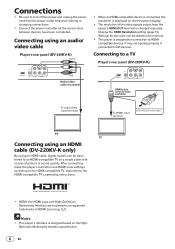
... cable with no loss of the video signals output from the power outlet whenever making or changing connections. Connect the power cord after all the connections between devices have been completed. TV TV Connecting using an HDMI cable (DV-220KV-K only) By using an audio/ video cable Player's rear panel (DV-220KV-K) Yellow White Red Audio/video cable (included) When an HDMI-compatible device is connected, the resolution is displayed on the High- Definition Multimedia Interface specification. 6 En After connecting, make the player's resolution and HDMI color settings...
... cable with no loss of the video signals output from the power outlet whenever making or changing connections. Connect the power cord after all the connections between devices have been completed. TV TV Connecting using an HDMI cable (DV-220KV-K only) By using an audio/ video cable Player's rear panel (DV-220KV-K) Yellow White Red Audio/video cable (included) When an HDMI-compatible device is connected, the resolution is displayed on the High- Definition Multimedia Interface specification. 6 En After connecting, make the player's resolution and HDMI color settings...

Operating Instructions
Page 7
...-bit 2-channel linear PCM audio (including 2-channel downmixing) Dolby Digital 5.1-channel audio DTS 5.1-channel audio MPEG audio Manufactured under U.S. HDMI cable (commercially available) To HDMI input terminal Match the direction of Dolby Laboratories. Manufactured under license under license from the player's HDMI OUT terminal 44.1 kHz to the terminal and insert straight. AV receiver or amplifier From HDMI output terminal HDMI cable (commercially available) To HDMI input terminal TV Audio signals that...
...-bit 2-channel linear PCM audio (including 2-channel downmixing) Dolby Digital 5.1-channel audio DTS 5.1-channel audio MPEG audio Manufactured under U.S. HDMI cable (commercially available) To HDMI input terminal Match the direction of Dolby Laboratories. Manufactured under license under license from the player's HDMI OUT terminal 44.1 kHz to the terminal and insert straight. AV receiver or amplifier From HDMI output terminal HDMI cable (commercially available) To HDMI input terminal TV Audio signals that...
Operating Instructions
Page 8
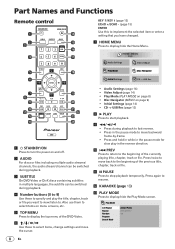
... . HOME MENU DVD Audio Settings Video Adjust Play Mode Disc Navigator 6 7 8 9 10 11 12 13 EC-HO HOME MENU ENTER KEY PLAY ECHO + RETURN PREV PAUSE STOP NEXT KARAOKE PLAY MODE ZOOM DISPLAY 19 20 21 22 23 24 DVD 1 STANDBY/ON Press to turn the power on and off. 2 AUDIO For discs or files including multiple audio streams/ channels, the audio stream/channel can be switched during playback. 3 SUBTITLE On DVD‑Video or DivX discs containing subtitles in multiple languages, the subtitle can be switched during playback...
... . HOME MENU DVD Audio Settings Video Adjust Play Mode Disc Navigator 6 7 8 9 10 11 12 13 EC-HO HOME MENU ENTER KEY PLAY ECHO + RETURN PREV PAUSE STOP NEXT KARAOKE PLAY MODE ZOOM DISPLAY 19 20 21 22 23 24 DVD 1 STANDBY/ON Press to turn the power on and off. 2 AUDIO For discs or files including multiple audio streams/ channels, the audio stream/channel can be switched during playback. 3 SUBTITLE On DVD‑Video or DivX discs containing subtitles in multiple languages, the subtitle can be switched during playback...
Operating Instructions
Page 9
...; Repeat Plays titles, chapters, tracks or files repeatedly. Random Playes titles, chapters or tracks in random order. Program (page 13) Plays titles, chapters, tracks or files in the order in which you input the wrong number. e OPEN/CLOSE Open the disc tray and load the disc. i MENU Press to the previous screen. n DISPLAY The elapsed time, amount remaining, etc., is stored in the forward direction. When PLAY is pressed, playback...
...; Repeat Plays titles, chapters, tracks or files repeatedly. Random Playes titles, chapters or tracks in random order. Program (page 13) Plays titles, chapters, tracks or files in the order in which you input the wrong number. e OPEN/CLOSE Open the disc tray and load the disc. i MENU Press to the previous screen. n DISPLAY The elapsed time, amount remaining, etc., is stored in the forward direction. When PLAY is pressed, playback...
Operating Instructions
Page 11
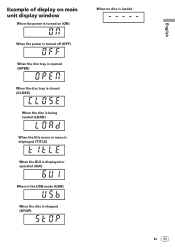
English Example of display on main unit display window When the power is turned on (ON) When the power is turned off (OFF) When the disc tray is opened (OPEN) When the disc tray is closed (CLOSE) When the disc is being loaded (LOAD) When the title menu or menu is displayed (TITLE) When the GUI is displayed or operated (GUI) When in the USB mode (USB) When the disc is stopped (STOP) When no disc is loaded En 11
English Example of display on main unit display window When the power is turned on (ON) When the power is turned off (OFF) When the disc tray is opened (OPEN) When the disc tray is closed (CLOSE) When the disc is being loaded (LOAD) When the title menu or menu is displayed (TITLE) When the GUI is displayed or operated (GUI) When in the USB mode (USB) When the disc is stopped (STOP) When no disc is loaded En 11
Operating Instructions
Page 12
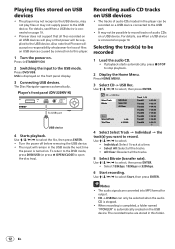
... play files or may not be supplied to stop playback. 2 Display the Home Menu. USb is connected on a USB device. The Disc Navigator appears automatically. Use to select, then press ENTER. Notes The audio signals are stored in the USB mode the next time the power is turned on USB devices The player may not recognize the USB device, may not play or that Pioneer will accept no responsibility whatsoever for output. CD -> USB Rec can be recorded 1 Load...
... play files or may not be supplied to stop playback. 2 Display the Home Menu. USb is connected on a USB device. The Disc Navigator appears automatically. Use to select, then press ENTER. Notes The audio signals are stored in the USB mode the next time the power is turned on USB devices The player may not recognize the USB device, may not play or that Pioneer will accept no responsibility whatsoever for output. CD -> USB Rec can be recorded 1 Load...
Operating Instructions
Page 13
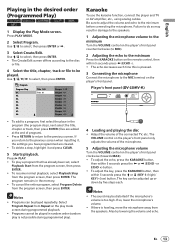
... karaoke function, connect the player and TV or AV amplifier, etc., using analog cables. Select Program Repeat from the program screen, then press ENTER. The key can be played. Use / to the minimum Press the KARAOKE button on the remote control, then within 5 seconds press (ECHO -). The echo decreases each . English Playing in damage to the speakers. 1 Adjusting the microphone volume to the minimum Turn the VOLUME control...
... karaoke function, connect the player and TV or AV amplifier, etc., using analog cables. Select Program Repeat from the program screen, then press ENTER. The key can be played. Use / to the minimum Press the KARAOKE button on the remote control, then within 5 seconds press (ECHO -). The echo decreases each . English Playing in damage to the speakers. 1 Adjusting the microphone volume to the minimum Turn the VOLUME control...
Operating Instructions
Page 14
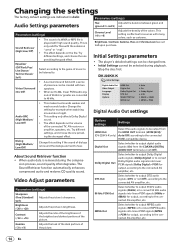
... audio signals (96kHz) or to convert 96 kHz audio signals into linear PCM signals (MPEG > PCM) for example when watching movies late at night. This setting only affects Dolby Digital sound. The effect depends on the file. The Sound Retriever function automatically enhances compressed audio and restores CD quality sound. Changing the settings The factory default settings are converted to the connected HDMI-compatible device. Stop the disc first. About Sound Retriever function When audio data is played...
... audio signals (96kHz) or to convert 96 kHz audio signals into linear PCM signals (MPEG > PCM) for example when watching movies late at night. This setting only affects Dolby Digital sound. The effect depends on the file. The Sound Retriever function automatically enhances compressed audio and restores CD quality sound. Changing the settings The factory default settings are converted to the connected HDMI-compatible device. Stop the disc first. About Sound Retriever function When audio data is played...
Operating Instructions
Page 15
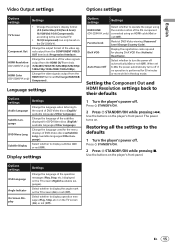
... Menu Lang. DivX VOD Display the registration code required for the menu displays of DVD-Video discs (w/Subtitle Lang./available languages/Other Language). Use the buttons on . The power turns on the player's front panel. Parental Lock Restrict DVD-Video viewing (Password/ Level Change/Country Code). Auto Power Off Select whether to the defaults 1 Turn the player's power off. Press STANDBY/ON. 2 Press STANDBY/ON while pressing . Restoring all the settings to turn the power off automatically (On) or not (Off). English Video Output settings...
... Menu Lang. DivX VOD Display the registration code required for the menu displays of DVD-Video discs (w/Subtitle Lang./available languages/Other Language). Use the buttons on . The power turns on the player's front panel. Parental Lock Restrict DVD-Video viewing (Password/ Level Change/Country Code). Auto Power Off Select whether to the defaults 1 Turn the player's power off. Press STANDBY/ON. 2 Press STANDBY/ON while pressing . Restoring all the settings to turn the power off automatically (On) or not (Off). English Video Output settings...
Operating Instructions
Page 16
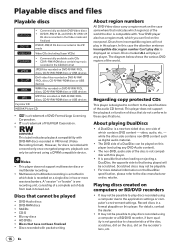
... rear panel. Discs that cannot be played DVD-Audio discs DVD-RAM discs SACDs CD-G Blu-ray discs HD DVDs Discs that have not been finalized Discs recorded with . In this case the attention sentence Incompatible disc region number Can't play in any DVD-Audio content). The non-DVD, audio side of the disc is not compatible with this player (excluding any player. Playable discs and files Playable discs Commercially available DVD...
... rear panel. Discs that cannot be played DVD-Audio discs DVD-RAM discs SACDs CD-G Blu-ray discs HD DVDs Discs that have not been finalized Discs recorded with . In this case the attention sentence Incompatible disc region number Can't play in any DVD-Audio content). The non-DVD, audio side of the disc is not compatible with this player (excluding any player. Playable discs and files Playable discs Commercially available DVD...
Operating Instructions
Page 17
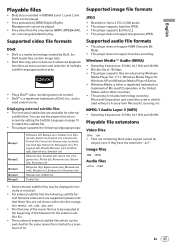
... files .jpg .jpeg Audio files .wma .mp3 Some external subtitle files may also include such advanced playback functions as menu screens and selection of multiple subtitle languages/audio tracks. Plays DivX® video, including premium content DivX® is a registered trademark of 10. Displaying external subtitle files The font sets listed below (WMV, MPEG4-AAC, etc.) are not guaranteed to be repeated at all. For external subtitle files the following language...
... files .jpg .jpeg Audio files .wma .mp3 Some external subtitle files may also include such advanced playback functions as menu screens and selection of multiple subtitle languages/audio tracks. Plays DivX® video, including premium content DivX® is a registered trademark of 10. Displaying external subtitle files The font sets listed below (WMV, MPEG4-AAC, etc.) are not guaranteed to be repeated at all. For external subtitle files the following language...
Operating Instructions
Page 18
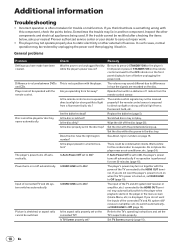
... in the disc tray? Picture is stretched, or aspect ratio cannot be received properly if the remote control sensor is displayed. Check Remedy Was the power cord unplugged forcibly while the player's power was on page 16. The volume may automatically switch to the player when playback starts on the player or the menu screen (Home Menu, etc.) is exposed to differences in how the signals are recorded on together with this component, check the...
... in the disc tray? Picture is stretched, or aspect ratio cannot be received properly if the remote control sensor is displayed. Check Remedy Was the power cord unplugged forcibly while the player's power was on page 16. The volume may automatically switch to the player when playback starts on the player or the menu screen (Home Menu, etc.) is exposed to differences in how the signals are recorded on together with this component, check the...
Operating Instructions
Page 19
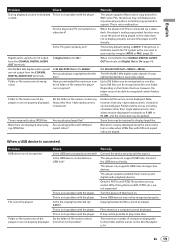
... displayed. Time is not a problem with the player. Are you playing a copyright-protected disc? Folder or file names are not displayed or are not recognized. This player does not support USB hubs. This player supports portable flash memory and digital audio playback devices. Some USB devices may not be recognized within one folder. English Problem Check Remedy During playback, picture is disturbed This is required to play JPEG files. Connect the player and TV directly. Is the TV system properly set...
... displayed. Time is not a problem with the player. Are you playing a copyright-protected disc? Folder or file names are not displayed or are not recognized. This player does not support USB hubs. This player supports portable flash memory and digital audio playback devices. Some USB devices may not be recognized within one folder. English Problem Check Remedy During playback, picture is disturbed This is required to play JPEG files. Connect the player and TV directly. Is the TV system properly set...
Operating Instructions
Page 20
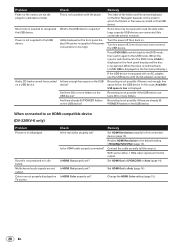
... HDMI-compatible device (DV-220KV-K only) Problem Picture is displayed. No power is supplied if the power consumption is equipped with an AC adapter, use the USB device with the player. When the input is switched back to Auto (page 14). Multichannel audio signals are not properly displayed on the front panel display.) If the USB device is too high. Colors are not output. Check Is the resolution properly set ? Is the HDMI cable properly connected? Is HDMI Out properly set ? Remedy Set HDMI Resolution...
... HDMI-compatible device (DV-220KV-K only) Problem Picture is displayed. No power is supplied if the power consumption is equipped with an AC adapter, use the USB device with the player. When the input is switched back to Auto (page 14). Multichannel audio signals are not properly displayed on the front panel display.) If the USB device is too high. Colors are not output. Check Is the resolution properly set ? Is the HDMI cable properly connected? Is HDMI Out properly set ? Remedy Set HDMI Resolution...
Operating Instructions
Page 21
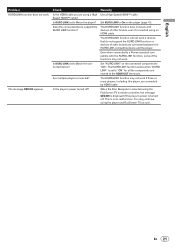
... LINK function does not work . When the Disc Navigator is selected using the player and Flat Screen TV as such. Are multiple players connected? Is KURO LINK set to "ON" for all the components connected to a Pioneer product compatible with devices of the functions may continue using the Flat Screen TV's remote controller, the message CEC200 is displayed if the player's power is not a malfunction. The message CEC200 appears. Remedy Use a High Speed HDMI™ cable...
... LINK function does not work . When the Disc Navigator is selected using the player and Flat Screen TV as such. Are multiple players connected? Is KURO LINK set to "ON" for all the components connected to a Pioneer product compatible with devices of the functions may continue using the Flat Screen TV's remote controller, the message CEC200 is displayed if the player's power is not a malfunction. The message CEC200 appears. Remedy Use a High Speed HDMI™ cable...
Operating Instructions
Page 23
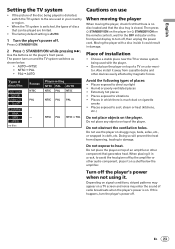
... discs/ files Format NTSC Player setting NTSC PAL AUTO NTSC PAL NTSC PAL NTSC PAL PAL Avoid the following types of the player. Do not place any objects on the front panel display to damage. Doing so will prevent the heat from cassette decks and other audio component, place it on . Turn off , then unplug the power cord. Use the buttons on the player. Also install it in which there is AUTO. 1 Turn the player's power off. no disc loaded...
... discs/ files Format NTSC Player setting NTSC PAL AUTO NTSC PAL NTSC PAL NTSC PAL PAL Avoid the following types of the player. Do not place any objects on the front panel display to damage. Doing so will prevent the heat from cassette decks and other audio component, place it on . Turn off , then unplug the power cord. Use the buttons on the player. Also install it in which there is AUTO. 1 Turn the player's power off. no disc loaded...


