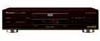
Owner's Manual
Page 2
... you will increase eye hazard. [For Canadian model] This Class B digital apparatus complies with the instructions, may invalidate the user's right to which can radiate radio frequency energy and, if not installed and used to connect the unit to Part 15 of certain U.S. model] The serial number for a Class B digital device, pursuant to other rights owners. NOTE: This equipment has been tested and found...
... you will increase eye hazard. [For Canadian model] This Class B digital apparatus complies with the instructions, may invalidate the user's right to which can radiate radio frequency energy and, if not installed and used to connect the unit to Part 15 of certain U.S. model] The serial number for a Class B digital device, pursuant to other rights owners. NOTE: This equipment has been tested and found...
Owner's Manual
Page 3
... service or repairs to this product from touching such power lines or circuits as the original part. This is a safety feature. or near a bathtub, wash bowl, kitchen sink, or laundry tub; The appliance should be installed in the operating instructions should not be sure the service technician has used replacement parts specified by the manufacturer, or sold with a three-wire grounding type...
... service or repairs to this product from touching such power lines or circuits as the original part. This is a safety feature. or near a bathtub, wash bowl, kitchen sink, or laundry tub; The appliance should be installed in the operating instructions should not be sure the service technician has used replacement parts specified by the manufacturer, or sold with a three-wire grounding type...
Owner's Manual
Page 4
... the rear panel. * Playing recordable CDs • Note that have established a comfortable sound level: • Set the dial and leave it is included for your volume control at two feet. Taking a minute to your hearing "comfort level" adapts to excessive noise. Over time your hearing. DVD VIDEO Digital audio Digital video (MPEG 2) 8 cm (3 in .)/ * single-sided Max. 20 minutes The disc format logos shown above cannot be played on...
... the rear panel. * Playing recordable CDs • Note that have established a comfortable sound level: • Set the dial and leave it is included for your volume control at two feet. Taking a minute to your hearing "comfort level" adapts to excessive noise. Over time your hearing. DVD VIDEO Digital audio Digital video (MPEG 2) 8 cm (3 in .)/ * single-sided Max. 20 minutes The disc format logos shown above cannot be played on...
Owner's Manual
Page 5
... Multi-Language Subtitles (page 34) You can select the language on a progressive-scan compatible TV. Audio1 Audio2 Video Language General Setup Navigator Setup Navigator Start Auto Start Off Setting up using and the preferred screen format you 'll find setting up and adjusting the system easy to do with on -screen information ( i ) is in one of four types of digital audio formats (as component video outs. Subtitle :1 English Subtitle :2 Spanish HELLO! While using on-screen menus Press SETUP on the remote control to open the Setup screen...
... Multi-Language Subtitles (page 34) You can select the language on a progressive-scan compatible TV. Audio1 Audio2 Video Language General Setup Navigator Setup Navigator Start Auto Start Off Setting up using and the preferred screen format you 'll find setting up and adjusting the system easy to do with on -screen information ( i ) is in one of four types of digital audio formats (as component video outs. Subtitle :1 English Subtitle :2 Spanish HELLO! While using on-screen menus Press SETUP on the remote control to open the Setup screen...

Owner's Manual
Page 6
.... Play a disc. Make the necessary connections. Because using your home entertainment system. The section "Getting Started Using Your DVD Player" starting on page 37 describes how to output the video and audio information that can be recorded onto a DVD disc is also a list of tracks. When discs have a unique title division, it should set up the player to use the Setup screen menus as well as they will make the necessary initial adjustments. Before...
.... Play a disc. Make the necessary connections. Because using your home entertainment system. The section "Getting Started Using Your DVD Player" starting on page 37 describes how to output the video and audio information that can be recorded onto a DVD disc is also a list of tracks. When discs have a unique title division, it should set up the player to use the Setup screen menus as well as they will make the necessary initial adjustments. Before...
Owner's Manual
Page 7
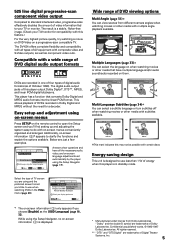
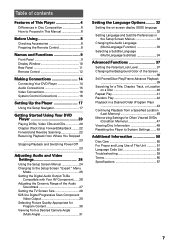
... 23 Stopping Playback and Switching Power Off 23 Adjusting Audio and Video Settings 24 Using the Setup Screen Menus 24 Changing to the Setup Screen "Expert" Menu Mode 25 Setting the Digital Audio Output To Be Compatible with Your AV Component ...... 26 Adjusting the Dynamic Range of the Audio Soundtrack 27 Setting the TV Screen Size 28 525 line Digital Progressive Scan Component Video Output 29 Selecting Picture Quality Appropriate for Program Content 30 Viewing from a Desired Camera Angle (Multi-Angle 31 Setting the Language Options......... 32 Setting the on-screen display...
... 23 Stopping Playback and Switching Power Off 23 Adjusting Audio and Video Settings 24 Using the Setup Screen Menus 24 Changing to the Setup Screen "Expert" Menu Mode 25 Setting the Digital Audio Output To Be Compatible with Your AV Component ...... 26 Adjusting the Dynamic Range of the Audio Soundtrack 27 Setting the TV Screen Size 28 525 line Digital Progressive Scan Component Video Output 29 Selecting Picture Quality Appropriate for Program Content 30 Viewing from a Desired Camera Angle (Multi-Angle 31 Setting the Language Options......... 32 Setting the on-screen display...
Owner's Manual
Page 11
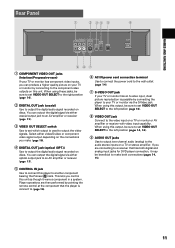
... output is connect to the component video outputs on discs. Player operations are connecting to a receiver that the player is used to the video input on a TV or stereo amplifier. NAMES AND FUNCTIONS Rear Panel 1 2 34 5 6 COMPONENT VIDEO OUT Y PB PR DIGITAL OUT VIDEO OUT SELECT DIGITAL OUT OPT CONTROL IN R L AUDIO OUT VIDEO OUT S-VIDEO OUT AC IN 9 87 1 COMPONENT VIDEO OUT jacks (Interlace/Progressive-scan) If your TV or monitor has component video inputs, you make both digital and analog input jacks for DVD player connection, it were a component...
... output is connect to the component video outputs on discs. Player operations are connecting to a receiver that the player is used to the video input on a TV or stereo amplifier. NAMES AND FUNCTIONS Rear Panel 1 2 34 5 6 COMPONENT VIDEO OUT Y PB PR DIGITAL OUT VIDEO OUT SELECT DIGITAL OUT OPT CONTROL IN R L AUDIO OUT VIDEO OUT S-VIDEO OUT AC IN 9 87 1 COMPONENT VIDEO OUT jacks (Interlace/Progressive-scan) If your TV or monitor has component video inputs, you make both digital and analog input jacks for DVD player connection, it were a component...
Owner's Manual
Page 12
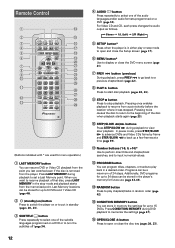
...to select one of the subtitle languages programmed on a DVD (page 33). Remote Control 1 2 3 4 5 6 7 8 9 0 - = ~ LAST CONDITION MEMORY MEMORY OPEN/ CLOSE 0 AUDIO SUBTITLE ANGLE DISPLAY SETUP MENU 5 TOP MENU RETURN 5 5 ENTER 5 PREV 4 STOP PLAY 7 3 STEP/SLOW eE REV 1 1 2 3 NEXT ¢ PAUSE 8 FWD ¡ CLEAR C 4 5 6 +10 7 8 9 0 PROGRAM RANDOM REPEAT REPEAT SEARCH MODE A-B TV CONTROL VOLUME CHANNEL TV FUNC TV Î ! @ ¡ ™ £ ¢ (Buttons indicated with * are used for menu operation.) 1 LAST MEMORY button You can resume DVD or Video...
...to select one of the subtitle languages programmed on a DVD (page 33). Remote Control 1 2 3 4 5 6 7 8 9 0 - = ~ LAST CONDITION MEMORY MEMORY OPEN/ CLOSE 0 AUDIO SUBTITLE ANGLE DISPLAY SETUP MENU 5 TOP MENU RETURN 5 5 ENTER 5 PREV 4 STOP PLAY 7 3 STEP/SLOW eE REV 1 1 2 3 NEXT ¢ PAUSE 8 FWD ¡ CLEAR C 4 5 6 +10 7 8 9 0 PROGRAM RANDOM REPEAT REPEAT SEARCH MODE A-B TV CONTROL VOLUME CHANNEL TV FUNC TV Î ! @ ¡ ™ £ ¢ (Buttons indicated with * are used for menu operation.) 1 LAST MEMORY button You can resume DVD or Video...
Owner's Manual
Page 14
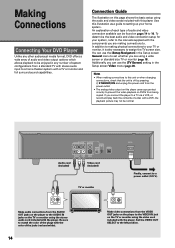
.... L R AUDIO IN Make audio connections from being copied. Use this illustration as a guide to setting up your TV or monitor, it is off by pressing STANDBY/ON and unplug the power cord from a standard TV with stereo audio input to a home theater system with a TV or monitor and full surround sound capabilities. An explanation of each type of audio and video connection available can use the [Setup Navigator] in the Setup screen General menu to set...
.... L R AUDIO IN Make audio connections from being copied. Use this illustration as a guide to setting up your TV or monitor, it is off by pressing STANDBY/ON and unplug the power cord from a standard TV with stereo audio input to a home theater system with a TV or monitor and full surround sound capabilities. An explanation of each type of audio and video connection available can use the [Setup Navigator] in the Setup screen General menu to set...
Owner's Manual
Page 16
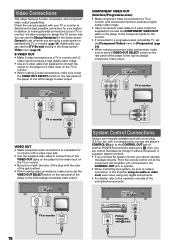
... set the VIDEO OUT SELECT switch on the monitor. • If connected to a progressive-scan compatible TV, set the VIDEO OUT SELECT switch on the rear panel of the player to the left to assign S-video output. COMPONENT VIDEO OUT Y PB PR DIGITAL OUT VIDEO OUT SELECT DIGITAL OUT OPT CONTROL IN R L AUDIO OUT VIDEO OUT S-VIDEO OUT VIDEO OUT VIDEO OUT SELECT AC IN TV or monitor VIDEO IN System Control Connections Using a commercially available cord with component inputs to produce a higher quality video image. • Use a component video cable or 3 video cords...
... set the VIDEO OUT SELECT switch on the monitor. • If connected to a progressive-scan compatible TV, set the VIDEO OUT SELECT switch on the rear panel of the player to the left to assign S-video output. COMPONENT VIDEO OUT Y PB PR DIGITAL OUT VIDEO OUT SELECT DIGITAL OUT OPT CONTROL IN R L AUDIO OUT VIDEO OUT S-VIDEO OUT VIDEO OUT VIDEO OUT SELECT AC IN TV or monitor VIDEO IN System Control Connections Using a commercially available cord with component inputs to produce a higher quality video image. • Use a component video cable or 3 video cords...
Owner's Manual
Page 17
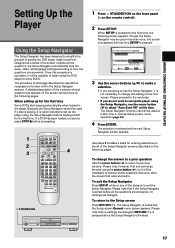
... MEMORY OPEN/ CLOSE 0 AUDIO SUBTITLE ANGLE DISPLAY SETUP MENU 5 TOP MENU RETURN 5 ENTER 5 PREV 4 STOP PLAY 7 3 STEP/SLOW eE REV 1 1 2 3 NEXT ¢ PAUSE 8 FWD ¡ CLEAR C 4 5 6 +10 7 8 9 0 PROGRAM RANDOM REPEAT REPEAT SEARCH MODE A-B TV CONTROL VOLUME CHANNEL TV FUNC TV Î 4 STANDBY/ON STANDBY/ON DVD PLAYER FL DIMMER FL OFF 0 41 ¡¢ 7 8 3 Î 1 Press STANDBY/ON on the front panel ( on the following pages. MAKING CONNECTIONS / SETTING UP THE PLAYER 5 Setting Up the Player Using the Setup Navigator The Setup...
... MEMORY OPEN/ CLOSE 0 AUDIO SUBTITLE ANGLE DISPLAY SETUP MENU 5 TOP MENU RETURN 5 ENTER 5 PREV 4 STOP PLAY 7 3 STEP/SLOW eE REV 1 1 2 3 NEXT ¢ PAUSE 8 FWD ¡ CLEAR C 4 5 6 +10 7 8 9 0 PROGRAM RANDOM REPEAT REPEAT SEARCH MODE A-B TV CONTROL VOLUME CHANNEL TV FUNC TV Î 4 STANDBY/ON STANDBY/ON DVD PLAYER FL DIMMER FL OFF 0 41 ¡¢ 7 8 3 Î 1 Press STANDBY/ON on the front panel ( on the following pages. MAKING CONNECTIONS / SETTING UP THE PLAYER 5 Setting Up the Player Using the Setup Navigator The Setup...

Owner's Manual
Page 20
... OPEN/ CLOSE 0 AUDIO SUBTITLE ANGLE DISPLAY SETUP MENU 5 TOP MENU RETURN 5 5 ENTER 5 PREV 4 STOP PLAY 7 3 STEP/SLOW eE REV 1 1 2 3 NEXT ¢ PAUSE 8 FWD ¡ CLEAR C 4 5 6 +10 7 8 9 0 PROGRAM RANDOM REPEAT REPEAT SEARCH MODE A-B TV CONTROL VOLUME CHANNEL TV FUNC TV Î 2 4 1 3 STANDBY/ON DVD PLAYER FL DIMMER FL OFF 2 4 0 41 ¡¢ 7 8 3 Î 20 1 Press ( STANDBY/ON on the front panel). 2 Press OPEN/CLOSE0 (0 on the disc, a menu may be performed. When this setting can start using the player...
... OPEN/ CLOSE 0 AUDIO SUBTITLE ANGLE DISPLAY SETUP MENU 5 TOP MENU RETURN 5 5 ENTER 5 PREV 4 STOP PLAY 7 3 STEP/SLOW eE REV 1 1 2 3 NEXT ¢ PAUSE 8 FWD ¡ CLEAR C 4 5 6 +10 7 8 9 0 PROGRAM RANDOM REPEAT REPEAT SEARCH MODE A-B TV CONTROL VOLUME CHANNEL TV FUNC TV Î 2 4 1 3 STANDBY/ON DVD PLAYER FL DIMMER FL OFF 2 4 0 41 ¡¢ 7 8 3 Î 20 1 Press ( STANDBY/ON on the front panel). 2 Press OPEN/CLOSE0 (0 on the disc, a menu may be performed. When this setting can start using the player...
Owner's Manual
Page 24
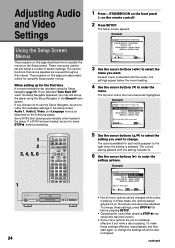
... grayed out on the remote control) 2 Press SETUP. MPEG 3 PCM Change Dolby Digital output mode Move SETUP Exit 5 Use the cursor buttons (5/∞) to select the setting you may cancel the resume function. • Some menu options are not immediately effective if set up for using the Setup Navigator (page 17). These menus are covered throughout this manual. To make the necessary settings in the General menu screen. Adjusting Audio and Video Settings Using the Setup Screen Menus The procedure on...
... grayed out on the remote control) 2 Press SETUP. MPEG 3 PCM Change Dolby Digital output mode Move SETUP Exit 5 Use the cursor buttons (5/∞) to select the setting you may cancel the resume function. • Some menu options are not immediately effective if set up for using the Setup Navigator (page 17). These menus are covered throughout this manual. To make the necessary settings in the General menu screen. Adjusting Audio and Video Settings Using the Setup Screen Menus The procedure on...

Owner's Manual
Page 28
... viewing software recorded in different aspect ratios, the image's height to match the TV or monitor being used. Audio1 Audio2 Video Language General TV Screen 4:3(Letter Box) Component Video - 4:3(Pan&Scan) Progressive DNR - 16:9(Wide) Picture Quality -Standard Select your display preference Move SETUP Exit Settings: 4:3 (Letter Box) 4:3 (Pan & Scan) 16:9 (Wide)* * Factory Setting Notes • If [Standard (4:3)] is selected in the Setup Navigator screen, [4:3 (Letter Box)] is selected on your TV screen size in screen sizes and DVD formats The number...
... viewing software recorded in different aspect ratios, the image's height to match the TV or monitor being used. Audio1 Audio2 Video Language General TV Screen 4:3(Letter Box) Component Video - 4:3(Pan&Scan) Progressive DNR - 16:9(Wide) Picture Quality -Standard Select your display preference Move SETUP Exit Settings: 4:3 (Letter Box) 4:3 (Pan & Scan) 16:9 (Wide)* * Factory Setting Notes • If [Standard (4:3)] is selected in the Setup Navigator screen, [4:3 (Letter Box)] is selected on your TV screen size in screen sizes and DVD formats The number...
Owner's Manual
Page 29
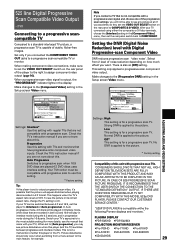
...video output (page 16). "525P DVD PLAYER is applied to the [Component Video] setting in the [Component Video] menu, then set the VIDEO OUT SELECT switch on the rear panel of this setting with progressive scan. 525 line Digital Progressive Scan Compatible Video Output - Make changes to the picture. Audio1 Audio2 Video Language General TV Screen - 16:9(Wide) Component Video - Progressive Picture Quality - ADJUSTING AUDIO AND VIDEO SETTINGS Audio1 Audio2 Video Language General TV Screen - 16:9(Wide) Component Video - Strong DNR is compatible withe the following Pioneer displays...
...video output (page 16). "525P DVD PLAYER is applied to the [Component Video] setting in the [Component Video] menu, then set the VIDEO OUT SELECT switch on the rear panel of this setting with progressive scan. 525 line Digital Progressive Scan Compatible Video Output - Make changes to the picture. Audio1 Audio2 Video Language General TV Screen - 16:9(Wide) Component Video - Progressive Picture Quality - ADJUSTING AUDIO AND VIDEO SETTINGS Audio1 Audio2 Video Language General TV Screen - 16:9(Wide) Component Video - Strong DNR is compatible withe the following Pioneer displays...

Owner's Manual
Page 34
...the subtitle language is recorded. • Switching the subtitle language may be different from the subtitles programmed on the DVD. DVD You can select a desired subtitle language with some discs, subtitle language selection can be made using the menu on them. SUBTITLE LAST CONDITION MEMORY MEMORY OPEN/ CLOSE 0 AUDIO SUBTITLE ANGLE DISPLAY SETUP MENU 5 TOP MENU RETURN 5 5 ENTER 5 PREV 4 STOP PLAY 7 3 STEP/SLOW eE REV 1 1 2 3 NEXT ¢ PAUSE 8 FWD ¡ CLEAR C 4 5 6 +10 7 8 9 0 PROGRAM RANDOM REPEAT REPEAT SEARCH MODE A-B TV CONTROL VOLUME CHANNEL...
...the subtitle language is recorded. • Switching the subtitle language may be different from the subtitles programmed on the DVD. DVD You can select a desired subtitle language with some discs, subtitle language selection can be made using the menu on them. SUBTITLE LAST CONDITION MEMORY MEMORY OPEN/ CLOSE 0 AUDIO SUBTITLE ANGLE DISPLAY SETUP MENU 5 TOP MENU RETURN 5 5 ENTER 5 PREV 4 STOP PLAY 7 3 STEP/SLOW eE REV 1 1 2 3 NEXT ¢ PAUSE 8 FWD ¡ CLEAR C 4 5 6 +10 7 8 9 0 PROGRAM RANDOM REPEAT REPEAT SEARCH MODE A-B TV CONTROL VOLUME CHANNEL...
Owner's Manual
Page 46
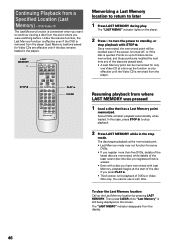
... the next time any of DVDs or Video CDs only. LAST MEMORY STOP 7 LAST CONDITION MEMORY MEMORY OPEN/ CLOSE 0 AUDIO SUBTITLE ANGLE DISPLAY SETUP MENU 5 TOP MENU RETURN 5 5 ENTER 5 PREV 4 STOP PLAY 7 3 STEP/SLOW eE REV 1 1 2 3 NEXT ¢ PAUSE 8 FWD ¡ CLEAR C 4 5 6 +10 7 8 9 0 PROGRAM RANDOM REPEAT REPEAT SEARCH MODE A-B TV CONTROL VOLUME CHANNEL TV FUNC TV Î PLAY 3 CLEAR Memorizing a Last Memory location to return to standby, or stop mode. Resuming playback from the player. The "LAST...
... the next time any of DVDs or Video CDs only. LAST MEMORY STOP 7 LAST CONDITION MEMORY MEMORY OPEN/ CLOSE 0 AUDIO SUBTITLE ANGLE DISPLAY SETUP MENU 5 TOP MENU RETURN 5 5 ENTER 5 PREV 4 STOP PLAY 7 3 STEP/SLOW eE REV 1 1 2 3 NEXT ¢ PAUSE 8 FWD ¡ CLEAR C 4 5 6 +10 7 8 9 0 PROGRAM RANDOM REPEAT REPEAT SEARCH MODE A-B TV CONTROL VOLUME CHANNEL TV FUNC TV Î PLAY 3 CLEAR Memorizing a Last Memory location to return to standby, or stop mode. Resuming playback from the player. The "LAST...

Owner's Manual
Page 47
... memorize new settings. • Switching of the multi-language mode etc., is automatic on the screen, and the previously memorized settings will be selected. Settings are automatically recalled. If you load a disc that has memorized settings is being displayed. LAST CONDITION MEMORY MEMORY OPEN/ CLOSE 0 AUDIO SUBTITLE ANGLE DISPLAY SETUP MENU 5 TOP MENU RETURN 5 ENTER 5 PREV 4 STOP PLAY 7 3 STEP/SLOW eE REV 1 1 2 3 NEXT ¢ PAUSE 8 FWD ¡ CLEAR C 4 5 6 +10 7 8 9 0 PROGRAM RANDOM REPEAT REPEAT SEARCH MODE A-B TV CONTROL VOLUME CHANNEL TV...
... memorize new settings. • Switching of the multi-language mode etc., is automatic on the screen, and the previously memorized settings will be selected. Settings are automatically recalled. If you load a disc that has memorized settings is being displayed. LAST CONDITION MEMORY MEMORY OPEN/ CLOSE 0 AUDIO SUBTITLE ANGLE DISPLAY SETUP MENU 5 TOP MENU RETURN 5 ENTER 5 PREV 4 STOP PLAY 7 3 STEP/SLOW eE REV 1 1 2 3 NEXT ¢ PAUSE 8 FWD ¡ CLEAR C 4 5 6 +10 7 8 9 0 PROGRAM RANDOM REPEAT REPEAT SEARCH MODE A-B TV CONTROL VOLUME CHANNEL TV...
Owner's Manual
Page 53
... multi aspect setting is not appropriate. \ Change the aspect setting in the [TV Screen] setting in the Setup screen menus while a disc is playing are canceled. Region number does not conform with Macro-Vision System copy guard. There is a Video CD or CD loaded in the display. Troubleshooting Incorrect operations are using a composite or S-video cord, then set to [Progressive] but your TV/monitor is not compatible with the label side facing up to view DVD playback. The selected function does...
... multi aspect setting is not appropriate. \ Change the aspect setting in the [TV Screen] setting in the Setup screen menus while a disc is playing are canceled. Region number does not conform with Macro-Vision System copy guard. There is a Video CD or CD loaded in the display. Troubleshooting Incorrect operations are using a composite or S-video cord, then set to [Progressive] but your TV/monitor is not compatible with the label side facing up to view DVD playback. The selected function does...
Owner's Manual
Page 56
... into PCM to enable you to listen to quality digital sound even without a special decoder. The region number can use the time number to locate scenes that occur at a specific frequency rate. The subtitle function can control the player as though it were a component in a system. A disc which include scenes that in to DVD players and DVD discs for desired scenes, and playback. For example, a signal with a mini plug to another Pioneer component...
... into PCM to enable you to listen to quality digital sound even without a special decoder. The region number can use the time number to locate scenes that occur at a specific frequency rate. The subtitle function can control the player as though it were a component in a system. A disc which include scenes that in to DVD players and DVD discs for desired scenes, and playback. For example, a signal with a mini plug to another Pioneer component...


