Owner's Manual
Page 1
DVD PLAYER DV-434 Operating Instructions
DVD PLAYER DV-434 Operating Instructions
Owner's Manual
Page 2
... shielded cables and connectors are designed to operate the equipment. NOTE: This equipment has been tested and found to comply with the DVD player. IMPORTANT NOTICE [For U.S. This is intended for your security. CAUTION • Use of controls or adjustments or performance of.... Connect the equipment into an outlet on the leading edge of the following measures: - CONGRATULATIONS ON YOUR PURCHASE OF THIS FINE PIONEER PRODUCT. model] The serial number for connections. Increase the separation between the equipment and receiver. - Information to User Alteration or ...
... shielded cables and connectors are designed to operate the equipment. NOTE: This equipment has been tested and found to comply with the DVD player. IMPORTANT NOTICE [For U.S. This is intended for your security. CAUTION • Use of controls or adjustments or performance of.... Connect the equipment into an outlet on the leading edge of the following measures: - CONGRATULATIONS ON YOUR PURCHASE OF THIS FINE PIONEER PRODUCT. model] The serial number for connections. Increase the separation between the equipment and receiver. - Information to User Alteration or ...
Owner's Manual
Page 4
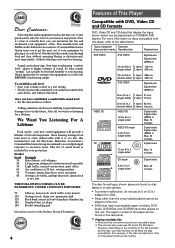
...actually be deceiving. ELECTR N• USTRIES •A ONIC IND EIA EST 1924 SSOCIATIO We Want You LISTENING For A Lifetime 4 Features of sound. DVD VIDEO Digital audio Digital video (MPEG 2) 8 cm (3 in front of speakers, thunderclap 140 Gunshot blast, jet plane 180 Rocket launching pad Information...-sided 2 layer 242 min. 12 cm (5in.)/ 1 layer 266 min. single-sided 2 layer 75 min. Sound can be played on PIONEER DVD players. For more information on disc jackets. • To prevent malfunction, do this unit. The region number of playable Diameter/ discs and their...
...actually be deceiving. ELECTR N• USTRIES •A ONIC IND EIA EST 1924 SSOCIATIO We Want You LISTENING For A Lifetime 4 Features of sound. DVD VIDEO Digital audio Digital video (MPEG 2) 8 cm (3 in front of speakers, thunderclap 140 Gunshot blast, jet plane 180 Rocket launching pad Information...-sided 2 layer 242 min. 12 cm (5in.)/ 1 layer 266 min. single-sided 2 layer 75 min. Sound can be played on PIONEER DVD players. For more information on disc jackets. • To prevent malfunction, do this unit. The region number of playable Diameter/ discs and their...
Owner's Manual
Page 5
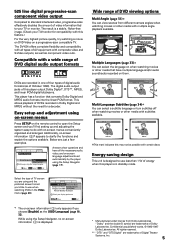
...the Setup Navigator Move ENTER Select SETUP Exit Answer a few examples. Confidential unpublished works, © 1992-1997 Dolby Laboratories. The DV-434 offers complete flexibility and compatibility with subtitles available. Easy setup and adjustment using on-screen menus Press SETUP on the remote control to ...Component Video - 4:3(Pan&Scan) Progressive DNR - 16:9(Wide) Picture Quality -Standard Select your TV or monitor. Below are trademarks of DVD viewing options Multi-Angle (page 31) You can select a subtitle language or turn subtitles off when watching movies or other media that ...
...the Setup Navigator Move ENTER Select SETUP Exit Answer a few examples. Confidential unpublished works, © 1992-1997 Dolby Laboratories. The DV-434 offers complete flexibility and compatibility with subtitles available. Easy setup and adjustment using on-screen menus Press SETUP on the remote control to ...Component Video - 4:3(Pan&Scan) Progressive DNR - 16:9(Wide) Picture Quality -Standard Select your TV or monitor. Below are trademarks of DVD viewing options Multi-Angle (page 31) You can select a subtitle language or turn subtitles off when watching movies or other media that ...

Owner's Manual
Page 6
... section starting on page 37 describes how to use the Setup screen menus as well as indexes. Once you are comfortable using the DVD player and DVDs may be affected. Menu screens do not belong to use the features available on page 20 outlines the basic player operations. The player...divisions. One song generally corresponds to one title with the player. Make the necessary connections. The Setup screen menus are used in This Manual DVD is also a list of terms that presents the highest quality digital audio and video available today. When played back on the disc. Set ...
... section starting on page 37 describes how to use the Setup screen menus as well as indexes. Once you are comfortable using the DVD player and DVDs may be affected. Menu screens do not belong to use the features available on page 20 outlines the basic player operations. The player...divisions. One song generally corresponds to one title with the player. Make the necessary connections. The Setup screen menus are used in This Manual DVD is also a list of terms that presents the highest quality digital audio and video available today. When played back on the disc. Set ...
Owner's Manual
Page 7
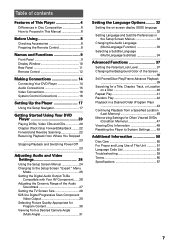
... Control 8 Names and Functions 9 Front Panel 9 Display Window 10 Rear Panel 11 Remote Control 12 Making Connections 14 Connecting Your DVD Player 14 Audio Connections 15 Video Connections 16 System Control Connections 16 Setting Up the Player 17 Using the Setup Navigator 17 Getting ...Playback in a Desired Order (Program Play) 43 Continuing Playback from a Specified Location (Last Memory 46 Memorizing Settings for Often Viewed DVDs (Condition Memory 47 Viewing Disc Information 48 Resetting the Player to System Settings ....... 49 Additional Information 50 Disc Care 50 For ...
... Control 8 Names and Functions 9 Front Panel 9 Display Window 10 Rear Panel 11 Remote Control 12 Making Connections 14 Connecting Your DVD Player 14 Audio Connections 15 Video Connections 16 System Control Connections 16 Setting Up the Player 17 Using the Setup Navigator 17 Getting ...Playback in a Desired Order (Program Play) 43 Continuing Playback from a Specified Location (Last Memory 46 Memorizing Settings for Often Viewed DVDs (Condition Memory 47 Viewing Disc Information 48 Resetting the Player to System Settings ....... 49 Additional Information 50 Disc Care 50 For ...
Owner's Manual
Page 9
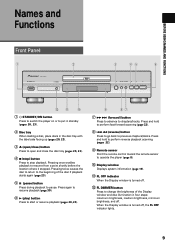
... sensor Point the remote control toward the remote sensor to previous chapters/tracks. BEFORE USING/NAMES AND FUNCTIONS Names and Functions Front Panel 1 2 STANDBY/ON DVD PLAYER FL DIMMER FL OFF 3 45 6 0 41 ¡¢ 7 8 3 Î =- 0 1 STANDBY/ON button Press to switch the player on or to put in standby (pages...
... sensor Point the remote control toward the remote sensor to previous chapters/tracks. BEFORE USING/NAMES AND FUNCTIONS Names and Functions Front Panel 1 2 STANDBY/ON DVD PLAYER FL DIMMER FL OFF 3 45 6 0 41 ¡¢ 7 8 3 Î =- 0 1 STANDBY/ON button Press to switch the player on or to put in standby (pages...
Owner's Manual
Page 10
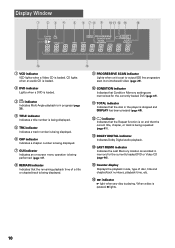
...non-interlaced) video (page 29). 2 DVD indicator Lights when a DVD is loaded. 3 indicator Indicates Multi-Angle playback is in memory for the currently loaded DVD (page 47). - LAST MEMO indicator Indicates the Last Memory location is playing. DVD VCD TITLE TRK GUI CHP PROGRESSIVE CONDITION TOTAL...on -screen menu operation is being performed (page 17). 0 CONDITION indicator Indicates that Condition Memory settings are memorized for the currently loaded DVD or Video CD (page 46). 8 REMAIN indicator Indicates that the remaining playback time of a title or chapter/track is being displayed....
...non-interlaced) video (page 29). 2 DVD indicator Lights when a DVD is loaded. 3 indicator Indicates Multi-Angle playback is in memory for the currently loaded DVD (page 47). - LAST MEMO indicator Indicates the Last Memory location is playing. DVD VCD TITLE TRK GUI CHP PROGRESSIVE CONDITION TOTAL...on -screen menu operation is being performed (page 17). 0 CONDITION indicator Indicates that Condition Memory settings are memorized for the currently loaded DVD or Video CD (page 46). 8 REMAIN indicator Indicates that the remaining playback time of a title or chapter/track is being displayed....
Owner's Manual
Page 11
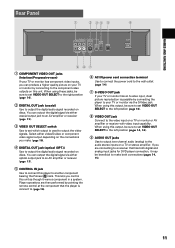
...16). 4 DIGITAL OUT jack (optical (OPT.)) Use to output the digital audio signal recorded on discs. When using this player to another component bearing the Pioneer Î mark. When using these jacks, be sure to set which output is connect to (page 16). 11 NAMES AND FUNCTIONS Rear Panel 1 2 ...jack. Select either video/S-video or component video signal output depending on the connections you make both digital and analog input jacks for DVD player connection, it were a component in a system. Player operations are connecting to a receiver that the player is used to output the ...
...16). 4 DIGITAL OUT jack (optical (OPT.)) Use to output the digital audio signal recorded on discs. When using this player to another component bearing the Pioneer Î mark. When using these jacks, be sure to set which output is connect to (page 16). 11 NAMES AND FUNCTIONS Rear Panel 1 2 ...jack. Select either video/S-video or component video signal output depending on the connections you make both digital and analog input jacks for DVD player connection, it were a component in a system. Player operations are connecting to a receiver that the player is used to output the ...
Owner's Manual
Page 12
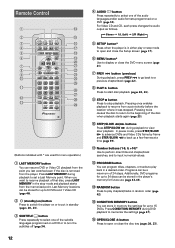
...Left) = 2/R (Right) 5 SETUP button* Press when the player is removed from the player. In pause mode, press STEP/SLOW E to advance DVDs and Video CDs frame by frame and STEP/SLOW e to set a Last Memory point. Pressing once enables playback to view slow playback. Pressing twice ...track (page 22). 8 PLAY 3 button Press to start disc playback (pages 20, 23). 9 STOP 7 button Press to play back in random order (page 42). ! Additionally, DVD programs for up to play chapters/tracks in a desired order. Remote Control 1 2 3 4 5 6 7 8 9 0 - = ~ LAST CONDITION MEMORY MEMORY OPEN/ CLOSE 0...
...Left) = 2/R (Right) 5 SETUP button* Press when the player is removed from the player. In pause mode, press STEP/SLOW E to advance DVDs and Video CDs frame by frame and STEP/SLOW e to set a Last Memory point. Pressing once enables playback to view slow playback. Pressing twice ...track (page 22). 8 PLAY 3 button Press to start disc playback (pages 20, 23). 9 STOP 7 button Press to play back in random order (page 42). ! Additionally, DVD programs for up to play chapters/tracks in a desired order. Remote Control 1 2 3 4 5 6 7 8 9 0 - = ~ LAST CONDITION MEMORY MEMORY OPEN/ CLOSE 0...
Owner's Manual
Page 13
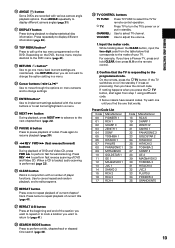
... RCA 5 SHARP 1 ZENITH 2 SANYO 1 PANASONIC 2 GOLDSTAR 2 HITACHI 2 HITACHI 3 TOSHIBA 2 SHARP 2 GE 2 MAGNAVOX 2 TOSHIBA 3 HITACHI 4 JVC 2 FUJITSU PIONEER 2 GRANDIENTE 13 Press REV 1 to the make of player functions. VOLUME: Use to select TV channel. TV: Press TV to go one that corresponds to... turn the TV's power on the remote control. 2. # ANGLE button Some DVDs are maintained). While holiding down the CLEAR button, input the two digit code from step 1 using a different code. • Some makers have a Pioneer TV, press and hold CLEAR, then press 0, 0 on or put in ...
... RCA 5 SHARP 1 ZENITH 2 SANYO 1 PANASONIC 2 GOLDSTAR 2 HITACHI 2 HITACHI 3 TOSHIBA 2 SHARP 2 GE 2 MAGNAVOX 2 TOSHIBA 3 HITACHI 4 JVC 2 FUJITSU PIONEER 2 GRANDIENTE 13 Press REV 1 to the make of player functions. VOLUME: Use to select TV channel. TV: Press TV to go one that corresponds to... turn the TV's power on the remote control. 2. # ANGLE button Some DVDs are maintained). While holiding down the CLEAR button, input the two digit code from step 1 using a different code. • Some makers have a Pioneer TV, press and hold CLEAR, then press 0, 0 on or put in ...
Owner's Manual
Page 14
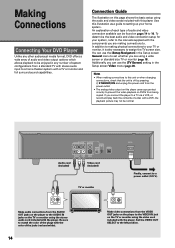
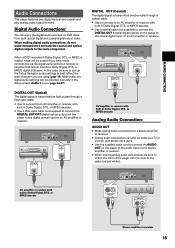
... and white). 14 VIDEO IN S-VIDEO IN Make video connections from the VIDEO OUT jacks on the player to the AUDIO IN jacks on DVDs from being copied. To determine the best audio and video connection setup for your system, refer to the manuals supplied with the components you can...this unit or when changing connections, check that the unit is also necessary to the left position. Making Connections Connecting Your DVD Player Unlike any other audiovisual media format, DVD offers a wide array of audio and video output options which allows playback to be enjoyed in any number of system ...
... and white). 14 VIDEO IN S-VIDEO IN Make video connections from the VIDEO OUT jacks on the player to the AUDIO IN jacks on DVDs from being copied. To determine the best audio and video connection setup for your system, refer to the manuals supplied with the components you can...this unit or when changing connections, check that the unit is also necessary to the left position. Making Connections Connecting Your DVD Player Unlike any other audiovisual media format, DVD offers a wide array of audio and video output options which allows playback to be enjoyed in any number of system ...
Owner's Manual
Page 15
... monitor with stereo input jacks. • Use the supplied audio cord to connect the AUDIO OUT on the player to the digital optical input on DVD discs from both optical digital and coaxial digital output jacks. COMPONENT VIDEO OUT Y PB PR DIGITAL OUT VIDEO OUT SELECT DIGITAL OUT OPT CONTROL IN... coaxial and optical digital outputs to best reflect the type of the plugs with built-in the Setup screen Audio 1 menu (page 26-27). When a DVD recorded in Dolby Digital, DTS, or MPEG decoder R L AUDIO OUT AUDIO IN R L Stereo amplifier or receiver 15 In this case, be sure to set up...
... monitor with stereo input jacks. • Use the supplied audio cord to connect the AUDIO OUT on the player to the digital optical input on DVD discs from both optical digital and coaxial digital output jacks. COMPONENT VIDEO OUT Y PB PR DIGITAL OUT VIDEO OUT SELECT DIGITAL OUT OPT CONTROL IN... coaxial and optical digital outputs to best reflect the type of the plugs with built-in the Setup screen Audio 1 menu (page 26-27). When a DVD recorded in Dolby Digital, DTS, or MPEG decoder R L AUDIO OUT AUDIO IN R L Stereo amplifier or receiver 15 In this case, be sure to set up...
Owner's Manual
Page 17
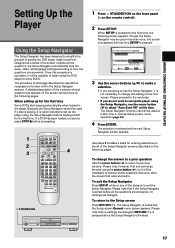
...described on -screen multiple-choice questions, the Setup Navigator automatically sets the audio, video, and language settings according to enjoy DVDs. To return to function within the Setup Navigator screens. Once this procedure is complete, it will be used at this page... FWD ¡ CLEAR C 4 5 6 +10 7 8 9 0 PROGRAM RANDOM REPEAT REPEAT SEARCH MODE A-B TV CONTROL VOLUME CHANNEL TV FUNC TV Î 4 STANDBY/ON STANDBY/ON DVD PLAYER FL DIMMER FL OFF 0 41 ¡¢ 7 8 3 Î 1 Press STANDBY/ON on the front panel ( on this time. To change the setting on the...
...described on -screen multiple-choice questions, the Setup Navigator automatically sets the audio, video, and language settings according to enjoy DVDs. To return to function within the Setup Navigator screens. Once this procedure is complete, it will be used at this page... FWD ¡ CLEAR C 4 5 6 +10 7 8 9 0 PROGRAM RANDOM REPEAT REPEAT SEARCH MODE A-B TV CONTROL VOLUME CHANNEL TV FUNC TV Î 4 STANDBY/ON STANDBY/ON DVD PLAYER FL DIMMER FL OFF 0 41 ¡¢ 7 8 3 Î 1 Press STANDBY/ON on the front panel ( on this time. To change the setting on the...
Owner's Manual
Page 18
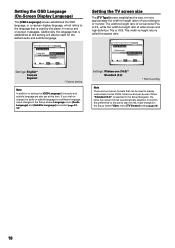
...ñol Move ENTER Select SETUP Exit Settings: English* français Español * Factory setting Note In addition to display wide-screen format DVDs: letter box and pan & scan. The width-to-height ratio of conventional TVs is 4:3, while the width-to height ration of wide screen and high...
...ñol Move ENTER Select SETUP Exit Settings: English* français Español * Factory setting Note In addition to display wide-screen format DVDs: letter box and pan & scan. The width-to-height ratio of conventional TVs is 4:3, while the width-to height ration of wide screen and high...

Owner's Manual
Page 20
...; Load a disc with the label side facing up the player to correspond to a receiver or amplifier that you want to view. • When a DVD is loaded: Select the item with the cursor buttons (2/3/5/ ∞) or the number buttons then press ENTER. • When a Video CD is factory ... to match your home system. Having made connections to (page 26-27). • The TV screen size is loaded: Use the number buttons to enjoy DVDs, Video CDs, and CDs. 1 5 LAST CONDITION MEMORY MEMORY OPEN/ CLOSE 0 AUDIO SUBTITLE ANGLE DISPLAY SETUP MENU 5 TOP MENU RETURN 5 5 ENTER 5 PREV 4 ...
...; Load a disc with the label side facing up the player to correspond to a receiver or amplifier that you want to view. • When a DVD is loaded: Select the item with the cursor buttons (2/3/5/ ∞) or the number buttons then press ENTER. • When a Video CD is factory ... to match your home system. Having made connections to (page 26-27). • The TV screen size is loaded: Use the number buttons to enjoy DVDs, Video CDs, and CDs. 1 5 LAST CONDITION MEMORY MEMORY OPEN/ CLOSE 0 AUDIO SUBTITLE ANGLE DISPLAY SETUP MENU 5 TOP MENU RETURN 5 5 ENTER 5 PREV 4 ...
Owner's Manual
Page 21
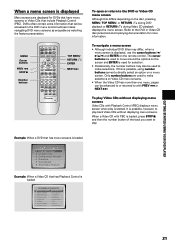
...may differ, when a menu screen is started. Refer to directly select an option on the disc, pressing MENU, TOP MENU, or RETURN during DVD playback or RETURN during Video CD playback displays the menu screen. If this differs depending on a menu screen. MENU Cursor buttons PREV 4 STOP... Artist Pfeuti John Torn Hot Monkey Stick 21 When a Video CD with Playback Control (PBC) display a menu screen when play . GETTING STARTED USING YOUR DVD PLAYER 5 When a menu screen is loaded STANDARD VOCAL BEST 1 Don't Tekno for an Answer 2 Bad Whack Naff Riff 3 dubmyheadbassman 4 Gooey Love Jingle...
...may differ, when a menu screen is started. Refer to directly select an option on the disc, pressing MENU, TOP MENU, or RETURN during DVD playback or RETURN during Video CD playback displays the menu screen. If this differs depending on a menu screen. MENU Cursor buttons PREV 4 STOP... Artist Pfeuti John Torn Hot Monkey Stick 21 When a Video CD with Playback Control (PBC) display a menu screen when play . GETTING STARTED USING YOUR DVD PLAYER 5 When a menu screen is loaded STANDARD VOCAL BEST 1 Don't Tekno for an Answer 2 Bad Whack Naff Riff 3 dubmyheadbassman 4 Gooey Love Jingle...

Owner's Manual
Page 22
...CLEAR C 4 5 6 +10 7 8 9 0 PROGRAM RANDOM REPEAT REPEAT SEARCH MODE A-B TV CONTROL VOLUME CHANNEL TV FUNC TV Î PLAY 3 FWD ¡ STANDBY/ON DVD PLAYER FL DIMMER FL OFF 22 3 0 41 ¡¢ 7 8 3 Î 41 ¡¢ Advancing to the next chapter (track) Press NEXT ¢ (¡...more than one track forward by pressing and holding NEXT ¢ and releasing when the desired chapter (track) number appears in the display. DVD/Video CD/CD PREV 4 LAST CONDITION MEMORY MEMORY OPEN/ CLOSE 0 AUDIO SUBTITLE ANGLE DISPLAY SETUP MENU 5 TOP MENU RETURN 5 5 ...
...CLEAR C 4 5 6 +10 7 8 9 0 PROGRAM RANDOM REPEAT REPEAT SEARCH MODE A-B TV CONTROL VOLUME CHANNEL TV FUNC TV Î PLAY 3 FWD ¡ STANDBY/ON DVD PLAYER FL DIMMER FL OFF 22 3 0 41 ¡¢ 7 8 3 Î 41 ¡¢ Advancing to the next chapter (track) Press NEXT ¢ (¡...more than one track forward by pressing and holding NEXT ¢ and releasing when the desired chapter (track) number appears in the display. DVD/Video CD/CD PREV 4 LAST CONDITION MEMORY MEMORY OPEN/ CLOSE 0 AUDIO SUBTITLE ANGLE DISPLAY SETUP MENU 5 TOP MENU RETURN 5 5 ...

Owner's Manual
Page 23
... return to the beginning when PLAY 3 is in . 23 The disc tray goes back in the player - The display shows the disc type (DVDs or Video CDs). Playback starts from the point that the disc was stopped last time. Playback stops. 2 Press OPEN/CLOSE0 (0 on the front ...panel). The disc tray comes out. 3 Remove the disc. 3 8 7 ¡¢ 1 4 0 4 Press ( STANDBY/ON on the front panel). Press STOP 7 once. DVD/Video CD/CD 4 1 LAST CONDITION MEMORY MEMORY OPEN/ CLOSE 0 AUDIO SUBTITLE ANGLE DISPLAY SETUP MENU 5 TOP MENU RETURN 5 ENTER 5 PREV 4 STOP PLAY 7 3 STEP/SLOW eE...
... return to the beginning when PLAY 3 is in . 23 The disc tray goes back in the player - The display shows the disc type (DVDs or Video CDs). Playback starts from the point that the disc was stopped last time. Playback stops. 2 Press OPEN/CLOSE0 (0 on the front ...panel). The disc tray comes out. 3 Remove the disc. 3 8 7 ¡¢ 1 4 0 4 Press ( STANDBY/ON on the front panel). Press STOP 7 once. DVD/Video CD/CD 4 1 LAST CONDITION MEMORY MEMORY OPEN/ CLOSE 0 AUDIO SUBTITLE ANGLE DISPLAY SETUP MENU 5 TOP MENU RETURN 5 ENTER 5 PREV 4 STOP PLAY 7 3 STEP/SLOW eE...
Owner's Manual
Page 24
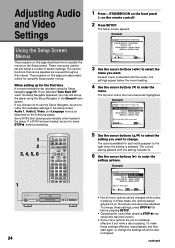
...ENTER Select SETUP Exit • Not all menu options can be sure to set up for each menu is stopped. Some DVDs start again, or change these settings effective, stop playback and then start playing automatically when loaded in the Setup screen Audio.../SLOW eE REV 1 1 2 3 NEXT ¢ PAUSE 8 FWD ¡ CLEAR C 4 5 6 +10 7 8 9 0 PROGRAM RANDOM REPEAT REPEAT SEARCH MODE A-B TV CONTROL STANDBY/ON DVD PLAYER FL DIMMER FL OFF 0 41 ¡¢ 7 8 3 Î 24 1 Press STANDBY/ON on the front panel ( on the remote control) 2 Press SETUP. Dolby Digital...
...ENTER Select SETUP Exit • Not all menu options can be sure to set up for each menu is stopped. Some DVDs start again, or change these settings effective, stop playback and then start playing automatically when loaded in the Setup screen Audio.../SLOW eE REV 1 1 2 3 NEXT ¢ PAUSE 8 FWD ¡ CLEAR C 4 5 6 +10 7 8 9 0 PROGRAM RANDOM REPEAT REPEAT SEARCH MODE A-B TV CONTROL STANDBY/ON DVD PLAYER FL DIMMER FL OFF 0 41 ¡¢ 7 8 3 Î 24 1 Press STANDBY/ON on the front panel ( on the remote control) 2 Press SETUP. Dolby Digital...


