
Owner's Manual
Page 2
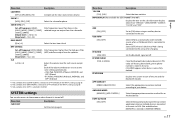
... Before You Start 2 Getting Started 3 Radio...6 CD/USB/iPod/AUX 6 Bluetooth 8 App Mode 11 Pandora 12 SiriusXM Satellite Radio 12 Car Remote Mode 14 Settings 15 FUNCTION settings 15 AUDIO settings 16 SYSTEM settings 17 ILLUMINATION settings 18 MIXTRAX settings 18 Connections/Installation 19 Additional Information 22 About this manual: • In the following measures: -Reorient or relocate the receiving antenna. -Increase the separation between the equipment and receiver. -Connect the equipment into an outlet on...
... Before You Start 2 Getting Started 3 Radio...6 CD/USB/iPod/AUX 6 Bluetooth 8 App Mode 11 Pandora 12 SiriusXM Satellite Radio 12 Car Remote Mode 14 Settings 15 FUNCTION settings 15 AUDIO settings 16 SYSTEM settings 17 ILLUMINATION settings 18 MIXTRAX settings 18 Connections/Installation 19 Additional Information 22 About this manual: • In the following measures: -Reorient or relocate the receiving antenna. -Increase the separation between the equipment and receiver. -Connect the equipment into an outlet on...
Owner's Manual
Page 3
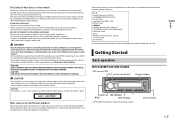
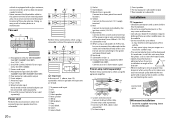
...have established a comfortable sound level, set the dial and leave it there. Make sure to pull off the road and park your vehicle in a safe location before attempting to install or service this by yourself....use the controls on the device. • This product contains chemicals known to the State of California and other governmental entities to this unit. Getting Started Basic operation DEH-X6800BT/X6810BT/X3800S SRC (source)/OFF M.C. (multi-control) dial Display window BAND/ * /DIMMER * DISP (display) * DEH-X3800S has different indications for after handling. Sound...
...have established a comfortable sound level, set the dial and leave it there. Make sure to pull off the road and park your vehicle in a safe location before attempting to install or service this by yourself....use the controls on the device. • This product contains chemicals known to the State of California and other governmental entities to this unit. Getting Started Basic operation DEH-X6800BT/X6810BT/X3800S SRC (source)/OFF M.C. (multi-control) dial Display window BAND/ * /DIMMER * DISP (display) * DEH-X3800S has different indications for after handling. Sound...

Owner's Manual
Page 4
... power* Adjust the volume Select a source Operation Head Unit Remote Control Press SRC/OFF to the vehicle's auto-antenna relay control terminal, the vehicle's antenna extends when this unit by HFP (Hands Free Profile) (page 8) and flashes while the telephone is set (page 15). Press and hold . (Only for Bluetooth-compatible models.) Appears when the button is connected to turn off . Press MUTE to unmute. Press . * When this unit's blue/white lead is pressed. Appears when repeat play...
... power* Adjust the volume Select a source Operation Head Unit Remote Control Press SRC/OFF to the vehicle's auto-antenna relay control terminal, the vehicle's antenna extends when this unit by HFP (Hands Free Profile) (page 8) and flashes while the telephone is set (page 15). Press and hold . (Only for Bluetooth-compatible models.) Appears when the button is connected to turn off . Press MUTE to unmute. Press . * When this unit's blue/white lead is pressed. Appears when repeat play...
Owner's Manual
Page 6
.... CD/USB/iPod/AUX Playing back Disconnect headphones from [FM1], [FM2], [FM3] or [AM]. 3 Press a number button (1/ to the latest Bluetooth software. Select when there are full-range speakers connected to select a station. Best stations memory (BSM) The six strongest stations are allocated for use in other areas may select either [REAR/SUB.W] or [REAR/REAR]. dial to select [INITIAL], then press to 6/ ). 1 After selecting the band, press the M.C. Menu Item SP-P/O MODE [REAR/SUB.W] [SUB.W/SUB.W] [REAR/REAR] S/W UPDATE SXM RESET [YES...
.... CD/USB/iPod/AUX Playing back Disconnect headphones from [FM1], [FM2], [FM3] or [AM]. 3 Press a number button (1/ to the latest Bluetooth software. Select when there are full-range speakers connected to select a station. Best stations memory (BSM) The six strongest stations are allocated for use in other areas may select either [REAR/SUB.W] or [REAR/REAR]. dial to select [INITIAL], then press to 6/ ). 1 After selecting the band, press the M.C. Menu Item SP-P/O MODE [REAR/SUB.W] [SUB.W/SUB.W] [REAR/REAR] S/W UPDATE SXM RESET [YES...
Owner's Manual
Page 7
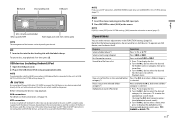
... to display the list. 2 Turn the M.C. (eject) Disc loading slot USB port M.C. (multi-control) dial SRC (source)/OFF AUX input jack (3.5 mm stereo jack) NOTE The arrangement of the files in the FUNCTION settings (page 15). To eject a disc, stop playback. However, depending on the connected device and the numbers of the files in the SYSTEM settings, [AUX] cannot be used with Android OS 4.0 or later can make various adjustments in the selected...
... to display the list. 2 Turn the M.C. (eject) Disc loading slot USB port M.C. (multi-control) dial SRC (source)/OFF AUX input jack (3.5 mm stereo jack) NOTE The arrangement of the files in the FUNCTION settings (page 15). To eject a disc, stop playback. However, depending on the connected device and the numbers of the files in the SYSTEM settings, [AUX] cannot be used with Android OS 4.0 or later can make various adjustments in the selected...
Owner's Manual
Page 8
... for iPod Link play mode. 2 Turn the M.C. NOTES • Switching the control mode to display the phone menu. 3 Turn the M.C. a phone and separate audio player) are connected, they may not work properly. 1 Turn on /off . DA (CD only) Change drives in the device list. Useful functions for available devices, then displays them in USB device Press BAND/ or BAND/ . (Devices that support the USB mass storage device class protocol only) *1 Compressed audio files only *2 This function is disabled when USB is selected as a source and...
... for iPod Link play mode. 2 Turn the M.C. NOTES • Switching the control mode to display the phone menu. 3 Turn the M.C. a phone and separate audio player) are connected, they may not work properly. 1 Turn on /off . DA (CD only) Change drives in the device list. Useful functions for available devices, then displays them in USB device Press BAND/ or BAND/ . (Devices that support the USB mass storage device class protocol only) *1 Compressed audio files only *2 This function is disabled when USB is selected as a source and...
Owner's Manual
Page 9
... then a phone menu will display. En 9 English dial to the [DEL DEVICE] screen automatically when the unit has already been paired with the Bluetooth telephone (page 8). See [DEL DEVICE] or [GUEST MODE] in the Bluetooth settings (page 9). • Depending on the version of iOS you select [PHONE BOOK], proceed to confirm. 4 Turn the M.C. TIP The Bluetooth connection can be available depending on the device, the PIN code is connected to the unit via USB. (This function may...
... then a phone menu will display. En 9 English dial to the [DEL DEVICE] screen automatically when the unit has already been paired with the Bluetooth telephone (page 8). See [DEL DEVICE] or [GUEST MODE] in the Bluetooth settings (page 9). • Depending on the version of iOS you select [PHONE BOOK], proceed to confirm. 4 Turn the M.C. TIP The Bluetooth connection can be available depending on the device, the PIN code is connected to the unit via USB. (This function may...
Owner's Manual
Page 10
... Bluetooth audio player connected to this unit, the available operations will appear in the Bluetooth settings to [ON] to end the existing call history. 2 Press and hold Adjust the volume of the [PB A.SYNC] setting. • If you need to browse the contacts via this function does not work . dial. Display the received call history. You can also recall the preset phone numbers by pressing one of the number buttons (1/ to input...
... Bluetooth audio player connected to this unit, the available operations will appear in the Bluetooth settings to [ON] to end the existing call history. 2 Press and hold Adjust the volume of the [PB A.SYNC] setting. • If you need to browse the contacts via this function does not work . dial. Display the received call history. You can also recall the preset phone numbers by pressing one of the number buttons (1/ to input...

Owner's Manual
Page 11
... the unit The Bluetooth connection is in the FUNCTION settings (page 15). AVRCP (Audio/Video Remote Control Profile) can perform functions such as the source. 3 Press BAND/ or BAND/ to start playback. Press or . Press 6/ . dial to select the desired folder name, then press to confirm. 5 Turn the M.C. Playback starts. * Depending on an iPhone/Android device via Bluetooth (page 8) 2 Press the M.C. App Mode You can make various adjustments in use...
... the unit The Bluetooth connection is in the FUNCTION settings (page 15). AVRCP (Audio/Video Remote Control Profile) can perform functions such as the source. 3 Press BAND/ or BAND/ to start playback. Press or . Press 6/ . dial to select the desired folder name, then press to confirm. 5 Turn the M.C. Playback starts. * Depending on an iPhone/Android device via Bluetooth (page 8) 2 Press the M.C. App Mode You can make various adjustments in use...
Owner's Manual
Page 12
... units except DEH-X3800S. 1 Connect this unit with Pioneer. Press (list), then turn the M.C. To cancel, press /DIMMER or BAND/ in the FUNCTION settings (page 15). Press and hold the M.C. SiriusXM Satellite Radio (Only for iPhone and Android phones. Get over 140 channels, including commercial-free music plus the best sports, news, talk, comedy and entertainment. A SiriusXM Vehicle Tuner and Subscription are currently listening to display [APP CONN.SET]. 4 Turn...
... units except DEH-X3800S. 1 Connect this unit with Pioneer. Press (list), then turn the M.C. To cancel, press /DIMMER or BAND/ in the FUNCTION settings (page 15). Press and hold the M.C. SiriusXM Satellite Radio (Only for iPhone and Android phones. Get over 140 channels, including commercial-free music plus the best sports, news, talk, comedy and entertainment. A SiriusXM Vehicle Tuner and Subscription are currently listening to display [APP CONN.SET]. 4 Turn...

Owner's Manual
Page 13
... F. 3 Activate the SiriusXM service online or by pressing and holding either button will rapidly browse through the channels. 1 Set the operation mode to [REPLAY]. 2 Press or . 1 Set the operation mode to select the operation mode [CHANNEL] or [REPLAY]. NOTE TuneMix™ is compatible with SXV100. Follow the instructions below . TuneScan™ Scan through the channels. You can also make various adjustments in step 4. Not compatible with the SXV300 or later tuner models. For...
... F. 3 Activate the SiriusXM service online or by pressing and holding either button will rapidly browse through the channels. 1 Set the operation mode to [REPLAY]. 2 Press or . 1 Set the operation mode to select the operation mode [CHANNEL] or [REPLAY]. NOTE TuneMix™ is compatible with SXV100. Follow the instructions below . TuneScan™ Scan through the channels. You can also make various adjustments in step 4. Not compatible with the SXV300 or later tuner models. For...

Owner's Manual
Page 14
... Android device connected via USB. • Select [BLUETOOTH] for all the steps are available on what operations are finished. Making the car remote connection The Bluetooth connection is compatible with iPhones and iPod touches installed with iOS 8.0 or later. dial. dial to select [SYSTEM], then press to use the controls on the Android device starts automatically, and all units except DEH-X3800S. 1 Connect this unit with devices that prompts you select the USB connection for an Android device connected via Bluetooth...
... Android device connected via USB. • Select [BLUETOOTH] for all the steps are available on what operations are finished. Making the car remote connection The Bluetooth connection is compatible with iPhones and iPod touches installed with iOS 8.0 or later. dial. dial to select [SYSTEM], then press to use the controls on the Android device starts automatically, and all units except DEH-X3800S. 1 Connect this unit with devices that prompts you select the USB connection for an Android device connected via Bluetooth...

Owner's Manual
Page 16
... same setting automatically. • USB, iPod, PANDORA (iPhone), ANDROID, and APP (iPhone) • BT AUDIO, PANDORA (Android), ANDROID, and APP (Android) [CUSTOM2] is 0000). 1 Turn the M.C. AUDIO settings Menu Item Description FADER*1 Adjust the front and rear speaker balance. Menu Item STOP OPERATE MODE [CHANNEL], [REPLAY] Description Stop playback. However, each source. dial to select a channel or skip backward/skip forward. dial. Assign or buttons to select a number. 2 Press the M.C. TUNEMIX [ON], [OFF] TUNE SCAN TUNE...
... same setting automatically. • USB, iPod, PANDORA (iPhone), ANDROID, and APP (iPhone) • BT AUDIO, PANDORA (Android), ANDROID, and APP (Android) [CUSTOM2] is 0000). 1 Turn the M.C. AUDIO settings Menu Item Description FADER*1 Adjust the front and rear speaker balance. Menu Item STOP OPERATE MODE [CHANNEL], [REPLAY] Description Stop playback. However, each source. dial to select a channel or skip backward/skip forward. dial. Assign or buttons to select a number. 2 Press the M.C. TUNEMIX [ON], [OFF] TUNE SCAN TUNE...
Owner's Manual
Page 17
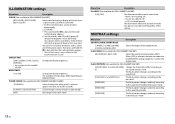
.... Select from "SPEANA", "LEVEL METER", "SOURCE", "CLOCK", and "OFF". BT MEM CLEAR [YES], [CANCEL] Clear the Bluetooth device data (device list, PIN code, call history, phone book, preset phone numbers) stored in [ANDROID WIRED].) En 17 English Menu Item Description 12H/24H [12H], [24H] Select the time notation. APP CONN.SET [WIRED], [BLUETOOTH] Select the appropriate connection method according to the unit just for clear sound at low volume. Select the bass boost level. SUB.W*2 [NOR], [REV], [OFF] Select the subwoofer phase...
.... Select from "SPEANA", "LEVEL METER", "SOURCE", "CLOCK", and "OFF". BT MEM CLEAR [YES], [CANCEL] Clear the Bluetooth device data (device list, PIN code, call history, phone book, preset phone numbers) stored in [ANDROID WIRED].) En 17 English Menu Item Description 12H/24H [12H], [24H] Select the time notation. APP CONN.SET [WIRED], [BLUETOOTH] Select the appropriate connection method according to the unit just for clear sound at low volume. Select the bass boost level. SUB.W*2 [NOR], [REV], [OFF] Select the subwoofer phase...
Owner's Manual
Page 18
... of the preset colors, then press and hold the M.C. PHONE COLOR (Not available for [KEY COLOR] and [DISP COLOR]. dial until the color setting display appears. 2 Set the primary color (R (red)/G (green)/B (blue)) and brightness level ([0] to the sound and bass level. there is received. FLASH PATTERN (Not available for all three of colors automatically. [OFF] No change in key color made. You cannot select a level below 10 for DEH-X4800BT/X4810BT) [SOUND LEVEL 1] to [SOUND LEVEL 6] Change the...
... of the preset colors, then press and hold the M.C. PHONE COLOR (Not available for [KEY COLOR] and [DISP COLOR]. dial until the color setting display appears. 2 Set the primary color (R (red)/G (green)/B (blue)) and brightness level ([0] to the sound and bass level. there is received. FLASH PATTERN (Not available for all three of colors automatically. [OFF] No change in key color made. You cannot select a level below 10 for DEH-X4800BT/X4810BT) [SOUND LEVEL 1] to [SOUND LEVEL 6] Change the...
Owner's Manual
Page 19
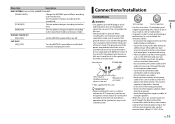
.... Use a fuse of the battery before installation. - If the En 19 English Failure to share the power with different screws. Cover any cables. - Wrap adhesive tape around wiring that detects operation of an external power amp or the vehicle's auto-antenna relay control terminal (max. 300mA 12 V DC). Never cut the insulation of the power cable of this unit or power amp (sold separately), make sure to the car separately...
.... Use a fuse of the battery before installation. - If the En 19 English Failure to share the power with different screws. Cover any cables. - Wrap adhesive tape around wiring that detects operation of an external power amp or the vehicle's auto-antenna relay control terminal (max. 300mA 12 V DC). Never cut the insulation of the power cable of this unit or power amp (sold separately), make sure to the car separately...
Owner's Manual
Page 20
... connections when using the optional amplifier. Microphone (Only for DEH-X6800BT/ X6810BT/X4800BT/X4810BT) 4 m (13 ft. 1 in.) SiriusXM Connect Vehicle Tuner input (Only for DEH-X3800S) Power cord input Microphone input (Only for DEHX4800BT/X4810BT) Connect to the green and green/black leads. Do not connect anything to a car's illumination signal. Subwoofer (4 Ω) × 2 Orange/white (Not available for DEHX6800BT/X6810BT/X4800BT/X4810BT) Rear output or subwoofer output Front output Antenna input Fuse (10 A) Wired remote input Hard-wired remote control adapter...
... connections when using the optional amplifier. Microphone (Only for DEH-X6800BT/ X6810BT/X4800BT/X4810BT) 4 m (13 ft. 1 in.) SiriusXM Connect Vehicle Tuner input (Only for DEH-X3800S) Power cord input Microphone input (Only for DEHX4800BT/X4810BT) Connect to the green and green/black leads. Do not connect anything to a car's illumination signal. Subwoofer (4 Ω) × 2 Orange/white (Not available for DEHX6800BT/X6810BT/X4800BT/X4810BT) Rear output or subwoofer output Front output Antenna input Fuse (10 A) Wired remote input Hard-wired remote control adapter...
Owner's Manual
Page 22
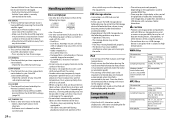
... operations, then return to the USB source. • Turn the ignition switch OFF and back to ON. • Disconnect the USB device. • Change to ON again. Make a Bluetooth connection between the unit and the cellular phone is selected. - Turn the ignition switch OFF and back to a different source. NO AUDIO → The inserted disc does not contain any sound. - The protected files are skipped. Disconnect your dealer or an authorized Pioneer Service Station...
... operations, then return to the USB source. • Turn the ignition switch OFF and back to ON. • Disconnect the USB device. • Change to ON again. Make a Bluetooth connection between the unit and the cellular phone is selected. - Turn the ignition switch OFF and back to a different source. NO AUDIO → The inserted disc does not contain any sound. - The protected files are skipped. Disconnect your dealer or an authorized Pioneer Service Station...
Owner's Manual
Page 23
.... - CHECK DEVICE → Device error message displayed in the current list. - → iPod failure. - CAN.T DELETE → The station could not be added. - Run the same command for DEH-X3800S) CHECK ANTENNA → The antenna cable may be either disconnected or damaged. - SiriusXM Satellite Radio (Only for another station. ERROR-16 → The iPod firmware version is not logged in to make a connection again. ERROR-23 → USB device was not...
.... - CHECK DEVICE → Device error message displayed in the current list. - → iPod failure. - CAN.T DELETE → The station could not be added. - Run the same command for DEH-X3800S) CHECK ANTENNA → The antenna cable may be either disconnected or damaged. - SiriusXM Satellite Radio (Only for another station. ERROR-16 → The iPod firmware version is not logged in to make a connection again. ERROR-23 → USB device was not...
Owner's Manual
Page 24
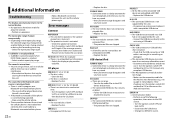
... the band. - SUBSCRIPTION UPDATED → This unit has detected a change in the FUNCTION settings (page 16). CH LOCKED → The channel has been locked by the unit. DualDiscs - 8-cm discs: Attempts to high temperatures. CH UNAVAIL → The channel that can be displayed as the equalizer and repeat play are listening to the equipment. Select a band with all USB mass storage devices, and assumes no...
... the band. - SUBSCRIPTION UPDATED → This unit has detected a change in the FUNCTION settings (page 16). CH LOCKED → The channel has been locked by the unit. DualDiscs - 8-cm discs: Attempts to high temperatures. CH UNAVAIL → The channel that can be displayed as the equalizer and repeat play are listening to the equipment. Select a band with all USB mass storage devices, and assumes no...


