Owner's Manual
Page 3
... - Basic Operations 40 - Adjusting subwoofer settings 27 Boosting the bass 28 Using the high pass filter 28 Adjusting source levels 28 Initial Settings Adjusting initial settings 29 Selecting the display language 29 Setting the date 29 Setting the clock 30 Switching the warning tone 30 Switching... the face auto open 30 Switching the auxiliary setting 30 Switching the dimmer setting 30 Adjusting the brightness 31 Setting the rear...
... - Basic Operations 40 - Adjusting subwoofer settings 27 Boosting the bass 28 Using the high pass filter 28 Adjusting source levels 28 Initial Settings Adjusting initial settings 29 Selecting the display language 29 Setting the date 29 Setting the clock 30 Switching the warning tone 30 Switching... the face auto open 30 Switching the auxiliary setting 30 Switching the dimmer setting 30 Adjusting the brightness 31 Setting the rear...
Owner's Manual
Page 10
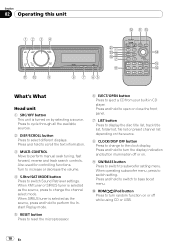
...is selected as the source, press to change to the clock display. a RDM/ /iPod button Press to turn the display indication and button illumination off while using CD or USB. 10 En When operating subwoofer menu, press to subwoofer setting menu. Press and hold to switch to change the ...channel select mode. When SIRIUS tuner is turned on the source. 8 CLOCK/DISP OFF button Press to bass boost menu...
...is selected as the source, press to change to the clock display. a RDM/ /iPod button Press to turn the display indication and button illumination off while using CD or USB. 10 En When operating subwoofer menu, press to subwoofer setting menu. Press and hold to switch to change the ...channel select mode. When SIRIUS tuner is turned on the source. 8 CLOCK/DISP OFF button Press to bass boost menu...
Owner's Manual
Page 29
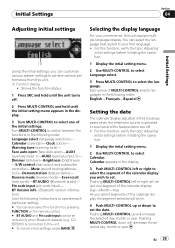
Initial Settings Section 04 Initial Settings Adjusting initial settings 1 Using the initial settings, you select segments of the initial settings. Shows the function status. 1 Press SRC and hold until the unit turns off. 2 Press MULTI-CONTROL and hold until the initial setting menu appears in this unit. 1 Function display ! Calendar (calendar)-Clock (clock)- Face auto open (face auto open...
Initial Settings Section 04 Initial Settings Adjusting initial settings 1 Using the initial settings, you select segments of the initial settings. Shows the function status. 1 Press SRC and hold until the unit turns off. 2 Press MULTI-CONTROL and hold until the initial setting menu appears in this unit. 1 Function display ! Calendar (calendar)-Clock (clock)- Face auto open (face auto open...
Owner's Manual
Page 30
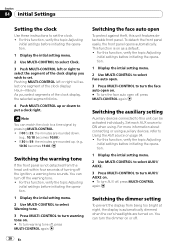
... the topic Adjusting initial settings before initiating the operation. 1 Display the intial setting menu. 2 Use MULTI-CONTROL to select Clock. 3 Push MULTI-CONTROL left or right will select one segment of the clock display: Hour-Minute As you select segments of the clock display you wish to ... open To protect against theft, this unit can match the clock to set the clock. ! Pushing MULTI-CONTROL left or right to put a clock right. If 30 to this unit features detachable front panel. Switching the auxiliary setting Auxiliary devices connected to 59, the minutes are turned on ...
... the topic Adjusting initial settings before initiating the operation. 1 Display the intial setting menu. 2 Use MULTI-CONTROL to select Clock. 3 Push MULTI-CONTROL left or right will select one segment of the clock display: Hour-Minute As you select segments of the clock display you wish to ... open To protect against theft, this unit can match the clock to set the clock. ! Pushing MULTI-CONTROL left or right to put a clock right. If 30 to this unit features detachable front panel. Switching the auxiliary setting Auxiliary devices connected to 59, the minutes are turned on ...
Owner's Manual
Page 36
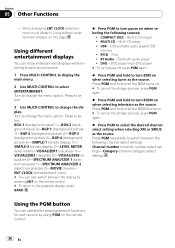
... again. % Press PGM and hold to turn pause on when selecting the following channel select settings: Channel number (channel number select setting)-Category (channel category select setting) Using the PGM button You can operate the preprogrammed functions for each sound source. 1 Press... clock) (Refer to Using different entertainment displays on this page) Using different entertainment displays You can also switch between the following sources: ! MULTI CD - USB portable audio player/USB memory ! Multi-CD player ! IPOD - iPod ! DVD player/multi-DVD player # To turn pause off...
... again. % Press PGM and hold to turn pause on when selecting the following channel select settings: Channel number (channel number select setting)-Category (channel category select setting) Using the PGM button You can operate the preprogrammed functions for each sound source. 1 Press... clock) (Refer to Using different entertainment displays on this page) Using different entertainment displays You can also switch between the following sources: ! MULTI CD - USB portable audio player/USB memory ! Multi-CD player ! IPOD - iPod ! DVD player/multi-DVD player # To turn pause off...
Owner's Manual
Page 41
... the volume is muted (zero level) on your cellular phone via Bluetooth wireless technology, refer to make sure to adjust the volume to Setting automatic answering on page 49). 7 Clock display Shows the time (if connected with a phone). 8 Calendar display Shows the day, month and year (if connected with your cellular phone...
... the volume is muted (zero level) on your cellular phone via Bluetooth wireless technology, refer to make sure to adjust the volume to Setting automatic answering on page 49). 7 Clock display Shows the time (if connected with a phone). 8 Calendar display Shows the day, month and year (if connected with your cellular phone...


