
Owner's Manual
Page 6
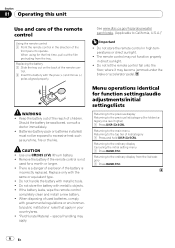
...used batteries, comply with governmental regulations or environmental public institutions' rules that apply in your country/area. ! Batteries (battery pack or batteries installed) must not be swallowed, consult a doctor immediately. ! Use one level higher) 1 Press DISP/ /SCRL. Replace only with metallic ...become jammed under the brake or accelerator pedal. WARNING ! If the battery leaks, wipe the remote control completely clean and install a new battery. ! When using for function settings/audio adjustments/initial settings/lists Returning to the previous display Returning to the...
...used batteries, comply with governmental regulations or environmental public institutions' rules that apply in your country/area. ! Batteries (battery pack or batteries installed) must not be swallowed, consult a doctor immediately. ! Use one level higher) 1 Press DISP/ /SCRL. Replace only with metallic ...become jammed under the brake or accelerator pedal. WARNING ! If the battery leaks, wipe the remote control completely clean and install a new battery. ! When using for function settings/audio adjustments/initial settings/lists Returning to the previous display Returning to the...
Owner's Manual
Page 14
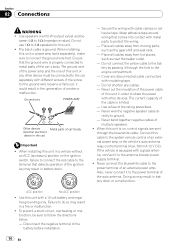
...(accessory) position on , control signals are sent through the hole to metal parts of smoke or malfunction. Use a fuse of the battery before installation. 14 En tween 4 W to the terminal that comes into contact with metal parts to share the power with a glass antenna, connect it ...black cable is on the ignition switch, failure to connect the red cable to 8 W (impedance value). F O OF - Section 02 Connections WARNING ! When installing this unit is ground. The ground wire of the power amp and the one of this cable to the car separately with a 12-volt battery...
...(accessory) position on , control signals are sent through the hole to metal parts of smoke or malfunction. Use a fuse of the battery before installation. 14 En tween 4 W to the terminal that comes into contact with metal parts to share the power with a glass antenna, connect it ...black cable is on the ignition switch, failure to connect the red cable to 8 W (impedance value). F O OF - Section 02 Connections WARNING ! When installing this unit is ground. The ground wire of the power amp and the one of this cable to the car separately with a 12-volt battery...

Owner's Manual
Page 16
...DIN Rear-mount 1 Determine the appropriate position where the holes on the sides of holes or other malfunctions. If there is installed securely in shallow spaces, use unauthorized parts as near the heater outlet. ! it may cause injury to bend the metal ...chassis). Optimum performance is obtained when the unit is installed at an angle of a sudden stop. ! Use commercially available parts when installing. For installation in place. Check all connections and systems before final installation. ! Dashboard Mounting sleeve 3 Install the unit as a result of less than 60°...
...DIN Rear-mount 1 Determine the appropriate position where the holes on the sides of holes or other malfunctions. If there is installed securely in shallow spaces, use unauthorized parts as near the heater outlet. ! it may cause injury to bend the metal ...chassis). Optimum performance is obtained when the unit is installed at an angle of a sudden stop. ! Use commercially available parts when installing. For installation in place. Check all connections and systems before final installation. ! Dashboard Mounting sleeve 3 Install the unit as a result of less than 60°...

Owner's Manual
Page 17
... plan to remove the trim ring. (When reattaching the trim ring, point the side with the supplied screw. Releasing the front panel allows easier ac- Installation 2 Tighten two screws on the bracket screw holes. Use either truss (5 mm × 8 mm) or flush surface (5 mm × 9 mm) screws, depending on each side...
... plan to remove the trim ring. (When reattaching the trim ring, point the side with the supplied screw. Releasing the front panel allows easier ac- Installation 2 Tighten two screws on the bracket screw holes. Use either truss (5 mm × 8 mm) or flush surface (5 mm × 9 mm) screws, depending on each side...


