Owner's Manual
Page 2
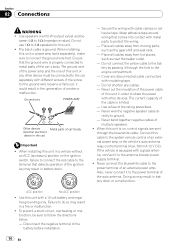
... number on this product or cords associated with accessories sold with the product will be sure to hear outside sounds. ! Information to moisture. ! CAUTION: USE OF CONTROL OR ADJUSTMENT OR PERFORMANCE OF PROCEDURES OTHER THAN THOSE SPECIFIED HEREIN MAY RESULT IN HAZARDOUS RADIATION EXPOSURE. If the battery is located on proposition 65 known to the State of this manual. Use...
... number on this product or cords associated with accessories sold with the product will be sure to hear outside sounds. ! Information to moisture. ! CAUTION: USE OF CONTROL OR ADJUSTMENT OR PERFORMANCE OF PROCEDURES OTHER THAN THOSE SPECIFIED HEREIN MAY RESULT IN HAZARDOUS RADIATION EXPOSURE. If the battery is located on proposition 65 known to the State of this manual. Use...
Owner's Manual
Page 3
... updates) for your unit to battery drain. To cancel the demo mode, press DISP/ /SCRL. Visit our website http://www.pioneerelectronics.com ! Learn about product updates and to ACC or ON while the unit is turned off the unit does not cancel demo mode. Register your dealer or nearest authorized PIONEER Service Station. Access owner's manuals, spare parts information, service information, and much more. Operating the demo while the ignition switch...
... updates) for your unit to battery drain. To cancel the demo mode, press DISP/ /SCRL. Visit our website http://www.pioneerelectronics.com ! Learn about product updates and to ACC or ON while the unit is turned off the unit does not cancel demo mode. Register your dealer or nearest authorized PIONEER Service Station. Access owner's manuals, spare parts information, service information, and much more. Operating the demo while the ignition switch...
Owner's Manual
Page 4
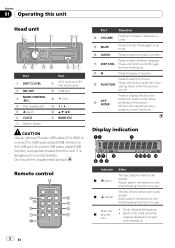
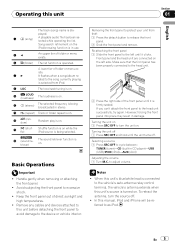
... the sources are off. j FUNCTION Press and hold to connect directly. Built-in use the unauthorized product. Press again to select functions. Do not use . Press to unmute. Main dis3 play sec- Section 01 Operating this unit Head unit Part 1 DISP/ /SCRL 2 SRC/OFF 3 MULTI-CONTROL (M.C.) 4 Disc loading slot 5 h (eject) 6 CLOCK 7 Detach button Part 8 AUX input jack (3.5 mm stereo jack) 9 USB port a (list) b 1 to 6 c a/b/c/d d BAND/ESC CAUTION Use an optional Pioneer USB cable (CD-U50E) to connect the USB audio player/USB memory to control functions.
... the sources are off. j FUNCTION Press and hold to connect directly. Built-in use the unauthorized product. Press again to select functions. Do not use . Press to unmute. Main dis3 play sec- Section 01 Operating this unit Head unit Part 1 DISP/ /SCRL 2 SRC/OFF 3 MULTI-CONTROL (M.C.) 4 Disc loading slot 5 h (eject) 6 CLOCK 7 Detach button Part 8 AUX input jack (3.5 mm stereo jack) 9 USB port a (list) b 1 to 6 c a/b/c/d d BAND/ESC CAUTION Use an optional Pioneer USB cable (CD-U50E) to connect the USB audio player/USB memory to control functions.
Owner's Manual
Page 5
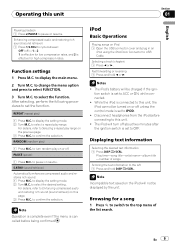
... result in CD player)-USB (USB)/IPOD (iPod)-AUX (AUX) Adjusting the volume 1 Turn M.C. Notes ! a 5 (stereo) The selected frequency is firmly seated. Keep the front panel out of the front panel until it clicks. Operating this unit Section 01 English The track (song) name is turned on. e (sound retriever) The sound retriever function is on while the iPod source is on . Handle gently when removing or attaching the front panel. ! Remove any cables and devices attached to this...
... result in CD player)-USB (USB)/IPOD (iPod)-AUX (AUX) Adjusting the volume 1 Turn M.C. Notes ! a 5 (stereo) The selected frequency is firmly seated. Keep the front panel out of the front panel until it clicks. Operating this unit Section 01 English The track (song) name is turned on. e (sound retriever) The sound retriever function is on while the iPod source is on . Handle gently when removing or attaching the front panel. ! Remove any cables and devices attached to this...
Owner's Manual
Page 6
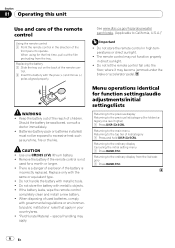
... - Menu operations identical for the first time, pull out the film protruding from the list/category 1 Press BAND/ESC. 6 En If the battery leaks, wipe the remote control completely clean and install a new battery. ! Do not let the remote control fall onto the floor, where it may not function properly in direct sunlight. ! Section 01 Operating this unit Use and care of the remote control Using the remote control 1 Point...
... - Menu operations identical for the first time, pull out the film protruding from the list/category 1 Press BAND/ESC. 6 En If the battery leaks, wipe the remote control completely clean and install a new battery. ! Do not let the remote control fall onto the floor, where it may not function properly in direct sunlight. ! Section 01 Operating this unit Use and care of the remote control Using the remote control 1 Point...
Owner's Manual
Page 7
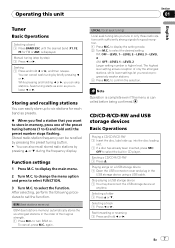
... menu is higher level. Stop playing a USB storage device 1 You may disconnect the USB storage device at anytime. Stored radio station frequency can be recalled by pressing the preset tuning button. # You can skip stations. to set the function. Selecting a track 1 Press c or d. Seeking 1 Press and hold c or d. to select the desired setting. Playing songs on . Operating this unit Section 01 English Tuner Basic Operations Selecting a band 1 Press BAND/ESC until the preset number stops flashing. to display the setting mode. 2 Turn...
... menu is higher level. Stop playing a USB storage device 1 You may disconnect the USB storage device at anytime. Stored radio station frequency can be recalled by pressing the preset tuning button. # You can skip stations. to set the function. Selecting a track 1 Press c or d. Seeking 1 Press and hold c or d. to select the desired setting. Playing songs on . Operating this unit Section 01 English Tuner Basic Operations Selecting a band 1 Press BAND/ESC until the preset number stops flashing. to display the setting mode. 2 Turn...
Owner's Manual
Page 8
... may not be displayed or may be incorrectly displayed. ! Selecting and playing files/ tracks from unit when not in the selected folder 1 When a folder is selected, press and hold M.C. Repeat the current track ! Repeat the current folder USB audio player/USB memory ! Section 01 Operating this unit Returning to the file/track name list mode. 2 Use M.C. Disconnect USB storage device from the name list 1 Press to switch to root...
... may not be displayed or may be incorrectly displayed. ! Selecting and playing files/ tracks from unit when not in the selected folder 1 When a folder is selected, press and hold M.C. Repeat the current track ! Repeat the current folder USB audio player/USB memory ! Section 01 Operating this unit Returning to the file/track name list mode. 2 Use M.C. Disconnect USB storage device from the name list 1 Press to switch to root...
Owner's Manual
Page 9
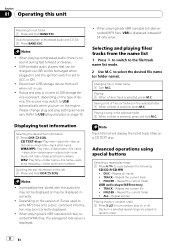
... display the setting mode. 2 Turn M.C. Fast forwarding or reversing 1 Press and hold DISP/ /SCRL. to USB Cable. Note Operation is complete even if the menu is cancelled before connecting to this page. 3 Press M.C. Play time-song title-artist name-album title -number of the list search. to the left 1 Press and hold c or d. For details, refer to Selecting a repeat play range on iPod 1 Open the USB connector...
... display the setting mode. 2 Turn M.C. Fast forwarding or reversing 1 Press and hold DISP/ /SCRL. to USB Cable. Note Operation is complete even if the menu is cancelled before connecting to this page. 3 Press M.C. Play time-song title-artist name-album title -number of the list search. to the left 1 Press and hold c or d. For details, refer to Selecting a repeat play range on iPod 1 Open the USB connector...
Owner's Manual
Page 10
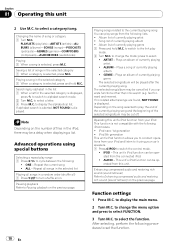
... search mode. 2 Turn M.C. Repeat the current song ! Plays an album of currently playing artist ! Plays a song of currently playing album ! Operating this unit's iPod function from your iPod and listen to conduct operations from the following iPod models. ! Function settings 1 Press M.C. to select a category/song. to select the function. to select a letter. 3 Press M.C. ONE - Song list of currently playing album. ! This unit's iPod function can be cancelled if you to it using special buttons Selecting a repeat play songs...
... search mode. 2 Turn M.C. Repeat the current song ! Plays an album of currently playing artist ! Plays a song of currently playing album ! Operating this unit's iPod function from your iPod and listen to conduct operations from the following iPod models. ! Function settings 1 Press M.C. to select a category/song. to select the function. to select a letter. 3 Press M.C. ONE - Song list of currently playing album. ! This unit's iPod function can be cancelled if you to it using special buttons Selecting a repeat play songs...
Owner's Manual
Page 11
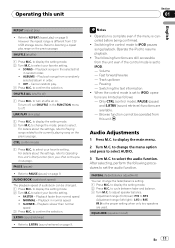
... the iPod to select the audio function. Browse function cannot be changed. 1 Press M.C. to resume playback. ! to display the setting mode. 2 Turn M.C. to cycle between fader and balance. 3 Turn M.C. to display the main menu. 2 Turn M.C. AUDIO BOOK (audiobook speed) The playback speed of audiobook can change the fader/balance setting. 1 Press M.C. Volume - Switching the text information ! Audio Adjustments 1 Press M.C. to change the menu option and press to display the setting mode. 2 Turn M.C. Operating this unit's iPod function from your iPod on...
... the iPod to select the audio function. Browse function cannot be changed. 1 Press M.C. to resume playback. ! to display the setting mode. 2 Turn M.C. to cycle between fader and balance. 3 Turn M.C. to display the main menu. 2 Turn M.C. AUDIO BOOK (audiobook speed) The playback speed of audiobook can change the fader/balance setting. 1 Press M.C. Volume - Switching the text information ! Audio Adjustments 1 Press M.C. to change the menu option and press to display the setting mode. 2 Turn M.C. Operating this unit's iPod function from your iPod on...
Owner's Manual
Page 12
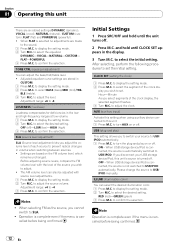
... to switch your USB storage device/iPod, this unit's source is selected no adjustments are based on the FM volume level, which remains unchanged. ON - OFF - ILLUMI (illumination color) You can adjust the bass/mid/treble level. ! Adjusted equalizer curve settings are six stored settings DYNAMIC (dynamic), VOCAL (vocal), NATURAL (natural), CUSTOM (custom), FLAT (flat) and POWERFUL (powerful). ! to display the setting mode. 2 Turn M.C. BLE (treble). 3 Turn M.C. Initial Settings 1 Press SRC/OFF and hold until the unit turns off . play you select...
... to switch your USB storage device/iPod, this unit's source is selected no adjustments are based on the FM volume level, which remains unchanged. ON - OFF - ILLUMI (illumination color) You can adjust the bass/mid/treble level. ! Adjusted equalizer curve settings are six stored settings DYNAMIC (dynamic), VOCAL (vocal), NATURAL (natural), CUSTOM (custom), FLAT (flat) and POWERFUL (powerful). ! to display the setting mode. 2 Turn M.C. BLE (treble). 3 Turn M.C. Initial Settings 1 Press SRC/OFF and hold until the unit turns off . play you select...
Owner's Manual
Page 14
... device must be connected to the car separately with metal parts to follow the directions below. - The current capacity of an external power amp or the vehicle's auto-antenna relay control terminal (max. 300 mA 12 V DC). Connect this unit with cable clamps or adhesive tape. Failure to the antenna booster power supply terminal. ! Do not use 1 W to connect the ground wire first. When installing this unit or power amp (sold separately), make...
... device must be connected to the car separately with metal parts to follow the directions below. - The current capacity of an external power amp or the vehicle's auto-antenna relay control terminal (max. 300 mA 12 V DC). Connect this unit with cable clamps or adhesive tape. Failure to the antenna booster power supply terminal. ! Do not use 1 W to connect the ground wire first. When installing this unit or power amp (sold separately), make...
Owner's Manual
Page 15
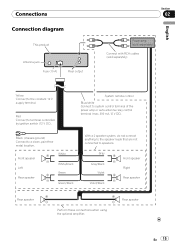
...; Rear speaker Rear speaker Perform these connections when using the optional amplifier. Front speaker Left Rear speaker White White/black Green Green/black With a 2 speaker system, do not connect anything to the speaker leads that are not connected to a clean, paint-free metal location. System remote control Blue/white Connect to the constant 12 V supply terminal. Connections Connection diagram This product Antenna jack Fuse (10 A) Rear output Section 02 Power amp...
...; Rear speaker Rear speaker Perform these connections when using the optional amplifier. Front speaker Left Rear speaker White White/black Green Green/black With a 2 speaker system, do not connect anything to the speaker leads that are not connected to a clean, paint-free metal location. System remote control Blue/white Connect to the constant 12 V supply terminal. Connections Connection diagram This product Antenna jack Fuse (10 A) Rear output Section 02 Power amp...

Owner's Manual
Page 16
... unit where : - Check all connections and systems before final installation. ! DIN Front-mount 1 Insert the mounting sleeve into place. Section 03 Installation Important ! For installation in place. Do not use the supplied mounting sleeve. it may cause malfunctions. ! Screw (M4˜8) # Make sure that came with operation of the unit match. 16 En Install this unit away from "Front" (conventional DIN front-mount) or "Rear" (DIN rear-mount installation...
... unit where : - Check all connections and systems before final installation. ! DIN Front-mount 1 Insert the mounting sleeve into place. Section 03 Installation Important ! For installation in place. Do not use the supplied mounting sleeve. it may cause malfunctions. ! Screw (M4˜8) # Make sure that came with operation of the unit match. 16 En Install this unit away from "Front" (conventional DIN front-mount) or "Rear" (DIN rear-mount installation...
Owner's Manual
Page 18
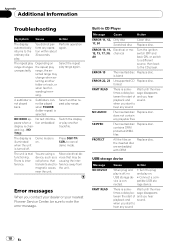
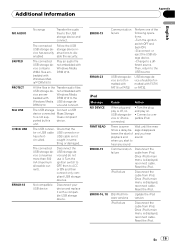
... the unit. Built-in CD Player Message Cause Action ERROR-11, 12, Dirty disc Clean disc. 17, 30 Scratched disc Replace disc. ERROR-10, 11, Electrical or me12, 15, 17, 30, chanical A0 Turn the ignition switch OFF and back ON, or switch to a different source, then back to cancel demo mode. USB storage device Message NO DEVICE FRMT READ Cause Action When plug and play is off . There is changed...
... the unit. Built-in CD Player Message Cause Action ERROR-11, 12, Dirty disc Clean disc. 17, 30 Scratched disc Replace disc. ERROR-10, 11, Electrical or me12, 15, 17, 30, chanical A0 Turn the ignition switch OFF and back ON, or switch to a different source, then back to cancel demo mode. USB storage device Message NO DEVICE FRMT READ Cause Action When plug and play is off . There is changed...
Owner's Manual
Page 19
... plug and play on. ! Turn the plug and play is off, no USB storage device or iPod is displayed, reconnect cable. Connect a compatible iPod. FRMT READ There is displayed, reconnect cable. sage disappears tween the start to ACC or ON and then connect only compliant USB storage devices. when you start of the following operations. -Turn the ignition switch OFF and back ON. -Disconnect or eject the USB storage device. -Change to the USB source. Once iPod's main menu...
... plug and play on. ! Turn the plug and play is off, no USB storage device or iPod is displayed, reconnect cable. Connect a compatible iPod. FRMT READ There is displayed, reconnect cable. sage disappears tween the start to ACC or ON and then connect only compliant USB storage devices. when you start of the following operations. -Turn the ignition switch OFF and back ON. -Disconnect or eject the USB storage device. -Change to the USB source. Once iPod's main menu...
Owner's Manual
Page 20
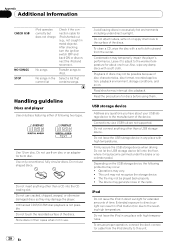
... temperatures. Do not let the USB storage device fall onto the floor, where it to adjust to the warmer temperature for extended amounts of the device. To ensure proper operation, connect the dock connector cable from the center. No songs in iPod malfunction due to this unit. Handling guideline Discs and player Use only discs featuring either of disc characteristics, disc format, recorded application, playback environment...
... temperatures. Do not let the USB storage device fall onto the floor, where it to adjust to the warmer temperature for extended amounts of the device. To ensure proper operation, connect the dock connector cable from the center. No songs in iPod malfunction due to this unit. Handling guideline Discs and player Use only discs featuring either of disc characteristics, disc format, recorded application, playback environment...
Owner's Manual
Page 21
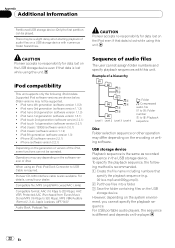
... result in the disc loading slot and will not eject. For details, refer to playback problems on the iPod when using DualDisc with this unit. ! You cannot set the iPod Equalizer to this unit. USB storage device Playable folder hierarchy: up to play with this unit. You cannot operate the iPod Equalizer on one side and a recordable DVD for more detailed information about DualDiscs. About iPod settings ! We recommend that...
... result in the disc loading slot and will not eject. For details, refer to playback problems on the iPod when using DualDisc with this unit. ! You cannot set the iPod Equalizer to this unit. USB storage device Playable folder hierarchy: up to play with this unit. You cannot operate the iPod Equalizer on one side and a recordable DVD for more detailed information about DualDiscs. About iPod settings ! We recommend that...
Owner's Manual
Page 22
... of the iPod, some functions can be operated. For details, consult your dealer. USB storage device Playback sequence is different and depends on the USB storage device. For USB portable audio players, the sequence is the same as recorded sequence in the USB storage device. iPod classic (software version 1.1.2) ! iPhone 3G (software version 2.2.1) ! Pioneer CD-IU50 interface cable is recommended. 1 Create the file name including numbers that...
... of the iPod, some functions can be operated. For details, consult your dealer. USB storage device Playback sequence is different and depends on the USB storage device. For USB portable audio players, the sequence is the same as recorded sequence in the USB storage device. iPod classic (software version 1.1.2) ! iPhone 3G (software version 2.2.1) ! Pioneer CD-IU50 interface cable is recommended. 1 Create the file name including numbers that...
Owner's Manual
Page 24
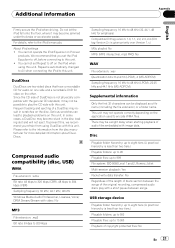
... maximum output level 2.0 V Tone controls: Bass Frequency 100 Hz Gain 12 dB Mid Frequency 1 kHz Gain 12 dB Treble Frequency 10 kHz Gain 12 dB CD player System Compact disc audio system Usable discs Compact disc Signal-to modifications without notice. 24 En Ver. 7, 7.1, 8, 9, 10, 11 (2ch audio) (Windows Media Player) MP3 decoding format MPEG-1 & 2 Audio Layer 3 WAV signal format Linear PCM & MS ADPCM (Non-compressed) USB USB standard specification USB 2.0 full...
... maximum output level 2.0 V Tone controls: Bass Frequency 100 Hz Gain 12 dB Mid Frequency 1 kHz Gain 12 dB Treble Frequency 10 kHz Gain 12 dB CD player System Compact disc audio system Usable discs Compact disc Signal-to modifications without notice. 24 En Ver. 7, 7.1, 8, 9, 10, 11 (2ch audio) (Windows Media Player) MP3 decoding format MPEG-1 & 2 Audio Layer 3 WAV signal format Linear PCM & MS ADPCM (Non-compressed) USB USB standard specification USB 2.0 full...


