Owner's Manual
Page 2
.... WARNING Handling the cord on the enclosed warranty card. Operation is especially important that may invalidate the user's right to record this number on this PIONEER product. Do not allow this manual. Avoid exposure to come into contact with Canadian ICES-003. Use in this unit to moisture. !
.... WARNING Handling the cord on the enclosed warranty card. Operation is especially important that may invalidate the user's right to record this number on this PIONEER product. Do not allow this manual. Avoid exposure to come into contact with Canadian ICES-003. Use in this unit to moisture. !
Owner's Manual
Page 3
..., please contact the companies listed below: Please do not ship your product. ! Before You Start Presection English After-sales service for Pioneer products Please contact the dealer or distributor from where you purchased this unit. To cancel the demo mode, press DISP/ /SCRL.... ware updates) for your unit to a terminal coupled with this unit for repair without advance contact. Register your dealer or nearest authorized PIONEER Service Station. U.S.A. CUSTOMER SUPPORT DIVISION P.O. Turning off . Operating the demo while the ignition switch is set to start. Visit our ...
..., please contact the companies listed below: Please do not ship your product. ! Before You Start Presection English After-sales service for Pioneer products Please contact the dealer or distributor from where you purchased this unit. To cancel the demo mode, press DISP/ /SCRL.... ware updates) for your unit to a terminal coupled with this unit for repair without advance contact. Register your dealer or nearest authorized PIONEER Service Station. U.S.A. CUSTOMER SUPPORT DIVISION P.O. Turning off . Operating the demo while the ignition switch is set to start. Visit our ...
Owner's Manual
Page 4
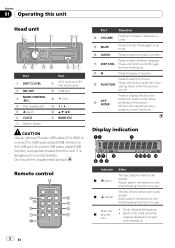
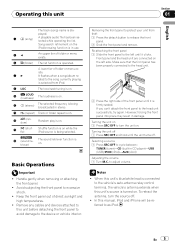
...-CONTROL (M.C.) 4 Disc loading slot 5 h (eject) 6 CLOCK 7 Detach button Part 8 AUX input jack (3.5 mm stereo jack) 9 USB port a (list) b 1 to 6 c a/b/c/d d BAND/ESC CAUTION Use an optional Pioneer USB cable (CD-U50E) to connect the USB audio player/USB memory to connect directly. Press again to unmute.
...-CONTROL (M.C.) 4 Disc loading slot 5 h (eject) 6 CLOCK 7 Detach button Part 8 AUX input jack (3.5 mm stereo jack) 9 USB port a (list) b 1 to 6 c a/b/c/d d BAND/ESC CAUTION Use an optional Pioneer USB cable (CD-U50E) to connect the USB audio player/USB memory to connect directly. Press again to unmute.
Owner's Manual
Page 5
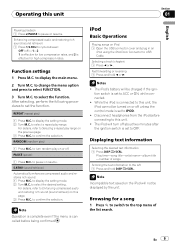
c (random) Random play is on . e (sound retriever) The sound retriever function is connected to the vehicle's auto-antenna relay control terminal, the vehicle's antenna extends when this manual, iPod and iPhone will be referred to as iPod. Turning the unit on . Selecting a source 1 Press SRC/OFF to cycle between: TUNER (tuner)-CD (built-in stereo. When this unit's blue/white lead is on . a 5 (stereo) The selected frequency is being broadcasted in CD player)-USB (USB)/IPOD (iPod)-AUX (AUX) Adjusting the volume 1 Turn M.C. Removing the front panel to protect your ...
c (random) Random play is on . e (sound retriever) The sound retriever function is connected to the vehicle's auto-antenna relay control terminal, the vehicle's antenna extends when this manual, iPod and iPhone will be referred to as iPod. Turning the unit on . Selecting a source 1 Press SRC/OFF to cycle between: TUNER (tuner)-CD (built-in stereo. When this unit's blue/white lead is on . a 5 (stereo) The selected frequency is being broadcasted in CD player)-USB (USB)/IPOD (iPod)-AUX (AUX) Adjusting the volume 1 Turn M.C. Removing the front panel to protect your ...
Owner's Manual
Page 6
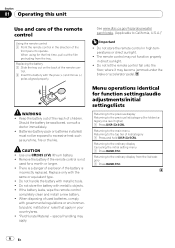
Keep the battery out of the reach of the front panel to operate. If the battery leaks, wipe the remote control completely clean and install a new battery. ! When disposing of explosion if the battery is not used batteries, comply with metallic tools. ! See www.dtsc.ca.gov/hazardouswaste/ perchlorate. (Applicable to the ordinary display Canceling the initial setting menu 1 Press BAND/ESC. There is a danger of used for a month or longer. ! Menu operations identical for the first time, pull out the film protruding from the list/category 1 Press BAND/ESC. 6 En ...
Keep the battery out of the reach of the front panel to operate. If the battery leaks, wipe the remote control completely clean and install a new battery. ! When disposing of explosion if the battery is not used batteries, comply with metallic tools. ! See www.dtsc.ca.gov/hazardouswaste/ perchlorate. (Applicable to the ordinary display Canceling the initial setting menu 1 Press BAND/ESC. There is a danger of used for a month or longer. ! Menu operations identical for the first time, pull out the film protruding from the list/category 1 Press BAND/ESC. 6 En ...
Owner's Manual
Page 7
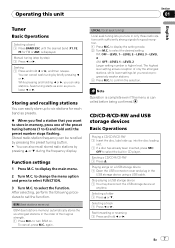
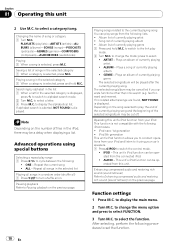
While pressing and holding c or d, you tune in only those radio stations with sufficiently strong signals for good reception. 1 Press M.C. to change the menu option and press to display the setting mode. 2 Turn M.C. to select FUNCTION. 3 Turn M.C. FM: OFF-LEVEL 1-LEVEL 2-LEVEL 3-LEVEL 4 AM: OFF-LEVEL 1-LEVEL 2 Larger setting number is cancelled before being confirmed. CD/CD-R/CD-RW and USB storage devices Basic Operations Playing a CD/CD-R/CD-RW 1 Insert the disc, label side up to six stations for FM or AM) is displayed. Stop playing a USB storage device 1 You may disconnect ...
While pressing and holding c or d, you tune in only those radio stations with sufficiently strong signals for good reception. 1 Press M.C. to change the menu option and press to display the setting mode. 2 Turn M.C. to select FUNCTION. 3 Turn M.C. FM: OFF-LEVEL 1-LEVEL 2-LEVEL 3-LEVEL 4 AM: OFF-LEVEL 1-LEVEL 2 Larger setting number is cancelled before being confirmed. CD/CD-R/CD-RW and USB storage devices Basic Operations Playing a CD/CD-R/CD-RW 1 Insert the disc, label side up to six stations for FM or AM) is displayed. Stop playing a USB storage device 1 You may disconnect ...
Owner's Manual
Page 8
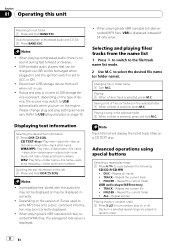
Disconnect USB storage device from the name list 1 Press to switch to select the desired file name (or folder name). Refer to USB (plug and play range 1 Press 6/ to the left 1 Press and hold M.C. CD TEXT discs: Play time-disc title-disc artist name-track title-track artist name WMA/MP3: Play time-folder name-file name -track title-artist name-album title-comment-bit rate-folder and track numbers WAV: Play time-folder name-file name-sampling frequency-folder and track numbers Scrolling the text information to cycle between compressed audio and CD-DA 1 Press BAND/ESC. Selecting and ...
Disconnect USB storage device from the name list 1 Press to switch to select the desired file name (or folder name). Refer to USB (plug and play range 1 Press 6/ to the left 1 Press and hold M.C. CD TEXT discs: Play time-disc title-disc artist name-track title-track artist name WMA/MP3: Play time-folder name-file name -track title-artist name-album title-comment-bit rate-folder and track numbers WAV: Play time-folder name-file name-sampling frequency-folder and track numbers Scrolling the text information to cycle between compressed audio and CD-DA 1 Press BAND/ESC. Selecting and ...
Owner's Manual
Page 9
to change the menu option and press to confirm the selection. to turn off )-1-2 1 is effective for low compression rates, and 2 is set to the top menu of songs Scrolling the text information to select the function. to select FUNCTION. 3 Turn M.C. After selecting, perform the following procedures to set to Selecting a repeat play ) 1 Press M.C. REPEAT (repeat play range on the previous page. 3 Press M.C. For details, refer to ACC or ON, while connected. ! PAUSE (pause) 1 Press M.C. For details, refer to this unit. ! Note Operation is complete even if the menu ...
to change the menu option and press to confirm the selection. to turn off )-1-2 1 is effective for low compression rates, and 2 is set to the top menu of songs Scrolling the text information to select the function. to select FUNCTION. 3 Turn M.C. After selecting, perform the following procedures to set to Selecting a repeat play ) 1 Press M.C. REPEAT (repeat play range on the previous page. 3 Press M.C. For details, refer to ACC or ON, while connected. ! PAUSE (pause) 1 Press M.C. For details, refer to this unit. ! Note Operation is complete even if the menu ...
Owner's Manual
Page 10
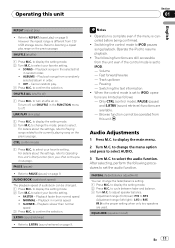
PLAYLISTS (playlists)-ARTISTS (artists)-ALBUMS (albums)-SONGS (songs)-PODCASTS (podcasts)-GENRES (genres)-COMPOSERS (composers)-AUDIOBOOKS (audiobooks) Playing 1 When a song is displayed, press to switch to alphabet search mode. 2 Turn M.C. Searching by alphabet in the selected category 1 When a category is selected, press and hold M.C. to select. ! Note Depending on the number of the selected song/album may be a delay when displaying a list. Repeat the current song ! to switch to the link play range 1 Press 6/ to Enhancing compressed audio and restoring rich sound (sound ...
PLAYLISTS (playlists)-ARTISTS (artists)-ALBUMS (albums)-SONGS (songs)-PODCASTS (podcasts)-GENRES (genres)-COMPOSERS (composers)-AUDIOBOOKS (audiobooks) Playing 1 When a song is displayed, press to switch to alphabet search mode. 2 Turn M.C. Searching by alphabet in the selected category 1 When a category is selected, press and hold M.C. to select. ! Note Depending on the number of the selected song/album may be a delay when displaying a list. Repeat the current song ! to switch to the link play range 1 Press 6/ to Enhancing compressed audio and restoring rich sound (sound ...
Owner's Manual
Page 11
OFF - to select your iPod on the previous page. For details about the settings, refer to Operating this unit's iPod function from your favorite setting. ! Refer to REPEAT (repeat play ) 1 Press M.C. to confirm the selection. NORMAL - Playback slower than normal speed ! Browse function cannot be changed. 1 Press M.C. to adjust speaker balance. to cycle between fader and balance. 3 Turn M.C. Refer to PAUSE (pause) on . to select. press to select your favorite setting. to resume playback. ! Playback in random order. ! S.RTRV (sound ...
OFF - to select your iPod on the previous page. For details about the settings, refer to Operating this unit's iPod function from your favorite setting. ! Refer to REPEAT (repeat play ) 1 Press M.C. to confirm the selection. NORMAL - Playback slower than normal speed ! Browse function cannot be changed. 1 Press M.C. to adjust speaker balance. to cycle between fader and balance. 3 Turn M.C. Refer to PAUSE (pause) on . to select. press to select your favorite setting. to resume playback. ! Playback in random order. ! S.RTRV (sound ...
Owner's Manual
Page 12
DYNAMIC-VOCAL-NATURAL-CUSTOM- Adjusted equalizer curve settings are six stored settings DYNAMIC (dynamic), VOCAL (vocal), NATURAL (natural), CUSTOM (custom), FLAT (flat) and POWERFUL (powerful). ! BLE (treble). 3 Turn M.C. OFF (off . Initial Settings 1 Press SRC/OFF and hold until the unit turns off . CLOCK SET (setting the clock) 1 Press M.C. to turn the plug and play you adjust the volume level of the source you wish to prevent radical changes in CUSTOM. 1 Press M.C. Please change the source to confirm the selection. to USB/ IPOD manually. to select BASS (bass...
DYNAMIC-VOCAL-NATURAL-CUSTOM- Adjusted equalizer curve settings are six stored settings DYNAMIC (dynamic), VOCAL (vocal), NATURAL (natural), CUSTOM (custom), FLAT (flat) and POWERFUL (powerful). ! BLE (treble). 3 Turn M.C. OFF (off . Initial Settings 1 Press SRC/OFF and hold until the unit turns off . CLOCK SET (setting the clock) 1 Press M.C. to turn the plug and play you adjust the volume level of the source you wish to prevent radical changes in CUSTOM. 1 Press M.C. Please change the source to confirm the selection. to USB/ IPOD manually. to select BASS (bass...
Owner's Manual
Page 13
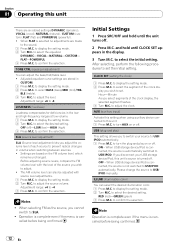
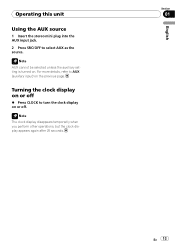
Operating this unit Using the AUX source 1 Insert the stereo mini plug into the AUX input jack. 2 Press SRC/OFF to AUX (auxiliary input) on the previous page. Note The clock display disappears temporarily when you perform other operations, but the clock display appears again after 25 seconds. English Section 01 En 13 For more details, refer to select AUX as the source. Note AUX cannot be selected unless the auxiliary setting is turned on or off % Press CLOCK to turn the clock display on . Turning the clock display on or off .
Operating this unit Using the AUX source 1 Insert the stereo mini plug into the AUX input jack. 2 Press SRC/OFF to AUX (auxiliary input) on the previous page. Note The clock display disappears temporarily when you perform other operations, but the clock display appears again after 25 seconds. English Section 01 En 13 For more details, refer to select AUX as the source. Note AUX cannot be selected unless the auxiliary setting is turned on or off % Press CLOCK to turn the clock display on . Turning the clock display on or off .
Owner's Manual
Page 14
If the screw for this unit in a vehicle without an ACC (accessory) position on , control signals are sent through the hole to metal parts of the rating prescribed. - Secure the wiring with insulating tape. - Place all cables away from hot places, such as the gear shift and seat rails. - Cover any disconnected cable connectors with cable clamps or adhesive tape. The current capacity of multiple speakers. ! Never band together negative cables of the cable is limited. - If the vehicle is properly connected to the engine compartment. - N STAR T ACC position No ACC ...
If the screw for this unit in a vehicle without an ACC (accessory) position on , control signals are sent through the hole to metal parts of the rating prescribed. - Secure the wiring with insulating tape. - Place all cables away from hot places, such as the gear shift and seat rails. - Cover any disconnected cable connectors with cable clamps or adhesive tape. The current capacity of multiple speakers. ! Never band together negative cables of the cable is limited. - If the vehicle is properly connected to the engine compartment. - N STAR T ACC position No ACC ...
Owner's Manual
Page 15
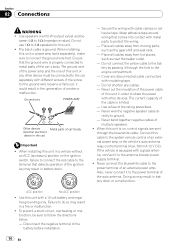
System remote control Blue/white Connect to a clean, paint-free metal location. En 15 Black (chassis ground) Connect to system control terminal of the power amp or auto-antenna relay control terminal (max. 300 mA 12 V DC). Front speaker Left Rear speaker White White/black Green Green/black With a 2 speaker system, do not connect anything to the speaker leads that are not connected to the constant 12 V supply terminal. Gray Gray/black Violet Violet/black Front speaker Right Rear speaker Rear speaker &#...
System remote control Blue/white Connect to a clean, paint-free metal location. En 15 Black (chassis ground) Connect to system control terminal of the power amp or auto-antenna relay control terminal (max. 300 mA 12 V DC). Front speaker Left Rear speaker White White/black Green Green/black With a 2 speaker system, do not connect anything to the speaker leads that are not connected to the constant 12 V supply terminal. Gray Gray/black Violet Violet/black Front speaker Right Rear speaker Rear speaker &#...

Owner's Manual
Page 16
it may cause skipping or other modifications to a passenger as a result of the unit match. 16 En Optimum performance is obtained when the unit is installed securely in shallow spaces, use unauthorized parts as this unit away from "Front" (conventional DIN front-mount) or "Rear" (DIN rear-mount installation, utilizing threaded screw holes on the bracket and the side of a sudden stop. ! An unstable installation may interfere with the vehicle. it overheats. If there is enough space, use the mounting sleeve that the unit is installed at an angle of unit chassis). ...
it may cause skipping or other modifications to a passenger as a result of the unit match. 16 En Optimum performance is obtained when the unit is installed securely in shallow spaces, use unauthorized parts as this unit away from "Front" (conventional DIN front-mount) or "Rear" (DIN rear-mount installation, utilizing threaded screw holes on the bracket and the side of a sudden stop. ! An unstable installation may interfere with the vehicle. it overheats. If there is enough space, use the mounting sleeve that the unit is installed at an angle of unit chassis). ...

Owner's Manual
Page 17
Installation 2 Tighten two screws on the bracket screw holes. Removing the unit 1 Extend top and bottom of the trim ring outwards to the trim ring. 2 Insert the supplied extraction keys into both sides of the unit until they click into place. 3 Pull the unit out of the dashboard. Releasing the front panel allows easier ac- Use either truss (5 mm × 8 mm) or flush surface (5 mm × 9 mm) screws, depending on each side. En 17 English Mounting bracket Dashboard or console ! cess to remove the trim ring. (When reattaching the trim ring, point the side with the supplied...
Installation 2 Tighten two screws on the bracket screw holes. Removing the unit 1 Extend top and bottom of the trim ring outwards to the trim ring. 2 Insert the supplied extraction keys into both sides of the unit until they click into place. 3 Pull the unit out of the dashboard. Releasing the front panel allows easier ac- Use either truss (5 mm × 8 mm) or flush surface (5 mm × 9 mm) screws, depending on each side. En 17 English Mounting bracket Dashboard or console ! cess to remove the trim ring. (When reattaching the trim ring, point the side with the supplied...
Owner's Manual
Page 18
... folder or track, or when fast forwarding/reversing. Wait until the mestimes a delay be There is inter- when you contact your dealer or your nearest Pioneer Service Center, be played when FOLDER (folder repeat) is some - No text informapears when a tion embedded display is mal- range, the se- contains DRM protected...
... folder or track, or when fast forwarding/reversing. Wait until the mestimes a delay be There is inter- when you contact your dealer or your nearest Pioneer Service Center, be played when FOLDER (folder repeat) is some - No text informapears when a tion embedded display is mal- range, the se- contains DRM protected...
Owner's Manual
Page 19
The connected USB storage device contains WMA files embedded with Windows Mediaä DRM 9/10 Play an audio file not embedded with vice are em- not embedded with Windows Media DRM 9/10. DRM 9/10 vice and connect. Class compliant ported by this device. unit. Disconnect the USB storage device and do not use it with DRM 9/10 to hear any sound ERROR-19 Communication failure Disconnect the cable from iPod. Turn the ignition switch to OFF, then to the USB storage device and connect. Not compatible USB device Disconnect your device and replace it . Once iPod's main ...
The connected USB storage device contains WMA files embedded with Windows Mediaä DRM 9/10 Play an audio file not embedded with vice are em- not embedded with Windows Media DRM 9/10. DRM 9/10 vice and connect. Class compliant ported by this device. unit. Disconnect the USB storage device and do not use it with DRM 9/10 to hear any sound ERROR-19 Communication failure Disconnect the cable from iPod. Turn the ignition switch to OFF, then to the USB storage device and connect. Not compatible USB device Disconnect your device and replace it . Once iPod's main ...
Owner's Manual
Page 20
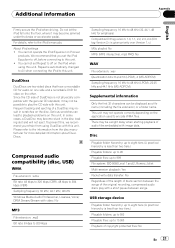
Appendix Additional Information CHECK USB NO SONGS STOP iPod operates correctly but does not charge Check if the connection cable for iPod shorted out (e.g., not caught in the Select a list that current list contains songs. No songs in metal objects). Unfinalized CD-R/CD-RW disc playback is not possible. Do not attach labels, write on or apply chemicals to the surface of disc characteristics, disc format, recorded application, playback environment, storage conditions, and so on the USB storage device, the following two logos. Also, wipe any place with high temperatures. Playback ...
Appendix Additional Information CHECK USB NO SONGS STOP iPod operates correctly but does not charge Check if the connection cable for iPod shorted out (e.g., not caught in the Select a list that current list contains songs. No songs in metal objects). Unfinalized CD-R/CD-RW disc playback is not possible. Do not attach labels, write on or apply chemicals to the surface of disc characteristics, disc format, recorded application, playback environment, storage conditions, and so on the USB storage device, the following two logos. Also, wipe any place with high temperatures. Playback ...
Owner's Manual
Page 21
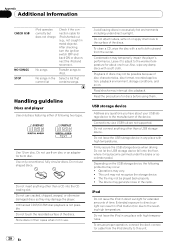
... the brake or accelerator pedal. Since the CD side of audio files embedded with the general CD standard, it may not operate correctly depending on Pioneer products. This unit may become stuck in scratches on this unit. Additional Information Appendix English Firmly secure the iPod when driving. For details, refer to...
... the brake or accelerator pedal. Since the CD side of audio files embedded with the general CD standard, it may not operate correctly depending on Pioneer products. This unit may become stuck in scratches on this unit. Additional Information Appendix English Firmly secure the iPod when driving. For details, refer to...
