Owner's Manual
Page 2
...-mount 16 Fastening the front panel (DEH-2000MP) 16 Additional Information Error messages 17 Handling guideline of discs and player 17 Dual Discs 17 Compressed audio files 18 - Using the remote control 5 Operating this Pioneer product. Remote control 6 - Storing...and recalling broadcast frequencies 8 - Head unit 6 - Installing the battery 5 - Before You Start Information to the radio 8 - Turning the unit off 7 Tuner 8 - Searching every 10 tracks in Player 8 - Compressed audio compatibility 18 Specifications 20 2 En Contents Thank you for Pioneer products 4 Visit our website ...
...-mount 16 Fastening the front panel (DEH-2000MP) 16 Additional Information Error messages 17 Handling guideline of discs and player 17 Dual Discs 17 Compressed audio files 18 - Using the remote control 5 Operating this Pioneer product. Remote control 6 - Storing...and recalling broadcast frequencies 8 - Head unit 6 - Installing the battery 5 - Before You Start Information to the radio 8 - Turning the unit off 7 Tuner 8 - Searching every 10 tracks in Player 8 - Compressed audio compatibility 18 Specifications 20 2 En Contents Thank you for Pioneer products 4 Visit our website ...
Owner's Manual
Page 4
...required. An independent license for such use this information in other information. Box 1760 Long Beach, CA 90801-1760 800-421-1404 CANADA Pioneer Electronics of direct sunlight and high temperatures. CUSTOMER SATISFACTION DEPARTMENT 300 Allstate Parkway Markham, Ontario L3R 0P2 1-877-283-5901 905-479-...the front panel to the left side. For details, please visit http://www.mp3licensing.com. Front panel and the head unit are jointed on file to help you purchased this unit. Section 01 Before You Start About MP3 Supply of this product only conveys a license for private, non-commercial ...
...required. An independent license for such use this information in other information. Box 1760 Long Beach, CA 90801-1760 800-421-1404 CANADA Pioneer Electronics of direct sunlight and high temperatures. CUSTOMER SATISFACTION DEPARTMENT 300 Allstate Parkway Markham, Ontario L3R 0P2 1-877-283-5901 905-479-...the front panel to the left side. For details, please visit http://www.mp3licensing.com. Front panel and the head unit are jointed on file to help you purchased this unit. Section 01 Before You Start About MP3 Supply of this product only conveys a license for private, non-commercial ...
Owner's Manual
Page 5
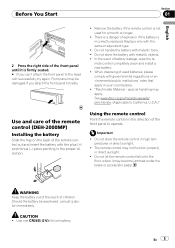
... with metallic tools. ! See www.dtsc.ca.gov/hazardouswaste/ perchlorate. (Applicable to California, U.S.A.)" Use and care of the remote control (DEH-2000MP) Installing the battery Slide the tray on the back of children. Do not store the remote control in your country/area. ! WARNING Keep...Press the right side of battery leakage, wipe the re- Remove the battery if the remote control is a danger of the front panel to the head unit successfully, try again. In the event of the front panel until it may be swallowed, consult a doctor immediately. mote control completely clean and ...
... with metallic tools. ! See www.dtsc.ca.gov/hazardouswaste/ perchlorate. (Applicable to California, U.S.A.)" Use and care of the remote control (DEH-2000MP) Installing the battery Slide the tray on the back of children. Do not store the remote control in your country/area. ! WARNING Keep...Press the right side of battery leakage, wipe the re- Remove the battery if the remote control is a danger of the front panel to the head unit successfully, try again. In the event of the front panel until it may be swallowed, consult a doctor immediately. mote control completely clean and ...
Owner's Manual
Page 6
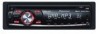
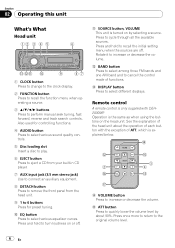
... a CD from your built-in CD player. 7 AUX input jack (3.5 mm stereo jack) Use to connect an auxiliary equipment. 8 DETACH button Press to remove the front panel from the head unit. 9 1 to select different displays. See the explanation of the head unit about 90%. Section 02 Operating this unit What's What Head unit 12.... Rotate it to the original volume level. 6 En f ATT button Press to cancel the control mode of ATT, which is turned on the head unit. e c f 3 2 4 g d h e VOLUME button Press to select various equalizer curves. c BAND button Press to select among three...
... a CD from your built-in CD player. 7 AUX input jack (3.5 mm stereo jack) Use to connect an auxiliary equipment. 8 DETACH button Press to remove the front panel from the head unit. 9 1 to select different displays. See the explanation of the head unit about 90%. Section 02 Operating this unit What's What Head unit 12.... Rotate it to the original volume level. 6 En f ATT button Press to cancel the control mode of ATT, which is turned on the head unit. e c f 3 2 4 g d h e VOLUME button Press to select various equalizer curves. c BAND button Press to select among three...

