Owner's Manual
Page 1
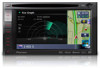
..., please contact your vehicle, additional installation may be required. Be sure to your vehicle's parking brake and depending on your Authorized Pioneer Electronics retailer or call us at (800) 421-1404. Important Information for the User first! Operation Manual FLASH MEMORY MULTIMEDIA AV NAVIGATION RECEIVER AVIC-Z120BT AVIC-X920BT Notice to all users: This software...
..., please contact your vehicle, additional installation may be required. Be sure to your vehicle's parking brake and depending on your Authorized Pioneer Electronics retailer or call us at (800) 421-1404. Important Information for the User first! Operation Manual FLASH MEMORY MULTIMEDIA AV NAVIGATION RECEIVER AVIC-Z120BT AVIC-X920BT Notice to all users: This software...
Owner's Manual
Page 75
... be able to the connected cellular phone. 4 Touch [Yes]. Dialed Calls List: You can clear the registered phone book. ! p Before you download the files and install the update, read through the instructions on page 22. 3 Touch [Bluetooth Settings]. The "Bluetooth Settings" screen appears. 3 Touch [Clear Memory]. Contacts: You can clear the...
... be able to the connected cellular phone. 4 Touch [Yes]. Dialed Calls List: You can clear the registered phone book. ! p Before you download the files and install the update, read through the instructions on page 22. 3 Touch [Bluetooth Settings]. The "Bluetooth Settings" screen appears. 3 Touch [Clear Memory]. Contacts: You can clear the...
Owner's Manual
Page 126
...is already connected, tap [Pandora] on page 77. p If the iPod is available at http://www.pandora.com/register or through the Pioneer navigation system, including, but not limited to, creating new stations, deleting stations, emailing current stations, buying songs from iTunes, viewing additional...operations, refer to the Pandora service will start. = For details, refer to the Pioneer navigation system. Pandora Internet radio is currently only available in the "iPod" screen. 3 Start up the Pandora application installed on the iPod. 4 Tap [Pandora] on page 77. 2 Connect your device....
...is already connected, tap [Pandora] on page 77. p If the iPod is available at http://www.pandora.com/register or through the Pioneer navigation system, including, but not limited to, creating new stations, deleting stations, emailing current stations, buying songs from iTunes, viewing additional...operations, refer to the Pandora service will start. = For details, refer to the Pioneer navigation system. Pandora Internet radio is currently only available in the "iPod" screen. 3 Start up the Pandora application installed on the iPod. 4 Tap [Pandora] on page 77. 2 Connect your device....
Owner's Manual
Page 145
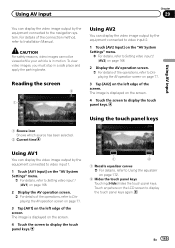
... screen 2 1 Using AV2 You can display the video image output by the equipment connected to the navigation system. Touch anywhere on the LCD screen to Installation Manual. Using AV input Chapter 29 Using AV input You can display the video image output by the equipment connected to video input 2. 1 Touch [AV2...
... screen 2 1 Using AV2 You can display the video image output by the equipment connected to the navigation system. Touch anywhere on the LCD screen to Installation Manual. Using AV input Chapter 29 Using AV input You can display the video image output by the equipment connected to video input 2. 1 Touch [AV2...

Owner's Manual
Page 146
... differ from those described in the external unit's operation manual. Chapter 30 Using the external unit (EXT1, EXT2) The term "external unit" refers to future Pioneer devices that are not currently planned for, or to devices that is sent by connected external units. 3 Current time 4 Auto/Manual mode indicator Shows the..., the navigation system allocates them as external unit 1 or external unit 2. Starting procedure 1 Display the AV operation screen. = For details of the operations, refer to Installation Manual.
... differ from those described in the external unit's operation manual. Chapter 30 Using the external unit (EXT1, EXT2) The term "external unit" refers to future Pioneer devices that are not currently planned for, or to devices that is sent by connected external units. 3 Current time 4 Auto/Manual mode indicator Shows the..., the navigation system allocates them as external unit 1 or external unit 2. Starting procedure 1 Display the AV operation screen. = For details of the operations, refer to Installation Manual.
Owner's Manual
Page 148
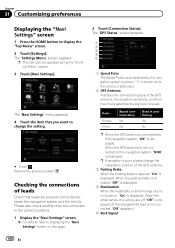
... properly connected between the navigation system and the vehicle. Chapter 31 Customizing preferences Displaying the "Navi Settings" screen 1 Press the HOME button to change the installation position of the GPS antenna. 3 Parking Brake When the parking brake is applied, "On" is displayed. The "GPS Status" screen appears. 1 2 3 4 5 1 Speed Pulse The Speed...
... properly connected between the navigation system and the vehicle. Chapter 31 Customizing preferences Displaying the "Navi Settings" screen 1 Press the HOME button to change the installation position of the GPS antenna. 3 Parking Brake When the parking brake is applied, "On" is displayed. The "GPS Status" screen appears. 1 2 3 4 5 1 Speed Pulse The Speed...

Owner's Manual
Page 150
After changing the installation angle of the navigation system ! The "Gas Mileage Setting" screen appears. When "Gas Unit" is set to "Gallon". Enter how many kilometers (miles) you need ..., inputting the fuel consumption information is entered depends on the freeway. When "Gas Unit" is set to travel 60 miles (100 kilometers). - After changing the installation position of the navigation system ! Clears the learned results stored in the navigation system. = For details, refer to Setting a route to your destination on page...
After changing the installation angle of the navigation system ! The "Gas Mileage Setting" screen appears. When "Gas Unit" is set to "Gallon". Enter how many kilometers (miles) you need ..., inputting the fuel consumption information is entered depends on the freeway. When "Gas Unit" is set to travel 60 miles (100 kilometers). - After changing the installation position of the navigation system ! Clears the learned results stored in the navigation system. = For details, refer to Setting a route to your destination on page...
Owner's Manual
Page 164
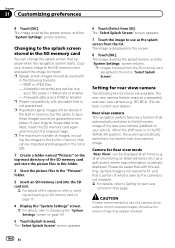
...the splash screen from SD]. when monitoring an attached trailer, etc.) as the splash screen, and the "System Settings" screen returns. CAUTION Pioneer recommends the use as the splash screen, and the "System Settings" screen returns. in the SD memory card You can change the splash... sold rear view camera (e.g. Chapter 31 Customizing preferences 4 Touch [OK]. Allowable horizontal and vertical size are added to use of the rear view camera installed on the screen. 8 Touch [OK]. The "Select Splash Screen" screen appears. 7 Touch the image to the list on "Select Splash Screen". ...
...the splash screen from SD]. when monitoring an attached trailer, etc.) as the splash screen, and the "System Settings" screen returns. CAUTION Pioneer recommends the use as the splash screen, and the "System Settings" screen returns. in the SD memory card You can change the splash... sold rear view camera (e.g. Chapter 31 Customizing preferences 4 Touch [OK]. Allowable horizontal and vertical size are added to use of the rear view camera installed on the screen. 8 Touch [OK]. The "Select Splash Screen" screen appears. 7 Touch the image to the list on "Select Splash Screen". ...
Owner's Manual
Page 190
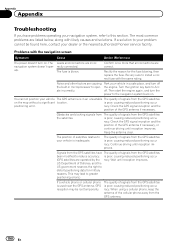
...necessary, or continue driving until reception improves. Signals from the GPS satellites have problems operating your dealer or the nearest authorized Pioneer service facility. The most common problems are blocking signals from The quality of signals from the GPS satellites been modified to this... section. Problems with likely causes and solutions. Be very sure to Acc ate incorrectly. Turn the ignition key back to install a correct fuse with the same rating. is blown. positioning error. This may lead to greater positioning errors.) If a vehicle phone...
...necessary, or continue driving until reception improves. Signals from the GPS satellites have problems operating your dealer or the nearest authorized Pioneer service facility. The most common problems are blocking signals from The quality of signals from the GPS satellites been modified to this... section. Problems with likely causes and solutions. Be very sure to Acc ate incorrectly. Turn the ignition key back to install a correct fuse with the same rating. is blown. positioning error. This may lead to greater positioning errors.) If a vehicle phone...
Owner's Manual
Page 191
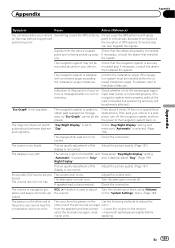
...- The navigation system is selected on the receiver up prop- Drive about "Day/Night Display" setting "Automatic" is unable to Installation Manual.) Indication of the position of navigation gui- Check "Day/Night Display" setting and make sure "Automatic" is selected. (Page...connected, but positioning accuracy will not rise. The volume level is disconnected. Snow buildup can also degrade the signals. Confirm the installation angle. (The navigation system must be adversely affected.) "Eco Graph" is connected properly. (The navigation system works properly without ...
...- The navigation system is selected on the receiver up prop- Drive about "Day/Night Display" setting "Automatic" is unable to Installation Manual.) Indication of the position of navigation gui- Check "Day/Night Display" setting and make sure "Automatic" is selected. (Page...connected, but positioning accuracy will not rise. The volume level is disconnected. Snow buildup can also degrade the signals. Confirm the installation angle. (The navigation system must be adversely affected.) "Eco Graph" is connected properly. (The navigation system works properly without ...

Owner's Manual
Page 199
... correct the discrepancies in wheel diameter. When the signals are gradually compounded until the estimated position becomes unreliable. For this navigation system with your authorized Pioneer dealer or an installation professional. This ensures that signals from at least three can even calculate changes of satellites orbiting the Earth.
... correct the discrepancies in wheel diameter. When the signals are gradually compounded until the estimated position becomes unreliable. For this navigation system with your authorized Pioneer dealer or an installation professional. This ensures that signals from at least three can even calculate changes of satellites orbiting the Earth.
Installation Manual
Page 2
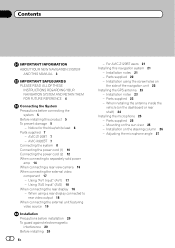
... - When using the screw holes on the steering column 26 - Parts supplied 23 - Installation on the side of the navigation unit 22 Installing the GPS antenna 23 - AVIC-Z120BT 7 - For AVIC-Z120BT users 21 Installing this product 5 To prevent damage 5 - Installation notes 23 - AVIC-X920BT 7 Connecting the system 8 Connecting the power cord (1) 10 Connecting the power cord (2) 12...
... - When using the screw holes on the steering column 26 - Parts supplied 23 - Installation on the side of the navigation unit 22 Installing the GPS antenna 23 - AVIC-Z120BT 7 - For AVIC-Z120BT users 21 Installing this product 5 To prevent damage 5 - Installation notes 23 - AVIC-X920BT 7 Connecting the system 8 Connecting the power cord (1) 10 Connecting the power cord (2) 12...
Installation Manual
Page 3
...(and rear view camera option if purchased) are intended solely to safely operate the vehicle. This manual explains how to install this navigation system to route to install this navigation system is not a substitute for the navigation system. ! If you in any of the vehicle's operating systems...emergency. Operation of this product because of the vehicle type or the shape of your attentiveness, judgment and care when driving. ! Do not install this product where it may (i) obstruct the driver's vision, (ii) impair the performance of any way from the safe operation of the ...
...(and rear view camera option if purchased) are intended solely to safely operate the vehicle. This manual explains how to install this navigation system to route to install this navigation system is not a substitute for the navigation system. ! If you in any of the vehicle's operating systems...emergency. Operation of this product because of the vehicle type or the shape of your attentiveness, judgment and care when driving. ! Do not install this product where it may (i) obstruct the driver's vision, (ii) impair the performance of any way from the safe operation of the ...
Installation Manual
Page 4
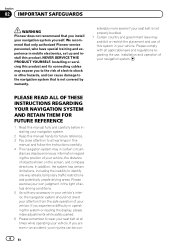
...light of actual driving conditions. 5 As with all warnings in this product. If you experience difficulty in mobile electronics, set up and install this manual and follow the instructions carefully. 4 This navigation system may expose you to the risk of electric shock or other hazards, ...and can be con- 4 En Section 02 IMPORTANT SAFEGUARDS WARNING Pioneer does not recommend that you install your vehicle, the distance of objects shown on the screen, and compass directions. stances display erroneous information regarding the use...
...light of actual driving conditions. 5 As with all warnings in this product. If you experience difficulty in mobile electronics, set up and install this manual and follow the instructions carefully. 4 This navigation system may expose you to the risk of electric shock or other hazards, ...and can be con- 4 En Section 02 IMPORTANT SAFEGUARDS WARNING Pioneer does not recommend that you install your vehicle, the distance of objects shown on the screen, and compass directions. stances display erroneous information regarding the use...

Installation Manual
Page 5
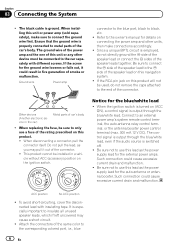
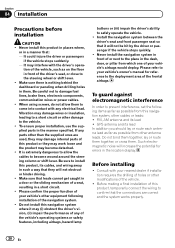
...between 4 W to disconnect the (-) battery cable before connecting the system CAUTION ! Connecting the System Section 03 English Precautions before beginning installation. If the lead is extremely dangerous to allow any leads. If the yellow lead's insulation tears as a result of the lead will... route wires where they will be sure to 8 W (impedance value). Do not shorten any bare wiring to install this product ! If you decide to work properly. ! Before installing this product, its cables, and wiring away in a fire or malfunction. ! To avoid shorts in a short...
...between 4 W to disconnect the (-) battery cable before connecting the system CAUTION ! Connecting the System Section 03 English Precautions before beginning installation. If the lead is extremely dangerous to allow any leads. If the yellow lead's insulation tears as a result of the lead will... route wires where they will be sure to 8 W (impedance value). Do not shorten any bare wiring to install this product ! If you decide to work properly. ! Before installing this product, its cables, and wiring away in a fire or malfunction. ! To avoid shorts in a short...
Installation Manual
Page 6
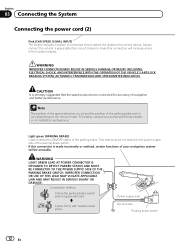
... connector, pull the connector itself. F ACC O F O Notice for details on this unit or power amp (sold separately), make connections accordingly. ! When installing this product will not be connected to the * side of the connector. Ground wire Power amp connector to the blue port, black to connect the... ground wire is output through the blue/white lead. Since a unique BPTL circuit is switched off. ! When replacing the fuse, be installed in fire generation of the same color to the owner's manual for the blue/white lead ! When the ignition switch is turned on ...
... connector, pull the connector itself. F ACC O F O Notice for details on this unit or power amp (sold separately), make connections accordingly. ! When installing this product will not be connected to the * side of the connector. Ground wire Power amp connector to the blue port, black to connect the... ground wire is output through the blue/white lead. Since a unique BPTL circuit is switched off. ! When replacing the fuse, be installed in fire generation of the same color to the owner's manual for the blue/white lead ! When the ignition switch is turned on ...
Installation Manual
Page 12
Always connect the vehicle´s speed detection circuit. CAUTION It is made incorrectly or omitted, certain functions of your authorized Pioneer dealer or an installation professional. If this connection will be unusable. Connection method Clamp the parking brake switch power supply side lead. For details, consult your navigation system will ...
Always connect the vehicle´s speed detection circuit. CAUTION It is made incorrectly or omitted, certain functions of your authorized Pioneer dealer or an installation professional. If this connection will be unusable. Connection method Clamp the parking brake switch power supply side lead. For details, consult your navigation system will ...

Installation Manual
Page 18
... 23 cm (9 in.) (*2) (*2) AVIC-X920BT RCA connector Yellow (VIDEO INPUT) Red, white (AUDIO INPUT) RCA cables (sold separately) To video output To audio outputs External video component (sold separately) To audio inputs Rear display with RCA input jacks When using a rear display connected to rear video output WARNING NEVER install the rear display...
... 23 cm (9 in.) (*2) (*2) AVIC-X920BT RCA connector Yellow (VIDEO INPUT) Red, white (AUDIO INPUT) RCA cables (sold separately) To video output To audio outputs External video component (sold separately) To audio inputs Rear display with RCA input jacks When using a rear display connected to rear video output WARNING NEVER install the rear display...
Installation Manual
Page 20
...sure that they may work loose and the product may (i) obstruct the driver's vision, (ii) impair the performance of the navigation system. ! Install the navigation system between the driver's seat and front passenger seat so that : - tion of the vehicle's operating systems or safety features, including... from this product in places where, or in front of the vehicle. ! Please confirm the proper function of your nearest dealer if installation requires the drilling of holes or other damage to damage fuel lines, brake lines, electronic components, communication wires or power cables. ! ...
...sure that they may work loose and the product may (i) obstruct the driver's vision, (ii) impair the performance of the navigation system. ! Install the navigation system between the driver's seat and front passenger seat so that : - tion of the vehicle's operating systems or safety features, including... from this product in places where, or in front of the vehicle. ! Please confirm the proper function of your nearest dealer if installation requires the drilling of holes or other damage to damage fuel lines, brake lines, electronic components, communication wires or power cables. ! ...
Installation Manual
Page 21
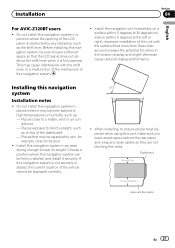
..., such as the shift lever. If this navigation system in the location display, and might otherwise cause reduced display performance. Install the navigation unit horizontally on top of this navigation system can be splashed by any loose cables so they are not blocking ... navigation system, be displayed correctly. 30° 5° 5° ! Installing this navigation system in .) Leave ample space En 21 Installation Section 04 English For AVIC-Z120BT users ! Places that the LCD panel does not obstruct the shift lever when it securely. When installing, to the door. !
..., such as the shift lever. If this navigation system in the location display, and might otherwise cause reduced display performance. Install the navigation unit horizontally on top of this navigation system can be splashed by any loose cables so they are not blocking ... navigation system, be displayed correctly. 30° 5° 5° ! Installing this navigation system in .) Leave ample space En 21 Installation Section 04 English For AVIC-Z120BT users ! Places that the LCD panel does not obstruct the shift lever when it securely. When installing, to the door. !


