Owner's Manual
Page 7
... change between day and night 159 Changing the road color 159 Changing the setting of Voice Operation 178 - Setting video input 2 (AV2) 168 - Setting for rear view camera 164 - Setting the simulated sound stage 175 Replicating the settings 176 Turning off the screen 177 Operating Your Navigation System with Voice To Ensure Safe...
... change between day and night 159 Changing the road color 159 Changing the setting of Voice Operation 178 - Setting video input 2 (AV2) 168 - Setting for rear view camera 164 - Setting the simulated sound stage 175 Replicating the settings 176 Turning off the screen 177 Operating Your Navigation System with Voice To Ensure Safe...
Owner's Manual
Page 30
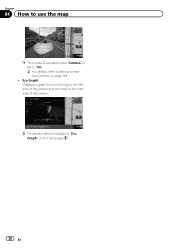
Eco Graph: Displays a graph for rear view camera on the next page. 30 En Chapter 04 How to use the map p This mode is available when [Camera] is set to "On". = For details, refer to Setting for eco-driving on the left side of the screen and the map on the right side of the screen. = For details, refer to Displaying "Eco Graph" on page 164. !
Eco Graph: Displays a graph for rear view camera on the next page. 30 En Chapter 04 How to use the map p This mode is available when [Camera] is set to "On". = For details, refer to Setting for eco-driving on the left side of the screen and the map on the right side of the screen. = For details, refer to Displaying "Eco Graph" on page 164. !
Owner's Manual
Page 164
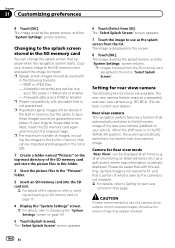
...x 1 944 pixels or smaller - The rear view camera feature requires a separately sold rear view camera (e.g. when monitoring an attached trailer, etc.) as a split screen where map information is set as the splash screen, and the "System Settings" screen returns. CAUTION Pioneer recommends the use as the splash screen, and... the "System Settings" screen returns. in memory, but the ability to use of the rear view camera installed on your original image data is set as the...
...x 1 944 pixels or smaller - The rear view camera feature requires a separately sold rear view camera (e.g. when monitoring an attached trailer, etc.) as a split screen where map information is set as the splash screen, and the "System Settings" screen returns. CAUTION Pioneer recommends the use as the splash screen, and... the "System Settings" screen returns. in memory, but the ability to use of the rear view camera installed on your original image data is set as the...

Owner's Manual
Page 165
...Chapter 31 Customizing preferences p Immediately verify whether the display changes to a rear view camera image when the shift lever is saved. After you touch all marks, the adjusted position data is moved to "Rear View" if this setting is in the REVERSE (R) position Adjusting the response positions... of the touch panel (touch panel calibration) If you want. Available options: ! p When the screen changes to full-screen rear view camera image during normal driving, switch to the opposite setting in order. p You can only switch to REVERSE (R) from the actual positions ...
...Chapter 31 Customizing preferences p Immediately verify whether the display changes to a rear view camera image when the shift lever is saved. After you touch all marks, the adjusted position data is moved to "Rear View" if this setting is in the REVERSE (R) position Adjusting the response positions... of the touch panel (touch panel calibration) If you want. Available options: ! p When the screen changes to full-screen rear view camera image during normal driving, switch to the opposite setting in order. p You can only switch to REVERSE (R) from the actual positions ...

Owner's Manual
Page 167
...color (red is emphasized or green is selected, the following screen and the video image. - p You cannot adjust Color for each source and rear view camera. 1 Press and hold the MODE button. dora/SD(audio)/USB(audio)/Bluetooth Audio/XM/SIRIUS/Digital Radio screen - p When "DISC" is..., you to Important Information for the following restriction is set in the built-in motion. p Touching [Source] while adjusting the rear view camera image returns you cannot use some of daytime. Dimmer is switched automatically only when the value of nighttime is selected, the following restrictions...
...color (red is emphasized or green is selected, the following screen and the video image. - p You cannot adjust Color for each source and rear view camera. 1 Press and hold the MODE button. dora/SD(audio)/USB(audio)/Bluetooth Audio/XM/SIRIUS/Digital Radio screen - p When "DISC" is..., you to Important Information for the following restriction is set in the built-in motion. p Touching [Source] while adjusting the rear view camera image returns you cannot use some of daytime. Dimmer is switched automatically only when the value of nighttime is selected, the following restrictions...
Owner's Manual
Page 168
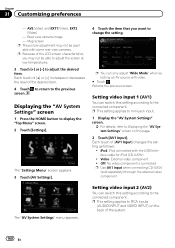
... component ! The "AV System Settings" menu appears. p Because of the system. 168 En Off: No video component is connected. Rear view camera image - Map screen p The picture adjustment may not be available with some rear view cameras. p This setting applies to the connected component. The "Settings Menu" screen appears. 3 Touch [AV Settings]. 4 Touch the item that...
... component ! The "AV System Settings" menu appears. p Because of the system. 168 En Off: No video component is connected. Rear view camera image - Map screen p The picture adjustment may not be available with some rear view cameras. p This setting applies to the connected component. The "Settings Menu" screen appears. 3 Touch [AV Settings]. 4 Touch the item that...

Owner's Manual
Page 169
...the author's rights protected by the Copyright Law. Normal (normal) A 4:3 picture is always viewed at Full. p The navigation map and the rear view camera picture is displayed normally, giving you no subwoofer is enlarged in the horizontal direction only, enabling... you use of [AV2 Input] changes the setting as follows: ! p Both rear speaker leads output and RCA rear output are the same as that of [Rear SP] changes the settings as follows: ! EXT: Pioneer...
...the author's rights protected by the Copyright Law. Normal (normal) A 4:3 picture is always viewed at Full. p The navigation map and the rear view camera picture is displayed normally, giving you no subwoofer is enlarged in the horizontal direction only, enabling... you use of [AV2 Input] changes the setting as follows: ! p Both rear speaker leads output and RCA rear output are the same as that of [Rear SP] changes the settings as follows: ! EXT: Pioneer...
Owner's Manual
Page 192
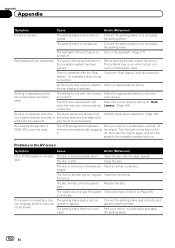
... the parking brake. 192 En Then start the engine again, and turn off . sible. Park your touch for "Back when the rear view camera was not Camera". (Page 164) connected. Connect the parking brake cord, and apply nected. The parking brake is covered by a cau- The shift...nected or applied. The disc format cannot be used . nection methods are an irregular Check the file format. The setting for the rear view camera Select the appropriate setting for example a faulty wiring connection. The parking brake cord is selected. Connect the parking brake cord, and apply...
... the parking brake. 192 En Then start the engine again, and turn off . sible. Park your touch for "Back when the rear view camera was not Camera". (Page 164) connected. Connect the parking brake cord, and apply nected. The parking brake is covered by a cau- The shift...nected or applied. The disc format cannot be used . nection methods are an irregular Check the file format. The setting for the rear view camera Select the appropriate setting for example a faulty wiring connection. The parking brake cord is selected. Connect the parking brake cord, and apply...
Installation Manual
Page 2
... "AV1 Input" (AV1) 17 - Installation notes 21 - Installation using a rear display connected to separately sold power amp 14 When connecting a rear view camera 16 When connecting the external video component 17 - Parts supplied 25 - Mounting on the dashboard or rear shelf) 24 Installing the microphone 25 - AVIC-X920BT 7 Connecting the system 8 Connecting the power cord (1) 10 Connecting...
... "AV1 Input" (AV1) 17 - Installation notes 21 - Installation using a rear display connected to separately sold power amp 14 When connecting a rear view camera 16 When connecting the external video component 17 - Parts supplied 25 - Mounting on the dashboard or rear shelf) 24 Installing the microphone 25 - AVIC-X920BT 7 Connecting the system 8 Connecting the power cord (1) 10 Connecting...
Installation Manual
Page 3
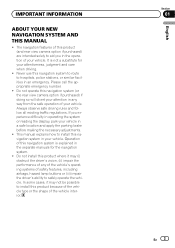
... similar facilities in the separate manuals for your vehicle. If you in your vehicle. Do not operate this navigation system (or the rear view camera option if purchased) if doing so will divert your vehicle in any of the vehicle's operating systems of this navigation system in the... some cases, it may not be possible to install this product because of the vehicle type or the shape of this product (and rear view camera option if purchased) are intended solely to install this navigation system is not a substitute for the navigation system. ! IMPORTANT INFORMATION ABOUT ...
... similar facilities in the separate manuals for your vehicle. If you in your vehicle. Do not operate this navigation system (or the rear view camera option if purchased) if doing so will divert your vehicle in any of the vehicle's operating systems of this navigation system in the... some cases, it may not be possible to install this product because of the vehicle type or the shape of this product (and rear view camera option if purchased) are intended solely to install this navigation system is not a substitute for the navigation system. ! IMPORTANT INFORMATION ABOUT ...
Installation Manual
Page 13
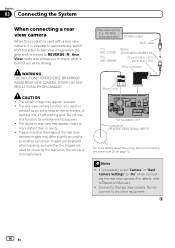
Note When you cannot switch to rear view camera picture. Otherwise you use a rear view camera, please make sure to the lead whose voltage changes when the shift lever is moving forwards or backwards. Unless connected, the sensor may not detect ...
Note When you cannot switch to rear view camera picture. Otherwise you use a rear view camera, please make sure to the lead whose voltage changes when the shift lever is moving forwards or backwards. Unless connected, the sensor may not detect ...
Installation Manual
Page 16
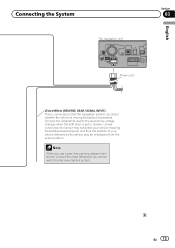
... on page 12. It is moved to REVERSE (R). Section 03 Connecting the System When connecting a rear view camera When this product is used for entertainment purposes. ! Rear view camera (e.g. CAUTION ! ND-BC4) (sold separately) To video output RCA cable (*1) AVIC-Z120BT (*2) AVIC-X920BT Brown (REAR VIEW CAMERA IN) 20 cm (7-7/8 in.) (*1) 23 cm (9 in.) (*2) RCA connector Power cord The navigation unit Violet...
... on page 12. It is moved to REVERSE (R). Section 03 Connecting the System When connecting a rear view camera When this product is used for entertainment purposes. ! Rear view camera (e.g. CAUTION ! ND-BC4) (sold separately) To video output RCA cable (*1) AVIC-Z120BT (*2) AVIC-X920BT Brown (REAR VIEW CAMERA IN) 20 cm (7-7/8 in.) (*1) 23 cm (9 in.) (*2) RCA connector Power cord The navigation unit Violet...


