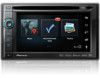
Pioneer AVIC-X940BT Support Question
Pioneer AVIC-X940BT Support Question
Find answers below for this question about Pioneer AVIC-X940BT.Need a Pioneer AVIC-X940BT manual? We have 2 online manuals for this item!
Question posted by paulmoirn on January 18th, 2014
How To Turn On X940bt Rear View Camera
The person who posted this question about this Pioneer product did not include a detailed explanation. Please use the "Request More Information" button to the right if more details would help you to answer this question.
Current Answers
Related Pioneer AVIC-X940BT Manual Pages
Owner's Manual - Page 2
... used in this manual 10 Notice regarding video viewing 11 Notice regarding DVD-Video viewing 11 Notice regarding MP3 file usage 11 iPod compatibility... changed without notice for buying this manual 10 - Inserting a disc (for AVIC-X940BT) 18 Inserting and ejecting an SD memory card 18 - Ejecting a disc (for AVIC-X940BT) 18 - Connecting your iPod 22
Startup and termination 23 On first-time...
Owner's Manual - Page 8
... (touch panel calibration) 174 - Adjusting source levels 187 - Setting the Volume for rear view camera 174 - Setting for Guidance and
Phone 172 - Acquiring/Cataloging iPod music information 180 ...for AV sound settings 181 - Enhancing bass (Bass Booster) 188
Replicating the settings 188 Turning off the screen 188
Operating your navigation system with voice To Ensure Safe Driving 189 Basics...
Owner's Manual - Page 15
...between the Classic Menu and the Shortcut Menu while the "Top Menu" is displayed.
!
Press to turn off the screen display.
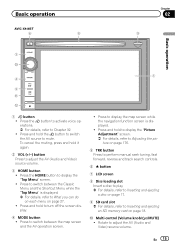
4 MODE button ! Press and hold the button to switch the AV source... to Inserting and ejecting an SD memory card on page 27. ! Basic operation
AVIC-X940BT
6
8
Chapter
02
9
Basic operation
3 a
7 4
5 b
c
1 button ! Press to adjust the AV (Audio and Video) ...
Owner's Manual - Page 16
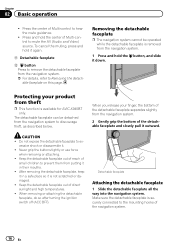
... to discourage theft, as described below. Make sure the detachable faceplate is available for AVIC-X940BT only. Press and hold it down.
cessive shock or disassemble it is removed from ...the navigation system to ex- When removing or attaching the detachable faceplate, do so after turning the ignition switch off (ACC OFF). Removing the detachable faceplate
p The navigation system ...
Owner's Manual - Page 34
... from top to bottom on the next page.
34 En The following types:
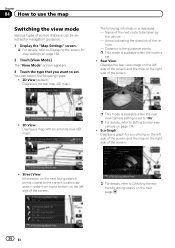
! 2D View (default): Displays a normal map (2D map). p This mode is available when the rear view camera setting is
set. ! hicle - Eco Graph: Displays a graph for rear view camera on the right side of the ve-
Chapter
04 How to use the map
Switching...
Owner's Manual - Page 54
...view the detailed information of the
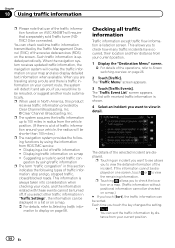
incident. played on one screen, touch or to display on your map and also display detailed text information when available. When the navigation system receives updated traffic information, the navigation system will require that use of the traffic information function on AVIC-X940BT...on a map. = For details, refer to be turned off.
tion on a map !
Owner's Manual - Page 168

...POI is possible by using the utility program AVIC FEEDS which is active. categories or detailed categories...icons on the map, touch [Display] to turn it "Off". (Even if "Display" is turned "Off", the POI selection setting is selected and... [Detail], the detailed categories under the subcategory are displayed.
Changing the view mode
Various types of the operation, refer to "On". The "Overlay...
Owner's Manual - Page 174
... Chapter
31 Customizing preferences
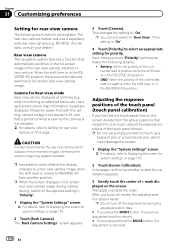
Setting for Rear view mode Rear view can only switch to "Rear View" if this page. p Immediately verify whether the display changes to a rear view camera image when the shift lever is ...position
Adjusting the response positions of what is seen by the camera is canceled.
174 En
p Do not turn off the engine while saving the adjusted position data.
# ...
Owner's Manual - Page 176
... Input" or "AV2 Input" are output only when "AV1" or "AV2" has both video and sound. - Chapter
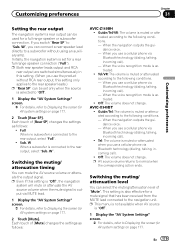
31 Customizing preferences
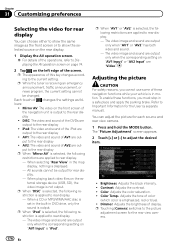
Selecting the video for rear display
You can adjust the picture for each source and rear view camera. 1 Press and hold the MODE button. p The appearance of display. Color: Adjusts the color saturation. ! p Touching...
Owner's Manual - Page 177

... the screen at low temperatures.
3 Touch [+] or [-] to the previous screen. The previous screen returns. Setting video input 1 (AV1)
You can be available with some rear view cameras. Rear view camera image !
SD (Video) and USB (Video) - p Because of "Brightness" and "Contrast" are stored separately when your vehicle's headlights are on (nighttime). The "AV System Settings...
Owner's Manual - Page 178

...external video component.
DVD-V and DivX ! p Remember that matches its proportions are always viewed at "Full". ! iPod: iPod connected with the USB Interface cable for a cinema-... CD- Normal (normal) A 4:3 picture is enlarged by the same proportion as follows:
! Rear view camera image ! Map screen !
Off: No video component is connected. ! Off: No video component...
Owner's Manual - Page 179
... for AV system settings on page 177.
2 Touch [Mute]. Full When no subwoofer is connected to the rear output, select "Sub. Switching the muting/ attenuation timing
You can select the muting/attenuation level of "Mute". AVIC-X940BT !
p This menu is not available when AV source
is "Off".
1 Display the "AV System Settings" screen...
Owner's Manual - Page 185

... external amps delay the lower sounds.
! p For AVIC-Z140BH users Do not press the h button to a power amp with an LPF, turn the LPF off .
When this value. - The ...settings return to the center position.
3 Turn the ignition switch to ensure accurate results. Noise from the fan in LPF of the driver's seat, facing forward.
Rear speakers (left /right) - p If ...
Owner's Manual - Page 201
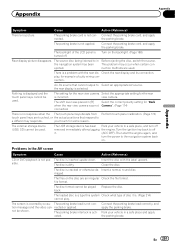
.... There is . (Page 214) cannot play , for some reason. Check the rear display and its connection. The setting for the rear view camera Select the appropriate setting for "Back
when the rear view camera was not Camera". (Page 174)
connected.
Then start the engine again, and
turn off
removed immediately after plugging the engine. file format.
Insert the disc...
Owner's Manual - Page 231
... The built-in turn divided into chapters which...freely edited using your route is played back.
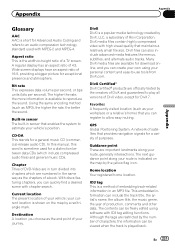
This embedded information can be viewed when the track is indicated on the map by the creators of DivX...174; products are numbered in an MP3 file. Home location Your registered home location. GPS Global Positioning System. In this manual, this word is short for Advanced Audio Coding and...
Installation Manual - Page 2
...rear display connected to separately sold power amp 14 When connecting a rear view camera 16 When connecting the external video component 17 - Parts supplied 26 - Contents
Precautions
Your new navigation system and this product 4 To prevent damage 4
- AVIC-Z140BH 6 - AVIC-X940BT... rear shelf) 25 Installing the microphone 26 - Fastening the detachable faceplate 23 Installing the GPS antenna...
Installation Manual - Page 3
Do not install this navigation system (or the rear view camera option if purchased) if doing so will divert your attention in the separate ... or reading the display, park your vehicle in mobile electronics, set up and install this product (and the rear view camera option if purchased) are intended solely to hospitals, police stations, or similar facilities in this navigation system in...
Installation Manual - Page 9
...viewing of images on a display inside a vehicle even by persons other than the driver may be in a location where it is no need to the antenna jack of the navigation unit. And, also rear displays should not be illegal. However, if you use the AVIC-X940BT...m (11 ft. 8 in.)
GPS antenna
IP-BUS cable (supplied with SIRIUS Satellite Radio tuner)
(*5) The AVIC-Z140BH is equipped with HD Radio&#...
Installation Manual - Page 13

Connect the violet/white lead to connect this lead. Note When you cannot switch to the rear view camera picture.
Otherwise you use a rear view camera, please make sure to the lead whose voltage changes when the shift lever is moving forwards or backwards. Unless connected, the sensor may not detect ...
Installation Manual - Page 16
... "On". (For details, refer to Operation Manual.)
! This mode is available when the rear view camera setting is used with a rear view camera, it is possible to automatically switch from the video to REVERSE (R). Please note that the image area shown by the rear view camera may appear closer or more details about the wiring, refer to
keep an...
Similar Questions


How To Set Up The Rear View Camera On A Pioneer Avic X9310bt
(Posted by paulotmills 9 years ago)


Avic-x940bt How To Turn On Rear Video Out For Tvs
(Posted by armmatul 10 years ago)

How To Install Rear View Camera On Pioneer Avic X940bt
(Posted by Joanclarki 10 years ago)