Pioneer AVIC-X920BT Support Question
Pioneer AVIC-X920BT Support Question
Find answers below for this question about Pioneer AVIC-X920BT.Need a Pioneer AVIC-X920BT manual? We have 2 online manuals for this item!
Question posted by mmaiorano520 on November 6th, 2012
Caution
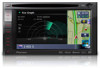
caution: screen may be reversed what does this mean? Help me!!!!
Current Answers
Answer #1: Posted by quaff on November 7th, 2012 9:05 AM
quaff

Member since:
November 13th, 2011 Points: 537,590

Member since:
November 13th, 2011 Points: 537,590
Related Pioneer AVIC-X920BT Manual Pages
Owner's Manual - Page 1
English Operation Manual
FLASH MEMORY MULTIMEDIA AV NAVIGATION RECEIVER
AVIC-Z120BT AVIC-X920BT
Notice to all users: This software requires that the navigation system is properly connected to read Important Information for the User includes the important information ...
Owner's Manual - Page 2
... device 18 - Before removing the vehicle
battery 11 - Data subject to operate your iPod 19
Flow from actual screens. Inserting a disc (for AVIC-Z120BT) 15 - Ejecting a disc (for AVIC- Inserting an SD memory card (for AVIC-X920BT) 15 Inserting and ejecting an SD memory card 15 - Z120BT) 15 - Z120BT) 16 - Inserting an SD memory card...
Owner's Manual - Page 9
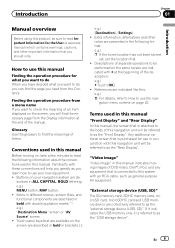
...contains warnings, cautions, and other notes are presented in the following information about the conventions used in this manual
"Front Display" and "Rear Display" In this manual, the screen that is... to check the meaning of the description: e.g.) # Touch [OK]. ! If it indicates the USB memory only, it is connected to this system with this navigation unit will help you greatly as the...
Owner's Manual - Page 12

Chapter
02 Basic operation
Checking part names and functions
This chapter gives information about the names of the parts and the main features using the buttons.
1
2
34
5
67
AVIC-Z120BT (with the LCD panel closed)
8
9
AVIC-Z120BT (with the LCD panel open) 12 En
Owner's Manual - Page 13
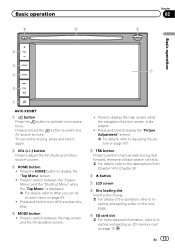
.... ! Press to switch between the map screen and the AV operation screen.
! Press the HOME button to What you can do on each menu on the next page.
9 SD card slot = For more detailed information, refer to mute.
En 13 Basic operation
6
8
Chapter
02
9
Basic operation
2
3
7 4
5
1
AVIC-X920BT
1 button Press the button to activate...
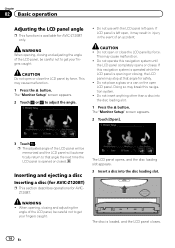
Owner's Manual - Page 14
...
p This function is available for safety. ! The "Monitor Setup" screen appears.
2 Touch or to that angle for AVIC-Z120BT only.
WARNING ! Do not place a glass or a can on...for AVIC-Z120BT)
p This section describes operations for AVICZ120BT. This may break this navigation system until
the LCD panel completely opens or closes.
Do not use with the LCD panel left open . CAUTION Do ...
Owner's Manual - Page 15
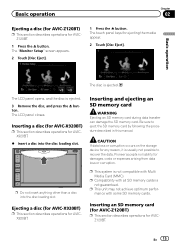
... than a disc into the disc loading slot.
Inserting a disc (for AVIC-X920BT)
p This section describes operations for AVICZ120BT.
1 Press the h button.
The LCD panel opens, and the disc is ejected.
The touch panel keys for any reason, it is not guaranteed. CAUTION If data loss or corruption occurs on the storage device for...
Owner's Manual - Page 16
...
Doing so may damage the card.
1 Press the h button. Ejecting an SD memory card (for AVIC-Z120BT)
p This section describes operations for AVICZ120BT.
1 Press the h button.
The LCD panel opens... h button. Chapter
02 Basic operation
CAUTION !
p If data related to the upside and press the card until it clicks and completely locks. The "Monitor Setup" screen appears.
2 Touch [SD Insert]....
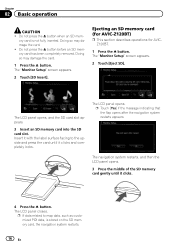
Owner's Manual - Page 17
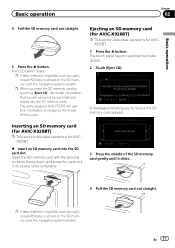
...], the model information that you are using will use . Inserting an SD memory card (for AVIC-X920BT)
p This section describes operations for AVICX920BT.
1 Press the h button. A message prompting you...card out straight.
5 Press the h button. En 17
Ejecting an SD memory card (for AVIC-X920BT)
p This section describes operations for AVICX920BT.
% Insert an SD memory card into the SD ...
Owner's Manual - Page 224
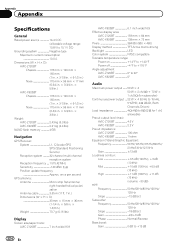
...1-3/8 in .)
Weight: AVIC-Z120BT 2.43 kg (5.3 lbs) AVIC-X920BT 2.01 kg (4.4 lbs)
NAND flash memory 4 GB
Navigation
GPS Receiver: System L1, C/Acode GPS SPS (Standard Positioning Service...
Screen size/aspect ratio: AVIC-Z120BT 7 inch wide/16:9
AVIC-X920BT 6.1 inch wide/16:9 Effective display area:
AVIC-Z120BT 159 mm × 84 mm AVIC-X920BT ...Reverse
Bass boost: Gain 0 dB to +12 dB
224 En
Owner's Manual - Page 225
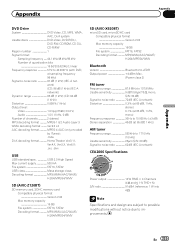
... card Compatible physical format Version 2.00 Max memory capacity 16 GB File system FAT16, FAT32 Decoding format MP3/WMA/AAC/WAVE/ H.264/MPEG4/WMV
SD (AVIC-X920BT)
microSD card, microSDHC card Compatible physical format Version 2.00 Max memory capacity 16 GB File system FAT16, FAT32 Decoding format MP3/WMA/AAC/WAVE/ H.264...
Installation Manual - Page 2
... display 18 - Installation on the sun visor 25 - For AVIC-Z120BT users 21 Installing this product 5 To prevent damage 5
- AVIC-Z120BT 7 - AVIC-X920BT 7 Connecting the system 8 Connecting the power cord (1) 10 Connecting... antenna inside the
vehicle (on
the side of the navigation unit 22 Installing the GPS antenna 23
- Parts supplied 22 - When using the screw holes on the dashboard...
Installation Manual - Page 5

...work properly.
! Be sure to shorten it longer. Do not cut the GPS antenna cable to install this product, its cables, and wiring away in such... installation manual. ! En 5 Before installing this product to disconnect the (-) battery cable before connecting the system
CAUTION ! Secure all of contact with a 12-volt battery and negative grounding only.
It is directly connected to ...
Installation Manual - Page 7
Connecting the System
Section
03
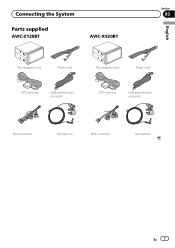
Parts supplied
AVIC-Z120BT
AVIC-X920BT
English
The navigation unit
Power cord
The navigation unit
Power cord
GPS antenna
USB and mini-jack connector
GPS antenna
USB and mini-jack connector
RCA connector
Microphone
RCA connector
Microphone
En 7
Installation Manual - Page 14
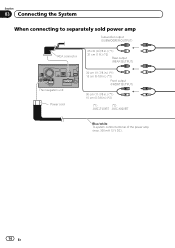
... (REAR OUTPUT)
The navigation unit Power cord
30 cm (11-7/8 in.) (*1) 15 cm (5-7/8 in.) (*2)
Front output (FRONT OUTPUT)
30 cm (11-7/8 in.) (*1) 15 cm (5-7/8 in.) (*2)
(*1)
(*2)
AVIC-Z120BT AVIC-X920BT
Blue/white To system control terminal of the power amp (max. 300 mA 12 V DC).
14 En
Installation Manual - Page 16
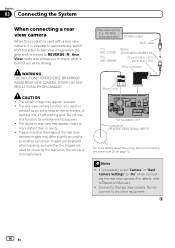
...differ slightly according to whether full screen images are displayed when backing, ...CAUTION ! The object in reality. !
Do not use this product is moving forward. Do not connect to the rear view camera. Rear view camera
(e.g.
WARNING USE INPUT ONLY FOR REVERSE OR MIRROR IMAGE REAR VIEW CAMERA. ND-BC4) (sold separately) To video output
RCA cable
(*1) AVIC-Z120BT
(*2) AVIC-X920BT...
Installation Manual - Page 18

...AV2 Input" (AV2)
The navigation unit
When connecting the rear display
The navigation unit
(*1)
20 cm (7-7/8 in.) (*1) AVIC-Z120BT
23 cm (9 in.) (*2)
(*2)
AVIC-X920BT
RCA connector
Yellow (VIDEO INPUT)
Red, white (AUDIO INPUT)
RCA cables (sold separately)
To video output
To audio ....)
This connection
15 cm (5-7/8 in the rear seats to enable passengers in .) is for AVIC-Z120BT.
Installation Manual - Page 19

... (VIDEO INPUT)
IP-BUS cable (sold separately)
Black
RCA cable (sold separately)
To IP-BUS output
To video output
Pioneer external unit (sold separately)
(*1)
(*2)
AVIC-Z120BT AVIC-X920BT
! Connecting the System
When connecting the external unit featuring video source
The navigation unit
Blue
RCA connector
20 cm (7-7/8 in.) (*1) 23 cm (9 in "AV Settings...
Installation Manual - Page 20
...
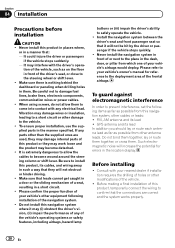
In order to prevent interference, set the following installation of the navigation system. ! GPS antenna and its lead In addition you should lay or route each antenna lead as far... other damage to come into contact with the driver's opera- Section
04 Installation
Precautions before installation
CAUTION ! It may interfere with any of your vehicle's owner's manual for errors in them . ...
Installation Manual - Page 23
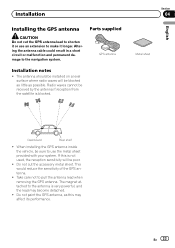
...
Installing the GPS antenna
CAUTION Do not cut the accessory metal sheet.
If this may become detached.
!
This would reduce the sensitivity of the GPS antenna.
!
When installing the GPS antenna inside the...its performance. Section
04
Metal sheet
English
Dashboard
Rear shelf
! Do not cut the GPS antenna lead to shorten it longer. En 23 The antenna should be installed on a ...


