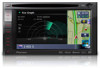
Pioneer AVIC-X920BT Support Question
Pioneer AVIC-X920BT Support Question
Find answers below for this question about Pioneer AVIC-X920BT.Need a Pioneer AVIC-X920BT manual? We have 2 online manuals for this item!
Question posted by Darryl686 on December 9th, 2013
How To Bypass Caution Screen May Be Reversed
The person who posted this question about this Pioneer product did not include a detailed explanation. Please use the "Request More Information" button to the right if more details would help you to answer this question.
Current Answers
Answer #1: Posted by TommyKervz on December 9th, 2013 11:49 PM
TommyKervz

Member since:
January 10th, 2013 Points: 17,776,833

Member since:
January 10th, 2013 Points: 17,776,833
Learn how to here
Related Pioneer AVIC-X920BT Manual Pages
Owner's Manual - Page 2
... MP3 file usage 10 iPod compatibility 10 Map coverage 10 Protecting the LCD panel and screen 11 Notes on internal memory 11 - Canceling the shortcut 24 Operating list screens (e.g. Display during freeway driving 27 Roads without notice for AVIC-X920BT) 15 - Setting the "Quick Access" menu 28 Switching the view mode 29
Eco-driving...
Owner's Manual - Page 9
... moving images of the description: e.g.) # Touch [OK]. ! gation menu screens on the same screen are indicated with these conventions will help you greatly as the "USB storage ...a few minutes to read Important Information for the User (a separate manual) which contains warnings, cautions, and other notes are presented in the following information about the conventions used in this manual
...
Owner's Manual - Page 13
... operation
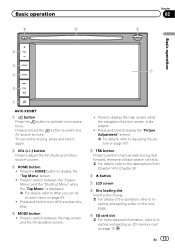
2
3
7 4
5
1
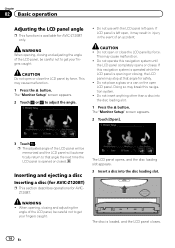
AVIC-X920BT
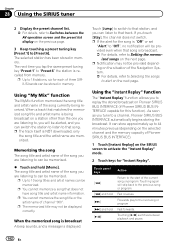
1 button Press the button to display the map screen while the navigation function screen is displayed. = For details, refer to mute. Press and hold to display the "Picture Adjustment" screen. = For details, refer to Adjusting the picture on page 167.
5 TRK button Press to perform manual seek tuning, fast forward, reverse and track...
Owner's Manual - Page 14
... Setup" screen appears.
2 Touch or to that angle for safety. !
Do not insert anything other than a disc into the disc loading slot.
CAUTION ! Do not operate this navigation system. ! Doing so may break this navigation system until
the LCD panel completely opens or closes. Inserting and ejecting a disc
Inserting a disc (for AVIC-Z120BT...
Owner's Manual - Page 15
...AVICX920BT.
En 15 The "Monitor Setup" screen appears.
2 Touch [Disc Eject].
1 Press the h button.
The LCD panel opens, and the disc is not guaranteed. Inserting a disc (for AVIC-X920BT)
p This section describes operations for AVICX920BT... card during data transfer can damage the SD memory card.
CAUTION If data loss or corruption occurs on the storage device for AVICZ120BT.
1 Press the ...
Owner's Manual - Page 16
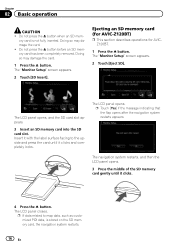
... Doing so may damage the card. ! Insert it clicks.
4 Press the h button. The "Monitor Setup" screen appears.
2 Touch [SD Insert]. Ejecting an SD memory card (for AVIC-Z120BT)
p This section describes operations for AVICZ120BT.
1 Press the h button. The LCD panel opens.
The LCD... inserted.
Do not press the h button when an SD mem- Chapter
02 Basic operation
CAUTION !
Owner's Manual - Page 33
... regulations when driving.
j
5 Confirm the location on the map. = For details, refer to Setting a route to Screen switching overview on page 41.
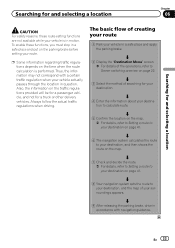
Searching for and selecting a location
Chapter
06
Searching for and selecting a location
CAUTION For safety reasons, these functions, you must stop in a safe place and put on the map. Thus...
Owner's Manual - Page 43
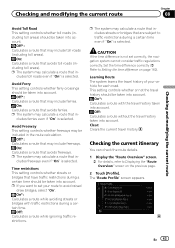
...*: Calculates a route while avoiding streets or bridges with the travel history taken into account. CAUTION If the time difference is selected.
On: Calculates a route that may calculate a route...traffic restrictions during a certain time should be taken into account. The "Route Profile" screen appears. p The system may be included in - Avoid Freeway This setting controls whether ...
Owner's Manual - Page 96
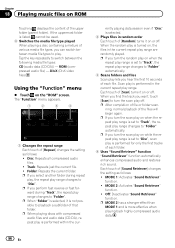
... of [Repeat] changes the setting as follows: ! When you find the track you perform fast reverse or fast forward during repeat play, the repeat play range changes to "Disc", scan play range...switch between media file types to playback a subfolder of [Scan] turns it on the "ROM" screen. ROM (compressed audio file) - Scan play is performed in the current repeat play is more ...
Owner's Manual - Page 101

... unclear
during slow motion playback. The "Function" menu appears.
1
2
3
Frame-by touching the screen.
p With some discs, images may be unclear during frame-by-frame playback. Touch [L/R Select] ...1 Changes the repeat range Each touch of [Position] changes the display po-
p Reversed slow motion playback is not available when disc playback has been stopped.
2 Selects audio ...
Owner's Manual - Page 105
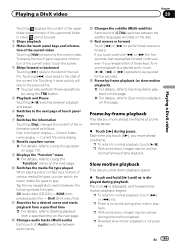
...) Each touch of the current video, touch the screen. 4 Skips forward or backward Touching [p] skips to perform fast reverse or forward. e Fast reverse or forward Touch [m] or [n] to the start of... time during pause.
% Touch [r] during frame-by -frame playback on this page. p Reversed slow motion playback is displayed, and forward slow motion playback begins.
p With some discs, images...
Owner's Manual - Page 106

... 3 seconds, touch [5], [min], [3], [sec] and [Enter] in order.
! p If you perform fast reverse or fast forward during repeat
play, the repeat play range changes to "Folder". Using the "Function" menu
% Touch...]. 2 Touch the keys to Displaying DVD/ DivX® Setup menu on the "DivX" screen. p When "Folder" is selected, it is selected. 2 DVD setup adjustments = For details, refer to...
Owner's Manual - Page 123
...
4 Scroll by using this navigation system. !
p After you want to the navigation system.
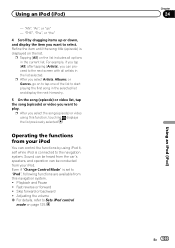
Fast reverse or forward ! Adjusting the volume = For details, refer to Sets iPod control
mode on to tap ... in the current list.
Skip forward or backward ! p After you want to the next screen with all options in the list selected. Sound can be heard from the car's speakers, and...
Owner's Manual - Page 142
... to listen to that track. Touch panel keys
[o]
[o] and hold [p] [p] and hold [Memo]. Fast reverses. Forwards play to the next song or program
Fast-forwards. p Up to 18 stations, six for the...channel does not switch. Touching again will be memorized. Touching [f] switches between the AV operation screen and the preset list display on the next page. The selected station has been stored in ...
Owner's Manual - Page 164
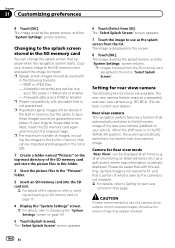
... (e.g. CAUTION Pioneer recommends the use as the splash screen, and the "System Settings" screen returns.
The "Select Splash Screen" screen appears.
7 Touch the image to the splash screen stored in the "Pictures" folder.
3 Insert an SD memory card into the SD card slot.
= For details of a camera which outputs mirror reversed images, otherwise the screen image may appear reversed...
Owner's Manual - Page 191
...the other end of your vehicle Something covers the GPS antenna. Turn the attenuator or mute off the navigation system and turn or reversing. The voice from the person on the Use... connection.
Turn the volume up prop-
Do not cover the GPS antenna with an extreme angle exceeding the installation angle limitations.
The screen is misaligned after a U-turn the power to an echo. ...
Owner's Manual - Page 224
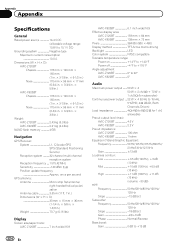
once per second
GPS antenna: Antenna Micro strip flat antenna/ right-handed helical polarization Antenna cable 3.55 m (11 ft. 7 in.) Dimensions (W × H × D 33 mm × 15 mm × 36 mm (1-1/4 in. × 5/8 in. × 1-3/8 in.) Weight 73.7 g (0.16 lbs)
Display
Screen size/aspect ratio: AVIC-Z120BT 7 inch wide/16:9
AVIC-X920BT 6.1 inch wide/16:9 Effective...
Installation Manual - Page 2
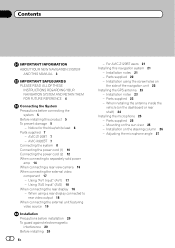
... 14 When connecting a rear view camera 16 When connecting the external video component 17 - AVIC-X920BT 7 Connecting the system 8 Connecting the power cord (1) 10 Connecting the power cord (2) 12... installation 20 To guard against electromagnetic
interference 20 Before installing 20
2 En
- For AVIC-Z120BT users 21 Installing this product 5 To prevent damage 5
- When installing the antenna...
Installation Manual - Page 7
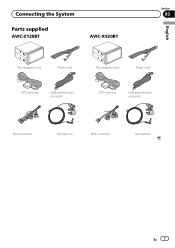
Connecting the System
Section
03
Parts supplied
AVIC-Z120BT
AVIC-X920BT
English
The navigation unit
Power cord
The navigation unit
Power cord
GPS antenna
USB and mini-jack connector
GPS antenna
USB and mini-jack connector
RCA connector
Microphone
RCA connector
Microphone
En 7
Installation Manual - Page 16
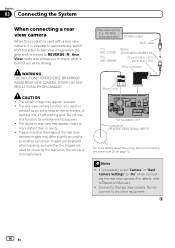
... vehicle is moving forward. CAUTION ! Rear View mode also...screen image may appear closer or more details about the wiring, refer to any other equipment.
16 En OTHER USE MAY RESULT IN INJURY OR DAMAGE.
ND-BC4) (sold separately) To video output
RCA cable
(*1) AVIC-Z120BT
(*2) AVIC-X920BT
Brown (REAR VIEW CAMERA IN)
20 cm (7-7/8 in.) (*1) 23 cm (9 in rear view may appear reversed...
Similar Questions

What Type Of Sd Card Ow To Program The Splash Screen On A Pioneer Avic Z140bh
(Posted by charlplace 9 years ago)

Can Not Get Past The Caution Screen After Update Avic Z1
(Posted by Veltcb 9 years ago)


Caution
caution: screen may be reversed what does this mean? Help me!!!!
caution: screen may be reversed what does this mean? Help me!!!!
(Posted by mmaiorano520 11 years ago)