Owner's Manual
Page 2
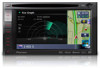
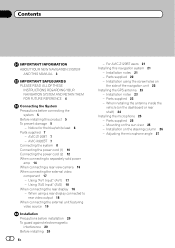
... an SD memory card (for AVIC-Z120BT) 15 - Plugging in the examples may be changed without turn-by address 34 POI list) 24 Operating the on each menu 23 Shortcut Menu 23 - Please read the map screen 25 - Terms used in this Pioneer product. Ejecting a disc (for... Disconnecting your iPod 19 - Scrolling the map to erasure 11 Basic operation Checking part names and functions 12 Adjusting the LCD panel angle 14 Inserting and ejecting a disc 14 - Z120BT) 16 - Ejecting a disc (for AVIC- X920BT) 17 2 En - Contents Thank you for performance and function improvements. Changing...
... an SD memory card (for AVIC-Z120BT) 15 - Plugging in the examples may be changed without turn-by address 34 POI list) 24 Operating the on each menu 23 Shortcut Menu 23 - Please read the map screen 25 - Terms used in this Pioneer product. Ejecting a disc (for... Disconnecting your iPod 19 - Scrolling the map to erasure 11 Basic operation Checking part names and functions 12 Adjusting the LCD panel angle 14 Inserting and ejecting a disc 14 - Z120BT) 16 - Ejecting a disc (for AVIC- X920BT) 17 2 En - Contents Thank you for performance and function improvements. Changing...

Owner's Manual
Page 12
Chapter 02 Basic operation Checking part names and functions This chapter gives information about the names of the parts and the main features using the buttons. 1 2 34 5 67 AVIC-Z120BT (with the LCD panel closed) 8 9 AVIC-Z120BT (with the LCD panel open) 12 En
Chapter 02 Basic operation Checking part names and functions This chapter gives information about the names of the parts and the main features using the buttons. 1 2 34 5 67 AVIC-Z120BT (with the LCD panel closed) 8 9 AVIC-Z120BT (with the LCD panel open) 12 En
Owner's Manual
Page 95
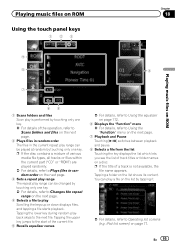
... list screen) on the list shows its content. p If the disc contains a mixture of various media file types, all tracks or files within the current part ("CD" or "ROM") are played randomly. = For details, refer to Plays files in the current repeat play Scrolling the keys up or down displays files...
... list screen) on the list shows its content. p If the disc contains a mixture of various media file types, all tracks or files within the current part ("CD" or "ROM") are played randomly. = For details, refer to Plays files in the current repeat play Scrolling the keys up or down displays files...

Owner's Manual
Page 163
... [Splash Screen]. Phone Ringtone This setting controls the incoming ring tone volume. ! The image is adjusted by the VOL (+/-) button. = For details, refer to Checking part names and functions on the screen. On this speed value. 5 Touch [OK]. p When set . Each time you touch the key changes that setting. ! Changing the...
... [Splash Screen]. Phone Ringtone This setting controls the incoming ring tone volume. ! The image is adjusted by the VOL (+/-) button. = For details, refer to Checking part names and functions on the screen. On this speed value. 5 Touch [OK]. p When set . Each time you touch the key changes that setting. ! Changing the...
Owner's Manual
Page 206
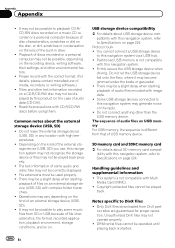
... data (CD-DA)). ! Depending on the radio. ! Do not connect anything other environmental factors. ! Handling guidelines and supplemental information ! This system is different from DivX part- Only DivX files downloaded from that of file characteristics, file format, recorded application, playback environment, storage conditions, and so on. Unauthorized DivX files may not...
... data (CD-DA)). ! Depending on the radio. ! Do not connect anything other environmental factors. ! Handling guidelines and supplemental information ! This system is different from DivX part- Only DivX files downloaded from that of file characteristics, file format, recorded application, playback environment, storage conditions, and so on. Unauthorized DivX files may not...
Installation Manual
Page 2
...Parts supplied 25 - Parts supplied 22 - Mounting on the dashboard or rear shelf) 24 Installing the microphone 25 - When using the screw holes on the steering column 26 - Adjusting the microphone angle 27 AVIC-Z120BT 7 - Installation on the side of the navigation unit 22 Installing the GPS antenna 23 - AVIC-X920BT... 5 Before installing this navigation system 21 - Using "AV2 Input" (AV2) 18 When connecting the rear display 18 - For AVIC-Z120BT users 21 Installing this product 5 To prevent damage 5 - Installation using a rear display connected to separately sold power amp ...
...Parts supplied 25 - Parts supplied 22 - Mounting on the dashboard or rear shelf) 24 Installing the microphone 25 - When using the screw holes on the steering column 26 - Adjusting the microphone angle 27 AVIC-Z120BT 7 - Installation on the side of the navigation unit 22 Installing the GPS antenna 23 - AVIC-X920BT... 5 Before installing this navigation system 21 - Using "AV2 Input" (AV2) 18 When connecting the rear display 18 - For AVIC-Z120BT users 21 Installing this product 5 To prevent damage 5 - Installation using a rear display connected to separately sold power amp ...

Installation Manual
Page 5
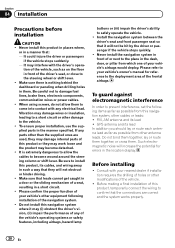
... clamps or electrical tape. Use this product to other electronic products by cutting the insulation of the power supply lead of the vehicle's moving parts, especially the steering wheel, shift lever, parking brake, sliding seat tracks, doors, or any leads. To prevent damage WARNING ! Do not... directly connect the yellow lead of this unit with metal parts, short-circuiting can occur, resulting in a fire or malfunction. ! Do not route wires where they will be exceeded, causing overheating. Never feed...
... clamps or electrical tape. Use this product to other electronic products by cutting the insulation of the power supply lead of the vehicle's moving parts, especially the steering wheel, shift lever, parking brake, sliding seat tracks, doors, or any leads. To prevent damage WARNING ! Do not... directly connect the yellow lead of this unit with metal parts, short-circuiting can occur, resulting in a fire or malfunction. ! Do not route wires where they will be exceeded, causing overheating. Never feed...
Installation Manual
Page 6
Ensure that the ground wire is properly connected to metal parts of the speaker lead on connecting the power amp and other device must be sure to only use a fuse of the same color to the * ... control terminal, or the antenna booster power control terminal (max. 300 mA 12 V DC). OF OF Other devices (Another electronic device in the car) Metal parts of the connector. ! When the ignition switch is employed, do not remove the caps attached to insulate all unused speaker leads, which if left uncovered...
Ensure that the ground wire is properly connected to metal parts of the speaker lead on connecting the power amp and other device must be sure to only use a fuse of the same color to the * ... control terminal, or the antenna booster power control terminal (max. 300 mA 12 V DC). OF OF Other devices (Another electronic device in the car) Metal parts of the connector. ! When the ignition switch is employed, do not remove the caps attached to insulate all unused speaker leads, which if left uncovered...
Installation Manual
Page 7
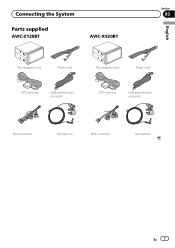
Connecting the System Section 03 Parts supplied AVIC-Z120BT AVIC-X920BT English The navigation unit Power cord The navigation unit Power cord GPS antenna USB and mini-jack connector GPS antenna USB and mini-jack connector RCA connector Microphone RCA connector Microphone En 7
Connecting the System Section 03 Parts supplied AVIC-Z120BT AVIC-X920BT English The navigation unit Power cord The navigation unit Power cord GPS antenna USB and mini-jack connector GPS antenna USB and mini-jack connector RCA connector Microphone RCA connector Microphone En 7
Installation Manual
Page 20
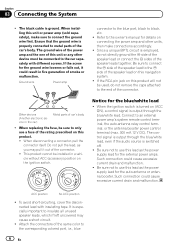
...system. ! Install the navigation system between the driver's seat and front passenger seat so that the connections are used, they may damage internal parts of or next to confirm that it may become wound around the steering column or shift lever. Before installing ! Never install this product, its... noise will not be hit by the driver or passenger if the vehicle stops quickly. ! To ensure proper installation, use the supplied parts in a manner that they may work loose and the product may (i) obstruct the driver's vision, (ii) impair the performance of any...
...system. ! Install the navigation system between the driver's seat and front passenger seat so that the connections are used, they may damage internal parts of or next to confirm that it may become wound around the steering column or shift lever. Before installing ! Never install this product, its... noise will not be hit by the driver or passenger if the vehicle stops quickly. ! To ensure proper installation, use the supplied parts in a manner that they may work loose and the product may (i) obstruct the driver's vision, (ii) impair the performance of any...
Installation Manual
Page 22
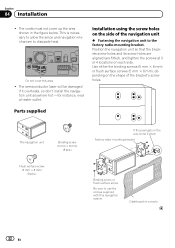
... way, bend it overheats, so don't install the navigation unit anywhere hot -for instance, near a heater outlet. Installation using the screw holes on each side. Parts supplied The navigation unit Binding screw (5 mm × 8 mm) (8 pcs.) Flush surface screw (5 mm × 8 mm) (8 pcs.) If the pawl gets in the figure below...
... way, bend it overheats, so don't install the navigation unit anywhere hot -for instance, near a heater outlet. Installation using the screw holes on each side. Parts supplied The navigation unit Binding screw (5 mm × 8 mm) (8 pcs.) Flush surface screw (5 mm × 8 mm) (8 pcs.) If the pawl gets in the figure below...
Installation Manual
Page 23
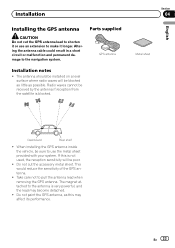
... radio waves will be received by the antenna if reception from the satellite is very powerful, and the lead may affect its performance. En 23 Parts supplied GPS antenna Installation notes ! Section 04 Metal sheet English Dashboard Rear shelf ! The magnet attached to the navigation system.
... radio waves will be received by the antenna if reception from the satellite is very powerful, and the lead may affect its performance. En 23 Parts supplied GPS antenna Installation notes ! Section 04 Metal sheet English Dashboard Rear shelf ! The magnet attached to the navigation system.
Installation Manual
Page 25
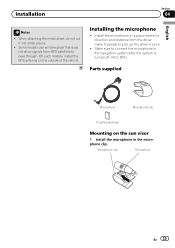
... the driver make it into small pieces. ! Make sure to connect the microphone to the navigation system after the system is turned off. (ACC OFF) Parts supplied Microphone Microphone clip Double-sided tape Mounting on the outside of the vehicle. Microphone clip Microphone En 25 When attaching the metal sheet, do...
... the driver make it into small pieces. ! Make sure to connect the microphone to the navigation system after the system is turned off. (ACC OFF) Parts supplied Microphone Microphone clip Double-sided tape Mounting on the outside of the vehicle. Microphone clip Microphone En 25 When attaching the metal sheet, do...


