Installation Manual
Page 3
... position of objects shown on the screen, and compass directions. Installing or servicing this product where it may expose you install your attentiveness, judgment and care when driving. ! It is explained in the operation of your vehicle, the distance of your vehicle. Operation of this navigation system in operating the system or reading the display, please make adjustments while safely parked. ! In addition, the system...
... position of objects shown on the screen, and compass directions. Installing or servicing this product where it may expose you install your attentiveness, judgment and care when driving. ! It is explained in the operation of your vehicle, the distance of your vehicle. Operation of this navigation system in operating the system or reading the display, please make adjustments while safely parked. ! In addition, the system...
Operation Manual
Page 2
... AVICX950BH, AVIC-X850BT and AVICX8510BT) 18 Plugging and unplugging a USB storage device 18 - Ejecting an SD memory card (for AVIC-X950BH, AVIC-X850BT and AVIC-X8510BT) 16 - POI list) 24 - Conventions used in standby mode) 20 How to use the map How to operate your iPod 19 Startup and termination 19 On first-time startup 19 Regular startup 20 - Before removing the vehicle battery 11 - Inserting a disc (for AVIC-X950BH, AVIC- Unplugging a USB storage device 18 Connecting and...
... AVICX950BH, AVIC-X850BT and AVICX8510BT) 18 Plugging and unplugging a USB storage device 18 - Ejecting an SD memory card (for AVIC-X950BH, AVIC-X850BT and AVIC-X8510BT) 16 - POI list) 24 - Conventions used in standby mode) 20 How to use the map How to operate your iPod 19 Startup and termination 19 On first-time startup 19 Regular startup 20 - Before removing the vehicle battery 11 - Inserting a disc (for AVIC-X950BH, AVIC- Unplugging a USB storage device 18 Connecting and...
Operation Manual
Page 4
... priority connecting 60 Using hands-free phoning Displaying the phone menu 61 Making a phone call 61 - Selecting a source 71 Turning off the AV source 71 AV source plate display 72 Using the radio Starting procedure 73 Reading the screen 73 Using the touch panel keys 73 - Storing and recalling broadcast frequencies 79 - Switching the reception mode 80 Operating by hardware buttons 80 Playing audio CDs Starting procedure 81 Reading the screen 81 Using the touch panel...
... priority connecting 60 Using hands-free phoning Displaying the phone menu 61 Making a phone call 61 - Selecting a source 71 Turning off the AV source 71 AV source plate display 72 Using the radio Starting procedure 73 Reading the screen 73 Using the touch panel keys 73 - Storing and recalling broadcast frequencies 79 - Switching the reception mode 80 Operating by hardware buttons 80 Playing audio CDs Starting procedure 81 Reading the screen 81 Using the touch panel...
Operation Manual
Page 5
... Reading the screen 103 Using the touch panel keys 104 Changing the wide screen mode 105 Operating by touch panel keys 88 - Functions coupled with Aha Radio and the navigation system 113 Using the Bluetooth audio player Starting procedure 114 En 5 Reading the screen 111 - Using the DVD menu by hardware buttons 106 Streaming Pandora® and using Aha Radio Information for a specific scene and starting playback from USB or SD) Starting procedure...
... Reading the screen 103 Using the touch panel keys 104 Changing the wide screen mode 105 Operating by touch panel keys 88 - Functions coupled with Aha Radio and the navigation system 113 Using the Bluetooth audio player Starting procedure 114 En 5 Reading the screen 111 - Using the DVD menu by hardware buttons 106 Streaming Pandora® and using Aha Radio Information for a specific scene and starting playback from USB or SD) Starting procedure...
Operation Manual
Page 6
... application (smartphone) 131 Customizing preferences Displaying the information screen 132 Checking the connections of connected devices 128 Starting procedure 128 - Setting the detailed city map 138 - Clearing status 134 Checking the device number 134 Checking the version information 134 Registering your home 134 Displaying the adjustment and correction screen 135 Switching the muting/attenuation timing 135 Switching the muting/attenuation level 136 Setting the Volume for Guidance and Phone 136 Correcting the current location 136 Switching the road on which you...
... application (smartphone) 131 Customizing preferences Displaying the information screen 132 Checking the connections of connected devices 128 Starting procedure 128 - Setting the detailed city map 138 - Clearing status 134 Checking the device number 134 Checking the version information 134 Registering your home 134 Displaying the adjustment and correction screen 135 Switching the muting/attenuation timing 135 Switching the muting/attenuation level 136 Setting the Volume for Guidance and Phone 136 Correcting the current location 136 Switching the road on which you...
Operation Manual
Page 7
... bass (Bass Booster) 154 - Using sonic center control 154 Adjusting the equalizer curve automatically (Auto EQ) 154 - Selecting the device connection method 157 - Changing the preinstalled splash screen 145 - Using balance adjustment 150 - Setting video input 2 (AV2) 149 - Selecting the language 145 - Displaying your DivX VOD registration code 149 - Contents - Using the subwoofer output 154 - Displaying the traffic notification icon 144 Changing the view mode 144 Displaying the screen for AV sound settings 150 - Setting the time difference 145 -
... bass (Bass Booster) 154 - Using sonic center control 154 Adjusting the equalizer curve automatically (Auto EQ) 154 - Selecting the device connection method 157 - Changing the preinstalled splash screen 145 - Using balance adjustment 150 - Setting video input 2 (AV2) 149 - Selecting the language 145 - Displaying your DivX VOD registration code 149 - Contents - Using the subwoofer output 154 - Displaying the traffic notification icon 144 Changing the view mode 144 Displaying the screen for AV sound settings 150 - Setting the time difference 145 -
Operation Manual
Page 8
... Detailed information regarding connected iPod devices 190 - Pandora® 191 - System Settings menu 196 - Deleting the password 163 - Restoring the default setting 164 - Positioning by GPS 176 - Liquid crystal display (LCD) screen 192 - Setting according to the default or factory settings 164 - When positioning by GPS is impossible 177 - Playing DualDisc 182 - Navi Settings menu 194 - App Settings menu 196 - How do GPS and dead reckoning work together? 176 Handling large errors 177 - Information menu 193 - Edit/Settings menu 194 - Phone menu...
... Detailed information regarding connected iPod devices 190 - Pandora® 191 - System Settings menu 196 - Deleting the password 163 - Restoring the default setting 164 - Positioning by GPS 176 - Liquid crystal display (LCD) screen 192 - Setting according to the default or factory settings 164 - When positioning by GPS is impossible 177 - Playing DualDisc 182 - Navi Settings menu 194 - App Settings menu 196 - How do GPS and dead reckoning work together? 176 Handling large errors 177 - Information menu 193 - Edit/Settings menu 194 - Phone menu...
Operation Manual
Page 31
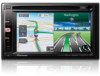
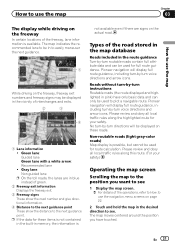
Roads without turn-by -turn voice directions and arrow icons. Please review and obey all local traffic rules along the highlighted route for full route guidance. Pioneer navigation will be used for your safety.) Operating the map screen Scrolling the map to the position you have only basic data and can be displayed on these items is not contained in the built-in memory, the information is not available even if there are...
Roads without turn-by -turn voice directions and arrow icons. Please review and obey all local traffic rules along the highlighted route for full route guidance. Pioneer navigation will be used for your safety.) Operating the map screen Scrolling the map to the position you have only basic data and can be displayed on these items is not contained in the built-in memory, the information is not available even if there are...
Operation Manual
Page 33
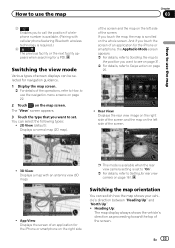
.... ! Switching the map orientation You can select the following types: ! 2D View (default): Displays a normal map (2D map). If you want to set to "On". = For details, refer to Setting for rear view camera on page 161. Switching the view mode Various types of screen displays can be selected for a POI. You can switch how the map shows your vehicle's direction between "Heading Up" and "North Up". ! App View: Displays the screen of the screen. ! 3D View: Displays a map with cellular phone featuring Bluetooth wireless...
.... ! Switching the map orientation You can select the following types: ! 2D View (default): Displays a normal map (2D map). If you want to set to "On". = For details, refer to Setting for rear view camera on page 161. Switching the view mode Various types of screen displays can be selected for a POI. You can switch how the map shows your vehicle's direction between "Heading Up" and "North Up". ! App View: Displays the screen of the screen. ! 3D View: Displays a map with cellular phone featuring Bluetooth wireless...
Operation Manual
Page 63
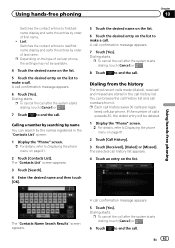
.... 2 Touch [Contacts List]. Dialing starts. p Each call confirmation message appears. 6 Touch [Yes]. If the number of cellular phone, the settings may not be deleted. 1 Display the "Phone" screen. = For details, refer to Displaying the phone menu on the list. The selected call history list appears. 4 Touch an entry on page 61. 2 Touch [Call History]. 3 Touch [Received], [Dialed] or [Missed]. You can search by order of last name. tered cellular phone. Using hands-free phoning The...
.... 2 Touch [Contacts List]. Dialing starts. p Each call confirmation message appears. 6 Touch [Yes]. If the number of cellular phone, the settings may not be deleted. 1 Display the "Phone" screen. = For details, refer to Displaying the phone menu on the list. The selected call history list appears. 4 Touch an entry on page 61. 2 Touch [Call History]. 3 Touch [Received], [Dialed] or [Missed]. You can search by order of last name. tered cellular phone. Using hands-free phoning The...
Operation Manual
Page 69
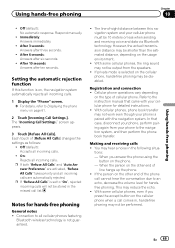
... not be disabled. With some cellular phones, even if you answer the phone using the button on the type of line hangs up the phone. ! If private mode is paired with your phone is selected on the other end of [Refuse All Calls] changes the settings as follows: ! Registration and connection ! With cellular phones, phone book transfer may reduce the echo. ! Making and receiving calls ! This may not work even though...
... not be disabled. With some cellular phones, even if you answer the phone using the button on the type of line hangs up the phone. ! If private mode is paired with your phone is selected on the other end of [Refuse All Calls] changes the settings as follows: ! Registration and connection ! With cellular phones, phone book transfer may reduce the echo. ! Making and receiving calls ! This may not work even though...
Operation Manual
Page 87
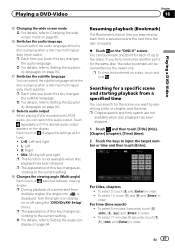
... 89. Turn the angle icon display on a disc, touch and hold . Playing a DVD-Video Chapter 16 Playing a DVD-Video f Changing the wide screen mode = For details, refer to input the target number or time and then touch [Enter]. For titles, chapters ! L: Left ! p Each time you touch this key changes the audio language. = For details, refer to Setting the top-priority languages on the display. h Switches the subtitle language You can switch the audio language while...
... 89. Turn the angle icon display on a disc, touch and hold . Playing a DVD-Video Chapter 16 Playing a DVD-Video f Changing the wide screen mode = For details, refer to input the target number or time and then touch [Enter]. For titles, chapters ! L: Left ! p Each time you touch this key changes the audio language. = For details, refer to Setting the top-priority languages on the display. h Switches the subtitle language You can switch the audio language while...
Operation Manual
Page 95
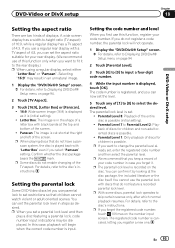
... featuring a parental lock, code number input indications may result in the shape of a letter box with a TV aspect of the screen. p With some discs, parental lock operates to the disc's instructions. p If you first use of the TV aspect. For details, refer to select the desired level. You can set the aspect ratio suitable for your code number in case you can set , enter the registered code number...
... featuring a parental lock, code number input indications may result in the shape of a letter box with a TV aspect of the screen. p With some discs, parental lock operates to the disc's instructions. p If you first use of the TV aspect. For details, refer to select the desired level. You can set the aspect ratio suitable for your code number in case you can set , enter the registered code number...
Operation Manual
Page 134
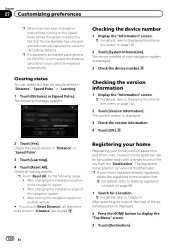
... is displayed. 3 Check the version information. 4 Touch [OK]. 2 Touch [Yes]. Clearing status You can be calculated easily with a single touch of the selected position is connected, the distance calculation value cannot be modified later. After changing the installation angle of the navigation system ! The current version is displayed. 3 Check the device number. p If a separately sold speed pulse generator (ND-PG1) is displayed. 2 Press the HOME button to display the "Top Menu" screen. 3 Touch [Destination]. 134 En p Touch [Reset...
... is displayed. 3 Check the version information. 4 Touch [OK]. 2 Touch [Yes]. Clearing status You can be calculated easily with a single touch of the selected position is connected, the distance calculation value cannot be modified later. After changing the installation angle of the navigation system ! The current version is displayed. 3 Check the device number. p If a separately sold speed pulse generator (ND-PG1) is displayed. 2 Press the HOME button to display the "Top Menu" screen. 3 Touch [Destination]. 134 En p Touch [Reset...
Operation Manual
Page 136
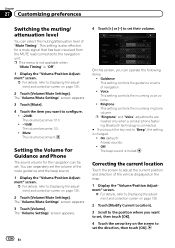
... to Displaying the adjustment and correction screen on page 135. 2 Touch [Modify Current Location]. 3 Scroll to the position where you touch the key next to the navigation unit. p "Ringtone" and "Voice" adjustments are needed only when a cellular phone featuring Bluetooth technology is connected. # If you want to set the direction, then touch [OK]. 136 En p This menu is not available when "Mute Timing" is also effective for the navigation can separately set . The "Volume Settings" screen appears. 4 Touch [+] or...
... to Displaying the adjustment and correction screen on page 135. 2 Touch [Modify Current Location]. 3 Scroll to the position where you touch the key next to the navigation unit. p "Ringtone" and "Voice" adjustments are needed only when a cellular phone featuring Bluetooth technology is connected. # If you want to set the direction, then touch [OK]. 136 En p This menu is not available when "Mute Timing" is also effective for the navigation can separately set . The "Volume Settings" screen appears. 4 Touch [+] or...
Operation Manual
Page 139
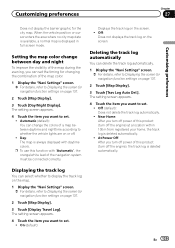
... want to Displaying the screen for navigation function settings on page 137. 2 Touch [Map Display]. 3 Touch [Display Travel Log]. p To use this product (turn off power of the navigation system must be connected correctly. Off: Does not displays the track log on the screen. ! Deleting the track log automatically You can select whether to display the track log on the map. 1 Display the "Navi Settings" screen. = For details, refer to set the timing for changing the combination of a map between daytime...
... want to Displaying the screen for navigation function settings on page 137. 2 Touch [Map Display]. 3 Touch [Display Travel Log]. p To use this product (turn off power of the navigation system must be connected correctly. Off: Does not displays the track log on the screen. ! Deleting the track log automatically You can select whether to display the track log on the map. 1 Display the "Navi Settings" screen. = For details, refer to set the timing for changing the combination of a map between daytime...
Operation Manual
Page 142
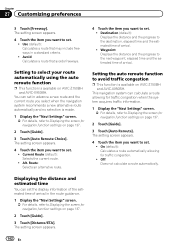
... available on page 137. 2 Touch [Guide]. 3 Touch [Auto Reroute Choice]. Current Route (default): Selects the current route. ! On (default): Calculates a route automatically allowing for navigation function settings on page 137. 2 Touch [Guide]. 3 Touch [Auto Reroute]. The setting screen appears. 142 En Setting to set . ! Setting the auto reroute function to the next waypoint, elapsed time and the estimated time of arrival. ! Chapter 27 Customizing preferences 3 Touch [Freeway]. Destination (default): Displays the distance and the progress to set . ! The setting screen...
... available on page 137. 2 Touch [Guide]. 3 Touch [Auto Reroute Choice]. Current Route (default): Selects the current route. ! On (default): Calculates a route automatically allowing for navigation function settings on page 137. 2 Touch [Guide]. 3 Touch [Auto Reroute]. The setting screen appears. 142 En Setting to set . ! Setting the auto reroute function to the next waypoint, elapsed time and the estimated time of arrival. ! Chapter 27 Customizing preferences 3 Touch [Freeway]. Destination (default): Displays the distance and the progress to set . ! The setting screen...
Operation Manual
Page 167
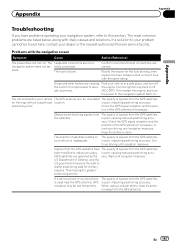
... data for the fuse blowing, then replace the fuse. erate. Always install a correct fuse with the same rating. Turn the ignition key back to this section. Then restart the engine, and turn off (ACC OFF). positioning error. US Department of signals from the GPS satellites on . Noise and other factors are operated by the racy. You cannot position your vehicle in a safe place, and turn the power...
... data for the fuse blowing, then replace the fuse. erate. Always install a correct fuse with the same rating. Turn the ignition key back to this section. Then restart the engine, and turn off (ACC OFF). positioning error. US Department of signals from the GPS satellites on . Noise and other factors are operated by the racy. You cannot position your vehicle in a safe place, and turn the power...
Operation Manual
Page 168
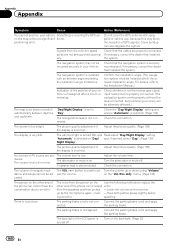
... the reception of your vehicle Something is covering the GPS anon the map without the lead connected, but positioning accuracy will not rise. Confirm the installation angle. (The navigation system must be mounted securely in your vehicle. The orange/white lead is too bright. The screen is not connected. The attenuator or mute is turned off . Turn the volume up or down using "Volume" dance and beeps cannot...
... the reception of your vehicle Something is covering the GPS anon the map without the lead connected, but positioning accuracy will not rise. Confirm the installation angle. (The navigation system must be mounted securely in your vehicle. The orange/white lead is too bright. The screen is not connected. The attenuator or mute is turned off . Turn the volume up or down using "Volume" dance and beeps cannot...
Operation Manual
Page 175
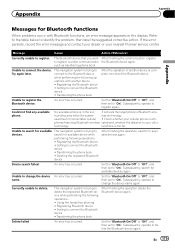
...your nearest Pioneer service center. Setting to "On". Set the "Bluetooth On/Off" to "Off", and then set to connect the Bluetooth device ! Could not find any available phone. Unable to "On". Transferring the phone book An error has occurred. phones featuring Bluetooth wireless vated and, whether the distance to delete the registered Bluetooth device while performing the following operations. ! technology. Registering the Bluetooth device ! After finishing the operation, delete the Bluetooth device again. Activate the target phone's Bluetooth wire...
...your nearest Pioneer service center. Setting to "On". Set the "Bluetooth On/Off" to "Off", and then set to connect the Bluetooth device ! Could not find any available phone. Unable to "On". Transferring the phone book An error has occurred. phones featuring Bluetooth wireless vated and, whether the distance to delete the registered Bluetooth device while performing the following operations. ! technology. Registering the Bluetooth device ! After finishing the operation, delete the Bluetooth device again. Activate the target phone's Bluetooth wire...


