Installation Manual
Page 2
... microphone 25 - When using the screw holes on the steering column 26 - Installation notes 23 - Adjusting the microphone angle 26 For AVIC-Z150BH users 20 Installing the navigation system 20 - Using an AV input (AV2) 18 When connecting the rear display 18 - When ...white lead 6 Parts supplied 7 Installing the HDMI® cable holder 7 Connecting the system 8 When connecting the Android™ device (for AVIC-Z150BH and AVIC-X950BH) 9 Connecting the power cord (1) 10 Connecting the power cord (2) 12 When connecting to rear video output 18 Installation Precautions before connecting...
... microphone 25 - When using the screw holes on the steering column 26 - Installation notes 23 - Adjusting the microphone angle 26 For AVIC-Z150BH users 20 Installing the navigation system 20 - Using an AV input (AV2) 18 When connecting the rear display 18 - When ...white lead 6 Parts supplied 7 Installing the HDMI® cable holder 7 Connecting the system 8 When connecting the Android™ device (for AVIC-Z150BH and AVIC-X950BH) 9 Connecting the power cord (1) 10 Connecting the power cord (2) 12 When connecting to rear video output 18 Installation Precautions before connecting...
Installation Manual
Page 7
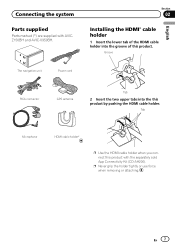
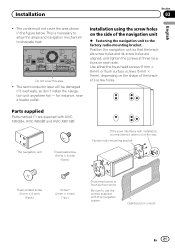
... or use force when removing or attaching. Tab Microphone HDMI cable holder* p Use the HDMI cable holder when you connect this product with AVICZ150BH and AVIC-X950BH. Section 02 Installing the HDMI® cable holder 1 Insert the lower tab of the HDMI cable holder into the this product. Groove English The...
... or use force when removing or attaching. Tab Microphone HDMI cable holder* p Use the HDMI cable holder when you connect this product with AVICZ150BH and AVIC-X950BH. Section 02 Installing the HDMI® cable holder 1 Insert the lower tab of the HDMI cable holder into the this product. Groove English The...
Installation Manual
Page 9
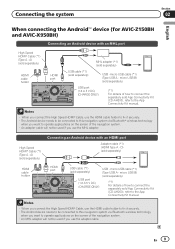
... Connectivity Kit (CD-AH200), refer to the App Connectivity Kit manual. Connecting the system Section 02 English When connecting the Android™ device (for AVIC-Z150BH and AVIC-X950BH) Connecting an Android device with an HDMI port Adapter cable (*1) (HDMI Type A - A) (sold separately) HDMI cable holder HDMI port MHL adapter (*1) (sold separately...
... Connectivity Kit (CD-AH200), refer to the App Connectivity Kit manual. Connecting the system Section 02 English When connecting the Android™ device (for AVIC-Z150BH and AVIC-X950BH) Connecting an Android device with an HDMI port Adapter cable (*1) (HDMI Type A - A) (sold separately) HDMI cable holder HDMI port MHL adapter (*1) (sold separately...
Installation Manual
Page 20
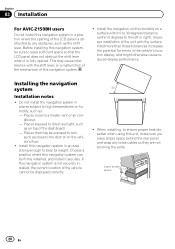
... sure you leave ample space behind the rear panel and wrap any obstacles, such as close to the left or right). Section 03 Installation For AVIC-Z150BH users Do not install this navigation system in a position where the opening of the LCD panel is obstructed by any loose cables so they...
... sure you leave ample space behind the rear panel and wrap any obstacles, such as close to the left or right). Section 03 Installation For AVIC-Z150BH users Do not install this navigation system in a position where the opening of the LCD panel is obstructed by any loose cables so they...
Installation Manual
Page 21
... bracket. Dashboard or console En 21 The semiconductor laser will be damaged if it down out of the way. If the pawl interferes with AVICX950BH, AVIC-X850BT and AVIC-X8510BT. This is necessary to allow the amps and navigation mechanism to use the screws supplied with this area. ! Installation using the screw holes...
... bracket. Dashboard or console En 21 The semiconductor laser will be damaged if it down out of the way. If the pawl interferes with AVICX950BH, AVIC-X850BT and AVIC-X8510BT. This is necessary to allow the amps and navigation mechanism to use the screws supplied with this area. ! Installation using the screw holes...
Installation Manual
Page 22
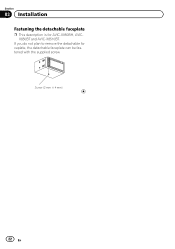
If you do not plan to remove the detachable faceplate, the detachable faceplate can be fastened with the supplied screw. Screw (2 mm × 4 mm) 22 En Section 03 Installation Fastening the detachable faceplate p This description is for AVIC-X950BH, AVICX850BT and AVIC-X8510BT.
If you do not plan to remove the detachable faceplate, the detachable faceplate can be fastened with the supplied screw. Screw (2 mm × 4 mm) 22 En Section 03 Installation Fastening the detachable faceplate p This description is for AVIC-X950BH, AVICX850BT and AVIC-X8510BT.
Operation Manual
Page 1
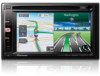
... navigation system is properly connected to all users: This software requires that you must understand before using this navigation system. Operation Manual MULTIMEDIA NAVIGATION RECEIVER AVIC-Z150BH AVIC-X950BH AVIC-X850BT AVIC-X8510BT Notice to your vehicle's parking brake and depending on your Authorized Pioneer Electronics retailer or call us at (800) 421-1404.
... navigation system is properly connected to all users: This software requires that you must understand before using this navigation system. Operation Manual MULTIMEDIA NAVIGATION RECEIVER AVIC-Z150BH AVIC-X950BH AVIC-X850BT AVIC-X8510BT Notice to your vehicle's parking brake and depending on your Authorized Pioneer Electronics retailer or call us at (800) 421-1404.
Operation Manual
Page 2
...keep this document in this Pioneer product. Before removing the vehicle battery 11 - Inserting a disc (for future reference. Ejecting a disc (for AVICZ150BH) 16 - Inserting an SD memory card (for AVIC-X950BH, AVIC- Ejecting an SD memory card (for AVICX950BH, AVIC-X850BT and AVICX8510BT) 17 - ...manual 9 - Removing the detachable faceplate 14 - Inserting a disc (for AVICZ150BH) 17 - Ejecting an SD memory card (for AVIC-X950BH, AVIC-X850BT and AVIC-X8510BT) 16 - Swipe action list 25 How to use the navigation menu screens 22 Shortcut Menu 23 - Removing a shortcut 23 ...
...keep this document in this Pioneer product. Before removing the vehicle battery 11 - Inserting a disc (for future reference. Ejecting a disc (for AVICZ150BH) 16 - Inserting an SD memory card (for AVIC-X950BH, AVIC- Ejecting an SD memory card (for AVICX950BH, AVIC-X850BT and AVICX8510BT) 17 - ...manual 9 - Removing the detachable faceplate 14 - Inserting a disc (for AVICZ150BH) 17 - Ejecting an SD memory card (for AVIC-X950BH, AVIC-X850BT and AVIC-X8510BT) 16 - Swipe action list 25 How to use the navigation menu screens 22 Shortcut Menu 23 - Removing a shortcut 23 ...
Operation Manual
Page 9
... Display information at the beginning of the description: e.g.) # If you want to use this manual. The screens may vary according to read Important Information for AVIC-Z150BH. The screen examples shown in bold with # at the end of other notes are de- scribed in brackets [ ]: e.g.) [Destination], [AV Source]. ! En 9 Menu items...
... Display information at the beginning of the description: e.g.) # If you want to use this manual. The screens may vary according to read Important Information for AVIC-Z150BH. The screen examples shown in bold with # at the end of other notes are de- scribed in brackets [ ]: e.g.) [Destination], [AV Source]. ! En 9 Menu items...
Operation Manual
Page 12
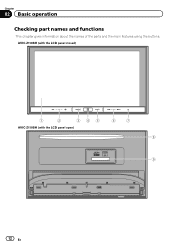
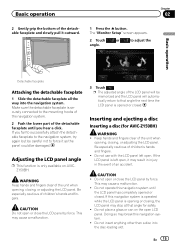
Chapter 02 Basic operation Checking part names and functions This chapter gives information about the names of the parts and the main features using the buttons. AVIC-Z150BH (with the LCD panel closed) 1 2 345 AVIC-Z150BH (with the LCD panel open) 6 7 8 9 12 En
Chapter 02 Basic operation Checking part names and functions This chapter gives information about the names of the parts and the main features using the buttons. AVIC-Z150BH (with the LCD panel closed) 1 2 345 AVIC-Z150BH (with the LCD panel open) 6 7 8 9 12 En
Operation Manual
Page 13
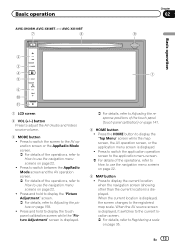
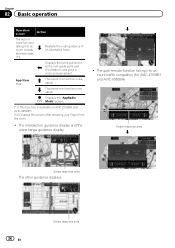
... screen is displayed, it switches to the current location screen. = For details, refer to use the navigation menu screens on page 22. ! Basic operation AVIC-X950BH, AVIC-X850BT, and AVIC-X8510BT 7 8 Chapter 02 9 Basic operation 2 3 4 5 6 a b 1 LCD screen 2 VOL (+/-) button Press to display the "Top Menu" screen while the map screen, the AV operation screen...
... screen is displayed, it switches to the current location screen. = For details, refer to use the navigation menu screens on page 22. ! Basic operation AVIC-X950BH, AVIC-X850BT, and AVIC-X8510BT 7 8 Chapter 02 9 Basic operation 2 3 4 5 6 a b 1 LCD screen 2 VOL (+/-) button Press to display the "Top Menu" screen while the map screen, the AV operation screen...
Operation Manual
Page 14
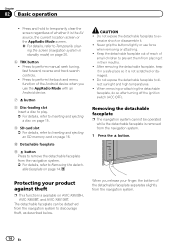
... ejecting an SD memory card on page 14. After removing the detachable faceplate, keep it in a safe place so it in standby mode) on AVIC-X950BH, AVIC-X850BT, and AVIC-X8510BT. Protecting your finger, the bottom of small children to prevent them from the navigation system. 14 En Chapter 02 Basic operation ! CAUTION ! Keep...
... ejecting an SD memory card on page 14. After removing the detachable faceplate, keep it in a safe place so it in standby mode) on AVIC-X950BH, AVIC-X850BT, and AVIC-X8510BT. Protecting your finger, the bottom of small children to prevent them from the navigation system. 14 En Chapter 02 Basic operation ! CAUTION ! Keep...
Operation Manual
Page 15
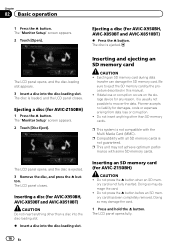
... LCD panel has completely opened or closed . Doing so may cause a malfunction. 3 Touch . Make sure the detachable faceplate is securely connected to that angle for AVIC-Z150BH) WARNING ! This may break this navigation system. ! Inserting and ejecting a disc Inserting a disc (for safety. ! If the LCD panel is opened or closed . Do...
... LCD panel has completely opened or closed . Doing so may cause a malfunction. 3 Touch . Make sure the detachable faceplate is securely connected to that angle for AVIC-Z150BH) WARNING ! This may break this navigation system. ! Inserting and ejecting a disc Inserting a disc (for safety. ! If the LCD panel is opened or closed . Do...
Operation Manual
Page 16
... disc is ejected. 3 Remove the disc, and press the h button. If data loss or corruption occurs on the storage device for AVIC-X950BH, AVIC-X850BT and AVIC-X8510BT) CAUTION Do not insert anything other than SD memory cards. Do not press the h button when an SD mem- Inserting a ...Doing so may damage the card. ! The "Monitor Setup" screen appears. 2 Touch [Open]. Ejecting a disc (for AVIC-Z150BH) 1 Press the h button. Pioneer accepts no liability for AVIC-Z150BH) CAUTION ! ory card is usually not possible to eject the SD memory card by the procedure described in this ...
... disc is ejected. 3 Remove the disc, and press the h button. If data loss or corruption occurs on the storage device for AVIC-X950BH, AVIC-X850BT and AVIC-X8510BT) CAUTION Do not insert anything other than SD memory cards. Do not press the h button when an SD mem- Inserting a ...Doing so may damage the card. ! The "Monitor Setup" screen appears. 2 Touch [Open]. Ejecting a disc (for AVIC-Z150BH) 1 Press the h button. Pioneer accepts no liability for AVIC-Z150BH) CAUTION ! ory card is usually not possible to eject the SD memory card by the procedure described in this ...
Operation Manual
Page 17
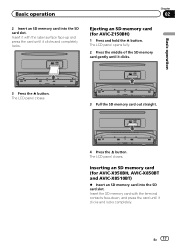
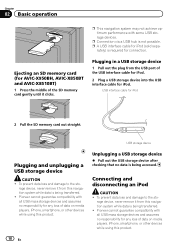
...of the SD memory card gently until it clicks and completely locks. Basic operation 3 Press the h button. Ejecting an SD memory card (for AVIC-X950BH, AVIC-X850BT and AVIC-X8510BT) % Insert an SD memory card into the SD card slot. Basic operation Chapter 02 2 Insert an SD memory card into the SD ... closes. The LCD panel closes. 3 Pull the SD memory card out straight. 4 Press the h button. En 17 Inserting an SD memory card (for AVIC-Z150BH) 1 Press and hold the h button. Insert the SD memory card with the label surface face-up and press the card until it clicks and...
...of the SD memory card gently until it clicks and completely locks. Basic operation 3 Press the h button. Ejecting an SD memory card (for AVIC-X950BH, AVIC-X850BT and AVIC-X8510BT) % Insert an SD memory card into the SD card slot. Basic operation Chapter 02 2 Insert an SD memory card into the SD ... closes. The LCD panel closes. 3 Pull the SD memory card out straight. 4 Press the h button. En 17 Inserting an SD memory card (for AVIC-Z150BH) 1 Press and hold the h button. Insert the SD memory card with the label surface face-up and press the card until it clicks and...
Operation Manual
Page 18
...data on media players, iPhone, smartphone, or other devices while using this product. 18 En Ejecting an SD memory card (for AVIC-X950BH, AVIC-X850BT and AVIC-X8510BT) 1 Press the middle of the USB interface cable for iPod. 2 Plug a USB storage device into the USB interface ... data is being accessed. p Connection via a USB hub is being transferred. ! Pioneer cannot guarantee compatibility with all USB mass storage devices and assumes no data is not possible. Pioneer cannot guarantee compatibility with all USB mass storage devices and assumes no responsibility for connection....
...data on media players, iPhone, smartphone, or other devices while using this product. 18 En Ejecting an SD memory card (for AVIC-X950BH, AVIC-X850BT and AVIC-X8510BT) 1 Press the middle of the USB interface cable for iPod. 2 Plug a USB storage device into the USB interface ... data is being accessed. p Connection via a USB hub is being transferred. ! Pioneer cannot guarantee compatibility with all USB mass storage devices and assumes no data is not possible. Pioneer cannot guarantee compatibility with all USB mass storage devices and assumes no responsibility for connection....
Operation Manual
Page 26
Displays the "AppRadio (*2) Mode" screen. (*1) This function is enabled. The sound mix function is available on AVIC-Z150BH and AVIC-X950BH. (*2) Displays this screen after releasing your finger from the circle. ! Displays the turning direction at the next guide point and ...closed/ blocked roads (*1) Restarts the route guidance of an alternative route. The auto reroute function taking into account traffic congestion (for AVIC-Z150BH and AVIC-X950BH) Swipe response area j Swipe response area The other guidance displays 26 En Swipe response area App View map The sound mix...
Displays the "AppRadio (*2) Mode" screen. (*1) This function is enabled. The sound mix function is available on AVIC-Z150BH and AVIC-X950BH. (*2) Displays this screen after releasing your finger from the circle. ! Displays the turning direction at the next guide point and ...closed/ blocked roads (*1) Restarts the route guidance of an alternative route. The auto reroute function taking into account traffic congestion (for AVIC-Z150BH and AVIC-X950BH) Swipe response area j Swipe response area The other guidance displays 26 En Swipe response area App View map The sound mix...
Operation Manual
Page 27
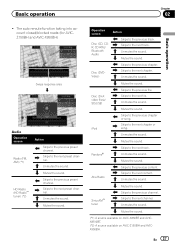
...Skips to the next preset channel. Unmutes the sound. Unmutes the sound. Mutes the sound. (*1) A source available on AVIC-X850BT and AVICX8510BT. (*2) A source available on AVIC-Z150BH and AVICX950BH. En 27 Skips to the previous content. Unmutes the sound. Mutes the sound. Unmutes the sound.... to the next file. Skips to the previous preset channel. The auto reroute function taking into account closed/blocked roads (for AVICZ150BH and AVIC-X950BH) Swipe response area j Audio Operation screen Radio (FM, AM) (*1) HD Radio (HD Radio™ tuner) (*2) Action Skips ...
...Skips to the next preset channel. Unmutes the sound. Unmutes the sound. Mutes the sound. (*1) A source available on AVIC-X850BT and AVICX8510BT. (*2) A source available on AVIC-Z150BH and AVICX950BH. En 27 Skips to the previous content. Unmutes the sound. Mutes the sound. Unmutes the sound.... to the next file. Skips to the previous preset channel. The auto reroute function taking into account closed/blocked roads (for AVICZ150BH and AVIC-X950BH) Swipe response area j Audio Operation screen Radio (FM, AM) (*1) HD Radio (HD Radio™ tuner) (*2) Action Skips ...

Operation Manual
Page 53
... information is updated to reflect the new situation. 3 Sort Touching the key displays the following pop-up to use the navigation menu screens on AVIC-Z150BH and AVIC-X950BH. The traffic information list is listed on screen. You can sort traffic information by Clear Channel Broadcasting, Inc. © Clear Channel Broadcasting, Inc...
... information is updated to reflect the new situation. 3 Sort Touching the key displays the following pop-up to use the navigation menu screens on AVIC-Z150BH and AVIC-X950BH. The traffic information list is listed on screen. You can sort traffic information by Clear Channel Broadcasting, Inc. © Clear Channel Broadcasting, Inc...
Operation Manual
Page 57
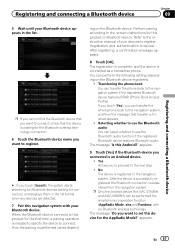
... them in the list format when any devices are detected. 7 Pair this navigation system with via Bluetooth wireless technology. p Only the Android device (for AVIC-Z150BH and AVIC-X950BH) can transfer the phone book to the navigation system if the registered Bluetooth device features PBAP (Phone Book Access Profile). Refer to the...
... them in the list format when any devices are detected. 7 Pair this navigation system with via Bluetooth wireless technology. p Only the Android device (for AVIC-Z150BH and AVIC-X950BH) can transfer the phone book to the navigation system if the registered Bluetooth device features PBAP (Phone Book Access Profile). Refer to the...


