Installation Manual
Page 2
... Parts supplied 7 Installing the HDMI® cable holder 7 Connecting the system 8 When connecting the Android™ device (for AVIC-Z150BH and AVIC-X950BH) 9 Connecting the power cord (1) 10 Connecting the power cord (2) 12 When connecting to rear video output 18 Installation ...When connecting the rear display 18 - Installation notes 23 - Installation notes 20 - Contents Precautions Your new navigation system and this manual 3 Important safeguards 3 Connecting the system Precautions before installation 19 To avoid electromagnetic interference 19 Before installing 19 - Mounting on ...
... Parts supplied 7 Installing the HDMI® cable holder 7 Connecting the system 8 When connecting the Android™ device (for AVIC-Z150BH and AVIC-X950BH) 9 Connecting the power cord (1) 10 Connecting the power cord (2) 12 When connecting to rear video output 18 Installation ...When connecting the rear display 18 - Installation notes 23 - Installation notes 20 - Contents Precautions Your new navigation system and this manual 3 Important safeguards 3 Connecting the system Precautions before installation 19 To avoid electromagnetic interference 19 Before installing 19 - Mounting on ...
Installation Manual
Page 3
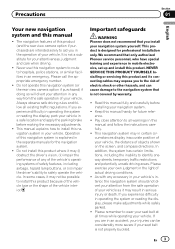
...in operating the system or reading the display, please make adjustments while safely parked. ! Important safeguards WARNING Pioneer does not recommend that only authorized Pioneer service personnel, who have special training and experience in an emergency. If you install your vehicle. Read... this product. NEVER SERVICE THIS PRODUCT YOURSELF. Pay close attention to install this manual handy for professional installation ...
...in operating the system or reading the display, please make adjustments while safely parked. ! Important safeguards WARNING Pioneer does not recommend that only authorized Pioneer service personnel, who have special training and experience in an emergency. If you install your vehicle. Read... this product. NEVER SERVICE THIS PRODUCT YOURSELF. Pay close attention to install this manual handy for professional installation ...

Installation Manual
Page 5
... system, be sure to disconnect the (-) battery cable before connecting the system WARNING Do not take any leads. If the lead is in the installation manual. ! Secure all wiring with metal parts, short-circuiting can occur, resulting in a short circuit or malfunction and permanent damage to perform the installation yourself, and...
... system, be sure to disconnect the (-) battery cable before connecting the system WARNING Do not take any leads. If the lead is in the installation manual. ! Secure all wiring with metal parts, short-circuiting can occur, resulting in a short circuit or malfunction and permanent damage to perform the installation yourself, and...

Installation Manual
Page 6
... connect the * side of another side of the same color to the corresponding colored port, i.e., blue connector to the blue port, black to the owner's manual for the blue/white lead ! F ACC O F O ! Refer to black, etc. ! When the ignition switch is turned on the ignition switch. Such connection could cause excessive...
... connect the * side of another side of the same color to the corresponding colored port, i.e., blue connector to the blue port, black to the owner's manual for the blue/white lead ! F ACC O F O ! Refer to black, etc. ! When the ignition switch is turned on the ignition switch. Such connection could cause excessive...

Installation Manual
Page 8
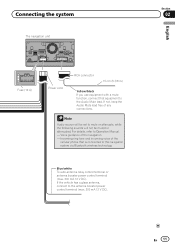
... on a display inside a vehicle even by persons other than the driver may be used while the vehicle is a visible distraction to Operation Manual. Where such regulations apply they must be obeyed and this product should never be used . 8 En Antenna jack Wired remote input Please refer... to the instruction manual for SiriusXM Connect Vehicle Tuner (sold separately). (*2) (*2) If you use a USB storage device, pull out the plug and insert a USB storage ...
... on a display inside a vehicle even by persons other than the driver may be used while the vehicle is a visible distraction to Operation Manual. Where such regulations apply they must be obeyed and this product should never be used . 8 En Antenna jack Wired remote input Please refer... to the instruction manual for SiriusXM Connect Vehicle Tuner (sold separately). (*2) (*2) If you use a USB storage device, pull out the plug and insert a USB storage ...
Installation Manual
Page 9
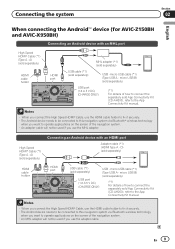
... holder HDMI port USB cable (*1) (sold separately) USB - En 9 Connecting the system Section 02 English When connecting the Android™ device (for AVIC-Z150BH and AVIC-X950BH) Connecting an Android device with an HDMI port Adapter cable (*1) (HDMI Type A - A) (sold separately) HDMI cable holder HDMI port MHL... adapter. micro USB cable (*1) (Type USB A - micro USB B) (sold App Connectivity Kit (CD-AH200), refer to the App Connectivity Kit manual. Notes · When you connect the High Speed HDMI® Cable, use the HDMI cable holder to fix it securely. · The Android...
... holder HDMI port USB cable (*1) (sold separately) USB - En 9 Connecting the system Section 02 English When connecting the Android™ device (for AVIC-Z150BH and AVIC-X950BH) Connecting an Android device with an HDMI port Adapter cable (*1) (HDMI Type A - A) (sold separately) HDMI cable holder HDMI port MHL... adapter. micro USB cable (*1) (Type USB A - micro USB B) (sold App Connectivity Kit (CD-AH200), refer to the App Connectivity Kit manual. Notes · When you connect the High Speed HDMI® Cable, use the HDMI cable holder to fix it securely. · The Android...

Installation Manual
Page 10
.../black Violet Violet/black Subwoofer (4 Ω) 2 10 En Do not connect anything to the speaker leads that are not connected to Operation Manual.) The subwoofer output of this navigation system instead of a rear speaker, change the rear output setting in the initial setting. (Refer to speakers. Green Not...
.../black Violet Violet/black Subwoofer (4 Ω) 2 10 En Do not connect anything to the speaker leads that are not connected to Operation Manual.) The subwoofer output of this navigation system instead of a rear speaker, change the rear output setting in the initial setting. (Refer to speakers. Green Not...
Installation Manual
Page 11
If the vehicle has a glass antenna, connect to Operation Manual. - Voice guidance of the cellular phone that equipment to the Audio Mute lead. For details, refer to the antenna booster power control terminal (max. 300 ...
If the vehicle has a glass antenna, connect to Operation Manual. - Voice guidance of the cellular phone that equipment to the Audio Mute lead. For details, refer to the antenna booster power control terminal (max. 300 ...

Installation Manual
Page 14
Section 02 Connecting the system When connecting to Operation Manual.) · The subwoofer output of the power amp (max. 300 mA 12 V DC). Notes · You can change the RCA output of the subwoofer depending on your subwoofer system. (Refer to separately sold power amp RCA connector Subwoofer outputs (SUB WOOFER OUTPUT) The navigation unit 25 cm (9-7/8 in.) Rear outputs (REAR OUTPUT) 30 cm (11-5/8 in.) Front outputs (FRONT OUTPUT) Power cord 30 cm (11-5/8 in.) Blue/white To system control terminal of this navigation system is monaural. 14 En
Section 02 Connecting the system When connecting to Operation Manual.) · The subwoofer output of the power amp (max. 300 mA 12 V DC). Notes · You can change the RCA output of the subwoofer depending on your subwoofer system. (Refer to separately sold power amp RCA connector Subwoofer outputs (SUB WOOFER OUTPUT) The navigation unit 25 cm (9-7/8 in.) Rear outputs (REAR OUTPUT) 30 cm (11-5/8 in.) Front outputs (FRONT OUTPUT) Power cord 30 cm (11-5/8 in.) Blue/white To system control terminal of this navigation system is monaural. 14 En

Installation Manual
Page 16
... camera, it is possible to automatically switch from the video to rear view image when the shift lever is used as an aid to Operation Manual.) ! Rear view camera (e.g. Rear View mode also allows you to check what is set to "On". (For details, refer to keep an eye on page...
... camera, it is possible to automatically switch from the video to rear view image when the shift lever is used as an aid to Operation Manual.) ! Rear view camera (e.g. Rear View mode also allows you to check what is set to "On". (For details, refer to keep an eye on page...
Installation Manual
Page 17
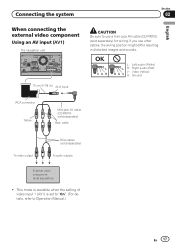
...) is set to "On". (For details, refer to use other cables, the wiring position might differ resulting in .) AUX input CAUTION Be sure to Operation Manual.) En 17 OK L VGR L RG V L : Left audio (White) R : Right audio (Red) V : Video (Yellow) G : Ground RCA connector Yellow Mini-jack AV cable (CD-RM10) (sold separately...
...) is set to "On". (For details, refer to use other cables, the wiring position might differ resulting in .) AUX input CAUTION Be sure to Operation Manual.) En 17 OK L VGR L RG V L : Left audio (White) R : Right audio (Red) V : Video (Yellow) G : Ground RCA connector Yellow Mini-jack AV cable (CD-RM10) (sold separately...
Installation Manual
Page 18
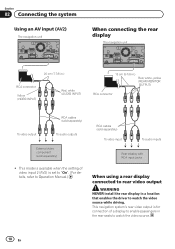
... enables the driver to watch the video source. 18 En This navigation system's rear video output is set to "On". (For details, refer to Operation Manual.) RCA cables (sold separately) ! Section 02 Connecting the system Using an AV input (AV2) The navigation unit When connecting the rear display The navigation unit...
... enables the driver to watch the video source. 18 En This navigation system's rear video output is set to "On". (For details, refer to Operation Manual.) RCA cables (sold separately) ! Section 02 Connecting the system Using an AV input (AV2) The navigation unit When connecting the rear display The navigation unit...

Installation Manual
Page 19
... the product may result in the manner specified. Installation Section 03 English Precautions before installation CAUTION ! Vibration may damage internal parts of your vehicle's owner's manual for errors in front of the vehicle. ! It is nothing behind the dashboard or paneling when drilling holes in a door or the sliding mechanism of...
... the product may result in the manner specified. Installation Section 03 English Precautions before installation CAUTION ! Vibration may damage internal parts of your vehicle's owner's manual for errors in front of the vehicle. ! It is nothing behind the dashboard or paneling when drilling holes in a door or the sliding mechanism of...
Operation Manual
Page 1
... brake and depending on your Authorized Pioneer Electronics retailer or call us at (800) 421-1404. Important Information for the User includes the important information that the navigation system is properly connected to read Important Information for the User first! Operation Manual MULTIMEDIA NAVIGATION RECEIVER AVIC-Z150BH AVIC-X950BH AVIC-X850BT AVIC-X8510BT Notice to all users...
... brake and depending on your Authorized Pioneer Electronics retailer or call us at (800) 421-1404. Important Information for the User includes the important information that the navigation system is properly connected to read Important Information for the User first! Operation Manual MULTIMEDIA NAVIGATION RECEIVER AVIC-Z150BH AVIC-X950BH AVIC-X850BT AVIC-X8510BT Notice to all users...
Operation Manual
Page 2
After you have finished reading the instructions, keep this manual 9 - Terms used in a safe place for future reference. Removing the detachable faceplate 14 - Ejecting a disc (for AVIC-X950BH, AVIC-X850BT and AVIC-X8510BT) 16 - Connecting your iPod 19 Startup and termination 19 On first...Inserting a disc (for AVICX950BH, AVIC-X850BT and AVICX8510BT) 17 - Using the common touch panel keys 24 - Data subject to use this document in this Pioneer product. Contents Thank you for buying this manual 9 - Conventions used in this manual 9 Notice regarding video viewing ...
After you have finished reading the instructions, keep this manual 9 - Terms used in a safe place for future reference. Removing the detachable faceplate 14 - Ejecting a disc (for AVIC-X950BH, AVIC-X850BT and AVIC-X8510BT) 16 - Connecting your iPod 19 Startup and termination 19 On first...Inserting a disc (for AVICX950BH, AVIC-X850BT and AVICX8510BT) 17 - Using the common touch panel keys 24 - Data subject to use this document in this Pioneer product. Contents Thank you for buying this manual 9 - Conventions used in this manual 9 Notice regarding video viewing ...
Operation Manual
Page 4
...79 Storing song information to an iPod (iTunes Tagging) 79 Using advanced functions 80 - Contents Selecting the preferred RDS-TMC service provider manually 55 Registering and connecting a Bluetooth device Preparing communication devices 56 Registering your Bluetooth devices 58 - Editing the password 68 - Answering an... incoming call 65 Transferring the phone book 65 - Deleting a registered device 59 Connecting a registered Bluetooth device manually 59 - Searching for hands-free phoning 69 4 En Basic operations of the AV source Displaying the AV operation screen 71 -
...79 Storing song information to an iPod (iTunes Tagging) 79 Using advanced functions 80 - Contents Selecting the preferred RDS-TMC service provider manually 55 Registering and connecting a Bluetooth device Preparing communication devices 56 Registering your Bluetooth devices 58 - Editing the password 68 - Answering an... incoming call 65 Transferring the phone book 65 - Deleting a registered device 59 Connecting a registered Bluetooth device manually 59 - Searching for hands-free phoning 69 4 En Basic operations of the AV source Displaying the AV operation screen 71 -
Operation Manual
Page 9
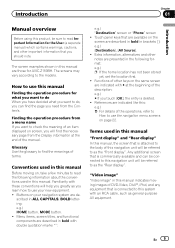
...vary according to this : e.g.) = For details of this navigation unit will find the meanings of terms. Conventions used in this manual Before moving images of DVD-Video, DivX®, iPod, and any equipment that you learn how to use this product, be ... use your navigation system are those for AVIC-Z150BH. scribed in brackets [ ]: e.g.) [Destination], [AV Source]. ! Menu items, screen titles, and functional components are described in this manual are de- Introduction Chapter 01 Introduction Manual overview Before using this manual Finding the operation procedure for what you ...
...vary according to this : e.g.) = For details of this navigation unit will find the meanings of terms. Conventions used in this manual Before moving images of DVD-Video, DivX®, iPod, and any equipment that you learn how to use this product, be ... use your navigation system are those for AVIC-Z150BH. scribed in brackets [ ]: e.g.) [Destination], [AV Source]. ! Menu items, screen titles, and functional components are described in this manual are de- Introduction Chapter 01 Introduction Manual overview Before using this manual Finding the operation procedure for what you ...
Operation Manual
Page 10
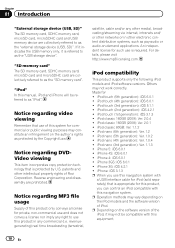
"iPod" In this manual, iPod and iPhone will be compatible with this equipment. 10 En patents and other intellectual property rights of the iPod, it is required. Notice regarding ...
"iPod" In this manual, iPod and iPhone will be compatible with this equipment. 10 En patents and other intellectual property rights of the iPod, it is required. Notice regarding ...
Operation Manual
Page 14
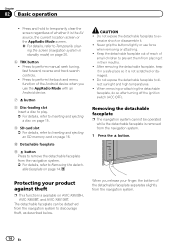
... navigation system. = For details, refer to perform manual seek tuning, fast forward, reverse and track search controls. ! When removing or attaching the detachable faceplate, do so after turning off the ignition switch (ACC OFF). Press to Removing the detachable faceplate on AVIC-X950BH, AVIC-X850BT, and AVIC-X8510BT. Chapter 02 Basic operation ! Keep the detachable...
... navigation system. = For details, refer to perform manual seek tuning, fast forward, reverse and track search controls. ! When removing or attaching the detachable faceplate, do so after turning off the ignition switch (ACC OFF). Press to Removing the detachable faceplate on AVIC-X950BH, AVIC-X850BT, and AVIC-X8510BT. Chapter 02 Basic operation ! Keep the detachable...
Operation Manual
Page 16
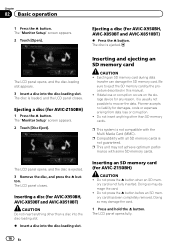
...Media Card (MMC). Inserting a disc (for any reason, it is usually not possible to eject the SD memory card by the procedure described in this manual. ! Do not press the h button when an SD mem- Do not press the h button before an SD memory card has been completely removed. ... recover the data. ory card is ejected. 3 Remove the disc, and press the h button. Doing so may damage the card. ! Pioneer accepts no liability for AVIC-X950BH, AVIC-X850BT and AVIC-X8510BT) % Press the h button. The LCD panel opens, and the disc is not fully inserted. Inserting and ejecting an SD memory card...
...Media Card (MMC). Inserting a disc (for any reason, it is usually not possible to eject the SD memory card by the procedure described in this manual. ! Do not press the h button when an SD mem- Do not press the h button before an SD memory card has been completely removed. ... recover the data. ory card is ejected. 3 Remove the disc, and press the h button. Doing so may damage the card. ! Pioneer accepts no liability for AVIC-X950BH, AVIC-X850BT and AVIC-X8510BT) % Press the h button. The LCD panel opens, and the disc is not fully inserted. Inserting and ejecting an SD memory card...


