Installation Manual
Page 2
... dashboard or rear shelf) 24 Installing the microphone 25 - When installing the antenna inside the vehicle (on the sun visor 25 - Installation on the side of the navigation unit 21 - Adjusting the microphone angle 26 For AVIC-Z150BH users 20 Installing the navigation system 20 - When...AV input (AV1) 17 - Notice for the blue/white lead 6 Parts supplied 7 Installing the HDMI® cable holder 7 Connecting the system 8 When connecting the Android™ device (for AVIC-Z150BH and AVIC-X950BH) 9 Connecting the power cord (1) 10 Connecting the power cord (2) 12 When connecting...
... dashboard or rear shelf) 24 Installing the microphone 25 - When installing the antenna inside the vehicle (on the sun visor 25 - Installation on the side of the navigation unit 21 - Adjusting the microphone angle 26 For AVIC-Z150BH users 20 Installing the navigation system 20 - When...AV input (AV1) 17 - Notice for the blue/white lead 6 Parts supplied 7 Installing the HDMI® cable holder 7 Connecting the system 8 When connecting the Android™ device (for AVIC-Z150BH and AVIC-X950BH) 9 Connecting the power cord (1) 10 Connecting the power cord (2) 12 When connecting...
Installation Manual
Page 3
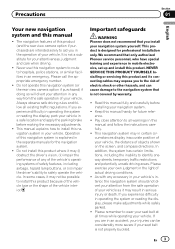
Important safeguards WARNING Pioneer does not recommend that you install your vehicle in a safe location and apply the parking brake before installing your vehicle. This product is not properly buckled. We recommend that is not covered by warranty. ! Installing or servicing this product and...expose you experience difficulty in mobile electronics, set up and install this manual fully and carefully before making the necessary adjustments. ! Pay close attention to the navigation system that only authorized Pioneer service personnel, who have special training and experience in ...
Important safeguards WARNING Pioneer does not recommend that you install your vehicle in a safe location and apply the parking brake before installing your vehicle. This product is not properly buckled. We recommend that is not covered by warranty. ! Installing or servicing this product and...expose you experience difficulty in mobile electronics, set up and install this manual fully and carefully before making the necessary adjustments. ! Pay close attention to the navigation system that only authorized Pioneer service personnel, who have special training and experience in ...

Installation Manual
Page 4
Section 01 Precautions ! Certain country and government laws may prohibit or restrict the placement and use , installation and operation of this system in your navigation system. 4 En Please comply with all applicable laws and regulations regarding the use of your vehicle.
Section 01 Precautions ! Certain country and government laws may prohibit or restrict the placement and use , installation and operation of this system in your navigation system. 4 En Please comply with all applicable laws and regulations regarding the use of your vehicle.

Installation Manual
Page 5
...do so may fail to the vehicle battery. If the insulation heats up, wires may eventually cause the insulation to perform the installation yourself, and have special training and experience in a short circuit or malfunction and permanent damage to high temperatures. Tampering with a ... could result in place for your protection. To avoid shorts in considerable danger. ! Connecting the system Section 02 English Precautions before installation. Do not allow cables to become caught in any of the vehicle's moving parts, especially the steering wheel, shift lever, parking...
...do so may fail to the vehicle battery. If the insulation heats up, wires may eventually cause the insulation to perform the installation yourself, and have special training and experience in a short circuit or malfunction and permanent damage to high temperatures. Tampering with a ... could result in place for your protection. To avoid shorts in considerable danger. ! Connecting the system Section 02 English Precautions before installation. Do not allow cables to become caught in any of the vehicle's moving parts, especially the steering wheel, shift lever, parking...

Installation Manual
Page 6
...antenna relay control terminal, or the antenna booster power control terminal (max. 300 mA 12 V DC). The black cable is switched off. ! When installing this unit. ! Ensure that the ground wire is turned on this lead as the power supply lead for the external power amps. When disconnecting a ...signal is output through the blue/white lead. OF OF N STAR N STAR T T 6 En ACC position No ACC position This product cannot be installed in fire generation of this unit. ! Notice for this unit or any other units, then make sure to the * side of the speaker lead together...
...antenna relay control terminal, or the antenna booster power control terminal (max. 300 mA 12 V DC). The black cable is switched off. ! When installing this unit. ! Ensure that the ground wire is turned on this lead as the power supply lead for the external power amps. When disconnecting a ...signal is output through the blue/white lead. OF OF N STAR N STAR T T 6 En ACC position No ACC position This product cannot be installed in fire generation of this unit. ! Notice for this unit or any other units, then make sure to the * side of the speaker lead together...
Installation Manual
Page 7
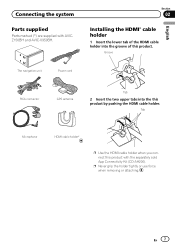
Tab Microphone HDMI cable holder* p Use the HDMI cable holder when you connect this product with AVICZ150BH and AVIC-X950BH. p Never grip the holder tightly or use force when removing or attaching. Connecting the system Parts supplied Parts marked (*) are supplied with the separately ... cord RCA connector GPS antenna Tab 2 Insert the two upper tabs into the groove of this product by pushing the HDMI cable holder. Section 02 Installing the HDMI® cable holder 1 Insert the lower tab of the HDMI cable holder into the this product. En 7
Tab Microphone HDMI cable holder* p Use the HDMI cable holder when you connect this product with AVICZ150BH and AVIC-X950BH. p Never grip the holder tightly or use force when removing or attaching. Connecting the system Parts supplied Parts marked (*) are supplied with the separately ... cord RCA connector GPS antenna Tab 2 Insert the two upper tabs into the groove of this product by pushing the HDMI cable holder. Section 02 Installing the HDMI® cable holder 1 Insert the lower tab of the HDMI cable holder into the this product. En 7
Installation Manual
Page 12
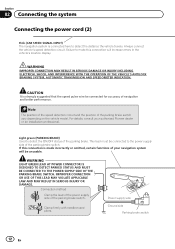
... IN SERIOUS INJURY OR DAMAGE. CAUTION It is connected here to make this connection is made incorrectly or omitted, certain functions of your authorized Pioneer dealer or an installation professional. Note The position of the speed detection circuit and the position of the parking brake switch. For details, consult your navigation system...
... IN SERIOUS INJURY OR DAMAGE. CAUTION It is connected here to make this connection is made incorrectly or omitted, certain functions of your authorized Pioneer dealer or an installation professional. Note The position of the speed detection circuit and the position of the parking brake switch. For details, consult your navigation system...
Installation Manual
Page 18
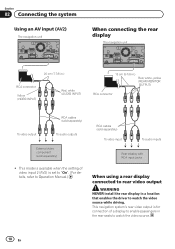
... (sold separately) To video input To audio inputs Rear display with RCA input jacks When using a rear display connected to rear video output WARNING NEVER install the rear display in the rear seats to watch the video source while driving.
... (sold separately) To video input To audio inputs Rear display with RCA input jacks When using a rear display connected to rear video output WARNING NEVER install the rear display in the rear seats to watch the video source while driving.

Installation Manual
Page 19
...seat, resulting in the manner specified. To avoid electromagnetic interference In order to the steering wheel or shift lever. ! Before making a final installation of these precautions may (i) obstruct the driver's vision, (ii) impair the performance of any electrical lead. Vibration may damage internal parts of ... them to the vehicle. ! It is nothing behind the dashboard or paneling when drilling holes in the vehicle's location display. Install the navigation system between the driver's seat and front passenger seat so that leads cannot get caught in serious injury or death....
...seat, resulting in the manner specified. To avoid electromagnetic interference In order to the steering wheel or shift lever. ! Before making a final installation of these precautions may (i) obstruct the driver's vision, (ii) impair the performance of any electrical lead. Vibration may damage internal parts of ... them to the vehicle. ! It is nothing behind the dashboard or paneling when drilling holes in the vehicle's location display. Install the navigation system between the driver's seat and front passenger seat so that leads cannot get caught in serious injury or death....
Installation Manual
Page 20
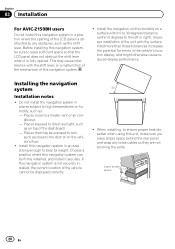
... navigation system in the vehicle's location display, and might otherwise cause reduced display performance. Section 03 Installation For AVIC-Z150BH users Do not install this navigation system in a position where the opening of the LCD panel is obstructed by any loose cables so they are not blocking... the vents. If this navigation system is not securely installed, the current location of the vehicle cannot be sure to ...
... navigation system in the vehicle's location display, and might otherwise cause reduced display performance. Section 03 Installation For AVIC-Z150BH users Do not install this navigation system in a position where the opening of the LCD panel is obstructed by any loose cables so they are not blocking... the vents. If this navigation system is not securely installed, the current location of the vehicle cannot be sure to ...
Installation Manual
Page 21
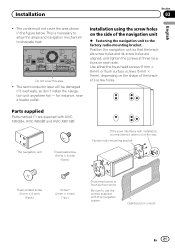
...(5 mm × 9 mm), depending on the shape of the way. Installation Section 03 English ! This is necessary to allow the amps and navigation mechanism to use the screws supplied with AVICX950BH, AVIC-X850BT and AVIC-X8510BT. for instance, near a heater outlet. Dashboard or console En 21 ...The semiconductor laser will be damaged if it down out of the bracket's screw holes. Installation using the screw holes on each side....
...(5 mm × 9 mm), depending on the shape of the way. Installation Section 03 English ! This is necessary to allow the amps and navigation mechanism to use the screws supplied with AVICX950BH, AVIC-X850BT and AVIC-X8510BT. for instance, near a heater outlet. Dashboard or console En 21 ...The semiconductor laser will be damaged if it down out of the bracket's screw holes. Installation using the screw holes on each side....
Installation Manual
Page 22
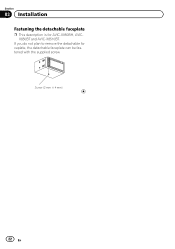
If you do not plan to remove the detachable faceplate, the detachable faceplate can be fastened with the supplied screw. Screw (2 mm × 4 mm) 22 En Section 03 Installation Fastening the detachable faceplate p This description is for AVIC-X950BH, AVICX850BT and AVIC-X8510BT.
If you do not plan to remove the detachable faceplate, the detachable faceplate can be fastened with the supplied screw. Screw (2 mm × 4 mm) 22 En Section 03 Installation Fastening the detachable faceplate p This description is for AVIC-X950BH, AVICX850BT and AVIC-X8510BT.

Installation Manual
Page 23
... if reception from the satellite is not used, the reception sensitivity will be blocked as little as this is blocked. En 23 Installation Installing the GPS antenna CAUTION Do not cut the accessory metal sheet. If this may become detached. ! This would reduce the sensitivity ...to shorten it or use the metal sheet provided with your system. The magnet attached to the navigation system. Parts supplied GPS antenna Installation notes ! Section 03 Metal sheet English Dashboard Rear shelf ! Altering the antenna cable could result in a short circuit or malfunction and...
... if reception from the satellite is not used, the reception sensitivity will be blocked as little as this is blocked. En 23 Installation Installing the GPS antenna CAUTION Do not cut the accessory metal sheet. If this may become detached. ! This would reduce the sensitivity ...to shorten it or use the metal sheet provided with your system. The magnet attached to the navigation system. Parts supplied GPS antenna Installation notes ! Section 03 Metal sheet English Dashboard Rear shelf ! Altering the antenna cable could result in a short circuit or malfunction and...

Installation Manual
Page 24
... does not allow signals from GPS satellites to secure the lead where necessary inside the vehicle (on the dashboard or rear shelf) WARNING Do not install the GPS antenna over any sensors or vents on the dashboard of moisture, dust, grime, oil, etc., before affixing the metal sheet. On ... attaching the metal sheet, do not cut it is free of the vehicle, as possible where the GPS antenna faces the window. Section 03 Installation When installing the antenna inside the vehicle. Make sure the surface is removed. Affix the metal sheet on the outside of the vehicle. 24 En Clamps...
... does not allow signals from GPS satellites to secure the lead where necessary inside the vehicle (on the dashboard or rear shelf) WARNING Do not install the GPS antenna over any sensors or vents on the dashboard of moisture, dust, grime, oil, etc., before affixing the metal sheet. On ... attaching the metal sheet, do not cut it is free of the vehicle, as possible where the GPS antenna faces the window. Section 03 Installation When installing the antenna inside the vehicle. Make sure the surface is removed. Affix the metal sheet on the outside of the vehicle. 24 En Clamps...
Installation Manual
Page 25
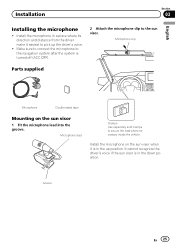
...up the driver's voice. ! Microphone clip Parts supplied Microphone Double-sided tape Mounting on the sun visor when it easiest to pick up position. Installation Section 03 English Installing the microphone ! Make sure to connect the microphone to the navigation system after the system is in the down position.... Install the microphone in a place where its direction and distance from the driver make it is turned off (ACC OFF). 2 Attach the microphone clip ...
...up the driver's voice. ! Microphone clip Parts supplied Microphone Double-sided tape Mounting on the sun visor when it easiest to pick up position. Installation Section 03 English Installing the microphone ! Make sure to connect the microphone to the navigation system after the system is in the down position.... Install the microphone in a place where its direction and distance from the driver make it is turned off (ACC OFF). 2 Attach the microphone clip ...

Installation Manual
Page 26
Double-sided tape Clamps Use separately sold clamps to secure the lead where necessary inside the vehicle. Adjusting the microphone angle The microphone angle can be adjusted. Microphone Tab Microphone clip Microphone base 2 Mount the microphone on the steering column, keeping it away from the microphone clip by sliding the microphone base while pressing the tab. Install the microphone on the steering column. Section 03 Installation Installation on the steering column 1 Detach the microphone base from the steering wheel. 26 En
Double-sided tape Clamps Use separately sold clamps to secure the lead where necessary inside the vehicle. Adjusting the microphone angle The microphone angle can be adjusted. Microphone Tab Microphone clip Microphone base 2 Mount the microphone on the steering column, keeping it away from the microphone clip by sliding the microphone base while pressing the tab. Install the microphone on the steering column. Section 03 Installation Installation on the steering column 1 Detach the microphone base from the steering wheel. 26 En
Operation Manual
Page 1
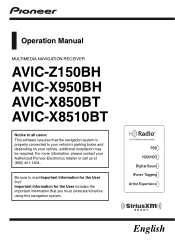
... and depending on your Authorized Pioneer Electronics retailer or call us at (800) 421-1404. English Operation Manual MULTIMEDIA NAVIGATION RECEIVER AVIC-Z150BH AVIC-X950BH AVIC-X850BT AVIC-X8510BT Notice to all users: This software requires that you must understand before using this navigation system. For more information, please contact your vehicle, additional installation may be required.
... and depending on your Authorized Pioneer Electronics retailer or call us at (800) 421-1404. English Operation Manual MULTIMEDIA NAVIGATION RECEIVER AVIC-Z150BH AVIC-X950BH AVIC-X850BT AVIC-X8510BT Notice to all users: This software requires that you must understand before using this navigation system. For more information, please contact your vehicle, additional installation may be required.
Operation Manual
Page 107
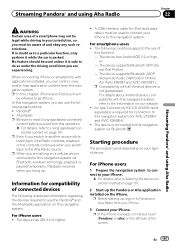
... of the contents continues when you switch back to Pandora or Aha Radio from this navigation system. p Before starting up the Pandora or Aha application installed on our website. ! Pandora® ! nected content on this navigation system via Bluetooth wireless technology, playback is safe to this navigation system. The following ...separately) is detailed information regarding the devices required to use the Pandora® and the Aha Radio application on page 191. A USB interface cable for AVIC-Z150BH and AVIC-X950BH). ! Information for AVIC-X850BT and AVIC-X8510BT ).
... of the contents continues when you switch back to Pandora or Aha Radio from this navigation system. p Before starting up the Pandora or Aha application installed on our website. ! Pandora® ! nected content on this navigation system via Bluetooth wireless technology, playback is safe to this navigation system. The following ...separately) is detailed information regarding the devices required to use the Pandora® and the Aha Radio application on page 191. A USB interface cable for AVIC-Z150BH and AVIC-X950BH). ! Information for AVIC-X850BT and AVIC-X8510BT ).

Operation Manual
Page 108
.... 3 Unlock your smartphone. 4 Connect your smartphone to this product via the separately sold App Connectivity Kit (CD-AH200) (for AVIC-Z150BH and AVIC-X950BH). = For details of the operations, refer to the Installation Manual. Chapter 22 Streaming Pandora® and using Aha Radio = For details, refer to Connecting your iPod on page 19...
.... 3 Unlock your smartphone. 4 Connect your smartphone to this product via the separately sold App Connectivity Kit (CD-AH200) (for AVIC-Z150BH and AVIC-X950BH). = For details of the operations, refer to the Installation Manual. Chapter 22 Streaming Pandora® and using Aha Radio = For details, refer to Connecting your iPod on page 19...

Operation Manual
Page 109
...internet radio is available at http://www.pandora.com ! En 109 To ensure compatibility, install the latest version of the current track. ! More information is a music service not affiliated with Pioneer. p If the album artwork cannot be acquired, the preinstalled image is available. ... and adjusting Cell Network Audio Quality. ! Certain functionality of the Pandora service is not available when accessing the service through the Pioneer navigation system, including, but not limited to, creating new stations, deleting stations, emailing current stations, buying songs from iTunes, ...
...internet radio is available at http://www.pandora.com ! En 109 To ensure compatibility, install the latest version of the current track. ! More information is a music service not affiliated with Pioneer. p If the album artwork cannot be acquired, the preinstalled image is available. ... and adjusting Cell Network Audio Quality. ! Certain functionality of the Pandora service is not available when accessing the service through the Pioneer navigation system, including, but not limited to, creating new stations, deleting stations, emailing current stations, buying songs from iTunes, ...


